instrument panel HYUNDAI IONIQ 5 2023 Owners Manual
[x] Cancel search | Manufacturer: HYUNDAI, Model Year: 2023, Model line: IONIQ 5, Model: HYUNDAI IONIQ 5 2023Pages: 680, PDF Size: 48.22 MB
Page 22 of 680
01
1-17
•
When the high voltage battery
charge reaches the set discharging
limit(%), the operation stops, and
a warning message is displayed on
the instrument panel. If you want
V2L operation, set the discharging
limit(%) lower than the current
battery charge.
• When using various electric
products, use them below the
maximum power capacity that can
be supplied by the vehicle.
• If you use an electrical appliance
that exceeds the maximum power
capacity that the vehicle can supply,
the operation will stop and a warning
message will be displayed on the
instrument panel. Make sure the
total power consumption of the
electrical appliance you use exceeds
the V2L maximum power capacity.
• Some of the electric products may
not operate normally even if the
product has power consumption less
than the maximum power capacity
provided by the vehicle.
- Electrical products that require
high power during initial
operation.
- Measuring devices that need to
process accurate data.
- Electric products sensitive to
inverter type AC power supply
(Inverter: A device that converts
DC power into AC power)
• Do not use products that require
a continuous power supply,
such as medical equipment. The
power supply may be interrupted
depending on the vehicle’s
condition.
• Only use home appliances under 16
ampere.
• Put the power plug fully and use
the qualified plug that meets the
standard. If you use worn, corroded
or broken plug or improper plug, it
might be a cause of malfunction. •
Use the power plug with ground
connection.
• Do not use high power home
appliances such as air conditioner,
washing machine or dryer.
• Do not hang the home appliances on
to the wire.
• For various devices connected to
an power outlet, use only products
that have obtained national
safety certification. For usage and
precautions, refer to the manual of
the device. (Electrical appliances,
multi-outlets, cord extension cables,
etc.)
• For devices used outdoors in
a vehicle, use a product with a
waterproof function or use it in a
waterproof environment. Do not use
in environments with rain or high
humidity. (Electrical appliances,
multi-outlets, cord extension cables,
etc.)
• If there is a risk of lightning, do not use the V2L function outside the
vehicle.
• Do not connect multiple portable
multi-outlets.
• When using an extension cable, if
the cable is twisted or overlapped by
itself may cause a fire. Be sure to use
the cable without twisting it.
• When using the vehicle’s outdoor
V2L connector, power is also
supplied to the vehicle’s indoor
power outlet. Unplug electrical
appliances that are not in use from
the indoor power outlet.
• When using the V2L, the cooling fan
in the vehicle motor compartment
can operate automatically even if the
vehicle is turned off. Do not put your
hand near the cooling fan in the V2L
operating state.
Page 71 of 680
2
2. Vehicle Information, Consumer Information and
Reporting Safety Defects
Exterior Overview (I) .......................................................................................... 2-2
Exterior Overview (II) ......................................................................................... 2-3
Interior Overview ............................................................................................. 2-4
Instrument Panel Overview (I) ......................................................................... 2-5
Instrument Panel Overview (II) ........................................................................ 2-6
Motor Compartment ......................................................................................... 2-7
Dimensions ........................................................................................................ 2-8
Electric Vehicle Specifications ......................................................................... 2-8
Bulb Wattage ..................................................................................................... 2-9
Tires and Wheels .............................................................................................. 2-10
Air Conditioning System ................................................................................... 2-11
Vehicle Weight and Luggage Volume ............................................................. 2-11
Available Front Trunk Weight ........................................................................... 2-11
Recommended Lubricants and Capacities ....................................................2-12
Vehicle Identification Number (VIN) .............................................................. 2-13
Vehicle Certification Label .............................................................................. 2-13
Tire Specification and Pressure Label ............................................................2-14
Motor Number ................................................................................................. 2-14
Air Conditioner Compressor Label ................................................................. 2-15
Consumer Information .................................................................................... 2-16
Reporting Safety Defects ................................................................................ 2-17
Page 74 of 680
2-4
Vehicle Information, Consumer Information and Reporting Safety Defects
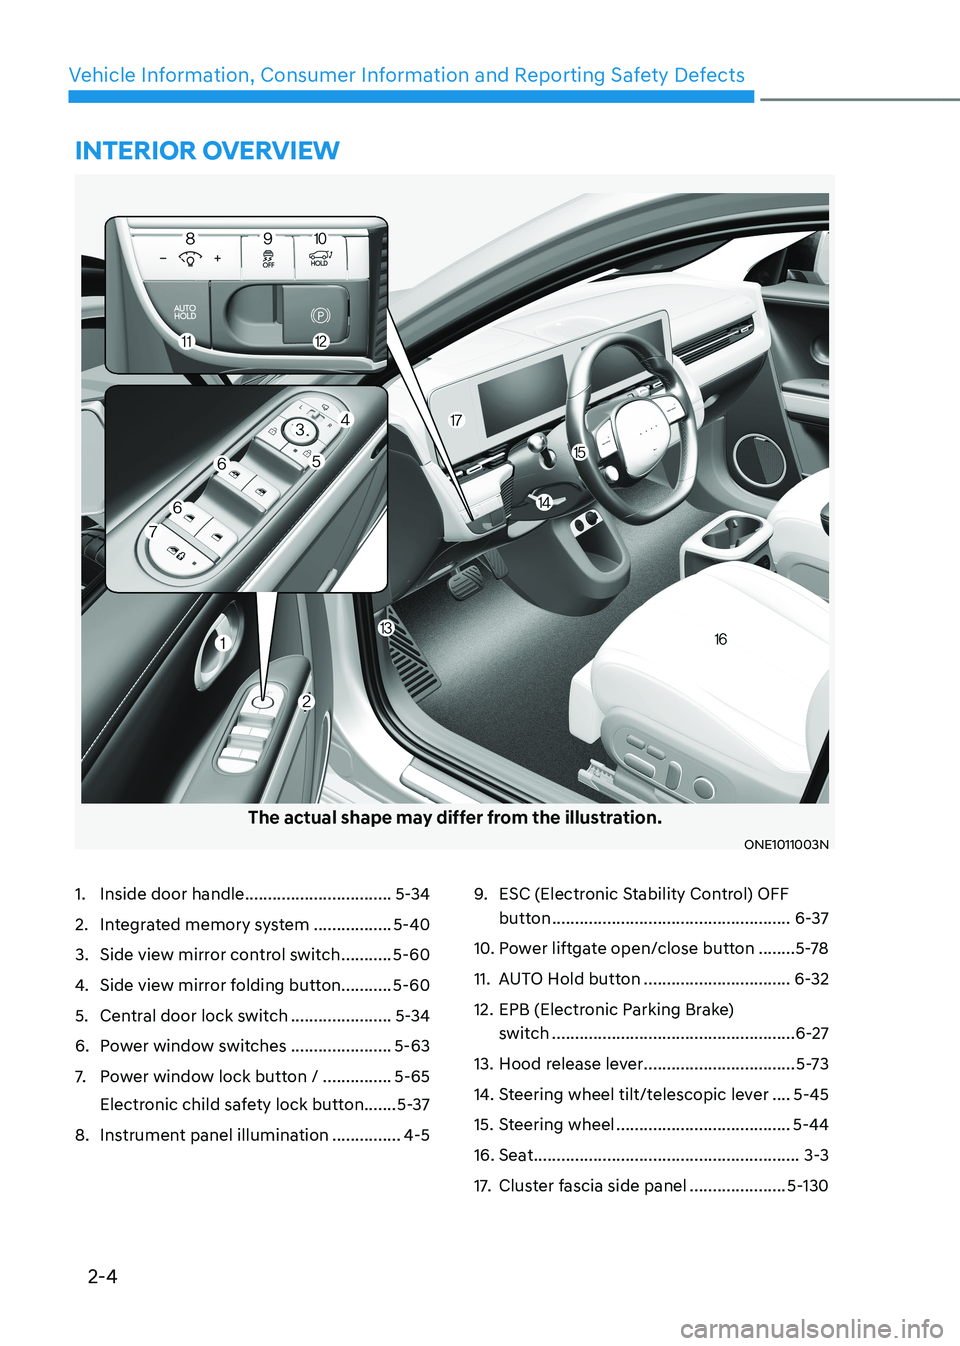
The actual shape may differ from the illustration.
ONE1011003N
1. Inside door handle ................................5-34
2. Integrated memory system .................5-40
3. Side view mirror control switch ...........5-60
4. Side view mirror folding button........... 5-60
5. Central door lock switch ......................5-34
6. Power window switches ......................5-63
7. Power window lock button / ...............5-65
Electronic child safety lock button .......5-37
8. Instrument panel illumination ...............4-59.
ESC (Electronic Stability Control) OFF
button .................................................... 6-37
10. Power liftgate open/close button ........5-78
11. AUTO Hold button ................................6-32
12. EPB (Electronic Parking Brake) switch ..................................................... 6-27
13. Hood release lever .................................5-73
14. Steering wheel tilt/telescopic lever ....5-45
15. Steering wheel ...................................... 5-44
16. Seat .......................................................... 3-3
17. Cluster fascia side panel .....................5-130
InterIor overvIew
Page 75 of 680
2-5
02
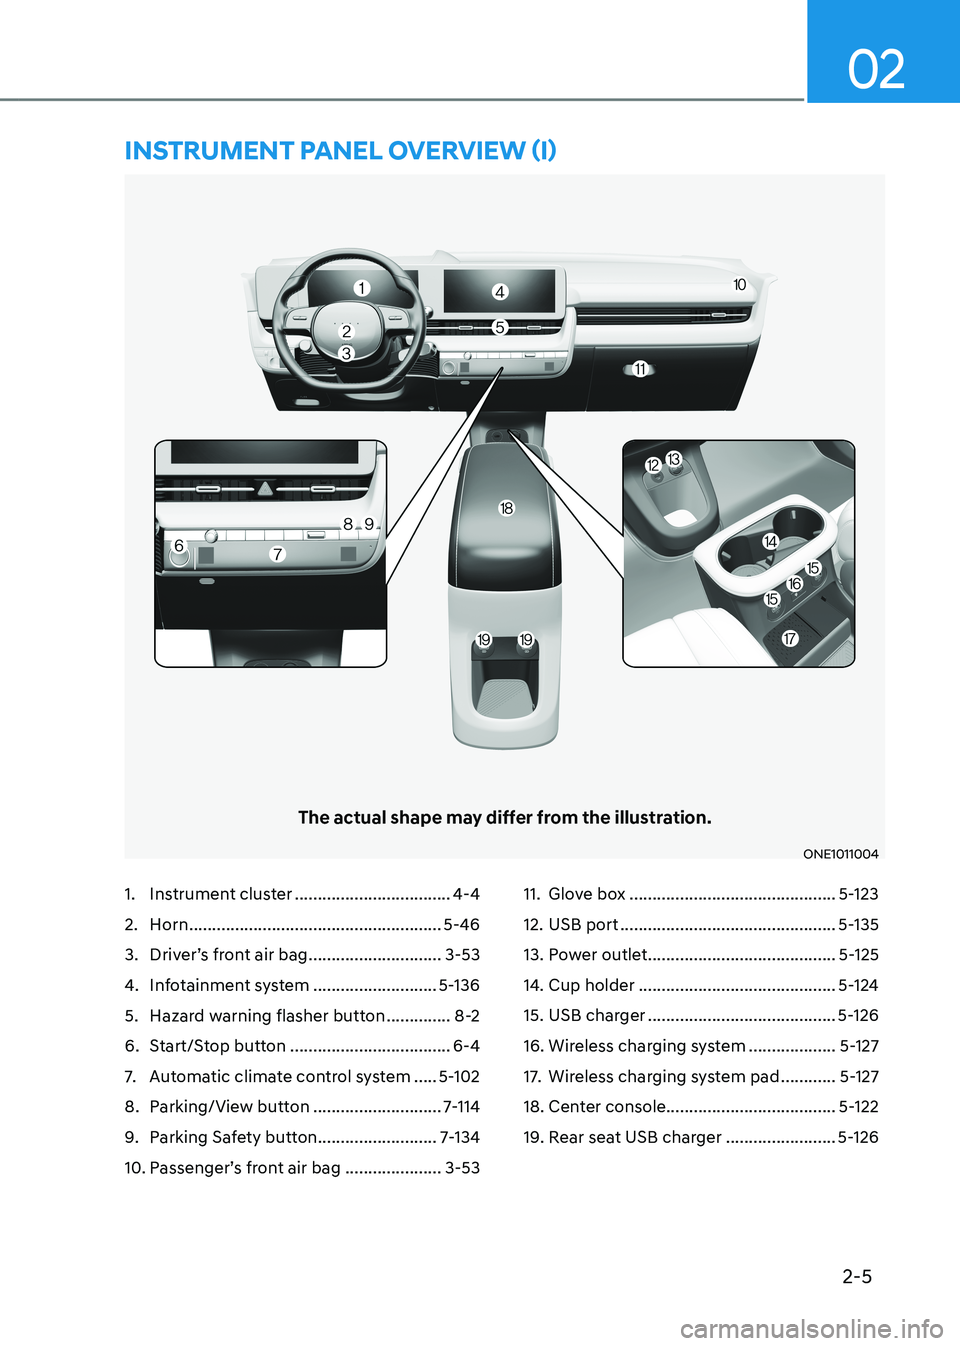
1. Instrument cluster ..................................4-4
2. Horn ....................................................... 5-46
3. Driver’s front air bag .............................3-53
4. Infotainment system ...........................5-136
5. Hazard warning flasher button ..............8-2
6. Start/Stop button ................................... 6-4
7. Automatic climate control system .....5-102
8. Parking/View button ............................7-114
9. Parking Safety button ..........................7-134
10. Passenger’s front air bag ..................... 3-53 11. Glove box
............................................. 5-123
12. USB port ............................................... 5-135
13. Power outlet ......................................... 5-125
14. Cup holder ........................................... 5-124
15. USB charger ......................................... 5-126
16. Wireless charging system ...................5-127
17. Wireless charging system pad ............5-127
18. Center console..................................... 5-122
19. Rear seat USB charger ........................5-126
The actual shape may differ from the illustration.
ONE1011004
instrumEnt panEl ovErviEw (i)
Page 76 of 680
2-6
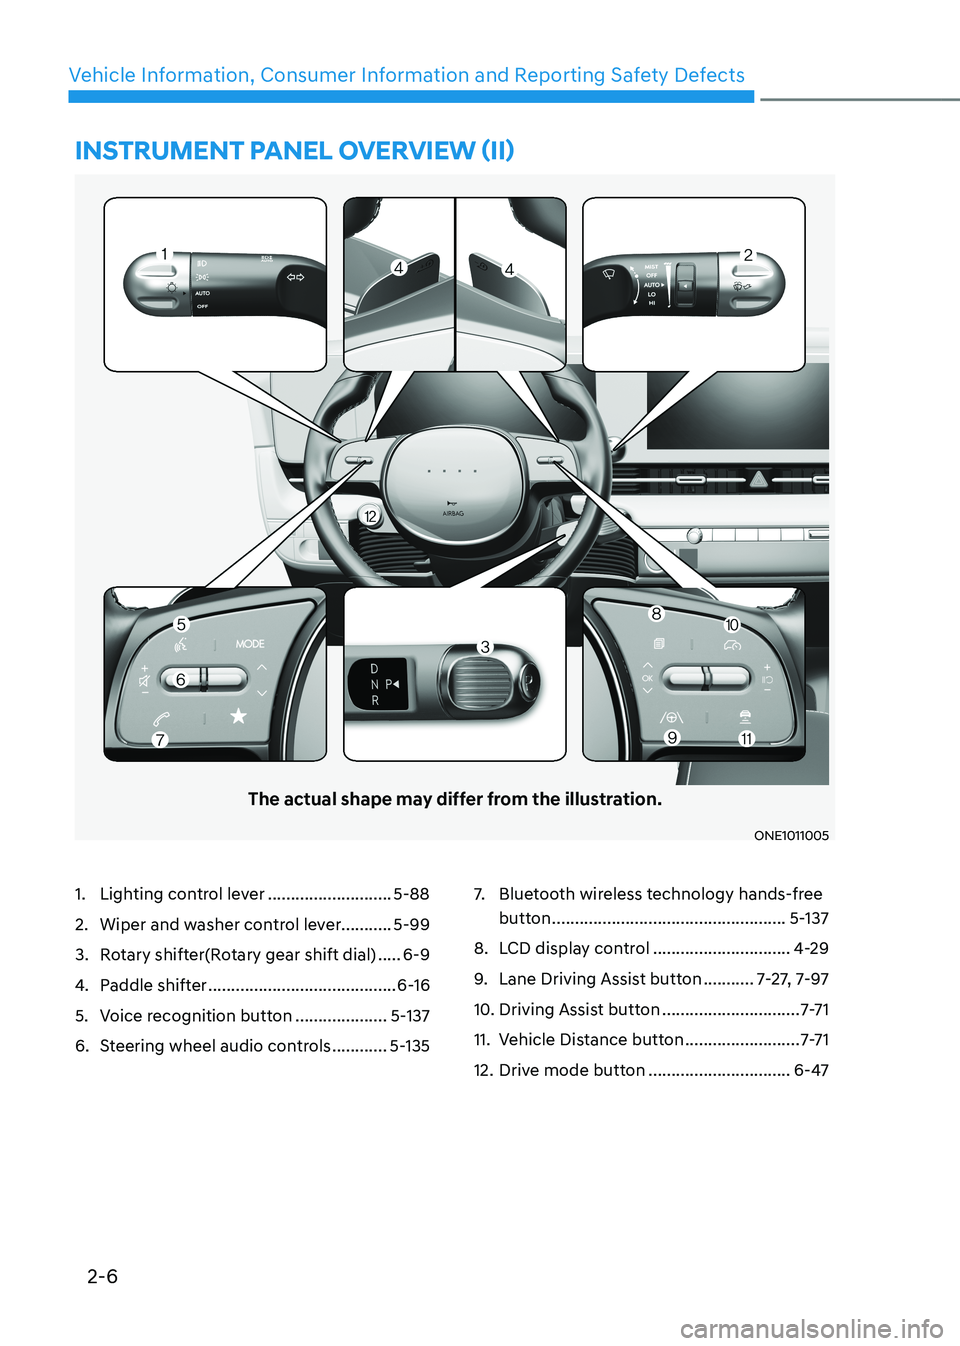
Vehicle Information, Consumer Information and Reporting Safety DefectsinstrumEnt panEl ovErviEw (ii)
The actual shape may differ from the illustration.
ONE1011005
1. Lighting control lever ...........................5-88
2. Wiper and washer control lever........... 5-99
3. Rotary shifter(Rotary gear shift dial) .....6-9
4. Paddle shifter ......................................... 6-16
5. Voice recognition button ....................5-137
6. Steering wheel audio controls ............5-135 7.
Bluetooth wireless technology hands-free
button ................................................... 5-137
8. LCD display control ..............................4-29
9. Lane Driving Assist button ...........7-27, 7-97
10. Driving Assist button ..............................7-7 1
11. Vehicle Distance button .........................7-7 1
12. Drive mode button ...............................6-47
Page 95 of 680
Seats & Safety System
3-8
CAUTION
To prevent injury: • Do not adjust your seat while
wearing your seat belt. Moving the
seat cushion forward may cause
strong pressure on your abdomen.
• Do not allow your hands or fingers to
get caught in the seat mechanisms
while the seat is moving.
WARNING
NEVER allow children in the vehicle
unattended. The power seats are
operable when the vehicle is turned off.
NOTICE
To prevent damage to the seats: • Always stop adjusting the seats when
the seat has been adjusted as far
forward or rearward as possible.
• Do not adjust the seats longer than
necessary when the vehicle is turned
off. This may result in unnecessary
battery drain.
• Do not operate two or more seats at
the same time. This may result in an electrical malfunction. Manual adjustment (if equipped)
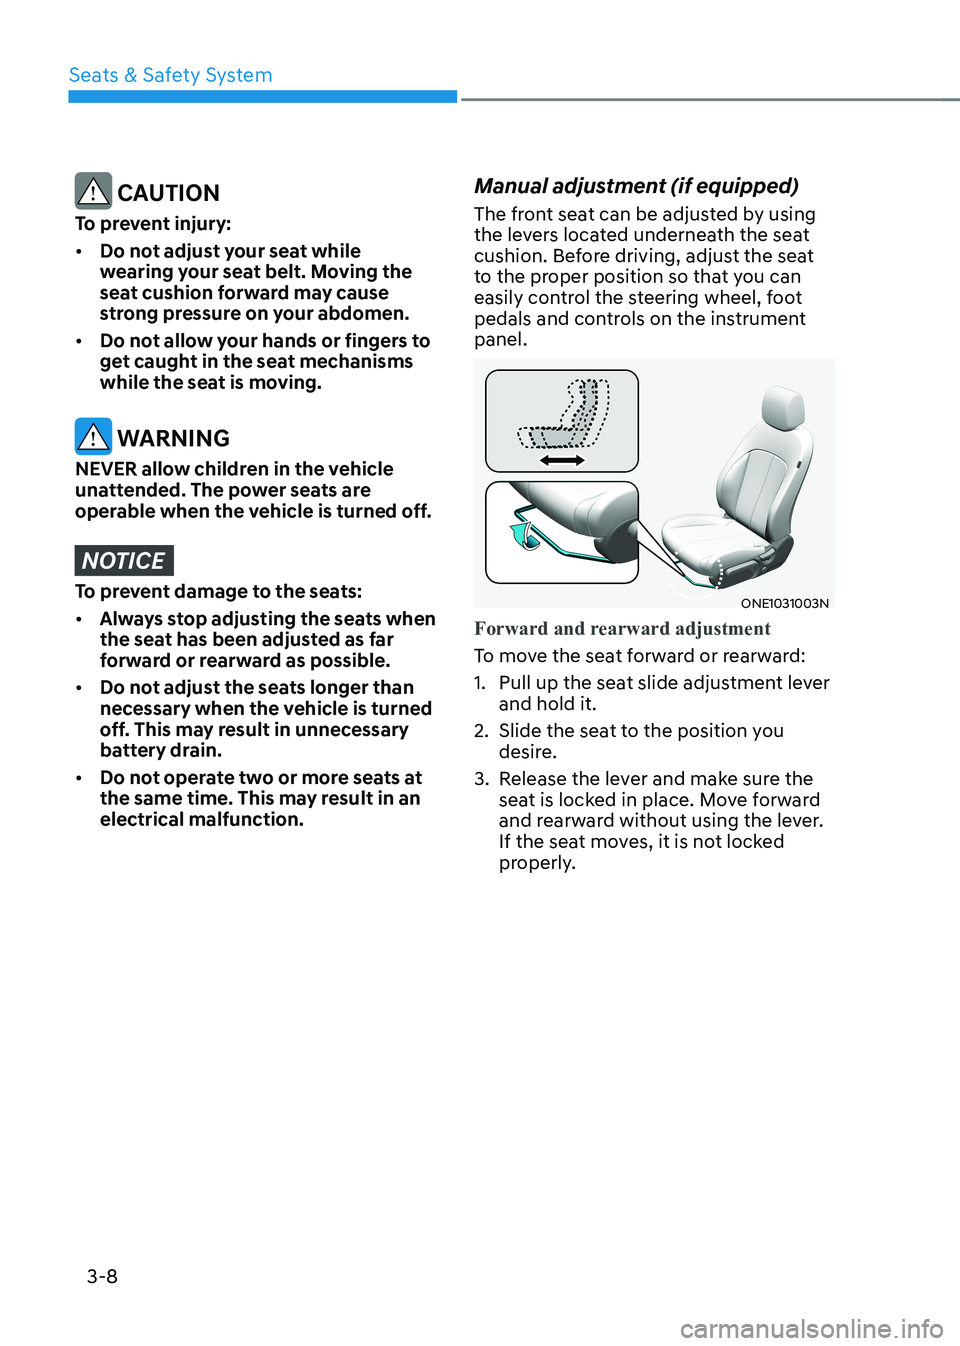
The front seat can be adjusted by using
the levers located underneath the seat
cushion. Before driving, adjust the seat
to the proper position so that you can
easily control the steering wheel, foot
pedals and controls on the instrument panel.ONE1031003N
Forward and rearward adjustment
To move the seat forward or rearward:
1. Pull up the seat slide adjustment lever
and hold it.
2. Slide the seat to the position you desire.
3. Release the lever and make sure the seat is locked in place. Move forward
and rearward without using the lever.
If the seat moves, it is not locked
properly.
Page 97 of 680
Seats & Safety System
3-10
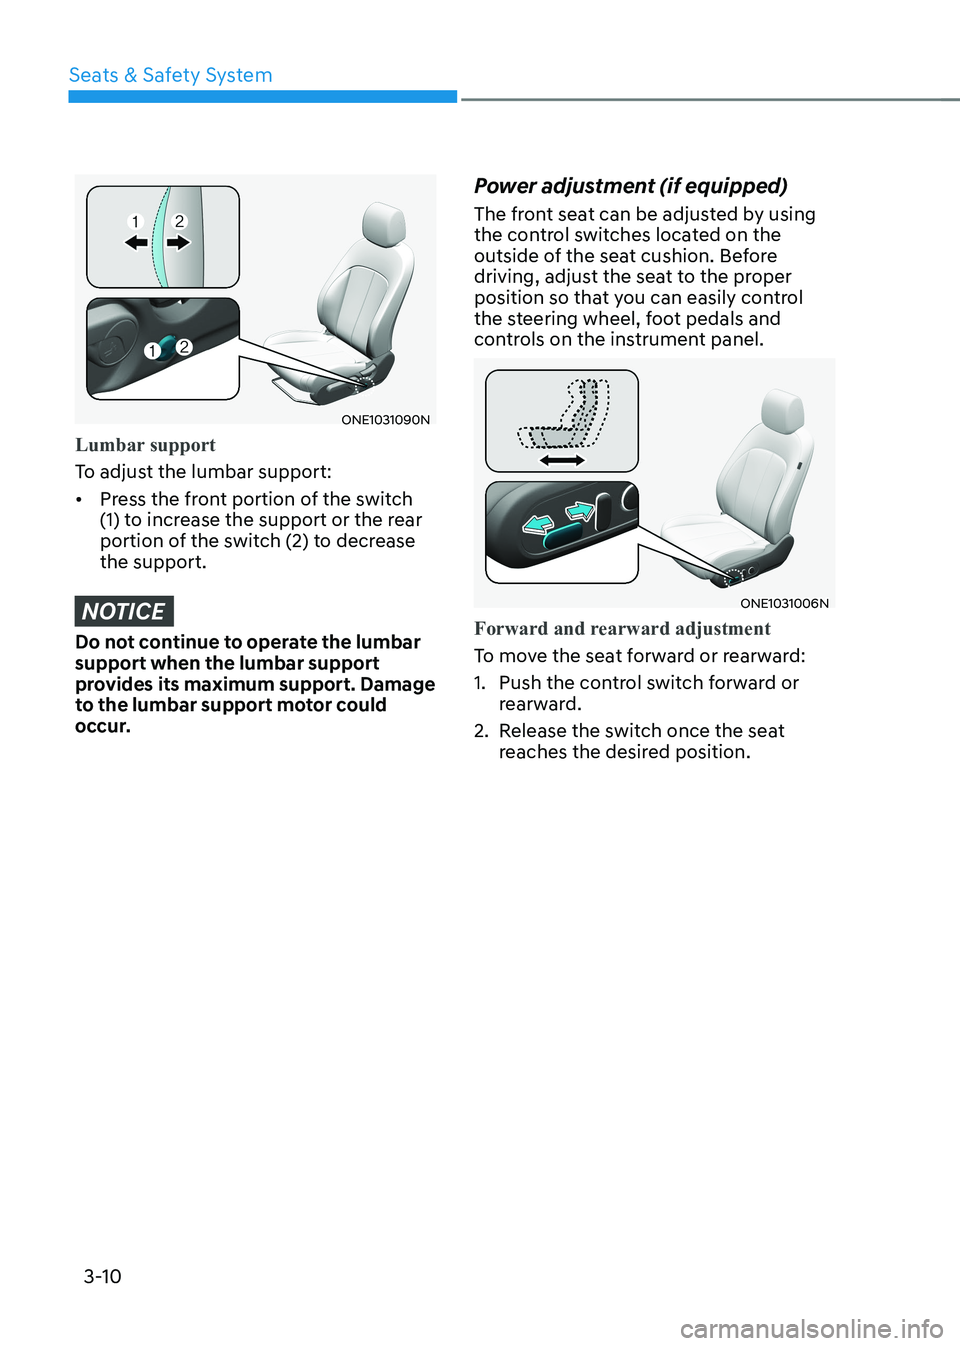
ONE1031090N
Lumbar support
To adjust the lumbar support: • Press the front portion of the switch
(1) to increase the support or the rear
portion of the switch (2) to decrease the support.
NOTICE
Do not continue to operate the lumbar support when the lumbar support
provides its maximum support. Damage
to the lumbar support motor could
occur. Power adjustment (if equipped)
The front seat can be adjusted by using
the control switches located on the
outside of the seat cushion. Before
driving, adjust the seat to the proper
position so that you can easily control
the steering wheel, foot pedals and
controls on the instrument panel.
ONE1031006N
Forward and rearward adjustment
To move the seat forward or rearward:
1. Push the control switch forward or
rearward.
2. Release the switch once the seat reaches the desired position.
Page 138 of 680
03
3-51
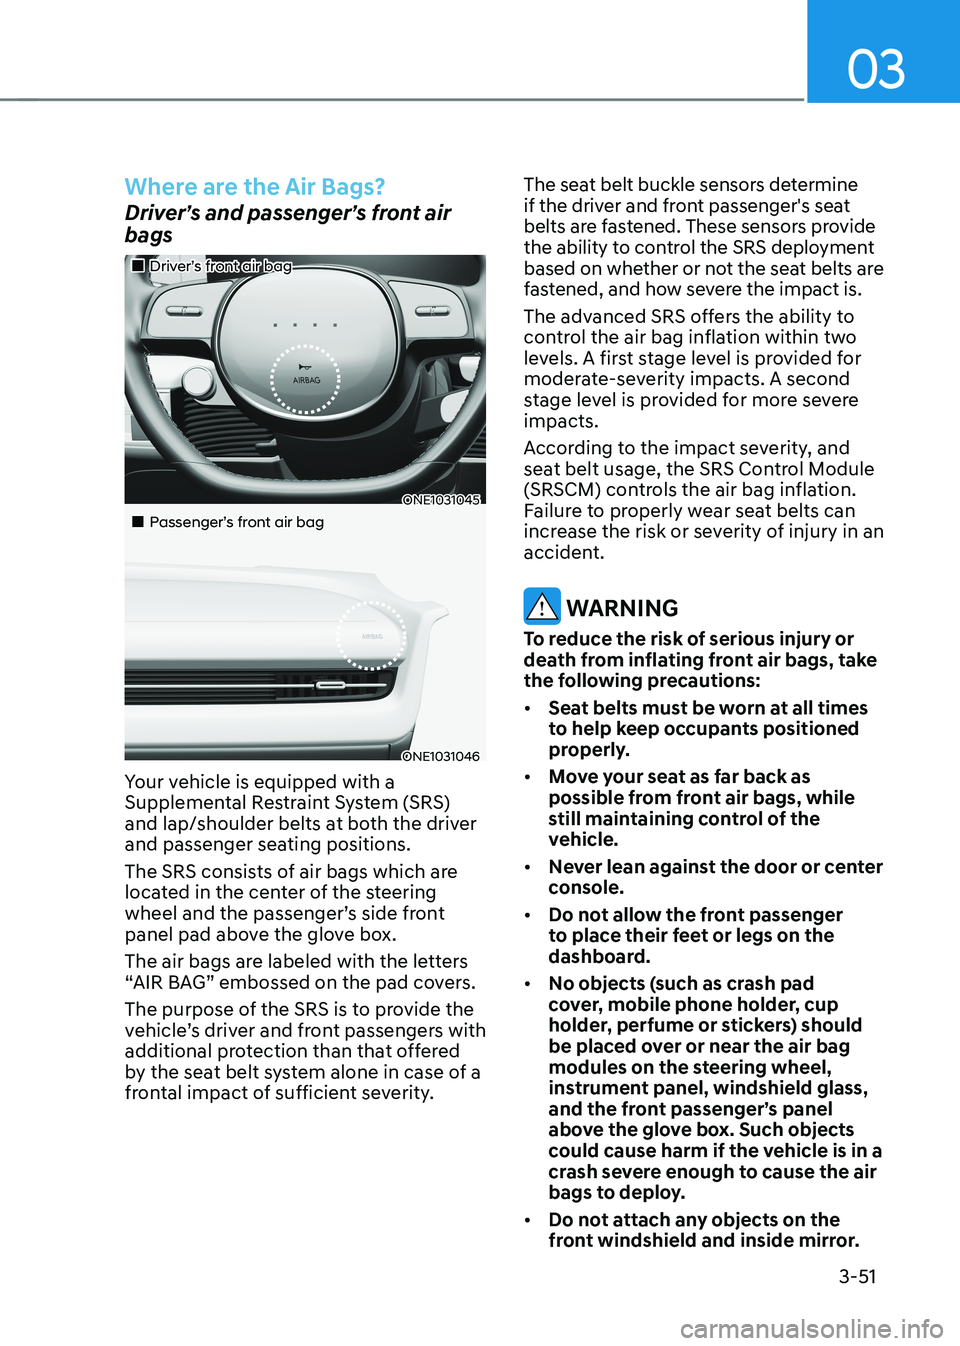
Where are the Air Bags?
Driver’s and passenger’s front air bags
„„Driver’s front air bag
ONE1031045
„„Passenger’s front air bag
ONE1031046
Your vehicle is equipped with a
Supplemental Restraint System (SRS)
and lap/shoulder belts at both the driver
and passenger seating positions.
The SRS consists of air bags which are
located in the center of the steering
wheel and the passenger’s side front
panel pad above the glove box.
The air bags are labeled with the letters
“AIR BAG” embossed on the pad covers.
The purpose of the SRS is to provide the
vehicle’s driver and front passengers with
additional protection than that offered
by the seat belt system alone in case of a
frontal impact of sufficient severity. The seat belt buckle sensors determine
if the driver and front passenger's seat
belts are fastened. These sensors provide
the ability to control the SRS deployment
based on whether or not the seat belts are
fastened, and how severe the impact is.
The advanced SRS offers the ability to
control the air bag inflation within two
levels. A first stage level is provided for
moderate-severity impacts. A second
stage level is provided for more severe impacts.
According to the impact severity, and
seat belt usage, the SRS Control Module
(SRSCM) controls the air bag inflation.
Failure to properly wear seat belts can
increase the risk or severity of injury in an
accident.
WARNING
To reduce the risk of serious injury or
death from inflating front air bags, take
the following precautions: • Seat belts must be worn at all times
to help keep occupants positioned
properly.
• Move your seat as far back as
possible from front air bags, while
still maintaining control of the
vehicle.
• Never lean against the door or center
console.
• Do not allow the front passenger
to place their feet or legs on the
dashboard.
• No objects (such as crash pad
cover, mobile phone holder, cup
holder, perfume or stickers) should
be placed over or near the air bag
modules on the steering wheel,
instrument panel, windshield glass,
and the front passenger’s panel
above the glove box. Such objects
could cause harm if the vehicle is in a
crash severe enough to cause the air
bags to deploy.
• Do not attach any objects on the
front windshield and inside mirror.
Page 142 of 680
03
3-55
The SRSCM (Supplemental Restraint
System Control Module) continually
monitors all SRS components while the
Start/Stop button is ON to determine if a
crash impact is severe enough to require
air bag deployment or pre-tensioner seat
belt deployment.
SRS warning light
The SRS (Supplemental Restraint System)
air bag warning light on the instrument
panel displays the air bag symbol
depicted in the illustration. The system
checks the air bag electrical system for
malfunctions. The light indicates that
there is a potential problem with your
air bag system, which could include
your side and/or curtain air bags used
for rollover protection (if equipped with
rollover sensor).
WARNING
If your SRS malfunctions, the air bag
may not inflate properly during an
accident increasing the risk of serious
injury or death.
If any of the following conditions occur,
your SRS is malfunctioning: • The light does not turn on for
approximately three to six seconds
when the Start/Stop button is in the ON position.
• The light stays on after illuminating
for approximately three to six
seconds.
• The light comes on while the vehicle
is in motion.
• The light blinks when the vehicle is running.
Have an authorized HYUNDAI dealer inspect the SRS as soon as possible if
any of these conditions occur. During a moderate to severe frontal
collision, sensors will detect the
vehicle’s rapid deceleration. If the rate of
deceleration is high enough, the control
unit will inflate the front air bags, at the
time and with the force needed.
The front air bags help protect the driver
and front passenger by responding to
frontal impacts in which seat belts alone
cannot provide adequate restraint. When
needed, the side air bags help provide
protection in the event of a side impact
or rollover by supporting the side upper
body area. •
Air bags are activated (able to inflate
if necessary) only when the Start/Stop
button is in the ON or START position,
and it can be activated within about 3
minutes after the vehicle is turned off.
• Air bags inflate in the event of certain
frontal or side collisions to help
protect the occupants from serious
physical injury.
• Generally, air bags are designed to
inflate based upon the severity of a
collision, its direction, or etc. These
two factors determine whether
the sensors produce an electronic
deployment/inflation signal.
• The front air bags will completely
inflate and deflate in an instant. It is
virtually impossible for you to see the
air bags inflate during an accident. It is
much more likely that you will simply
see the deflated air bags hanging out
of their storage compartments after the collision.
Page 144 of 680
03
3-57
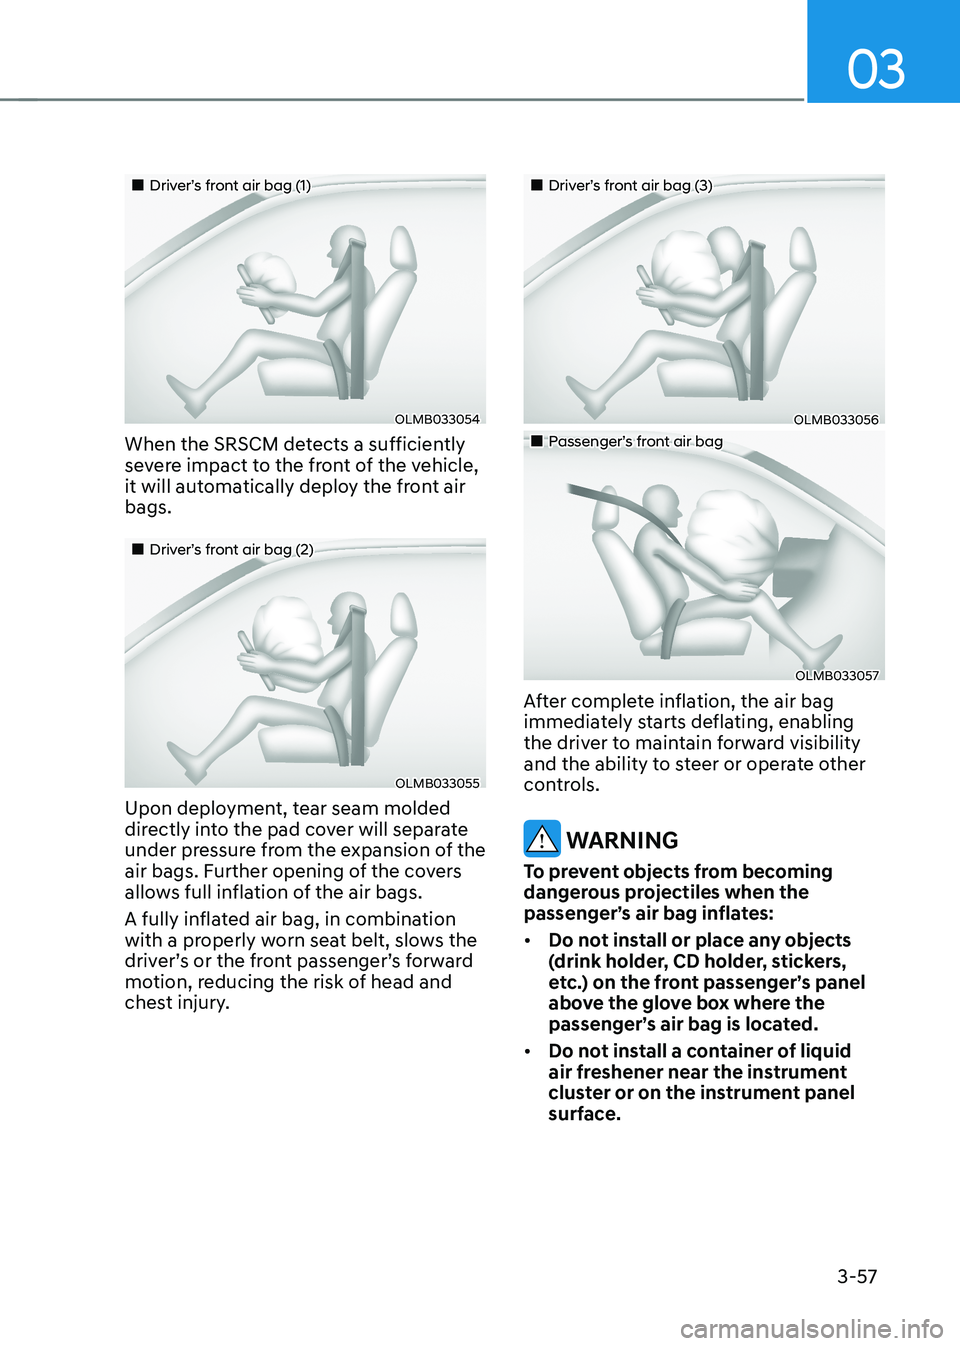
„„Driver’s front air bag (1)
OLMB033054
When the SRSCM detects a sufficiently
severe impact to the front of the vehicle,
it will automatically deploy the front air bags.
„„Driver’s front air bag (2)
OLMB033055
Upon deployment, tear seam molded
directly into the pad cover will separate
under pressure from the expansion of the
air bags. Further opening of the covers
allows full inflation of the air bags.
A fully inflated air bag, in combination
with a properly worn seat belt, slows the
driver’s or the front passenger’s forward
motion, reducing the risk of head and
chest injury.
„„Driver’s front air bag (3)
OLMB033056
„„Passenger’s front air bag
OLMB033057
After complete inflation, the air bag
immediately starts deflating, enabling
the driver to maintain forward visibility
and the ability to steer or operate other
controls.
WARNING
To prevent objects from becoming
dangerous projectiles when the
passenger’s air bag inflates: • Do not install or place any objects
(drink holder, CD holder, stickers,
etc.) on the front passenger’s panel
above the glove box where the
passenger’s air bag is located.
• Do not install a container of liquid
air freshener near the instrument
cluster or on the instrument panel
surface.