cluster HYUNDAI IONIQ 5 2023 Workshop Manual
[x] Cancel search | Manufacturer: HYUNDAI, Model Year: 2023, Model line: IONIQ 5, Model: HYUNDAI IONIQ 5 2023Pages: 680, PDF Size: 48.22 MB
Page 237 of 680
05
5-45
Tilt/Telescopic Steering
When adjusting the steering wheel to a
comfortable position, adjust the steering
wheel so that it points toward your chest,
not toward your face. Make sure you can
see the instrument cluster warning lights
and gauges. After adjusting, push the
steering wheel both up and down to be
certain it is locked in position.
Always adjust the position of the steering
wheel before driving.
WARNING
NEVER adjust the steering wheel while
driving. This may cause loss of vehicle
control resulting in an accident.
NOTICE
While adjusting the steering wheel
height, please do not push or pull it
hard since the fixture can be damaged. Manual adjustment
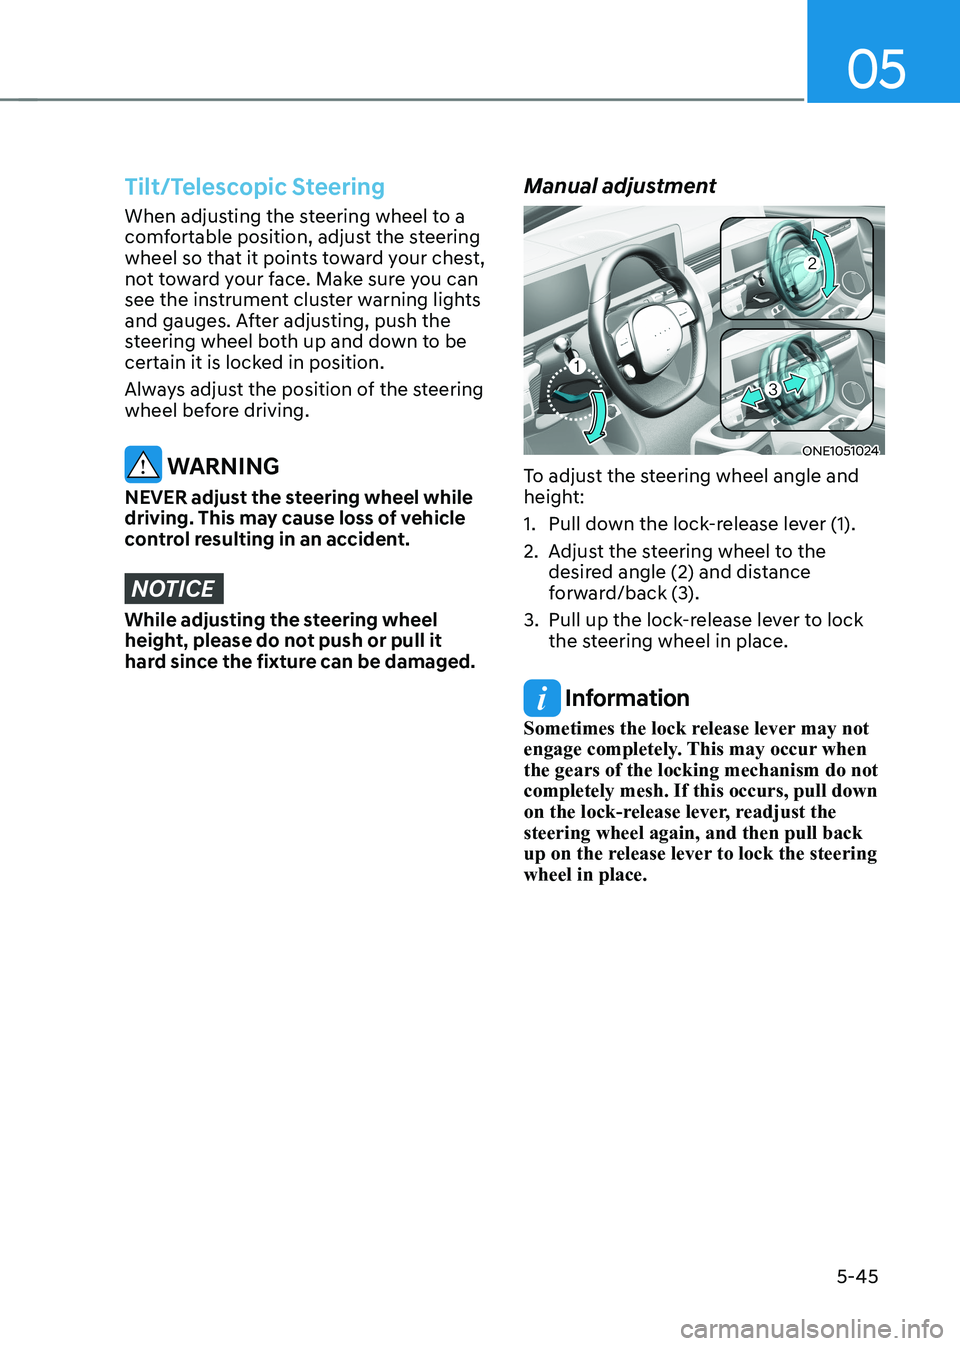
ONE1051024
To adjust the steering wheel angle and
height:
1. Pull down the lock-release lever (1).
2. Adjust the steering wheel to the desired angle (2) and distance
forward/back (3).
3. Pull up the lock-release lever to lock the steering wheel in place.
Information
Sometimes the lock release lever may not
engage completely. This may occur when the gears of the locking mechanism do not completely mesh. If this occurs, pull down
on the lock-release lever, readjust the steering wheel again, and then pull back
up on the release lever to lock the steering wheel in place.
Page 262 of 680
Convenience Features
5-70
exterior feAtures
Hood
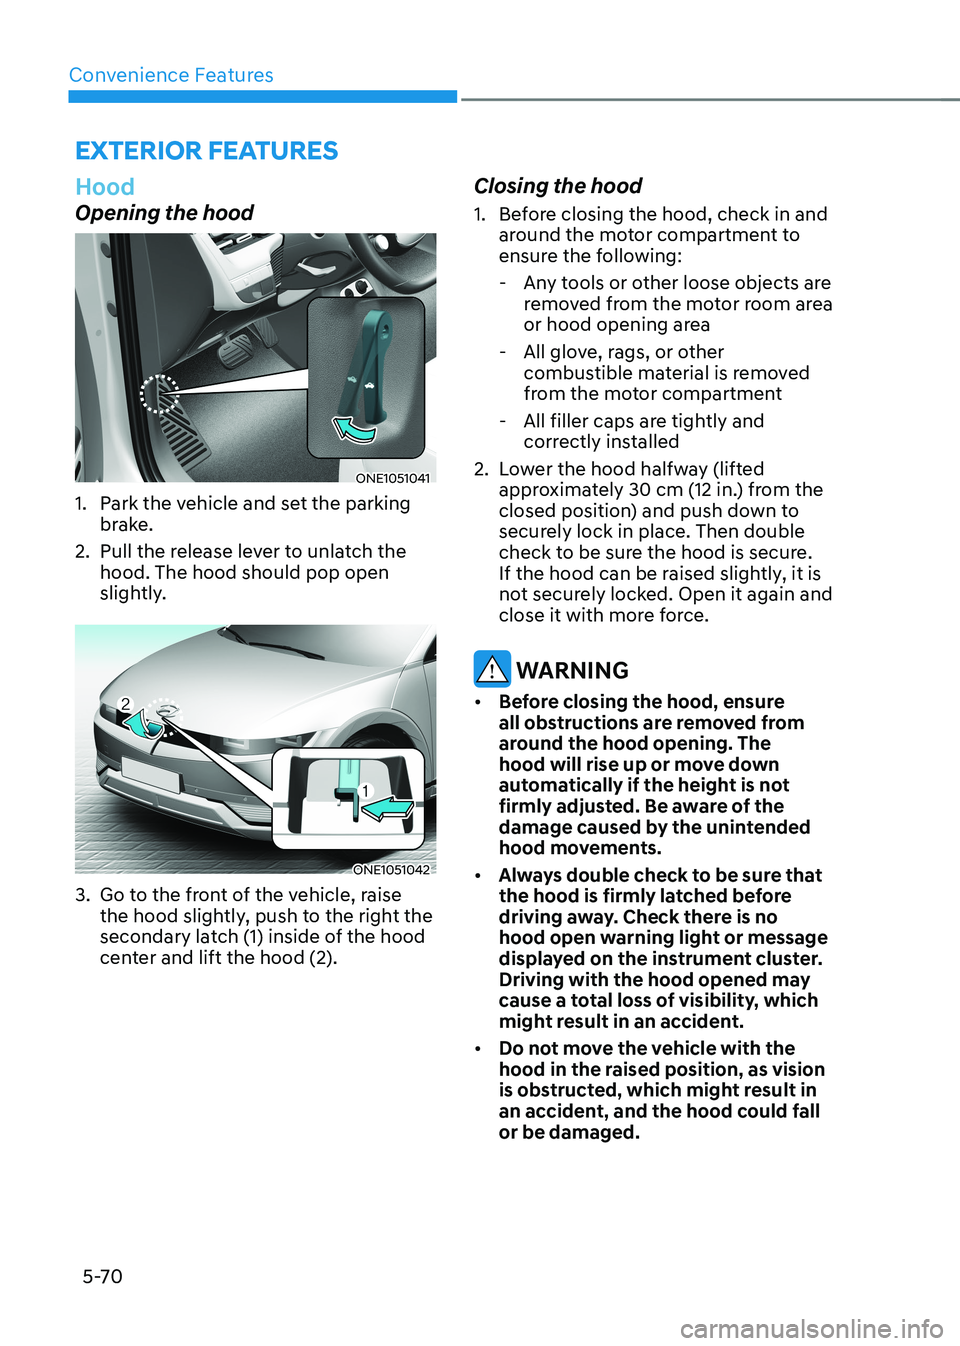
Opening the hood
ONE1051041
1. Park the vehicle and set the parking brake.
2. Pull the release lever to unlatch the hood. The hood should pop open
slightly.
ONE1051042
3. Go to the front of the vehicle, raise the hood slightly, push to the right the
secondary latch (1) inside of the hood
center and lift the hood (2). Closing the hood
1. Before closing the hood, check in and
around the motor compartment to
ensure the following:
- Any tools or other loose objects are removed from the motor room area
or hood opening area
- All glove, rags, or other combustible material is removed
from the motor compartment
- All filler caps are tightly and correctly installed
2. Lower the hood halfway (lifted approximately 30 cm (12 in.) from the
closed position) and push down to
securely lock in place. Then double
check to be sure the hood is secure.
If the hood can be raised slightly, it is
not securely locked. Open it again and
close it with more force.
WARNING
• Before closing the hood, ensure
all obstructions are removed from
around the hood opening. The
hood will rise up or move down
automatically if the height is not
firmly adjusted. Be aware of the
damage caused by the unintended
hood movements.
• Always double check to be sure that
the hood is firmly latched before
driving away. Check there is no
hood open warning light or message
displayed on the instrument cluster.
Driving with the hood opened may
cause a total loss of visibility, which
might result in an accident.
• Do not move the vehicle with the
hood in the raised position, as vision
is obstructed, which might result in
an accident, and the hood could fall or be damaged.
Page 286 of 680
Convenience Features
5-94
High Beam Assist Operation
Display and control • After selecting ‘High Beam Assist’
in the Settings menu, High Beam
Assist will operate by following the
procedure below.
- Place the headlamp switch in the AUTO position and push
the headlamp lever towards the
instrument cluster. The High Beam
Assist (
) indicator light will
illuminate on the cluster and High
Beam Assist will be enabled.
- When High Beam Assist is enabled, high beam will turn on when vehicle
speed is above 40 km/h (25 mph).
When vehicle speed is below 25
km/h (15 mph), high beam will turn
off.
- The High Beam (
) indicator light
will illuminate on the cluster when high beam is on.
• When High Beam Assist is operating, if
the headlamp lever or switch is used,
High Beam Assist operates as follow:
- If the headlamp lever is pulled towards you when the high beam
is off, the high beam will turn on
without High Beam Assist canceled.
When you let go of the headlamp
lever, the lever will move to the middle and the high beam will turn
off.
- If the headlamp lever is pulled towards you when the high beam is
on by High Beam Assist, low beam will turn on and the function will
turn off.
- If the headlamp switch is placed from AUTO to another position
(headlamp/position/off), High
Beam Assist will turn off and the
corresponding lamp will turn on. •
When High Beam Assist is operating,
high beam switches to low beam if
any of the following conditions occur:
- When the headlamp of an oncoming vehicle is detected.
- When the tail lamp of a vehicle in front is detected.
- When the headlamp or tail lamp of a motorcycle or a bicycle is detected.
- When the surrounding ambient light is bright enough that high beams
are not required.
- When streetlights or other lights are detected.
Information
The images or colors may be displayed
differently depending on the specifications
of the instrument panel or theme.
Page 287 of 680
05
5-95
High Beam Assist Malfunction
and Limitations
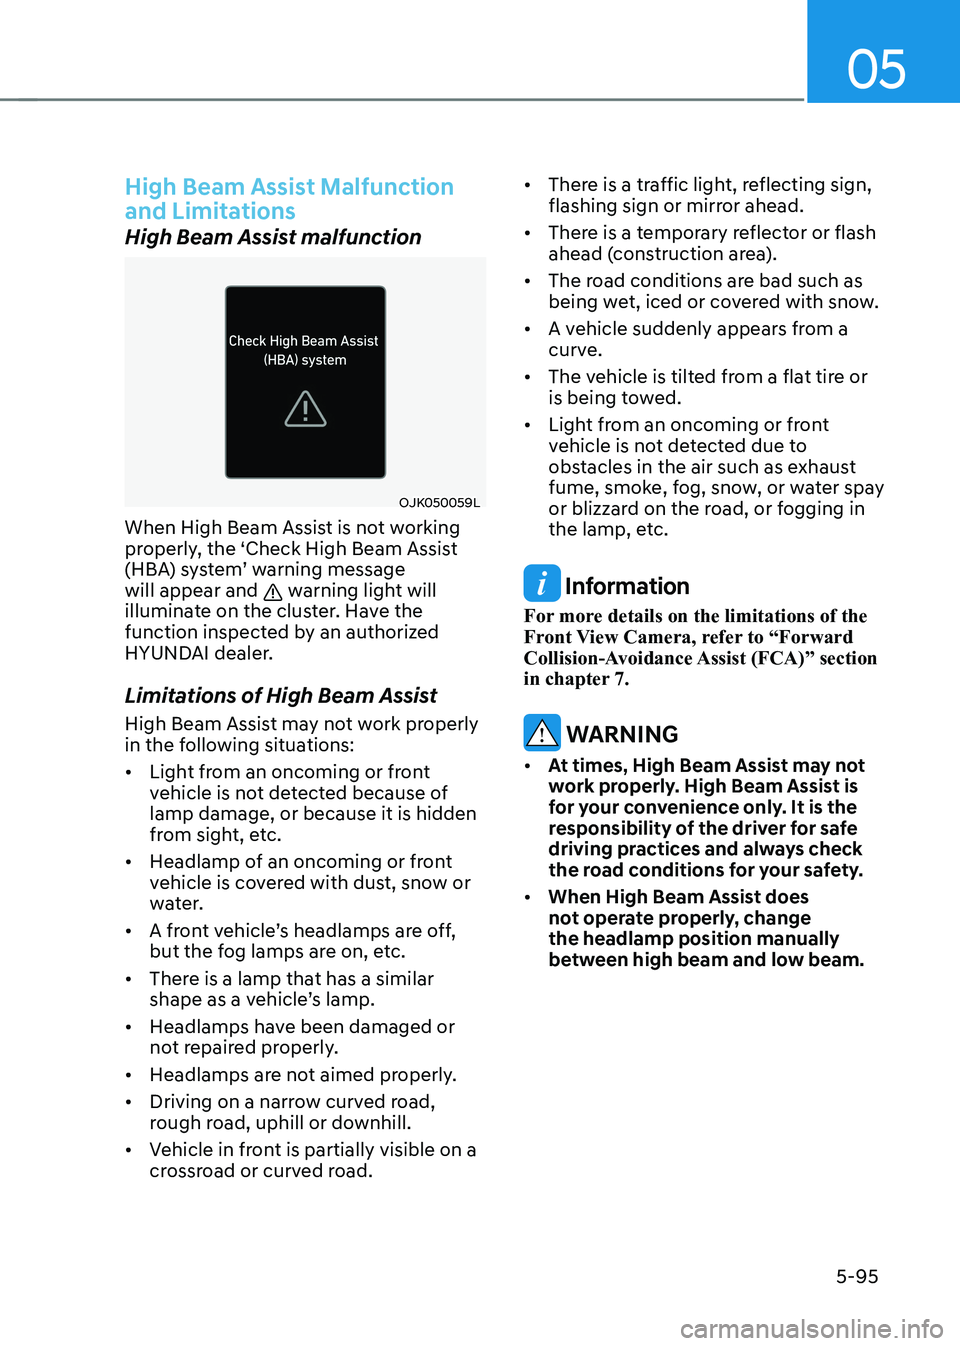
High Beam Assist malfunction
OJK050059L
When High Beam Assist is not working
properly, the ‘Check High Beam Assist
(HBA) system’ warning message will appear and
warning light will
illuminate on the cluster. Have the
function inspected by an authorized
HYUNDAI dealer.
Limitations of High Beam Assist
High Beam Assist may not work properly
in the following situations: • Light from an oncoming or front
vehicle is not detected because of lamp damage, or because it is hidden
from sight, etc.
• Headlamp of an oncoming or front
vehicle is covered with dust, snow or
water.
• A front vehicle’s headlamps are off,
but the fog lamps are on, etc.
• There is a lamp that has a similar
shape as a vehicle’s lamp.
• Headlamps have been damaged or
not repaired properly.
• Headlamps are not aimed properly.
• Driving on a narrow curved road,
rough road, uphill or downhill.
• Vehicle in front is partially visible on a
crossroad or curved road. •
There is a traffic light, reflecting sign,
flashing sign or mirror ahead.
• There is a temporary reflector or flash
ahead (construction area).
• The road conditions are bad such as
being wet, iced or covered with snow.
• A vehicle suddenly appears from a
curve.
• The vehicle is tilted from a flat tire or
is being towed.
• Light from an oncoming or front
vehicle is not detected due to
obstacles in the air such as exhaust
fume, smoke, fog, snow, or water spay
or blizzard on the road, or fogging in
the lamp, etc. Information
For more details on the limitations of the
Front View Camera, refer to “Forward
Collision-Avoidance Assist (FCA)” section
in chapter 7.
WARNING
• At times, High Beam Assist may not
work properly. High Beam Assist is
for your convenience only. It is the
responsibility of the driver for safe
driving practices and always check
the road conditions for your safety.
• When High Beam Assist does
not operate properly, change the headlamp position manually
between high beam and low beam.
Page 319 of 680
05
5-127
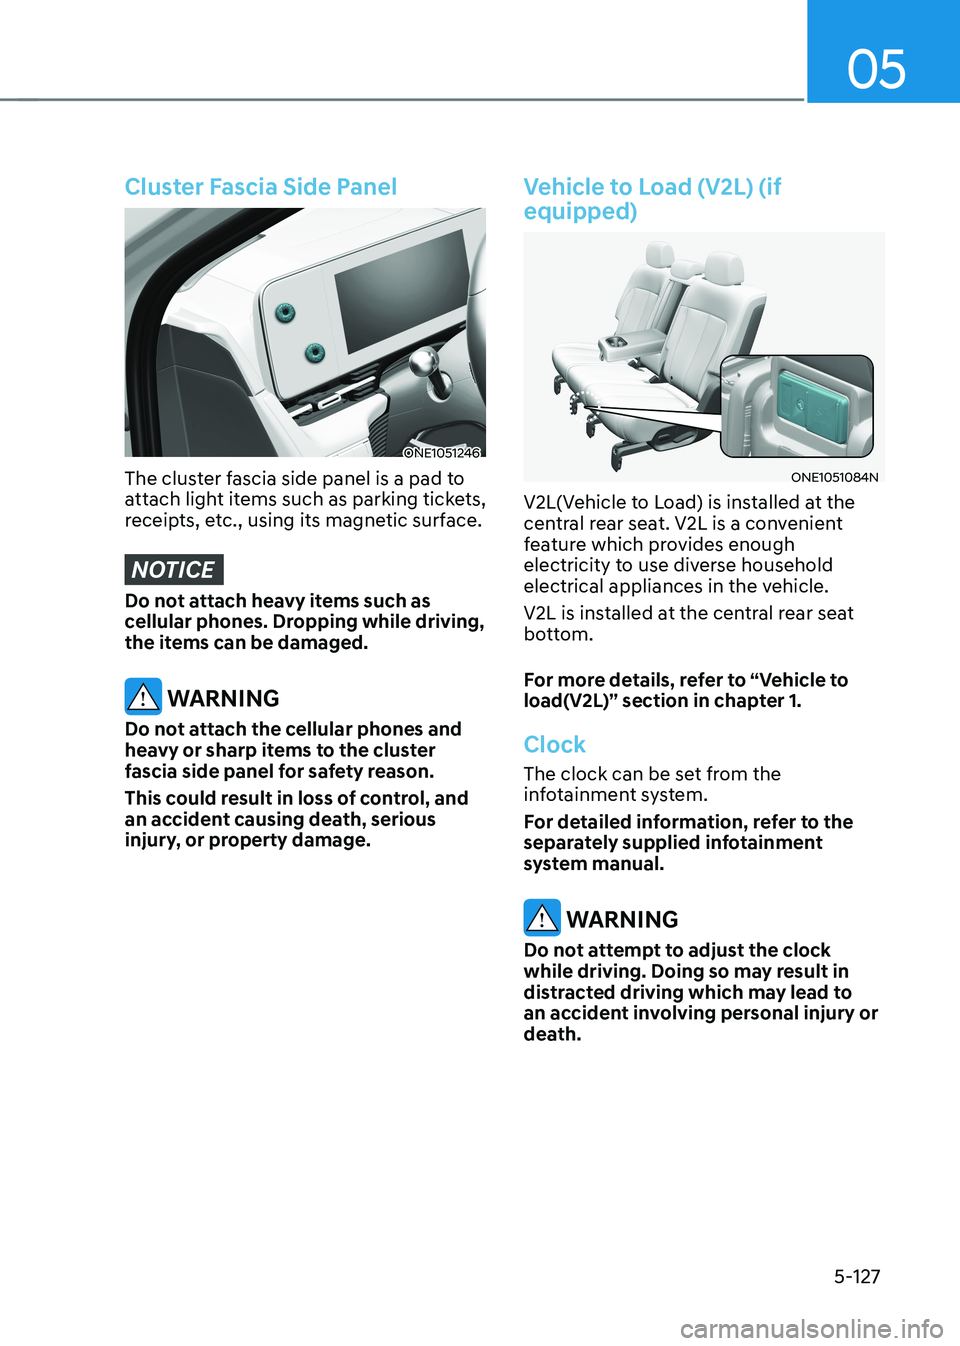
Cluster Fascia Side Panel
ONE1051246
The cluster fascia side panel is a pad to
attach light items such as parking tickets,
receipts, etc., using its magnetic surface.
NOTICE
Do not attach heavy items such as
cellular phones. Dropping while driving,
the items can be damaged.
WARNING
Do not attach the cellular phones and
heavy or sharp items to the cluster
fascia side panel for safety reason.
This could result in loss of control, and
an accident causing death, serious
injury, or property damage.
Vehicle to Load (V2L) (if equipped)
ONE1051084N
V2L(Vehicle to Load) is installed at the
central rear seat. V2L is a convenient
feature which provides enough
electricity to use diverse household
electrical appliances in the vehicle.
V2L is installed at the central rear seat
bottom.
For more details, refer to “Vehicle to
load(V2L)” section in chapter 1.
Clock
The clock can be set from the
infotainment system.
For detailed information, refer to the
separately supplied infotainment
system manual.
WARNING
Do not attempt to adjust the clock
while driving. Doing so may result in
distracted driving which may lead to
an accident involving personal injury or
death.
Page 327 of 680
6
6. Driving Your Vehicle
Before Driving ................................................................................................... 6-3
Before Entering the Vehicle ......................................................................................... 6-3
Before Starting ............................................................................................................. 6-3
Start/Stop Button .............................................................................................. 6-4
Start/Stop Button Positions ......................................................................................... 6-5
Starting the Vehicle ..................................................................................................... 6-6
Turning Off the Vehicle ................................................................................................ 6 -7
Remote Start ................................................................................................................ 6-8
Reduction Gear ................................................................................................. 6-9
Reduction Gear Operation .......................................................................................... 6-9
LCD Display Messages (Cluster) ................................................................................ 6-13
Good Driving Practices .............................................................................................. 6-15
Regenerative Braking System ......................................................................... 6-16
One Pedal Driving........................................................................................................6-17 i-Pedal ......................................................................................................................... 6-18
Smart Recuperation System ........................................................................... 6-19
Smart Recuperation System Setting ......................................................................... 6-19
To Activate Smart Recuperation System .................................................................. 6-19
Ready to Operate ...................................................................................................... 6-20
How to Operate .......................................................................................................... 6-21
Smart Recuperation System Will Be Temporarily Cancelled When: .......................6-21
To Resume Smart Recuperation System .................................................................. 6-21
Vehicle-to-Vehicle Distance Recognition Sensor (Front Radar) .............................6-22
System Malfunction ................................................................................................... 6-23
Limitations of the System .......................................................................................... 6-23
Braking System ............................................................................................... 6-26
Power-Assist Brakes ................................................................................................... 6-26
Disc Brakes Wear Indicator........................................................................................ 6-27
Electronic Parking Brake (EPB) .................................................................................. 6-27
Auto Hold .................................................................................................................... 6-32
Anti-Lock Brake System (ABS) ................................................................................... 6-35
Electronic Stability Control (ESC) ............................................................................. 6-37
Vehicle Stability Management (VSM) ...................................................................... 6-40
Hill-Start Assist Control (HAC) ................................................................................... 6-41
Good Braking Practices ............................................................................................ 6-42
Page 333 of 680
06
6 -7
NOTICE
To prevent damage to the vehicle:
Do not press the Start/Stop button for
more than 10 seconds except when the
stop lamp fuse is blown.
When the stop lamp fuse is blown,
you cannot normally start the vehicle.
Replace the fuse with a new one. If you
are not able to replace the fuse, you
can start the vehicle by pressing and
holding the Start/Stop button for 10
seconds with the Start/Stop button in
the ACC position.
Pressing the brake pedal many times while “
” indicator light is off will
increase the possibility of discharging
the 12V battery.
For your safety always depress the
brake pedal before starting the vehicle.
Information
Virtual Engine Sound System(VESS) VESS generates virtual engine sound to
make pedestrians to aware. VESS operates
when the vehicle can be driven. When the
vehicle in P(parking) gear status, VESS doesn't work.
CAUTION
• Because the vehicle doesn't make
the engine sound, pay attention to
the surrounding environment and
drive carefully.
• After parking or waiting for a traffic
light, please check around(children,
obstacle, etc.) before departure.
• When reversing, check directly
behind you before driving.
Pedestrians may not be able to
recognize vehicle sounds.
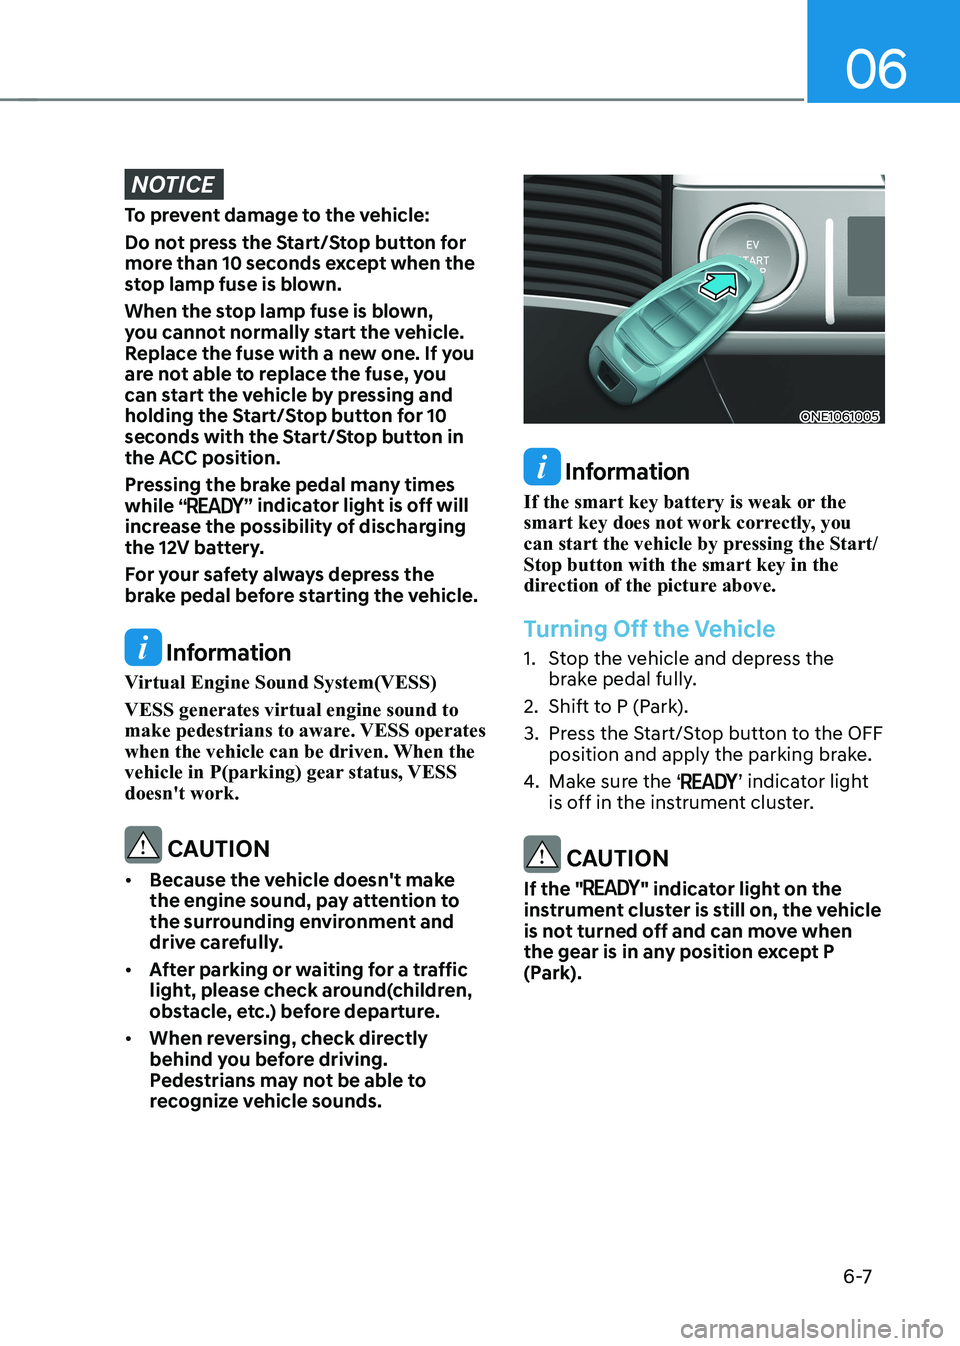
ONE1061005
Information
If the smart key battery is weak or the
smart key does not work correctly, you
can start the vehicle by pressing the Start/Stop button with the smart key in the
direction of the picture above.
Turning Off the Vehicle
1. Stop the vehicle and depress the brake pedal fully.
2. Shift to P (Park).
3. Press the Start/Stop button to the OFF position and apply the parking brake.
4. Make sure the ‘
’ indicator light
is off in the instrument cluster.
CAUTION
If the "
" indicator light on the
instrument cluster is still on, the vehicle
is not turned off and can move when
the gear is in any position except P
(Park).
Page 336 of 680
Driving Your Vehicle
6-10
Automatic gear shift to P (Park)
The gear is shifted to P (Park)
automatically for safety reasons under
the following conditions:
- When the vehicle is turned off with the gear in R (Reverse), D (Drive) or N
(Neutral).
- When the driver’s door is open with the vehicle running, the gear in R
(Reverse), D (Drive) or N (Neutral), and
the vehicle at a standstill.
- When the driver’s door is open with the gear in N (Neutral) and the vehicle
is off.
In situations the gear must be in P (Park),
always check if the gear is shifted to P
(Park) by checking the cluster.
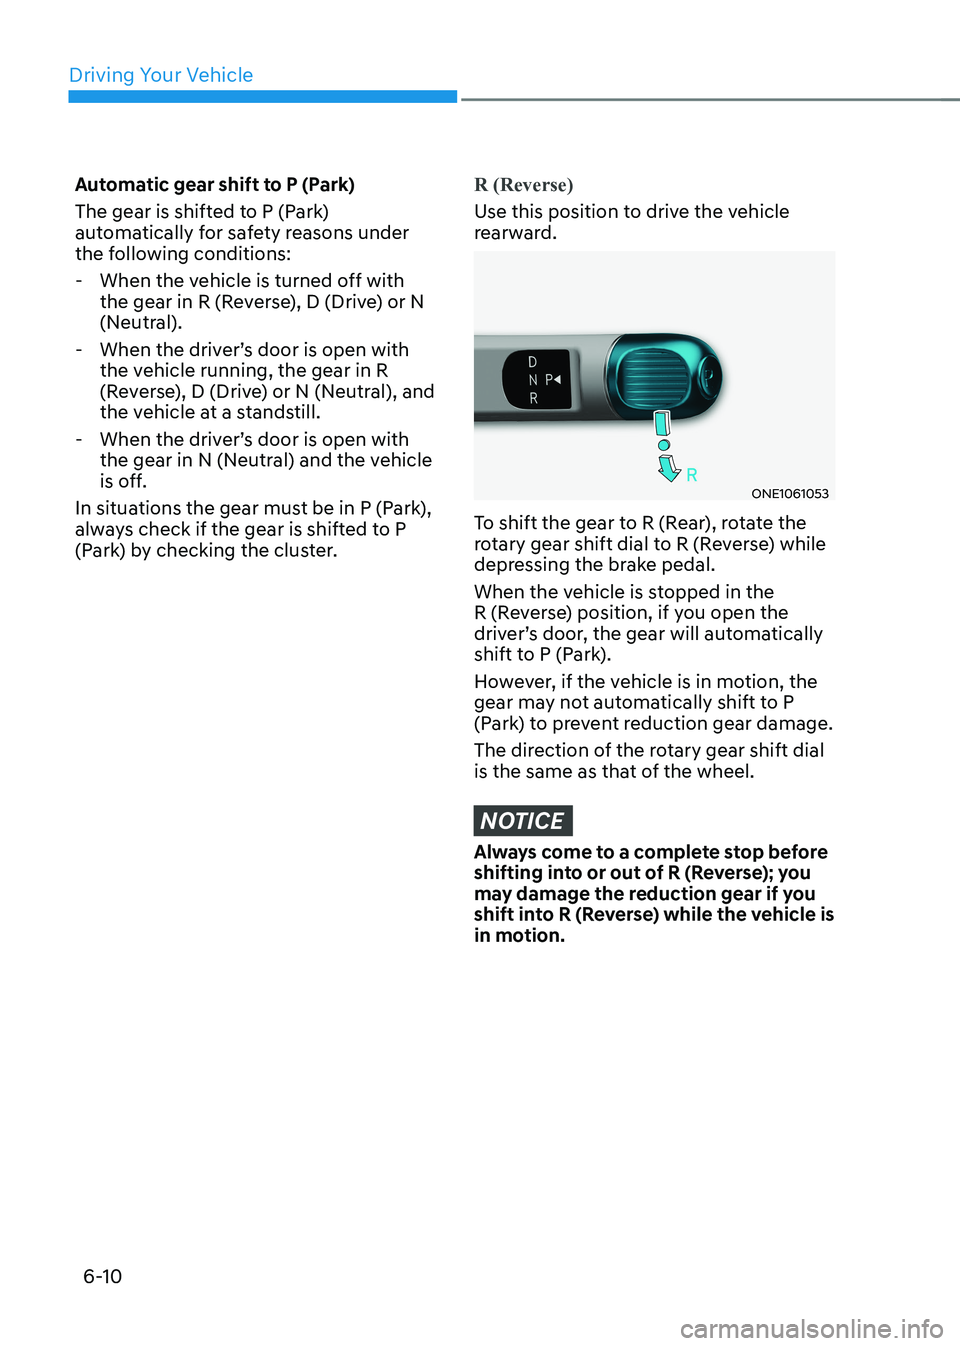
R (Reverse)
Use this position to drive the vehicle
rearward.
ONE1061053
To shift the gear to R (Rear), rotate the
rotary gear shift dial to R (Reverse) while
depressing the brake pedal.
When the vehicle is stopped in the
R (Reverse) position, if you open the
driver’s door, the gear will automatically
shift to P (Park).
However, if the vehicle is in motion, the
gear may not automatically shift to P
(Park) to prevent reduction gear damage.
The direction of the rotary gear shift dial
is the same as that of the wheel.
NOTICE
Always come to a complete stop before
shifting into or out of R (Reverse); you
may damage the reduction gear if you
shift into R (Reverse) while the vehicle is
in motion.
Page 337 of 680
06
6-11
N (Neutral)
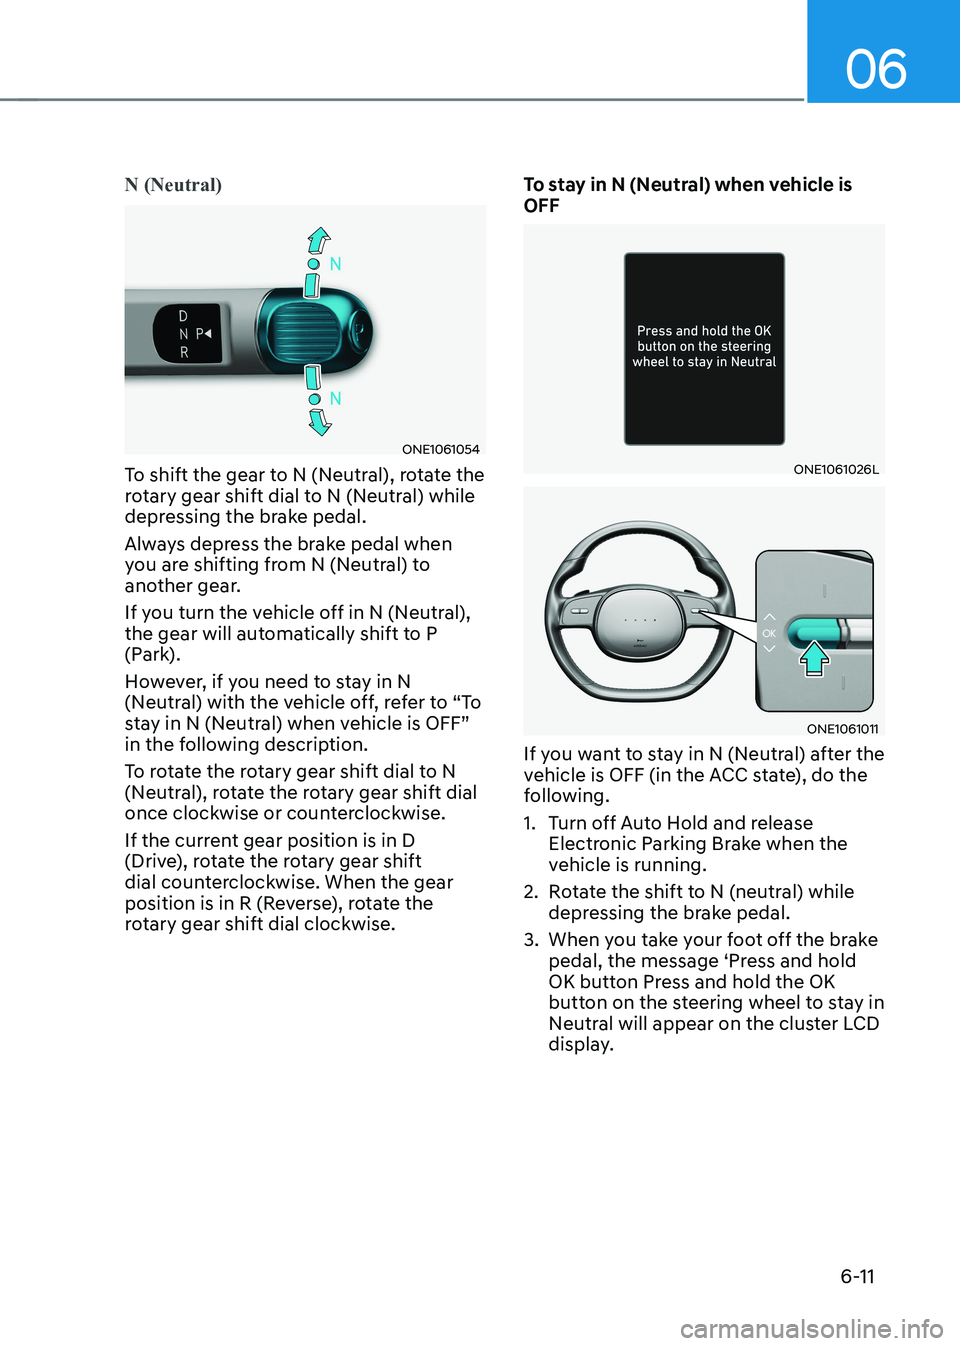
ONE1061054
To shift the gear to N (Neutral), rotate the
rotary gear shift dial to N (Neutral) while
depressing the brake pedal.
Always depress the brake pedal when
you are shifting from N (Neutral) to
another gear.
If you turn the vehicle off in N (Neutral),
the gear will automatically shift to P
(Park).
However, if you need to stay in N
(Neutral) with the vehicle off, refer to “To
stay in N (Neutral) when vehicle is OFF”
in the following description.
To rotate the rotary gear shift dial to N
(Neutral), rotate the rotary gear shift dial
once clockwise or counterclockwise.
If the current gear position is in D
(Drive), rotate the rotary gear shift
dial counterclockwise. When the gear
position is in R (Reverse), rotate the
rotary gear shift dial clockwise. To stay in N (Neutral) when vehicle is OFFONE1061026L
ONE1061011
If you want to stay in N (Neutral) after the
vehicle is OFF (in the ACC state), do the
following.
1. Turn off Auto Hold and release Electronic Parking Brake when the
vehicle is running.
2. Rotate the shift to N (neutral) while depressing the brake pedal.
3. When you take your foot off the brake pedal, the message ‘Press and hold
OK button Press and hold the OK
button on the steering wheel to stay in
Neutral will appear on the cluster LCD
display.
Page 338 of 680
Driving Your Vehicle
6-12
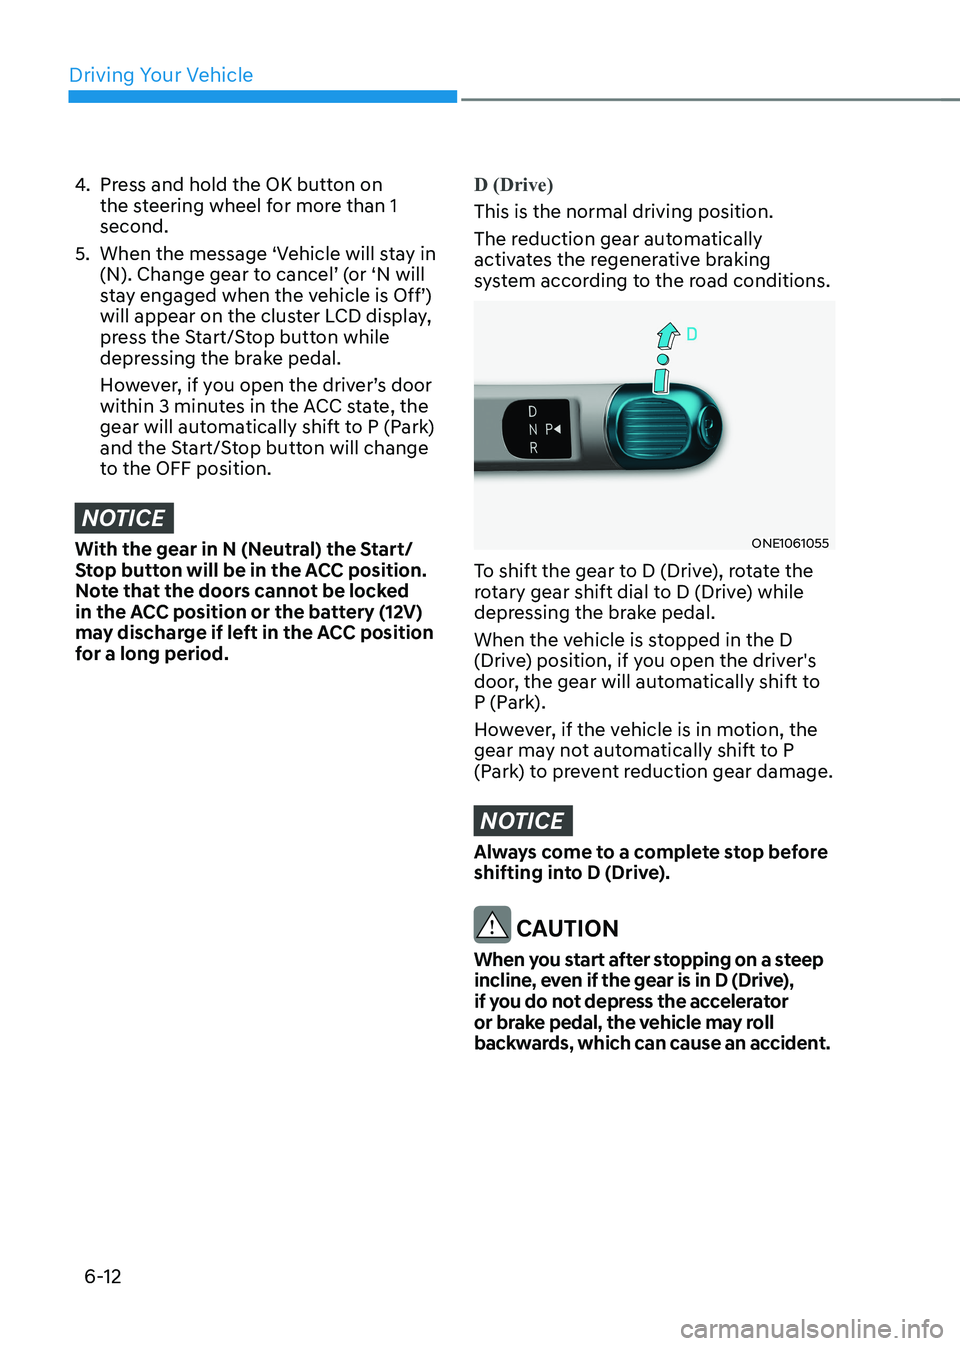
4. Press and hold the OK button on
the steering wheel for more than 1 second.
5. When the message ‘Vehicle will stay in (N). Change gear to cancel’ (or ‘N will
stay engaged when the vehicle is Off’)
will appear on the cluster LCD display,
press the Start/Stop button while
depressing the brake pedal.
However, if you open the driver’s door
within 3 minutes in the ACC state, the
gear will automatically shift to P (Park)
and the Start/Stop button will change
to the OFF position.
NOTICE
With the gear in N (Neutral) the Start/
Stop button will be in the ACC position.
Note that the doors cannot be locked
in the ACC position or the battery (12V)
may discharge if left in the ACC position
for a long period.
D (Drive)
This is the normal driving position.
The reduction gear automatically
activates the regenerative braking
system according to the road conditions.
ONE1061055
To shift the gear to D (Drive), rotate the
rotary gear shift dial to D (Drive) while
depressing the brake pedal.
When the vehicle is stopped in the D
(Drive) position, if you open the driver's
door, the gear will automatically shift to
P (Park).
However, if the vehicle is in motion, the
gear may not automatically shift to P
(Park) to prevent reduction gear damage.
NOTICE
Always come to a complete stop before
shifting into D (Drive).
CAUTION
When you start after stopping on a steep
incline, even if the gear is in D (Drive),
if you do not depress the accelerator
or brake pedal, the vehicle may roll
backwards, which can cause an accident.