charging cable Hyundai Ioniq Electric 2018 User Guide
[x] Cancel search | Manufacturer: HYUNDAI, Model Year: 2018, Model line: Ioniq Electric, Model: Hyundai Ioniq Electric 2018Pages: 541, PDF Size: 19.83 MB
Page 498 of 541
H16
Scheduled Charging
(if equipped)
You can set-up a charging sched-ule for your vehicle using the AVN
or BlueLink application.
Refer to the Multimedia manual or
the BlueLink manual for detailed
information about setting sched-
uled charging.
Scheduled charging can only be done when using a normal charger
or the portable charger (ICCB: In-
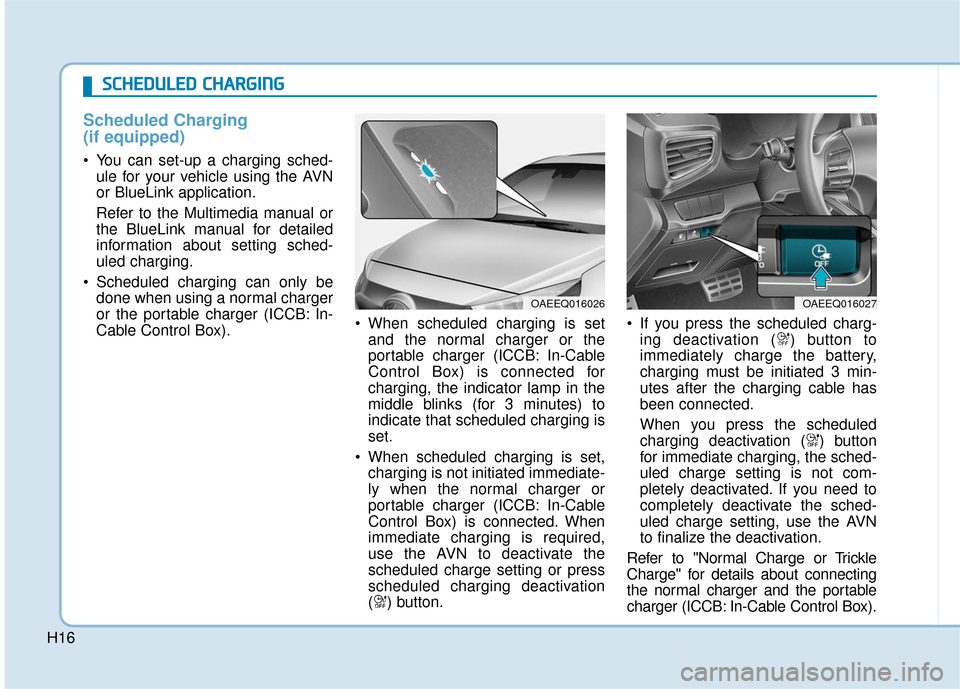
Cable Control Box). When scheduled charging is set
and the normal charger or the
portable charger (ICCB: In-Cable
Control Box) is connected for
charging, the indicator lamp in the
middle blinks (for 3 minutes) to
indicate that scheduled charging is
set.
When scheduled charging is set, charging is not initiated immediate-
ly when the normal charger or
portable charger (ICCB: In-Cable
Control Box) is connected. When
immediate charging is required,
use the AVN to deactivate the
scheduled charge setting or press
scheduled charging deactivation
( ) button. If you press the scheduled charg-
ing deactivation ( ) button to
immediately charge the battery,
charging must be initiated 3 min-
utes after the charging cable has
been connected.
When you press the scheduled
charging deactivation ( ) button
for immediate charging, the sched-
uled charge setting is not com-
pletely deactivated. If you need to
completely deactivate the sched-
uled charge setting, use the AVN
to finalize the deactivation.
Refer to "Normal Charge or Trickle
Charge" for details about connecting
the normal charger and the portable
charger (ICCB: In-Cable Control Box).
OAEEQ016026
S
S C
C H
H E
ED
D U
U L
LE
E D
D
C
C H
H A
AR
RG
G I
IN
N G
G
OAEEQ016027
Page 499 of 541
H17
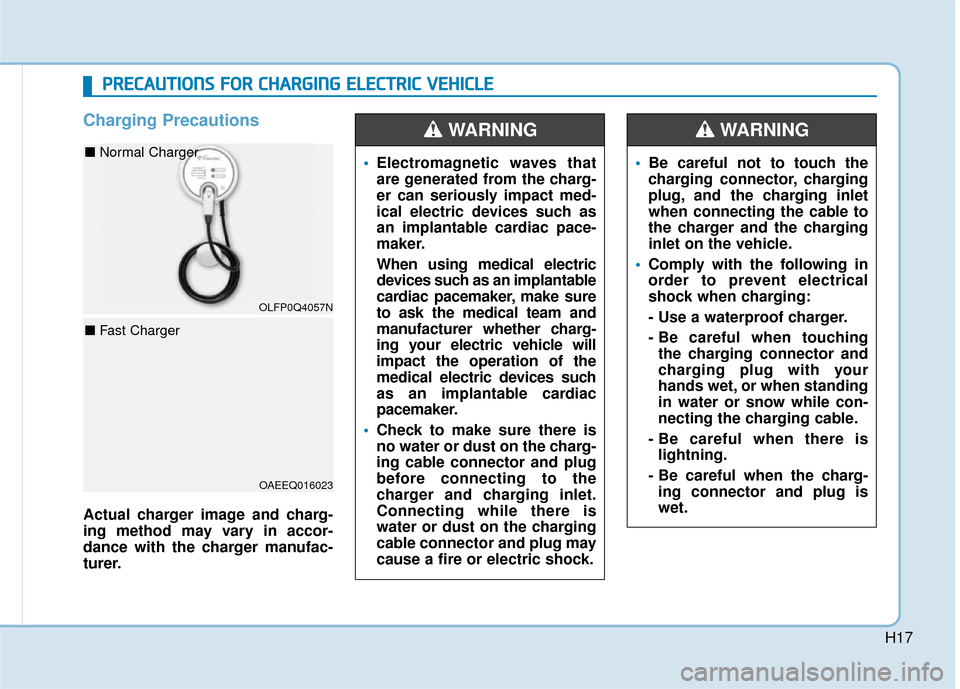
Charging Precautions
Actual charger image and charg-
ing method may vary in accor-
dance with the charger manufac-
turer.
Electromagnetic waves that
are generated from the charg-
er can seriously impact med-
ical electric devices such as
an implantable cardiac pace-
maker.
When using medical electric
devices such as an implantable
cardiac pacemaker, make sure
to ask the medical team and
manufacturer whether charg-
ing your electric vehicle will
impact the operation of the
medical electric devices such
as an implantable cardiac
pacemaker.
Check to make sure there is
no water or dust on the charg-
ing cable connector and plug
before connecting to the
charger and charging inlet.
Connecting while there is
water or dust on the charging
cable connector and plug may
cause a fire or electric shock.
WARNING
Be careful not to touch the
charging connector, charging
plug, and the charging inlet
when connecting the cable to
the charger and the charging
inlet on the vehicle.
Comply with the following in
order to prevent electrical
shock when charging:
- Use a waterproof charger.
- Be careful when touching
the charging connector and
charging plug with your
hands wet, or when standing
in water or snow while con-
necting the charging cable.
- Be careful when there is lightning.
- Be careful when the charg- ing connector and plug is
wet.
WARNING
P PR
R E
EC
CA
A U
U T
TI
IO
O N
NS
S
F
F O
O R
R
C
C H
H A
AR
RG
G I
IN
N G
G
E
E L
LE
E C
CT
T R
R I
IC
C
V
V E
EH
H I
IC
C L
LE
E
OAEEQ016023
■ Fast Charger
OLFP0Q4057N
■ Normal Charger
Page 500 of 541
H18
Immediately stop charging
when you find abnormal
symptoms (odor, smoke).
Replace the charging cable if
the cable coating is damaged
to prevent electrical shock.
When connecting or removing
the charging cable, make sure
to hold the charging connec-
tor handle and charging plug.
If you pull the cable itself
(without using the handle), the
internal wires may disconnect
or get damaged. This may lead
to electric shock or fire.
WARNING
Always keep the charging con-
nector and charging plug in
clean and dry condition. Be
sure to keep the charging
cable in a condition where
there is no water or moisture.
Make sure to use the designat-
ed charger for charging the
electric vehicle. Using any
other charger may cause fail-
ure.
Before charging the battery,
turn the vehicle OFF.
When the vehicle is switched
OFF while charging, the cool-
ing fan inside the motor com-
partment may automatically
operate. Do not touch the cool-
ing fan while charging.
Be careful not to drop the
charging connector. The
charging connector can be
damaged.
CAUTION
P PR
R E
EC
CA
A U
U T
TI
IO
O N
NS
S
F
F O
O R
R
C
C H
H A
AR
RG
G I
IN
N G
G
E
E L
LE
E C
CT
T R
R I
IC
C
V
V E
EH
H I
IC
C L
LE
E
(
( C
C O
O N
NT
T.
.)
)
Page 502 of 541
H20
C
CH
H A
AR
RG
G I
IN
N G
G
E
E L
LE
E C
CT
T R
R I
IC
C
V
V E
EH
H I
IC
C L
LE
E
(
( N
N O
O R
RM
M A
AL
L
C
C H
H A
AR
RG
G E
E)
)
(
( C
C O
O N
NT
T.
.)
)
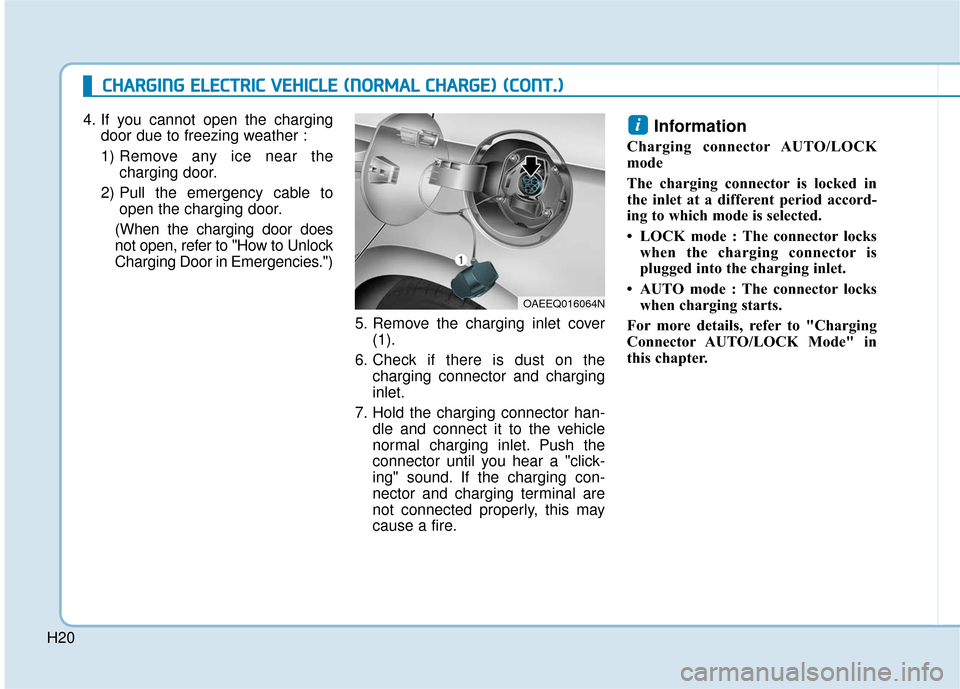
4. If you cannot open the charging
door due to freezing weather :
1) Remove any ice near the charging door.
2) Pull the emergency cable to open the charging door.
(When the charging door does
not open, refer to "How to Unlock
Charging Door in Emergencies.")
5. Remove the charging inlet cover(1).
6. Check if there is dust on the charging connector and charging
inlet.
7. Hold the charging connector han- dle and connect it to the vehicle
normal charging inlet. Push the
connector until you hear a "click-
ing" sound. If the charging con-
nector and charging terminal are
not connected properly, this may
cause a fire.Information
Charging connector AUTO/LOCK
mode
The charging connector is locked in
the inlet at a different period accord-
ing to which mode is selected.
• LOCK mode : The connector lockswhen the charging connector is
plugged into the charging inlet.
• AUTO mode : The connector locks when charging starts.
For more details, refer to "Charging
Connector AUTO/LOCK Mode" in
this chapter.
i
OAEEQ016064N
Page 503 of 541
H21
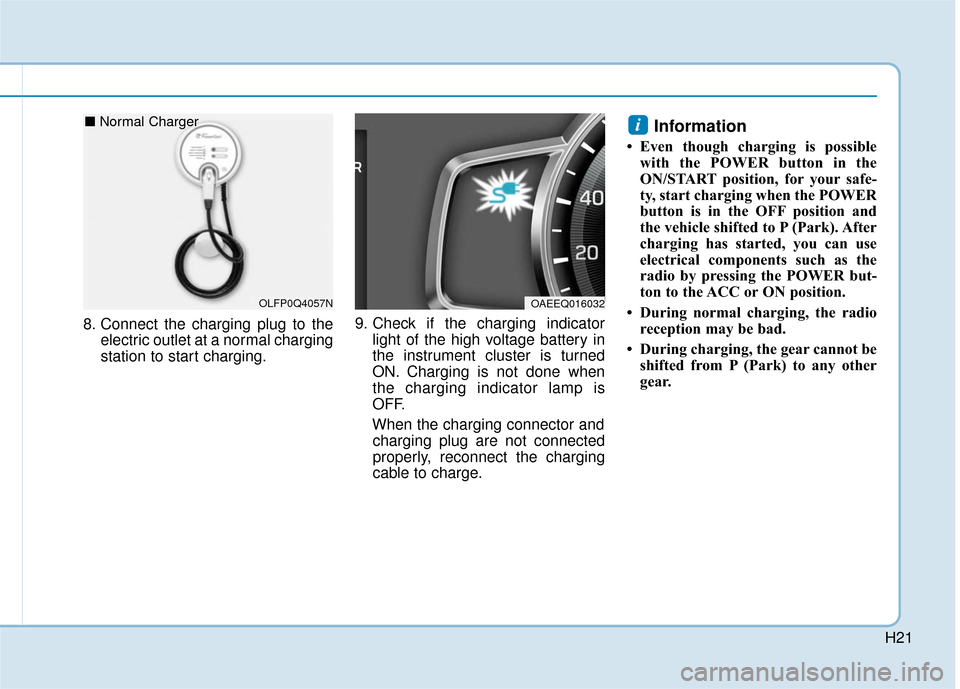
8. Connect the charging plug to theelectric outlet at a normal charging
station to start charging. 9. Check if the charging indicator
light of the high voltage battery in
the instrument cluster is turned
ON. Charging is not done when
the charging indicator lamp is
OFF.
When the charging connector and charging plug are not connected
properly, reconnect the charging
cable to charge.
Information
• Even though charging is possible with the POWER button in the
ON/START position, for your safe-
ty, start charging when the POWER
button is in the OFF position and
the vehicle shifted to P (Park). After
charging has started, you can use
electrical components such as the
radio by pressing the POWER but-
ton to the ACC or ON position.
• During normal charging, the radio reception may be bad.
• During charging, the gear cannot be shifted from P (Park) to any other
gear.
i
OAEEQ016032OLFP0Q4057N
■ Normal Charger
Page 504 of 541
H22
C
CH
H A
AR
RG
G I
IN
N G
G
E
E L
LE
E C
CT
T R
R I
IC
C
V
V E
EH
H I
IC
C L
LE
E
(
( N
N O
O R
RM
M A
AL
L
C
C H
H A
AR
RG
G E
E)
)
(
( C
C O
O N
NT
T.
.)
)
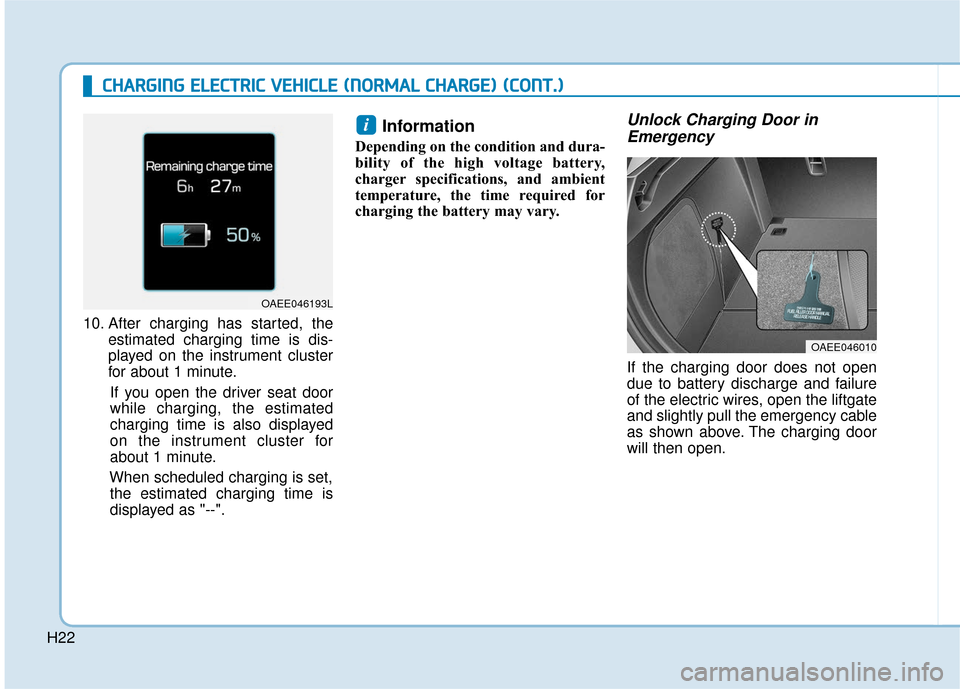
10. After charging has started, the
estimated charging time is dis-
played on the instrument cluster
for about 1 minute.
If you open the driver seat door
while charging, the estimated
charging time is also displayed
on the instrument cluster for
about 1 minute.
When scheduled charging is set, the estimated charging time is
displayed as "--".
Information
Depending on the condition and dura-
bility of the high voltage battery,
charger specifications, and ambient
temperature, the time required for
charging the battery may vary.
Unlock Charging Door in Emergency
If the charging door does not open
due to battery discharge and failure
of the electric wires, open the liftgate
and slightly pull the emergency cable
as shown above. The charging door
will then open.
i
OAEE046010
OAEE046193L
Page 506 of 541
H24
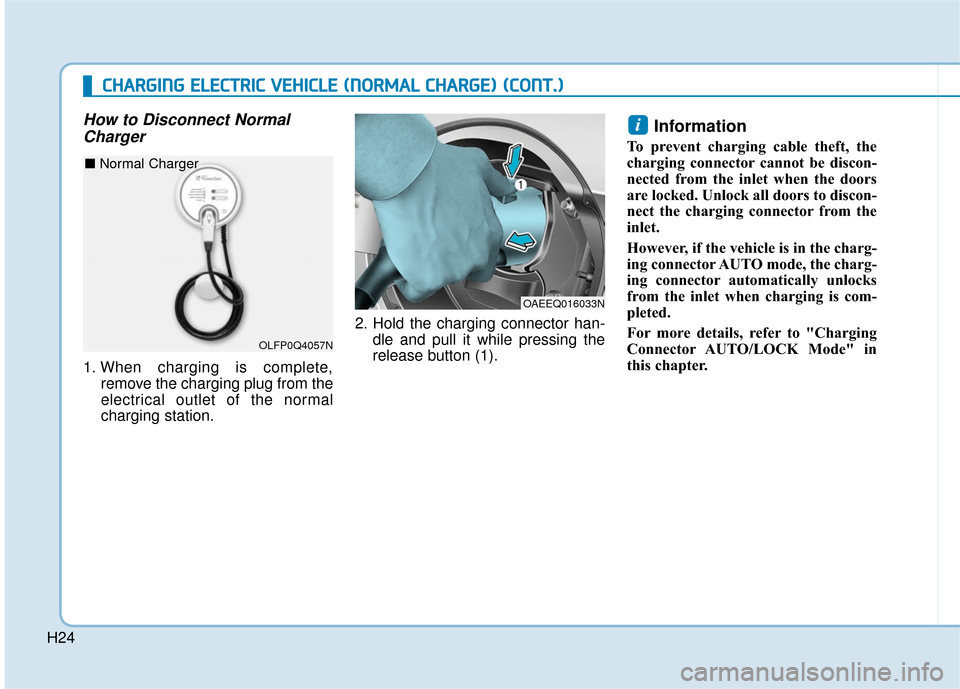
How to Disconnect NormalCharger
1. When charging is complete,
remove the charging plug from the
electrical outlet of the normal
charging station. 2. Hold the charging connector han-
dle and pull it while pressing the
release button (1).
Information
To prevent charging cable theft, the
charging connector cannot be discon-
nected from the inlet when the doors
are locked. Unlock all doors to discon-
nect the charging connector from the
inlet.
However, if the vehicle is in the charg-
ing connector AUTO mode, the charg-
ing connector automatically unlocks
from the inlet when charging is com-
pleted.
For more details, refer to "Charging
Connector AUTO/LOCK Mode" in
this chapter.
i
OAEEQ016033N
C
CH
H A
AR
RG
G I
IN
N G
G
E
E L
LE
E C
CT
T R
R I
IC
C
V
V E
EH
H I
IC
C L
LE
E
(
( N
N O
O R
RM
M A
AL
L
C
C H
H A
AR
RG
G E
E)
)
(
( C
C O
O N
NT
T.
.)
)
OLFP0Q4057N
■ Normal Charger
Page 507 of 541
H25
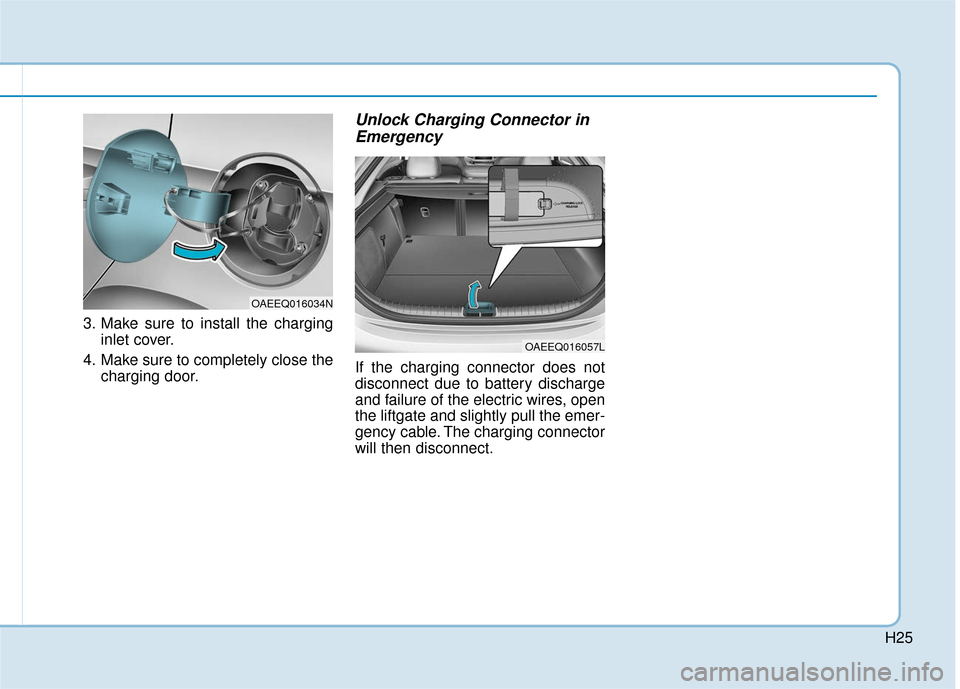
3. Make sure to install the charginginlet cover.
4. Make sure to completely close the charging door.
Unlock Charging Connector inEmergency
If the charging connector does not
disconnect due to battery discharge
and failure of the electric wires, open
the liftgate and slightly pull the emer-
gency cable. The charging connector
will then disconnect.
OAEEQ016034N
OAEEQ016057L
Page 509 of 541
H27
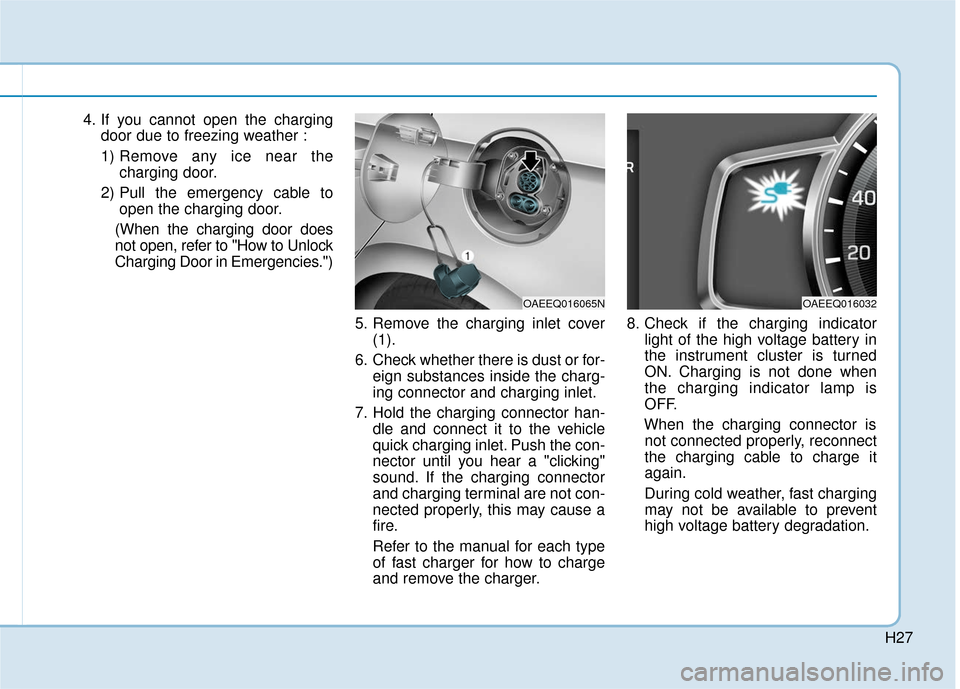
4. If you cannot open the chargingdoor due to freezing weather :
1) Remove any ice near the charging door.
2) Pull the emergency cable to open the charging door.
(When the charging door does
not open, refer to "How to Unlock
Charging Door in Emergencies.")
5. Remove the charging inlet cover(1).
6. Check whether there is dust or for- eign substances inside the charg-
ing connector and charging inlet.
7. Hold the charging connector han- dle and connect it to the vehicle
quick charging inlet. Push the con-
nector until you hear a "clicking"
sound. If the charging connector
and charging terminal are not con-
nected properly, this may cause a
fire.
Refer to the manual for each type
of fast charger for how to charge
and remove the charger. 8. Check if the charging indicator
light of the high voltage battery in
the instrument cluster is turned
ON. Charging is not done when
the charging indicator lamp is
OFF.
When the charging connector is not connected properly, reconnect
the charging cable to charge it
again.
During cold weather, fast charging
may not be available to prevent
high voltage battery degradation.
OAEEQ016065NOAEEQ016032
Page 510 of 541
H28
C
CH
H A
AR
RG
G I
IN
N G
G
E
E L
LE
E C
CT
T R
R I
IC
C
V
V E
EH
H I
IC
C L
LE
E
(
( F
F A
A S
ST
T
C
C H
H A
AR
RG
G E
E)
)
(
( C
C O
O N
NT
T.
.)
)
Information
• Even though charging is possible with the POWER button in the
ON/START position, for your safe-
ty, start charging when the POWER
button is in the OFF position and
the vehicle shifted to P (Park).
After charging has started, you can
use electrical components such as
the radio by pressing the POWER
button to ACC or ON position.
• During charging, the gear cannot be shifted from P (Park) to any other
gear.
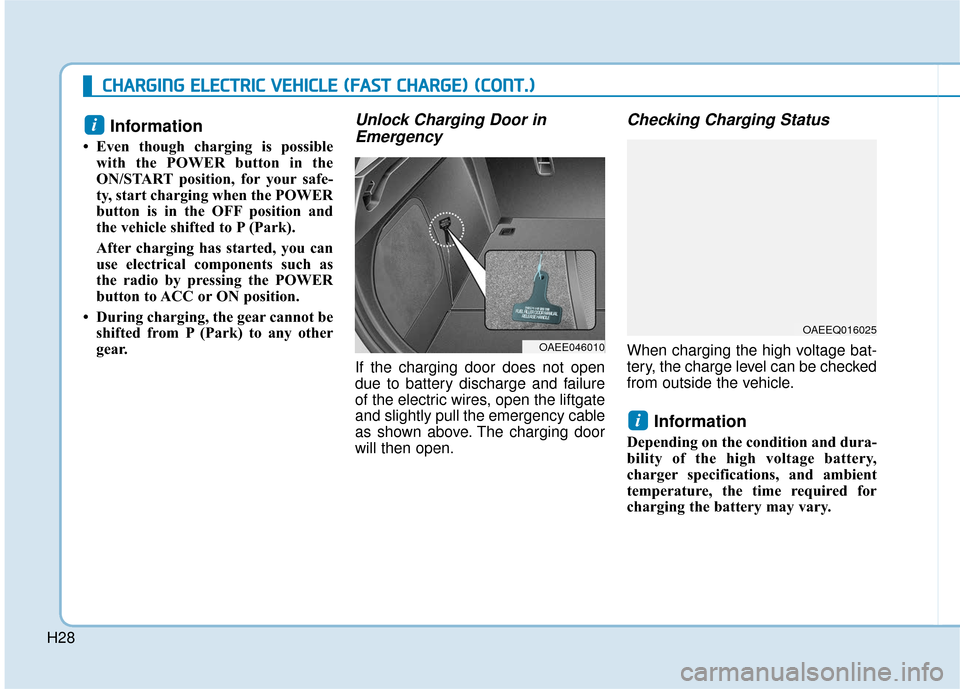
Unlock Charging Door inEmergency
If the charging door does not open
due to battery discharge and failure
of the electric wires, open the liftgate
and slightly pull the emergency cable
as shown above. The charging door
will then open.
Checking Charging Status
When charging the high voltage bat-
tery, the charge level can be checked
from outside the vehicle.
Information
Depending on the condition and dura-
bility of the high voltage battery,
charger specifications, and ambient
temperature, the time required for
charging the battery may vary.
i
i
OAEEQ016025
OAEE046010