instrument panel Hyundai Ioniq Electric 2019 - RHD (UK, Australia) User Guide
[x] Cancel search | Manufacturer: HYUNDAI, Model Year: 2019, Model line: Ioniq Electric, Model: Hyundai Ioniq Electric 2019Pages: 526, PDF Size: 16.63 MB
Page 164 of 526
3-17
Convenient features of your vehicle
3
Tilt steering / Telescope steeringInformation
After adjustment, sometimes the lock-
release lever may not lock the steering
wheel.
It is not a malfunction. This occurs
when two gears are not engaged cor-
rectly. In this case, adjust the steering
wheel again and then lock the steering
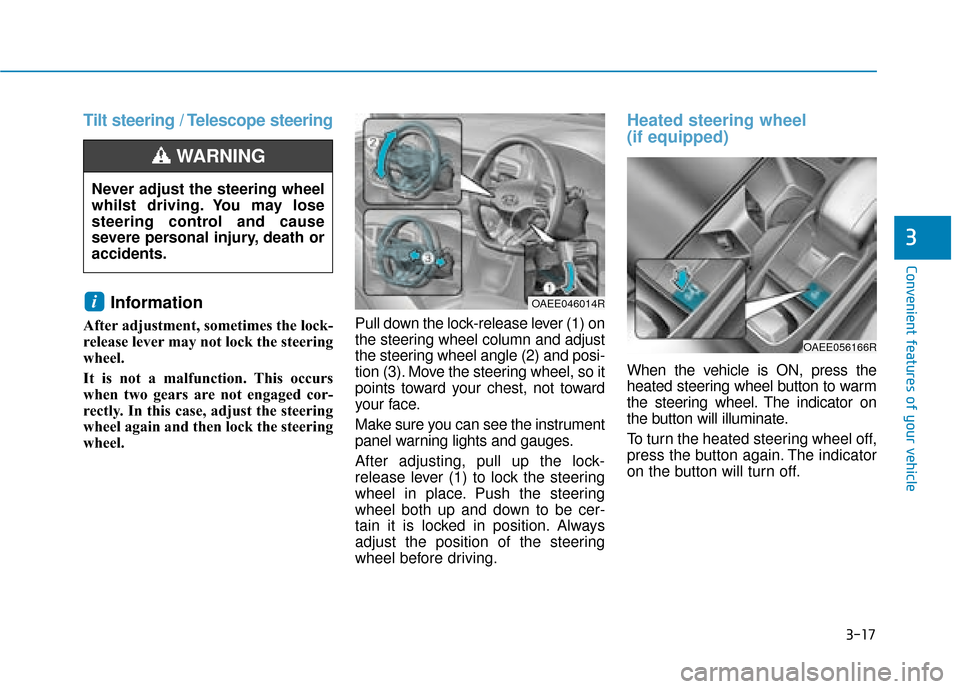
wheel. Pull down the lock-release lever (1) on
the steering wheel column and adjust
the steering wheel angle (2) and posi-
tion (3). Move the steering wheel, so it
points toward your chest, not toward
your face.
Make sure you can see the instrument
panel warning lights and gauges.
After adjusting, pull up the lock-
release lever (1) to lock the steering
wheel in place. Push the steering
wheel both up and down to be cer-
tain it is locked in position. Always
adjust the position of the steering
wheel before driving.
Heated steering wheel
(if equipped)
When the vehicle is ON, press the
heated steering wheel button to warm
the steering wheel. The indicator on
the button will illuminate.
To turn the heated steering wheel off,
press the button again. The indicator
on the button will turn off.
i
Never adjust the steering wheel
whilst driving. You may lose
steering control and cause
severe personal injury, death or
accidents.
WARNING
OAEE056166R
OAEE046014R
Page 183 of 526
3-36
Convenient features of your vehicle
Instrument cluster control
Instrument panel illumination
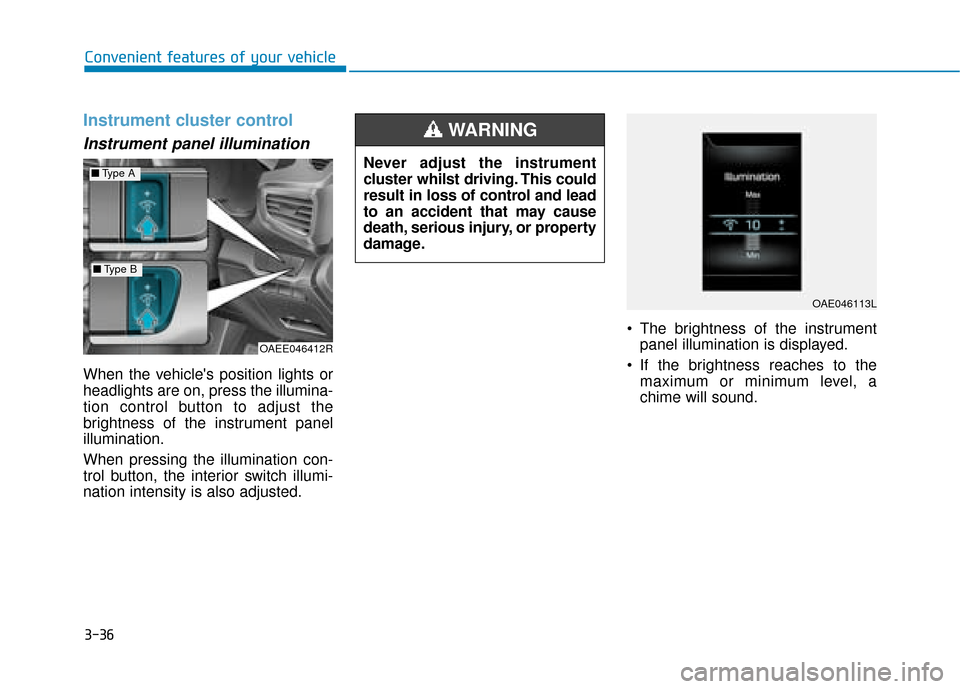
When the vehicle's position lights or
headlights are on, press the illumina-
tion control button to adjust the
brightness of the instrument panel
illumination.
When pressing the illumination con-
trol button, the interior switch illumi-
nation intensity is also adjusted. The brightness of the instrument
panel illumination is displayed.
If the brightness reaches to the maximum or minimum level, a
chime will sound.
Never adjust the instrument
cluster whilst driving. This could
result in loss of control and lead
to an accident that may cause
death, serious injury, or property
damage.
WARNING
OAE046113L
OAEE046412R
■
Type A
■Type B
Page 224 of 526
3-77
Convenient features of your vehicle
3
Exterior lights
Lighting control
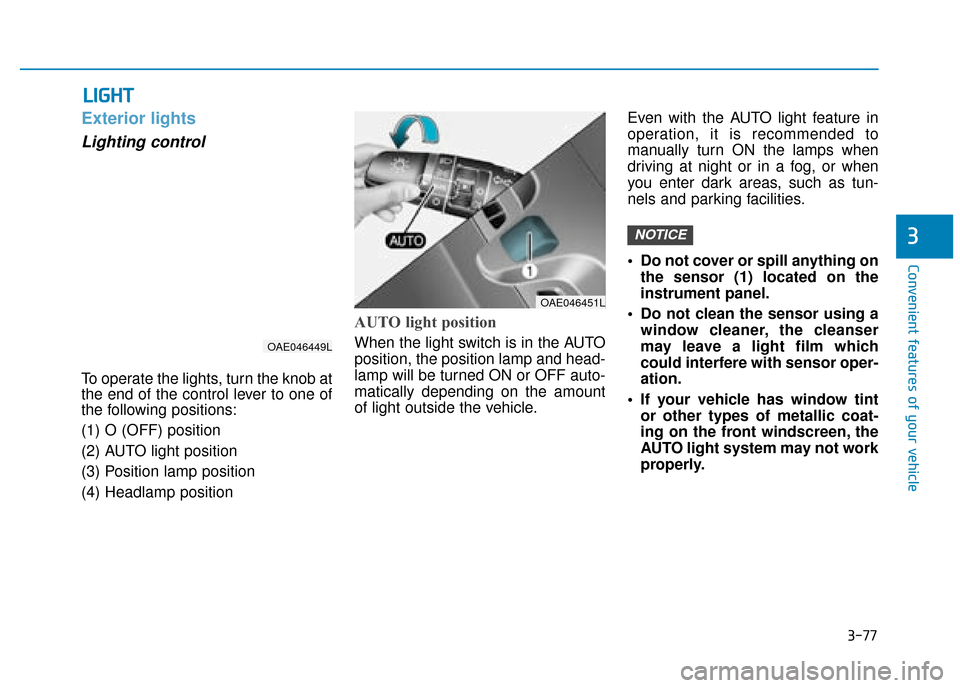
To operate the lights, turn the knob at
the end of the control lever to one of
the following positions:
(1) O (OFF) position
(2) AUTO light position
(3) Position lamp position
(4) Headlamp position
AUTO light position
When the light switch is in the AUTO
position, the position lamp and head-
lamp will be turned ON or OFF auto-
matically depending on the amount
of light outside the vehicle.Even with the AUTO light feature in
operation, it is recommended to
manually turn ON the lamps when
driving at night or in a fog, or when
you enter dark areas, such as tun-
nels and parking facilities.
• Do not cover or spill anything on
the sensor (1) located on the
instrument panel.
Do not clean the sensor using a window cleaner, the cleanser
may leave a light film which
could interfere with sensor oper-
ation.
If your vehicle has window tint or other types of metallic coat-
ing on the front windscreen, the
AUTO light system may not work
properly.
NOTICE
L LI
IG
G H
H T
T
OAE046449L
OAE046451L
Page 225 of 526
3-78
Convenient features of your vehicle
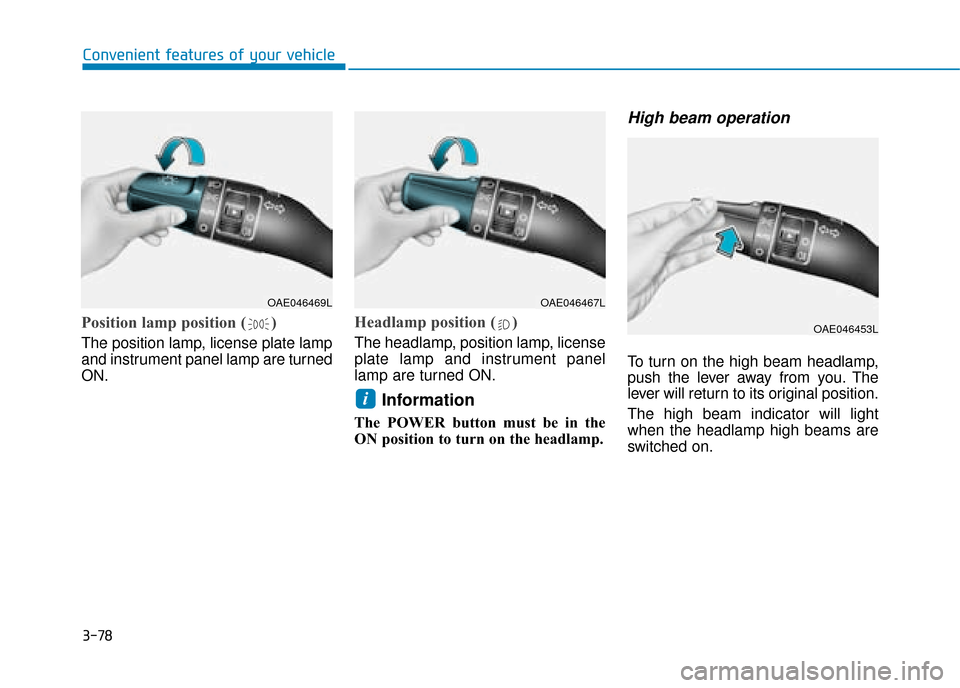
Position lamp position ( )
The position lamp, license plate lamp
and instrument panel lamp are turned
ON.
Headlamp position ( )
The headlamp, position lamp, license
plate lamp and instrument panel
lamp are turned ON.
Information
The POWER button must be in the
ON position to turn on the headlamp.
High beam operation
To turn on the high beam headlamp,
push the lever away from you. The
lever will return to its original position.
The high beam indicator will light
when the headlamp high beams are
switched on.
i
OAE046469LOAE046467L
OAE046453L
Page 244 of 526
3-97
Convenient features of your vehicle
3
D
DE
EF
FR
R O
O S
ST
T E
ER
R
To prevent damage to the conduc-
tors bonded to the inside surface
of the rear window, never use sharp
instruments or window cleaners
containing abrasives to clean the
window.
Information
If you want to defrost and defog the
front windscreen, refer to
“Windscreen Defrosting and
Defogging” in this chapter.
Rear window defroster
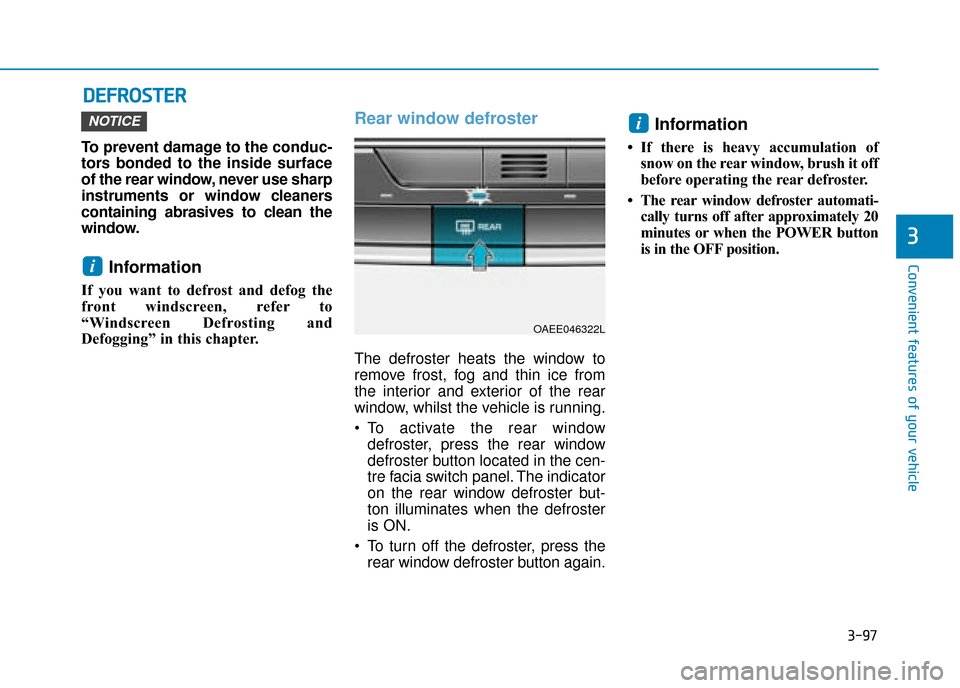
The defroster heats the window to
remove frost, fog and thin ice from
the interior and exterior of the rear
window, whilst the vehicle is running.
To activate the rear window
defroster, press the rear window
defroster button located in the cen-
tre facia switch panel. The indicator
on the rear window defroster but-
ton illuminates when the defroster
is ON.
To turn off the defroster, press the rear window defroster button again.
Information
• If there is heavy accumulation ofsnow on the rear window, brush it off
before operating the rear defroster.
• The rear window defroster automati- cally turns off after approximately 20
minutes or when the POWER button
is in the OFF position.
i
i
NOTICE
OAEE046322L
Page 249 of 526
3-102
Convenient features of your vehicle
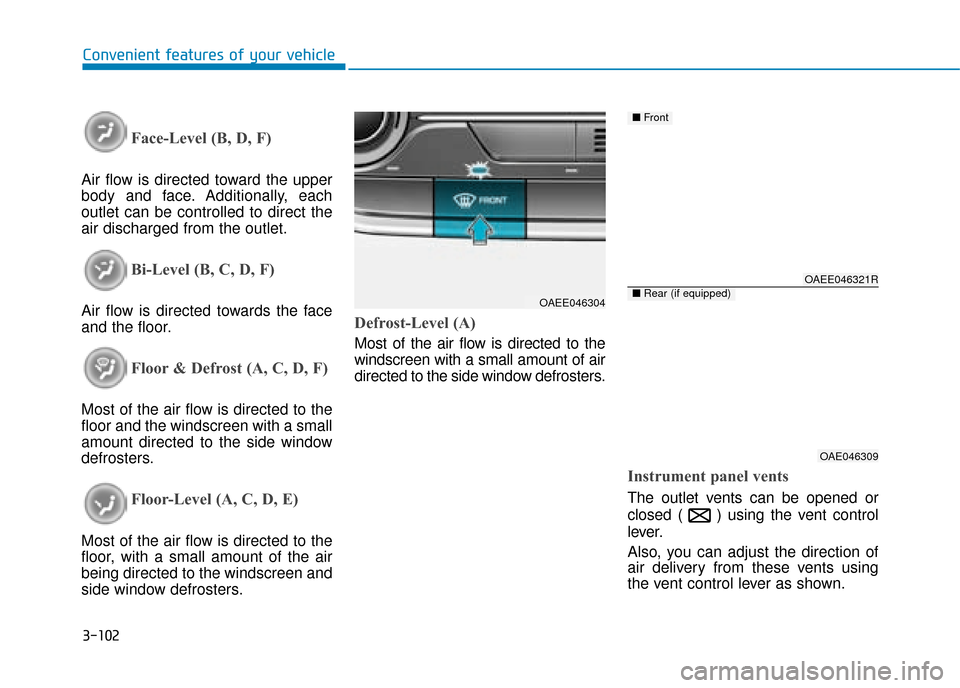
Face-Level (B, D, F)
Air flow is directed toward the upper
body and face. Additionally, each
outlet can be controlled to direct the
air discharged from the outlet.
Bi-Level (B, C, D, F)
Air flow is directed towards the face
and the floor.
Floor & Defrost (A, C, D, F)
Most of the air flow is directed to the
floor and the windscreen with a small
amount directed to the side window
defrosters.
Floor-Level (A, C, D, E)
Most of the air flow is directed to the
floor, with a small amount of the air
being directed to the windscreen and
side window defrosters.
Defrost-Level (A)
Most of the air flow is directed to the
windscreen with a small amount of air
directed to the side window defrosters.
Instrument panel vents
The outlet vents can be opened or
closed ( ) using the vent control
lever.
Also, you can adjust the direction of
air delivery from these vents using
the vent control lever as shown.
OAEE046304
OAEE046321R
OAE046309
■Front
■Rear (if equipped)
Page 319 of 526
5-3
Driving your vehicle
5
Before entering the vehicle
• Be sure all windows, outside mir-ror(s), and outside lights are clean
and unobstructed.
Remove frost, snow, or ice.
Visually check the tyres for uneven wear and damage.
Check under the vehicle for any sign of leaks.
Be sure there are no obstacles behind you if you intend to back up.
Before starting
Make sure the bonnet, the tailgate,and the doors are securely closed
and locked.
Adjust the position of the seat and steering wheel.
Adjust the inside and outside rearview mirrors.
Verify all the lights work.
Fasten your seat belt. Check that all passengers have fastened their
seat belts.
Check the gauges and indicators in the instrument panel and the mes-
sages on the instrument display
when the POWER button is in the
ON position.
Check that any items you are car- rying are stored properly or fas-
tened down securely.
B BE
EF
FO
O R
RE
E
D
D R
RI
IV
V I
IN
N G
G
To reduce the risk of SERIOUS
INJURY or DEATH, take the fol-
lowing precautions:
•ALWAYS wear your seat belt.
All passengers must be prop-
erly belted whenever the vehi-
cle is moving. For more infor-
mation, refer to "Seat Belts" in
chapter 2.
Always drive defensively.
Assume other drivers or pedes-
trians may be careless and
make mistakes.
Stay focused on the task of
driving. Driver distraction can
cause accidents.
Leave plenty of space between
you and the vehicle in front of
you.
WARNING
Page 377 of 526

5-61
Driving your vehicle
5
LKA operation
To activate/deactivate the LKA sys-
tem:
With the ignition switch in the ON
position, press the LKA system but-
ton located on the instrument panel
on the right hand side of the steering
wheel.
■Type A
OAEE056014R■Type B
OAEE056144R
(Continued)
The system detects lane
markers and controls the
steering wheel by a camera,
therefore, if the lane markers
are hard to detect, the system
may not work properly.
Please refer to "Limitations of
the system".
Do not remove or damage the
related parts of LKA system.
You may not hear a warning
sound of LKA system
because of excessive audio
sound.
Do not place objects on the
dashboard that reflects light
such as mirrors, white paper,
etc. The system may malfunc-
tion if the sunlight is reflected.
(Continued)
(Continued)
Always have your hands on
the steering wheel whilst the
LKA system is activated. If
you continue to drive with
your hands off the steering
wheel after the "Keep hands
on steering wheel" warning
message appears, the system
will stop controlling the steer-
ing wheel.
The steering wheel is not con-
tinuously controlled so if the
vehicle speed is at a higher
rate when leaving a lane the
vehicle may not be controlled
by the system. The driver
must always follow the speed
limit when using the system.
If you attach objects to the
steering wheel, the system
may not assist steering or the
hands off alarm may not work
properly.
Whilst other beeps such as
the seat belt warning sound
are in operation and override
the LKA alarming system,
LKA beeps may not occur
Page 450 of 526
Tyres and wheels .................................................7-23
Tyre care ........................................................................\
...7-23
Recommended cold tyre inflation pressures ...........7-24
Check tyre inflation pressure ......................................7-25
Tyre rotation ....................................................................7-26\
Wheel alignment and tyre balance.............................7-27
Tyre replacement ............................................................7-27
Wheel replacement .........................................................7-28
Tyre traction .....................................................................7-2\
8
Tyre maintenance ...........................................................7-28
Tyre sidewall labeling ................................................... 7-28
Low aspect ratio tyres...................................................7-32
Fuses ......................................................................7-\
34
Instrument panel fuse replacement ...........................7-35
Motor compartment panel fuse replacement ..........7-36
Fuse/relay panel description .......................................7-37
Light bulbs.............................................................7-49
Headlamp, position lamp, turn signal lamp
bulb replacement .............................................................7-50
Headlamp aiming .............................................................7-54
Daytime running lamp ....................................................7-57
Side repeater lamp replacement .................................7-57
Rear combination lamp bulb replacement ................7-57
Rear fog lamp ..................................................................7-60
High mounted stop lamp ...............................................7-60
License plate light bulb replacement .........................7-60
Interior light bulb replacement ....................................7-60
Appearance care ..................................................7-62
Exterior care ....................................................................7-62\
Interior care......................................................................7-\
67
Page 483 of 526
7-35
7
Maintenance
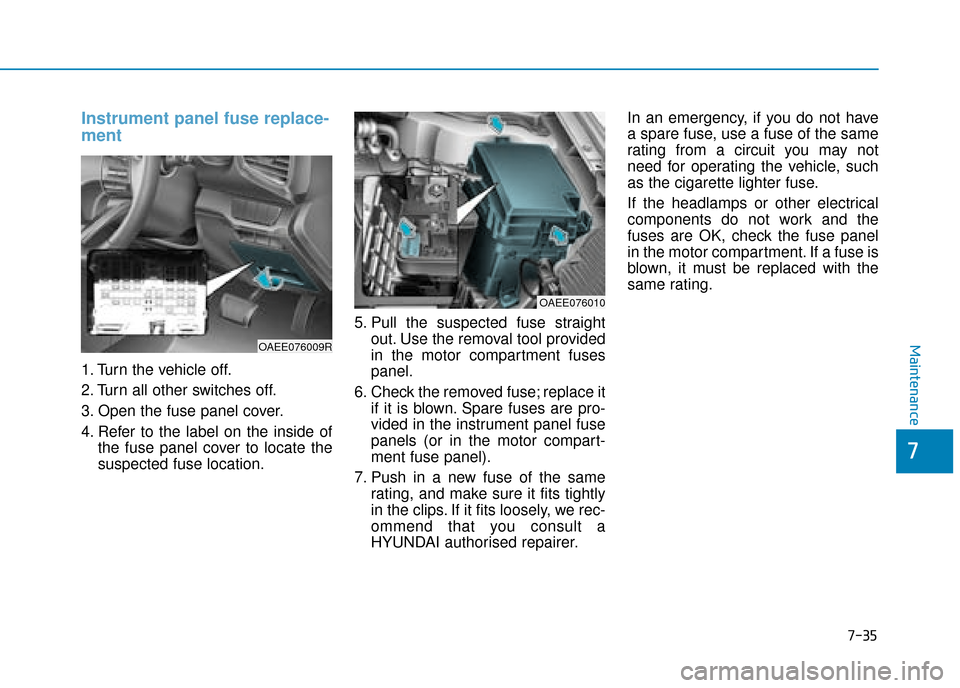
Instrument panel fuse replace-
ment
1. Turn the vehicle off.
2. Turn all other switches off.
3. Open the fuse panel cover.
4. Refer to the label on the inside ofthe fuse panel cover to locate the
suspected fuse location. 5. Pull the suspected fuse straight
out. Use the removal tool provided
in the motor compartment fuses
panel.
6. Check the removed fuse; replace it if it is blown. Spare fuses are pro-
vided in the instrument panel fuse
panels (or in the motor compart-
ment fuse panel).
7. Push in a new fuse of the same rating, and make sure it fits tightly
in the clips. If it fits loosely, we rec-
ommend that you consult a
HYUNDAI authorised repairer. In an emergency, if you do not have
a spare fuse, use a fuse of the same
rating from a circuit you may not
need for operating the vehicle, such
as the cigarette lighter fuse.
If the headlamps or other electrical
components do not work and the
fuses are OK, check the fuse panel
in the motor compartment. If a fuse is
blown, it must be replaced with the
same rating.
OAEE076009R
OAEE076010