Hyundai Ioniq Electric 2019 Owner's Manual - RHD (UK, Australia)
Manufacturer: HYUNDAI, Model Year: 2019, Model line: Ioniq Electric, Model: Hyundai Ioniq Electric 2019Pages: 526, PDF Size: 16.63 MB
Page 481 of 526
7-33
Maintenance
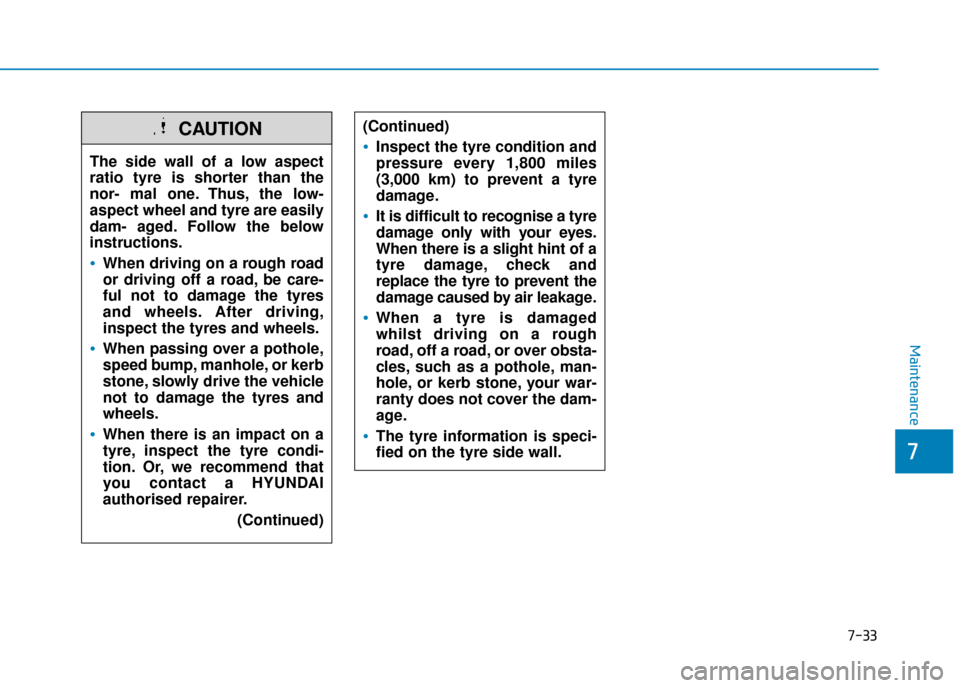
The side wall of a low aspect
ratio tyre is shorter than the
nor- mal one. Thus, the low-
aspect wheel and tyre are easily
dam- aged. Follow the below
instructions.
When driving on a rough road
or driving off a road, be care-
ful not to damage the tyres
and wheels. After driving,
inspect the tyres and wheels.
When passing over a pothole,
speed bump, manhole, or kerb
stone, slowly drive the vehicle
not to damage the tyres and
wheels.
When there is an impact on a
tyre, inspect the tyre condi-
tion. Or, we recommend that
you contact a HYUNDAI
authorised repairer.(Continued)
CAUTION(Continued)
Inspect the tyre condition and
pressure every 1,800 miles
(3,000 km) to prevent a tyre
damage.
It is difficult to recognise a tyre
damage only with your eyes.
When there is a slight hint of a
tyre damage, check and
replace the tyre to prevent the
damage caused by air leakage.
When a tyre is damaged
whilst driving on a rough
road, off a road, or over obsta-
cles, such as a pothole, man-
hole, or kerb stone, your war-
ranty does not cover the dam-
age.
The tyre information is speci-
fied on the tyre side wall.
7
Page 482 of 526
7-34
Maintenance
F
FU
U S
SE
E S
S
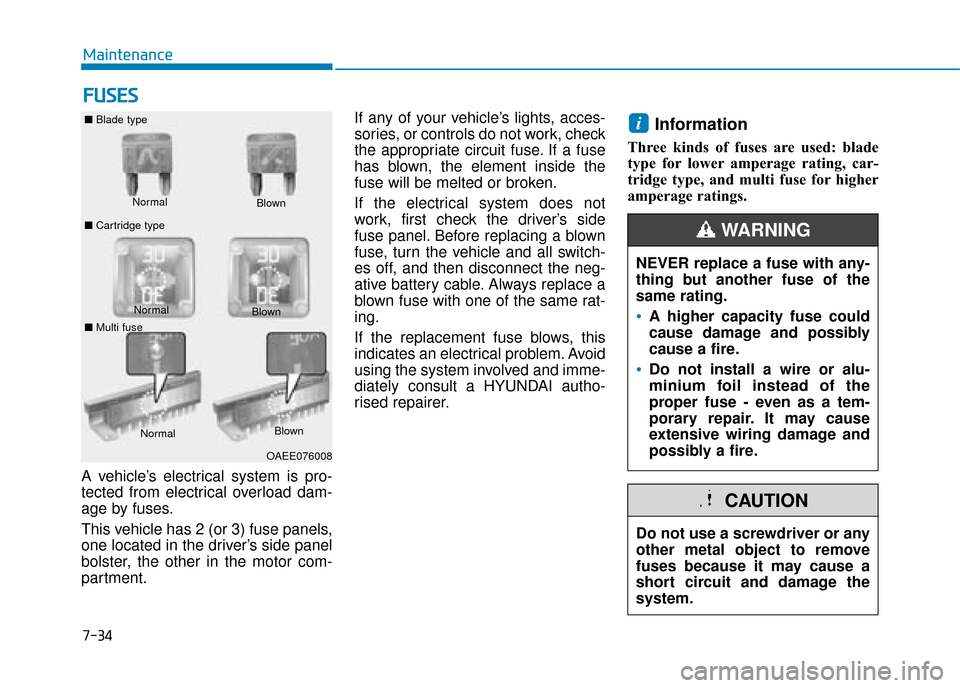
A vehicle’s electrical system is pro-
tected from electrical overload dam-
age by fuses.
This vehicle has 2 (or 3) fuse panels,
one located in the driver’s side panel
bolster, the other in the motor com-
partment. If any of your vehicle’s lights, acces-
sories, or controls do not work, check
the appropriate circuit fuse. If a fuse
has blown, the element inside the
fuse will be melted or broken.
If the electrical system does not
work, first check the driver’s side
fuse panel. Before replacing a blown
fuse, turn the vehicle and all switch-
es off, and then disconnect the neg-
ative battery cable. Always replace a
blown fuse with one of the same rat-
ing.
If the replacement fuse blows, this
indicates an electrical problem. Avoid
using the system involved and imme-
diately consult a HYUNDAI autho-
rised repairer.
Information
Three kinds of fuses are used: blade
type for lower amperage rating, car-
tridge type, and multi fuse for higher
amperage ratings.
i
Normal
■
Blade type
■ Cartridge type Blown
Normal Blown
OAEE076008
Do not use a screwdriver or any
other metal object to remove
fuses because it may cause a
short circuit and damage the
system.
CAUTION
NEVER replace a fuse with any-
thing but another fuse of the
same rating.
A higher capacity fuse could
cause damage and possibly
cause a fire.
Do not install a wire or alu-
minium foil instead of the
proper fuse - even as a tem-
porary repair. It may cause
extensive wiring damage and
possibly a fire.
WARNING
Normal Blown
■ Multi fuse
Page 483 of 526
7-35
7
Maintenance
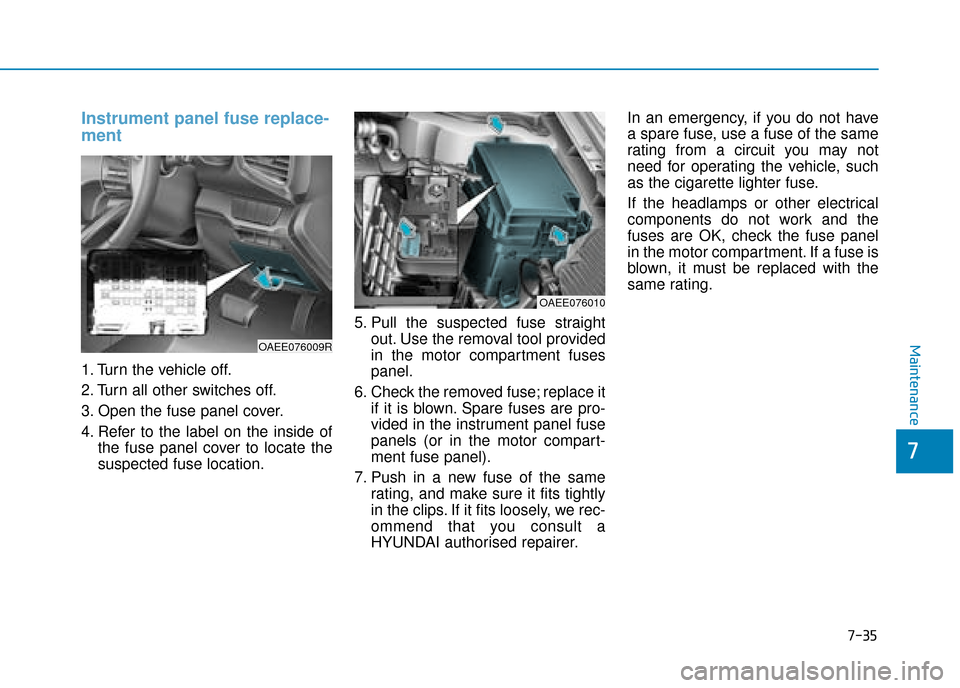
Instrument panel fuse replace-
ment
1. Turn the vehicle off.
2. Turn all other switches off.
3. Open the fuse panel cover.
4. Refer to the label on the inside ofthe fuse panel cover to locate the
suspected fuse location. 5. Pull the suspected fuse straight
out. Use the removal tool provided
in the motor compartment fuses
panel.
6. Check the removed fuse; replace it if it is blown. Spare fuses are pro-
vided in the instrument panel fuse
panels (or in the motor compart-
ment fuse panel).
7. Push in a new fuse of the same rating, and make sure it fits tightly
in the clips. If it fits loosely, we rec-
ommend that you consult a
HYUNDAI authorised repairer. In an emergency, if you do not have
a spare fuse, use a fuse of the same
rating from a circuit you may not
need for operating the vehicle, such
as the cigarette lighter fuse.
If the headlamps or other electrical
components do not work and the
fuses are OK, check the fuse panel
in the motor compartment. If a fuse is
blown, it must be replaced with the
same rating.
OAEE076009R
OAEE076010
Page 484 of 526
7-36
Maintenance
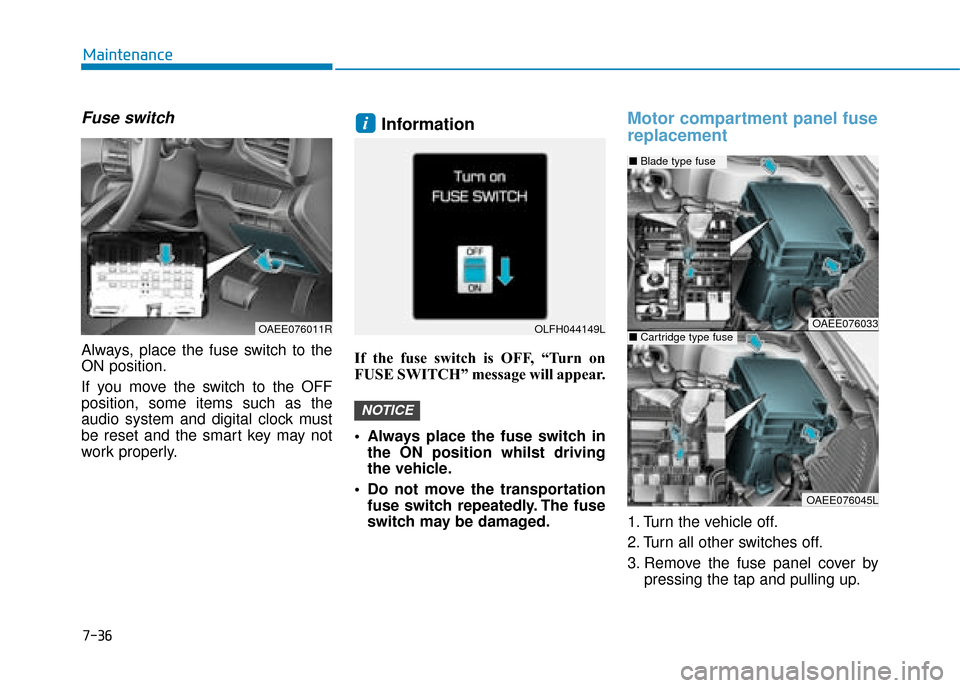
Fuse switch
Always, place the fuse switch to the
ON position.
If you move the switch to the OFF
position, some items such as the
audio system and digital clock must
be reset and the smart key may not
work properly.
Information
If the fuse switch is OFF, “Turn on
FUSE SWITCH” message will appear.
Always place the fuse switch inthe ON position whilst driving
the vehicle.
Do not move the transportation fuse switch repeatedly. The fuse
switch may be damaged.
Motor compartment panel fuse
replacement
1. Turn the vehicle off.
2. Turn all other switches off.
3. Remove the fuse panel cover by pressing the tap and pulling up.
NOTICE
i
OAEE076033
OAEE076045L
■Blade type fuse
■Cartridge type fuseOAEE076011ROLFH044149L
Page 485 of 526
7-37
7
Maintenance
4. Check the removed fuse; replace itif it is blown. To remove or insert
the fuse, use the fuse puller in the
motor compartment fuse panel.
5. Push in a new fuse of the same rating, and make sure it fits tightly
in the clips. If it fits loosely, consult
a HYUNDAI authorised repairer.
After checking the fuse panel in
the motor compartment, securely
install the fuse panel cover. You
may hear a clicking sound if the
cover is securely latched. If it is
not securely latched, electrical
failure may occur from water con-
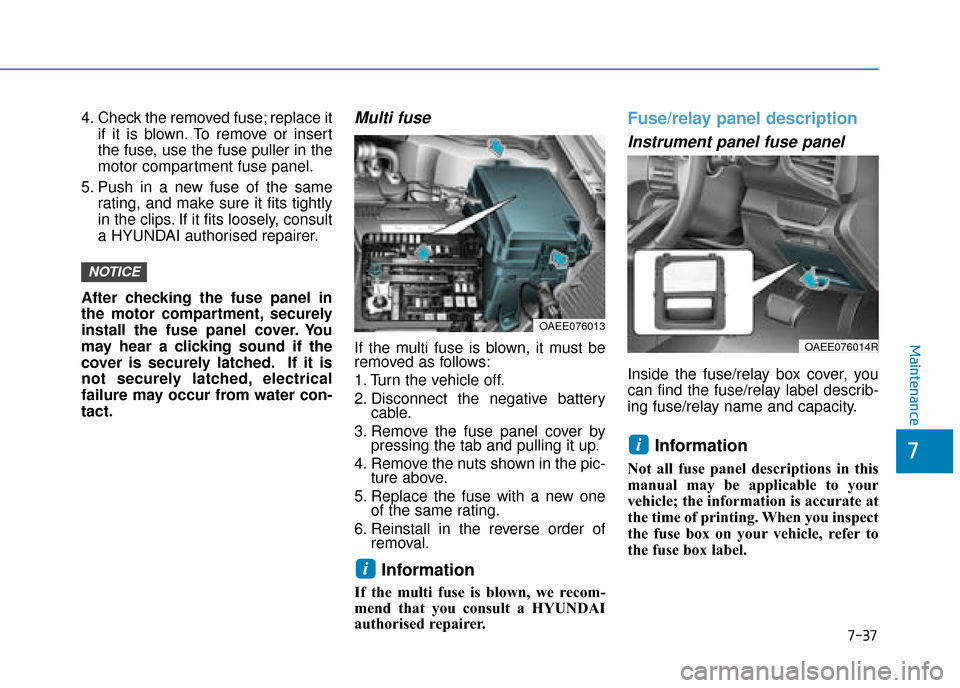
tact.Multi fuse
If the multi fuse is blown, it must be
removed as follows:
1. Turn the vehicle off.
2. Disconnect the negative battery cable.
3. Remove the fuse panel cover by pressing the tab and pulling it up.
4. Remove the nuts shown in the pic- ture above.
5. Replace the fuse with a new one of the same rating.
6. Reinstall in the reverse order of removal.
Information
If the multi fuse is blown, we recom-
mend that you consult a HYUNDAI
authorised repairer.
Fuse/relay panel description
Instrument panel fuse panel
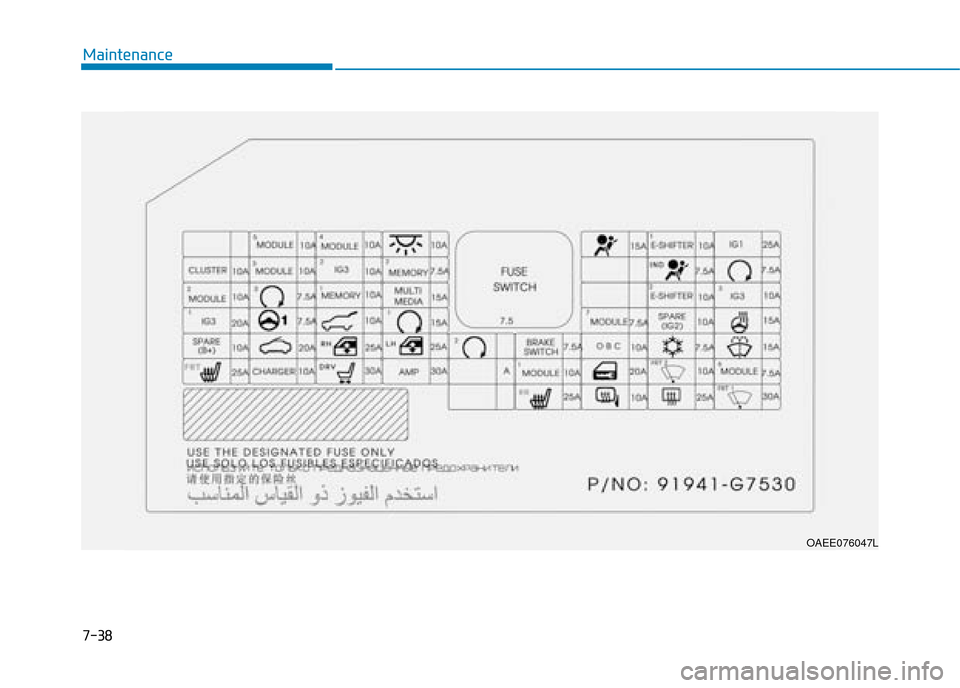
Inside the fuse/relay box cover, you
can find the fuse/relay label describ-
ing fuse/relay name and capacity.
Information
Not all fuse panel descriptions in this
manual may be applicable to your
vehicle; the information is accurate at
the time of printing. When you inspect
the fuse box on your vehicle, refer to
the fuse box label.
i
i
NOTICE
OAEE076013
OAEE076014R
Page 486 of 526
7-38
Maintenance
OAEE076047L
Page 487 of 526
7-39
7
Maintenance
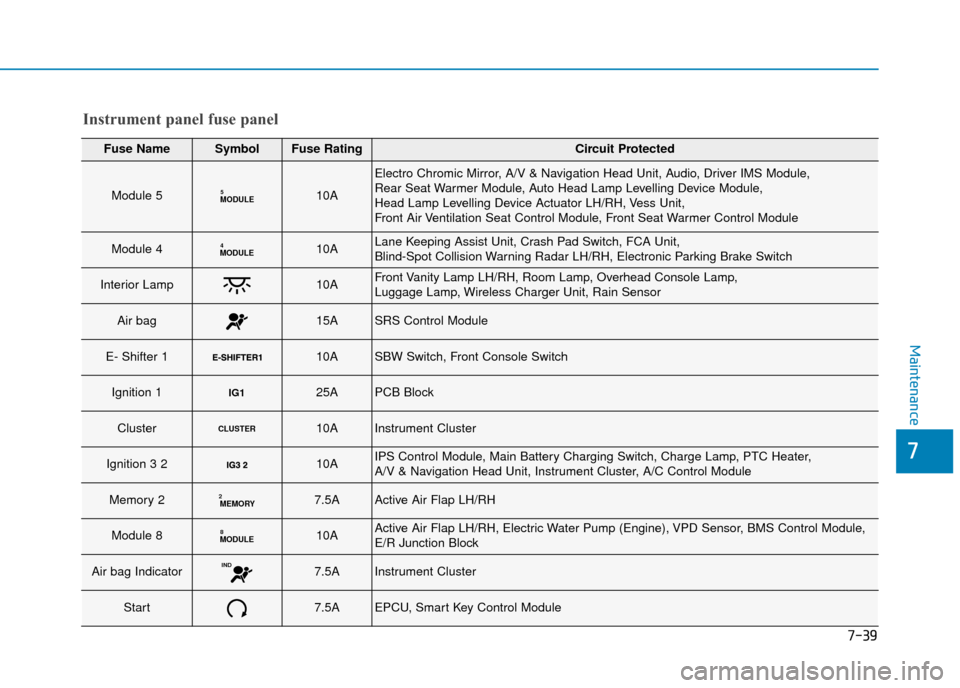
Instrument panel fuse panel
Fuse NameSymbolFuse RatingCircuit Protected
Module 5MODULE510A
Electro Chromic Mirror, A/V & Navigation Head Unit, Audio, Driver IMS Module,
Rear Seat Warmer Module, Auto Head Lamp Levelling Device Module,
Head Lamp Levelling Device Actuator LH/RH, Vess Unit,
Front Air Ventilation Seat Control Module, Front Seat Warmer Control Module
Module 4MODULE410ALane Keeping Assist Unit, Crash Pad Switch, FCA Unit,
Blind-Spot Collision Warning Radar LH/RH, Electronic Parking Brake Switch
Interior Lamp10AFront Vanity Lamp LH/RH, Room Lamp, Overhead Console Lamp,
Luggage Lamp, Wireless Charger Unit, Rain Sensor
Air bag15ASRS Control Module
E- Shifter 1 10ASBW Switch, Front Console Switch
Ignition 1IG125APCB Block
ClusterCLUSTER10AInstrument Cluster
Ignition 3 2 10AIPS Control Module, Main Battery Charging Switch, Charge Lamp, PTC Heater,
A/V & Navigation Head Unit, Instrument Cluster, A/C Control Module
Memory 2MEMORY27.5AActive Air Flap LH/RH
Module 8MODULE810AActive Air Flap LH/RH, Electric Water Pump (Engine), VPD Sensor, BMS Control Module,
E/R Junction Block
Air bag IndicatorIND7.5AInstrument Cluster
Start7.5AEPCU, Smart Key Control Module
Page 488 of 526
7-40
Maintenance
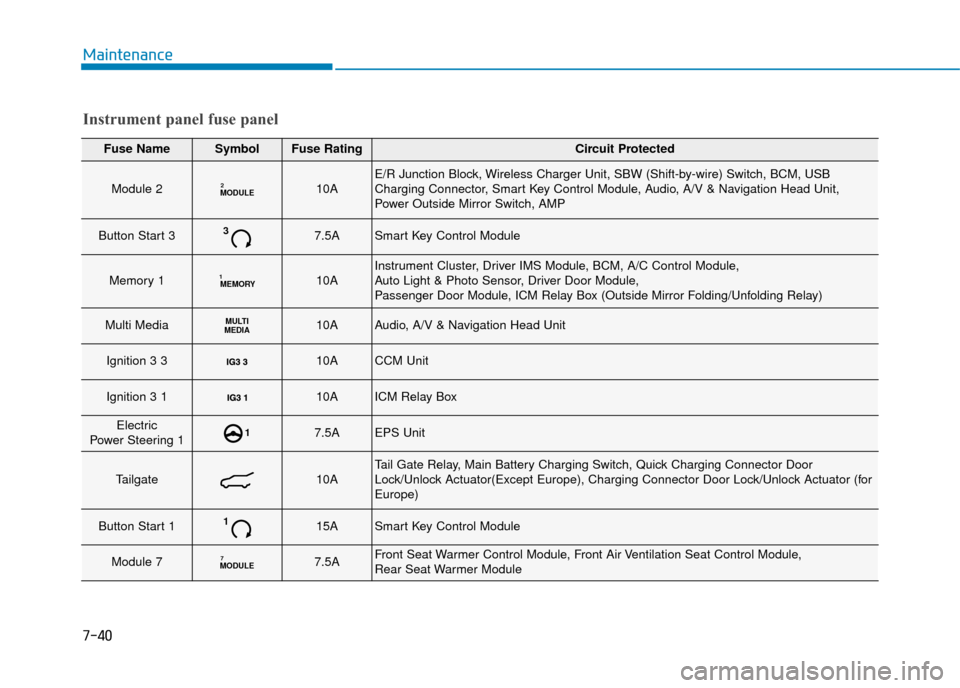
Fuse NameSymbolFuse RatingCircuit Protected
Module 2MODULE210AE/R Junction Block, Wireless Charger Unit, SBW (Shift-by-wire) Switch, BCM, USB
Charging Connector, Smart Key Control Module, Audio, A/V & Navigation Head Unit,
Power Outside Mirror Switch, AMP
Button Start 337.5ASmart Key Control Module
Memory 1MEMORY110AInstrument Cluster, Driver IMS Module, BCM, A/C Control Module,
Auto Light & Photo Sensor, Driver Door Module,
Passenger Door Module, ICM Relay Box (Outside Mirror Folding/Unfolding Relay)
Multi MediaMULTI
MEDIA10AAudio, A/V & Navigation Head Unit
Ignition 3 3 10ACCM Unit
Ignition 3 1 10AICM Relay Box
Electric
Power Steering 117.5AEPS Unit
Tailgate10ATail Gate Relay, Main Battery Charging Switch, Quick Charging Connector Door
Lock/Unlock Actuator(Except Europe), Charging Connector Door Lock/Unlock Actuator (for
Europe)
Button Start 1115ASmart Key Control Module
Module 7MODULE77.5AFront Seat Warmer Control Module, Front Air Ventilation Seat Control Module,
Rear Seat Warmer Module
Instrument panel fuse panel
Page 489 of 526
7-41
7
Maintenance
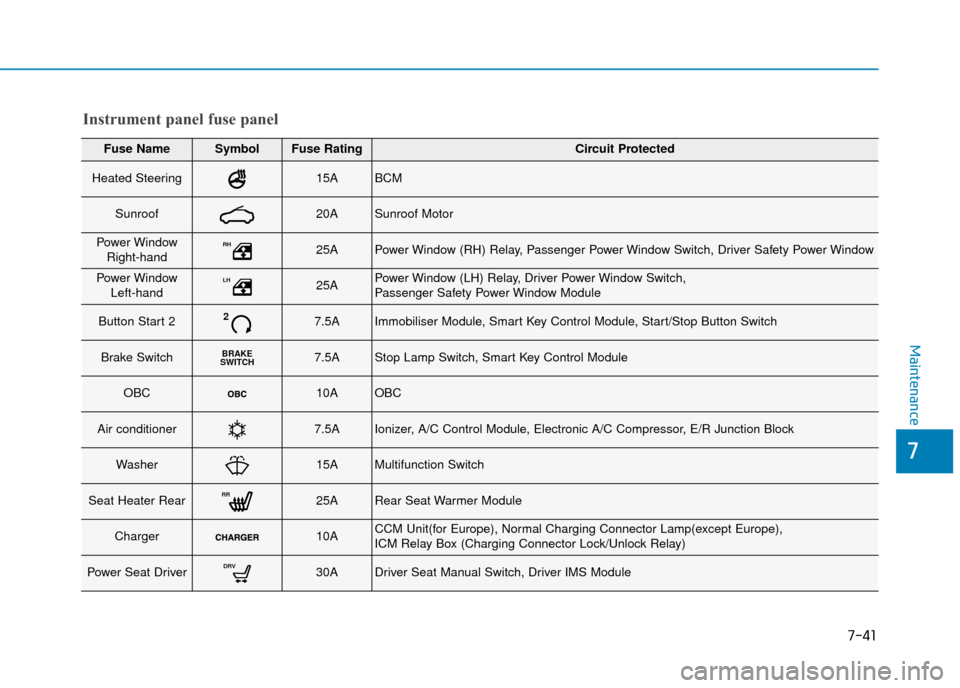
Fuse NameSymbolFuse RatingCircuit Protected
Heated Steering15ABCM
Sunroof20ASunroof Motor
Power WindowRight-handRH25APower Window (RH) Relay, Passenger Power Window Switch, Driver Safety Power Window
Power Window Left-handLH25APower Window (LH) Relay, Driver Power Window Switch,
Passenger Safety Power Window Module
Button Start 227.5AImmobiliser Module, Smart Key Control Module, Start/Stop Button Switch
Brake SwitchBRAKE
SWITCH7.5AStop Lamp Switch, Smart Key Control Module
OBC10AOBC
Air conditioner7.5AIonizer, A/C Control Module, Electronic A/C Compressor, E/R Junction Block
Washer15AMultifunction Switch
Seat Heater RearRR25ARear Seat Warmer Module
Charger10ACCM Unit(for Europe), Normal Charging Connector Lamp(except Europe),
ICM Relay Box (Charging Connector Lock/Unlock Relay)
Power Seat DriverDRV30ADriver Seat Manual Switch, Driver IMS Module
Instrument panel fuse panel
Page 490 of 526
7-42
Maintenance
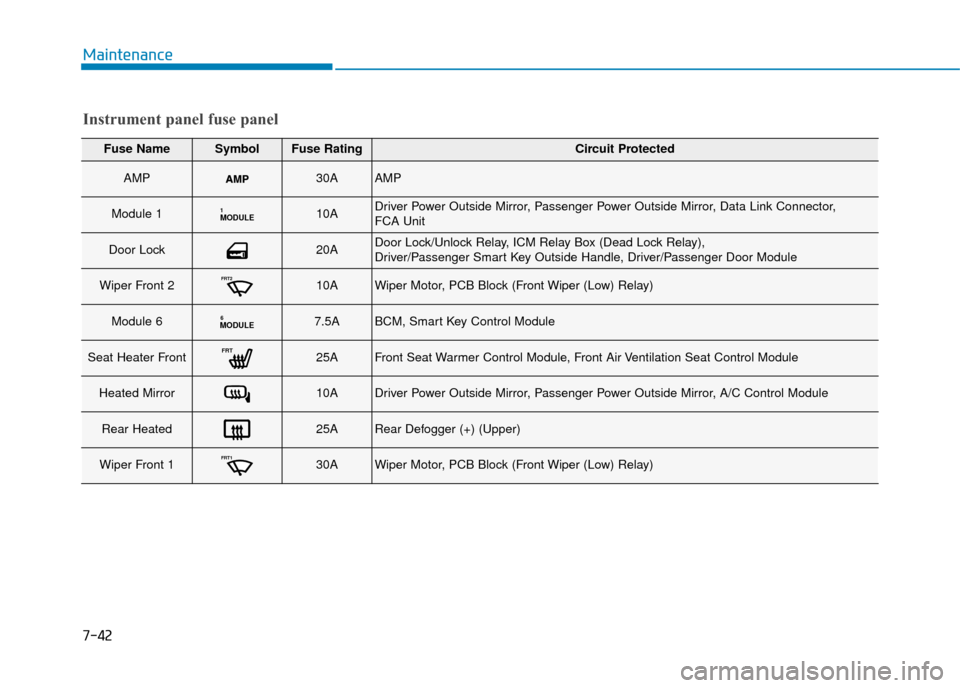
Fuse NameSymbolFuse RatingCircuit Protected
AMP30AAMP
Module 1MODULE110ADriver Power Outside Mirror, Passenger Power Outside Mirror, Data Link Connector,
FCA Unit
Door Lock20ADoor Lock/Unlock Relay, ICM Relay Box (Dead Lock Relay),
Driver/Passenger Smart Key Outside Handle, Driver/Passenger Door Module
Wiper Front 2FRT210AWiper Motor, PCB Block (Front Wiper (Low) Relay)
Module 6MODULE67.5ABCM, Smart Key Control Module
Seat Heater FrontFRT25AFront Seat Warmer Control Module, Front Air Ventilation Seat Control Module
Heated Mirror10ADriver Power Outside Mirror, Passenger Power Outside Mirror, A/C Control Module
Rear Heated25ARear Defogger (+) (Upper)
Wiper Front 1FRT130AWiper Motor, PCB Block (Front Wiper (Low) Relay)
Instrument panel fuse panel