sensor Hyundai Ioniq Electric 2019 - RHD (UK, Australia) Workshop Manual
[x] Cancel search | Manufacturer: HYUNDAI, Model Year: 2019, Model line: Ioniq Electric, Model: Hyundai Ioniq Electric 2019Pages: 526, PDF Size: 16.63 MB
Page 444 of 526

6-21
What to do in an emergency
6
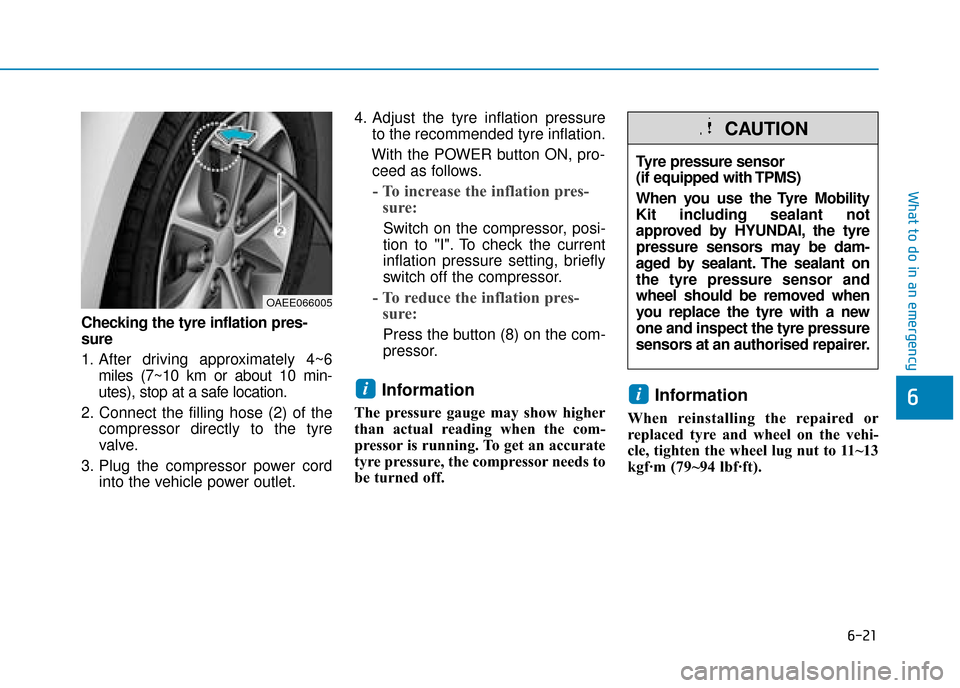
Checking the tyre inflation pres-
sure
1. After driving approximately 4~6miles (7~10 km or about 10 min-
utes), stop at a safe location.
2. Connect the filling hose (2) of the compressor directly to the tyre
valve.
3. Plug the compressor power cord into the vehicle power outlet. 4. Adjust the tyre inflation pressure
to the recommended tyre inflation.
With the POWER button ON, pro- ceed as follows.
- To increase the inflation pres- sure:
Switch on the compressor, posi-
tion to "I". To check the current
inflation pressure setting, briefly
switch off the compressor.
- To reduce the inflation pres- sure:
Press the button (8) on the com-
pressor.
Information
The pressure gauge may show higher
than actual reading when the com-
pressor is running. To get an accurate
tyre pressure, the compressor needs to
be turned off.
Information
When reinstalling the repaired or
replaced tyre and wheel on the vehi-
cle, tighten the wheel lug nut to 11~13
kgf·m (79~94 lbf·ft).
ii
OAEE066005
Tyre pressure sensor
(if equipped with TPMS)
When you use the Tyre Mobility
Kit including sealant not
approved by HYUNDAI, the tyre
pressure sensors may be dam-
aged by sealant. The sealant on
the tyre pressure sensor and
wheel should be removed when
you replace the tyre with a new
one and inspect the tyre pressure
sensors at an authorised repairer.
CAUTION
Page 487 of 526

7-39
7
Maintenance
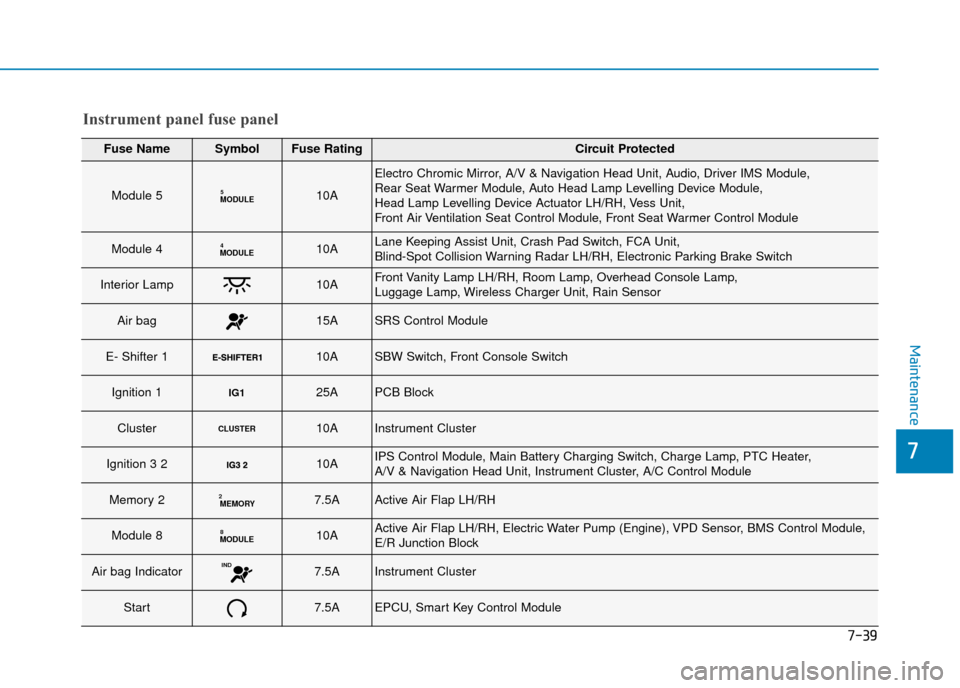
Instrument panel fuse panel
Fuse NameSymbolFuse RatingCircuit Protected
Module 5MODULE510A
Electro Chromic Mirror, A/V & Navigation Head Unit, Audio, Driver IMS Module,
Rear Seat Warmer Module, Auto Head Lamp Levelling Device Module,
Head Lamp Levelling Device Actuator LH/RH, Vess Unit,
Front Air Ventilation Seat Control Module, Front Seat Warmer Control Module
Module 4MODULE410ALane Keeping Assist Unit, Crash Pad Switch, FCA Unit,
Blind-Spot Collision Warning Radar LH/RH, Electronic Parking Brake Switch
Interior Lamp10AFront Vanity Lamp LH/RH, Room Lamp, Overhead Console Lamp,
Luggage Lamp, Wireless Charger Unit, Rain Sensor
Air bag15ASRS Control Module
E- Shifter 1 10ASBW Switch, Front Console Switch
Ignition 1IG125APCB Block
ClusterCLUSTER10AInstrument Cluster
Ignition 3 2 10AIPS Control Module, Main Battery Charging Switch, Charge Lamp, PTC Heater,
A/V & Navigation Head Unit, Instrument Cluster, A/C Control Module
Memory 2MEMORY27.5AActive Air Flap LH/RH
Module 8MODULE810AActive Air Flap LH/RH, Electric Water Pump (Engine), VPD Sensor, BMS Control Module,
E/R Junction Block
Air bag IndicatorIND7.5AInstrument Cluster
Start7.5AEPCU, Smart Key Control Module
Page 488 of 526

7-40
Maintenance
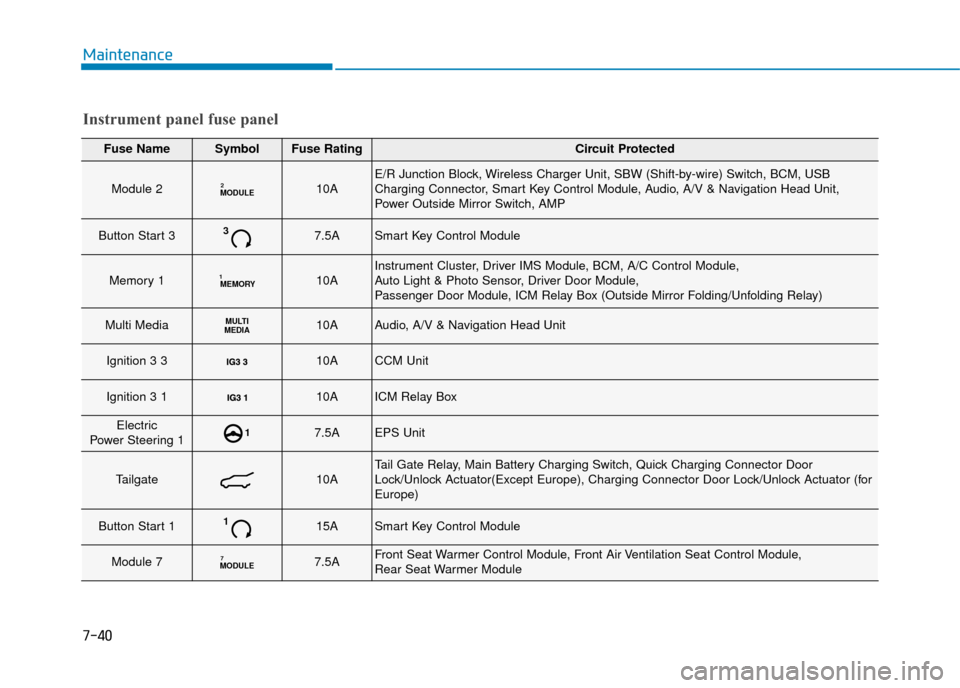
Fuse NameSymbolFuse RatingCircuit Protected
Module 2MODULE210AE/R Junction Block, Wireless Charger Unit, SBW (Shift-by-wire) Switch, BCM, USB
Charging Connector, Smart Key Control Module, Audio, A/V & Navigation Head Unit,
Power Outside Mirror Switch, AMP
Button Start 337.5ASmart Key Control Module
Memory 1MEMORY110AInstrument Cluster, Driver IMS Module, BCM, A/C Control Module,
Auto Light & Photo Sensor, Driver Door Module,
Passenger Door Module, ICM Relay Box (Outside Mirror Folding/Unfolding Relay)
Multi MediaMULTI
MEDIA10AAudio, A/V & Navigation Head Unit
Ignition 3 3 10ACCM Unit
Ignition 3 1 10AICM Relay Box
Electric
Power Steering 117.5AEPS Unit
Tailgate10ATail Gate Relay, Main Battery Charging Switch, Quick Charging Connector Door
Lock/Unlock Actuator(Except Europe), Charging Connector Door Lock/Unlock Actuator (for
Europe)
Button Start 1115ASmart Key Control Module
Module 7MODULE77.5AFront Seat Warmer Control Module, Front Air Ventilation Seat Control Module,
Rear Seat Warmer Module
Instrument panel fuse panel
Page 510 of 526

7-62
Maintenance
A
AP
PP
PE
EA
A R
RA
A N
N C
CE
E
C
C A
A R
RE
E
Exterior care
Exterior general caution
It is very important to follow the label
directions when using any chemical
cleaner or polish. Read all warning
and caution statements that appear
on the label.
High-pressure washing
When using high-pressure wash-
ers, make sure to maintain suffi-
cient distance from the vehicle.
Insufficient clearance or excessive
pressure can lead to component
damage or water penetration.
Do not spray the camera, sensors or its surrounding area directly with
a high pressure washer. Shock
applied from high pressure water
may cause the device to not oper-
ate normally.
Do not bring the nozzle tip close to boots (rubber or plastic covers) or
connectors as they may be dam-
aged if they come into contact with
high pressure water.
Finish maintenance
Washing
To help protect your vehicle’s finish
from rust and deterioration, wash it
thoroughly and frequently at least
once a month with lukewarm or cold
water.
If you use your vehicle for off-road
driving, you should wash it after each
off-road trip. Pay special attention to
the removal of any accumulation of
salt, dirt, mud, and other foreign
materials. Make sure the drain holes
in the lower edges of the doors and
rocker panels are kept clear and
clean.
Insects, tar, tree sap, bird droppings,
industrial pollution and similar
deposits can damage your vehicle’s
finish if not removed immediately.
Even prompt washing with plain
water may not completely remove all
these deposits. A mild soap, safe for
use on painted surfaces, should be
used.
After washing, rinse the vehicle thor-
oughly with lukewarm or cold water.
Do not allow soap to dry on the finish. After washing the vehicle, test
the brakes whilst driving slowly
to see if they have been affected
by water before getting on the
road. If braking performance is
impaired, dry the brakes by
applying them lightly whilst
maintaining a slow forward
speed.
WARNING