key battery Hyundai Ioniq Electric 2019 Owner's Manual - RHD (UK, Australia)
[x] Cancel search | Manufacturer: HYUNDAI, Model Year: 2019, Model line: Ioniq Electric, Model: Hyundai Ioniq Electric 2019Pages: 526, PDF Size: 16.63 MB
Page 152 of 526
3-5
Convenient features of your vehicle
Start-up
You can start the vehicle without
inserting the key.For detailed infor-
mation, refer to the POWER button
in chapter 5.
To prevent damaging the smart
key:
• Keep the smart key away from water or any liquid and fire. If the
inside of the smart key gets
damp (due to drinks or moisture),
or is heated, internal circuit may
malfunction, excluding the car
from the warranty.
Avoid dropping or throwing the smart key.
Protect the smart key from extreme temperatures.
Always have the smart key with
you when leaving the vehicle. If
the smart key is left near the vehi-
cle, the vehicle battery may be dis-
charged.
Mechanical key
If the Smart Key does not operate
normally, you can lock or unlock the
door by using the mechanical key.
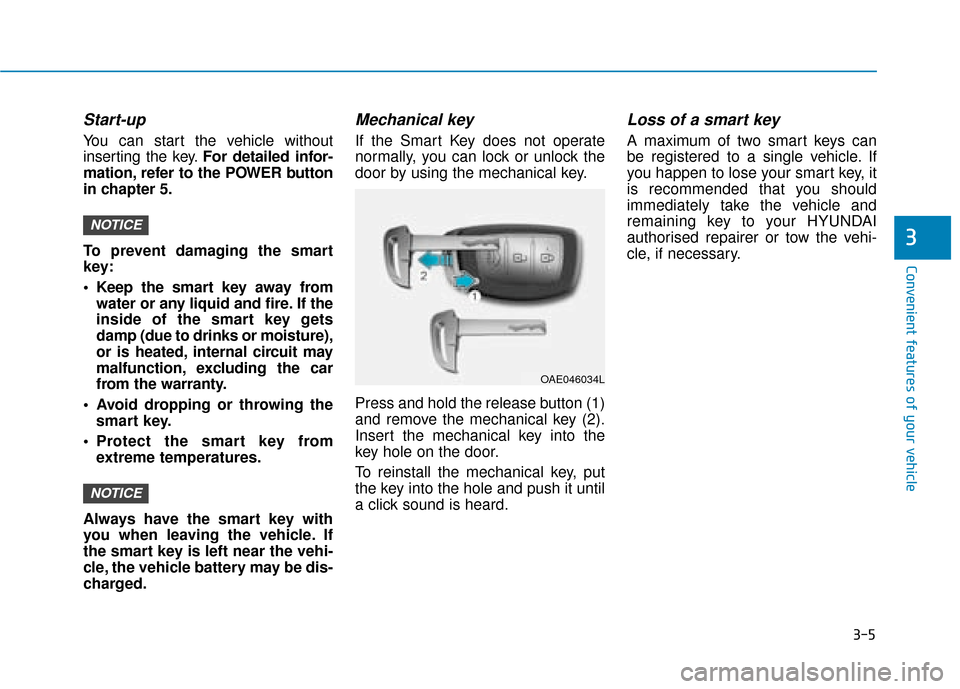
Press and hold the release button (1)
and remove the mechanical key (2).
Insert the mechanical key into the
key hole on the door.
To reinstall the mechanical key, put
the key into the hole and push it until
a click sound is heard.
Loss of a smart key
A maximum of two smart keys can
be registered to a single vehicle. If
you happen to lose your smart key, it
is recommended that you should
immediately take the vehicle and
remaining key to your HYUNDAI
authorised repairer or tow the vehi-
cle, if necessary.
NOTICE
NOTICE3
OAE046034L
Page 153 of 526
3-6
Convenient features of your vehicle
Smart key precautions
The smart key will not work if any of
the following occur:
The smart key is close to a radiotransmitter such as a radio station
or an airport which can interfere
with normal operation of the smart
key.
The smart key is near a mobile two way radio system or a mobile
phone.
Another vehicle’s smart key is being operated close to your vehi-
cle.
When the smart key does not work
correctly, open and close the door
with the mechanical key. If you have
a problem with the smart key, it is
recommended that you contact a
HYUNDAI authorised repairer.
If the smart key is in close proximity
to your mobile phone, the signal
could be blocked by your mobile
phones normal operational signals.
This is especially important when the
phone is active such as making and
receiving calls, text messaging,
and/or sending/receiving emails. Avoid placing the smart key and your
mobile phone in the same pants or
jacket pocket and always try to main-
tain an adequate distance between
the two devices.
Information
Changes or modifications not express-
ly approved by the party responsible
for compliance could void the user’s
authority to operate the equipment. If
the keyless entry system is inoperative
due to changes or modifications not
expressly approved by the party
responsible for compliance, it will not
be covered by your manufacturer’s
vehicle warranty.
Keep the smart key away from
electromagnetic materials that
blocks electromagnetic waves to
the key surface.
Battery replacement
If the Smart Key is not working prop-
erly, try replacing the battery with a
new one.
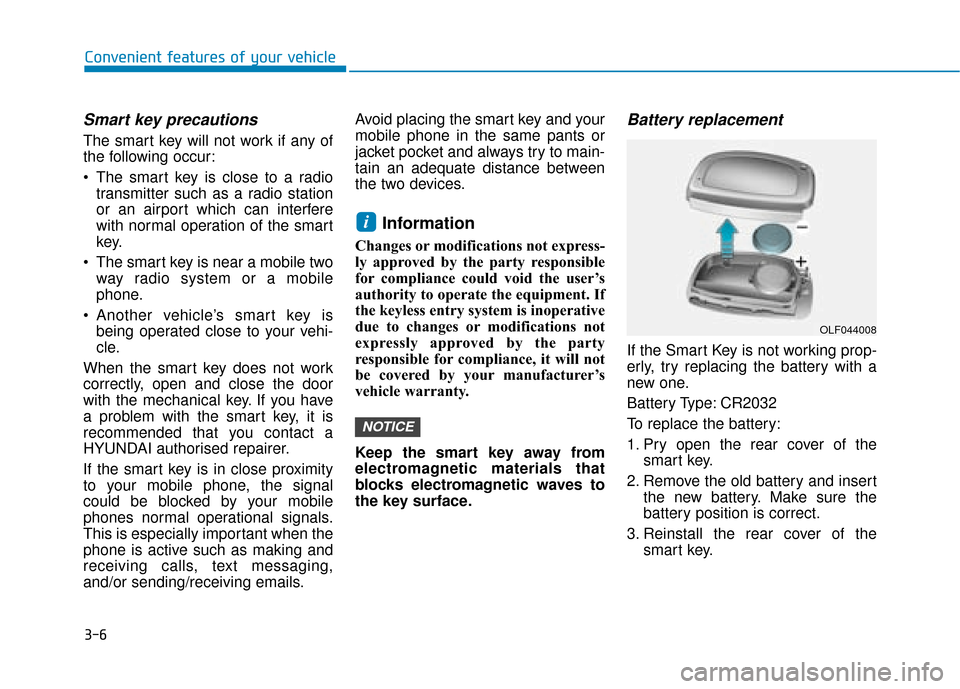
Battery Type: CR2032
To replace the battery:
1. Pry open the rear cover of the
smart key.
2. Remove the old battery and insert the new battery. Make sure the
battery position is correct.
3. Reinstall the rear cover of the smart key.
NOTICE
i
OLF044008
Page 154 of 526
3-7
Convenient features of your vehicle
3
If you suspect your smart key might
have sustained some damage, or
you feel your smart key is not work-
ing correctly, it is recommended that
you contact a HYUNDAI authorised
repairer.
Information
An inappropriately disposedbattery can be harmful to the
environment and human health.
Dispose of the battery according
to your local law(s) and regula-
tion.
Immobiliser system
The immobiliser system protects your
vehicle from theft. If an improperly
coded key (or other device) is used,
the power system is disabled.
When the POWER button is placed
in the ON position, the immobiliser
system indicator should come on
briefly, then go off. If the indicator
starts to blink, the system does not
recognise the coding of the key.
Place the POWER button to the OFF
position, then place the POWER but-
ton to the ON position again.
The system may not recognise your
key’s coding if another immobiliser
key or other metal object (i.e., key
chain) is near the key. The vehicle
may not start because the metal may
interrupt the transponder signal from
transmitting normally.
If the system repeatedly does not
recognise the coding of the key, it is
recommended that you contact a
HYUNDAI authorised repairer. Do not attempt to alter this system or
add other devices to it. Electrical
problems could result that may make
your vehicle inoperable.
The transponder in your key is an
important part of the immobiliser
system. It is designed to give
years of trouble-free service, how-
ever you should avoid exposure to
moisture, static electricity and
rough handling. Immobiliser sys-
tem malfunction could occur.
NOTICE
iIn order to prevent theft of your
vehicle, do not leave spare keys
anywhere in your vehicle. Your
immobiliser password is a cus-
tomer unique password and
should be kept confidential.
WARNING
Page 169 of 526
3-22
Convenient features of your vehicle
Folding the outside rearviewmirror
Manual type
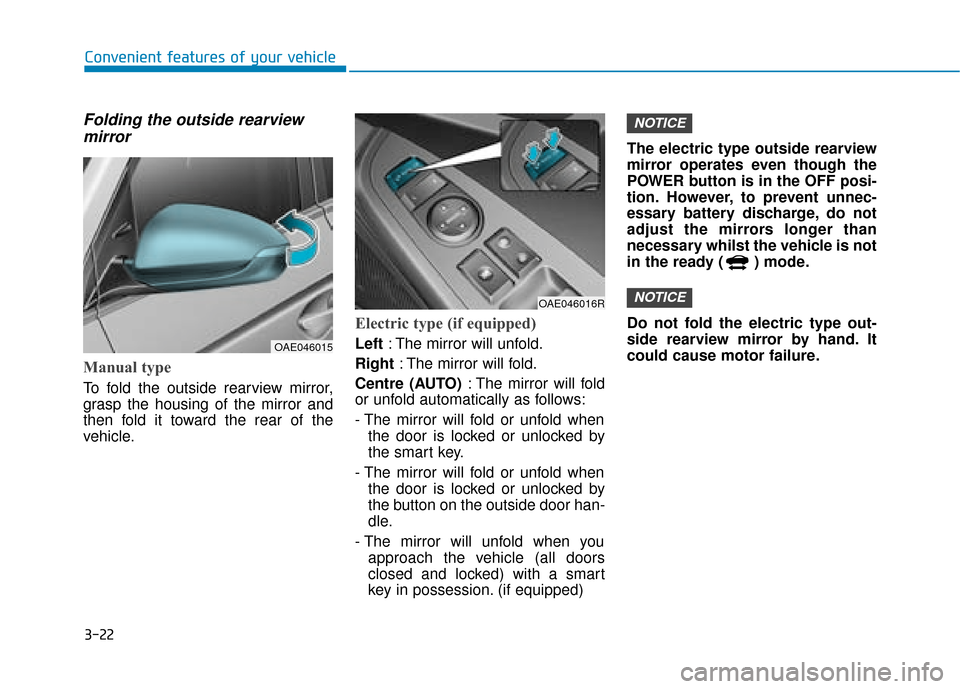
To fold the outside rearview mirror,
grasp the housing of the mirror and
then fold it toward the rear of the
vehicle.
Electric type (if equipped)
Left : The mirror will unfold.
Right : The mirror will fold.
Centre (AUTO) : The mirror will fold
or unfold automatically as follows:
- The mirror will fold or unfold when
the door is locked or unlocked by
the smart key.
- The mirror will fold or unfold when the door is locked or unlocked by
the button on the outside door han-
dle.
- The mirror will unfold when you approach the vehicle (all doors
closed and locked) with a smart
key in possession. (if equipped) The electric type outside rearview
mirror operates even though the
POWER button is in the OFF posi-
tion. However, to prevent unnec-
essary battery discharge, do not
adjust the mirrors longer than
necessary whilst the vehicle is not
in the ready ( ) mode.
Do not fold the electric type out-
side rearview mirror by hand. It
could cause motor failure.
NOTICE
NOTICE
OAE046015
OAE046016R
Page 196 of 526
3-49
Convenient features of your vehicle
3
This indicator light illuminates for
2 seconds and goes off:
If the smart key is in the vehicleand the POWER button is ON, but
the vehicle cannot detect the smart
key.
In this case, we recommend that
you have the vehicle inspected by
a HYUNDAI authorised repairer.
This indicator light blinks:
When the battery voltage of thesmart key is low.
- At this time, you can not start thevehicle. However, you can start
the vehicle if you press the
POWER button with the smart
key. (For more details, refer to
"Starting the vehicle" in chap-
ter 5).
When there is a malfunction with the immobiliser system.
In this case, we recommend that
you have the vehicle inspected by
a HYUNDAI authorised repairer.
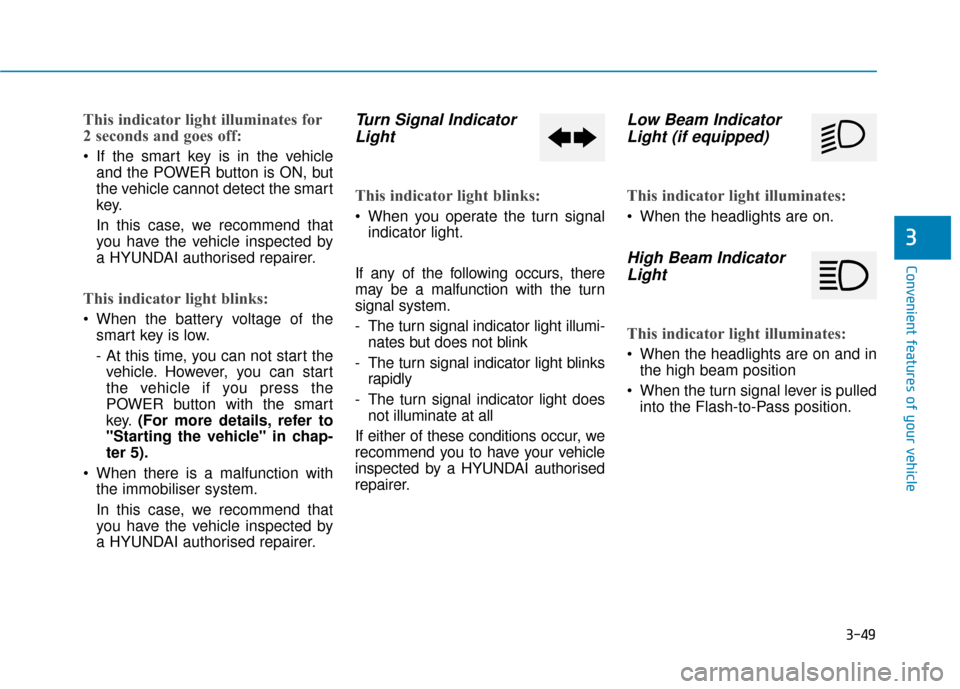
Turn Signal IndicatorLight
This indicator light blinks:
When you operate the turn signal
indicator light.
If any of the following occurs, there
may be a malfunction with the turn
signal system.
- The turn signal indicator light illumi- nates but does not blink
- The turn signal indicator light blinks rapidly
- The turn signal indicator light does not illuminate at all
If either of these conditions occur, we
recommend you to have your vehicle
inspected by a HYUNDAI authorised
repairer.
Low Beam Indicator Light (if equipped)
This indicator light illuminates:
When the headlights are on.
High Beam IndicatorLight
This indicator light illuminates:
When the headlights are on and in
the high beam position
When the turn signal lever is pulled into the Flash-to-Pass position.
Page 199 of 526
![Hyundai Ioniq Electric 2019 Owners Manual - RHD (UK, Australia) 3-52
Convenient features of your vehicle
Lane Keeping Assist(LKA) system indicatorlight (if equipped)
This indicator light illuminates:
[Green] When the system operat-
ing conditions are satisfied fo Hyundai Ioniq Electric 2019 Owners Manual - RHD (UK, Australia) 3-52
Convenient features of your vehicle
Lane Keeping Assist(LKA) system indicatorlight (if equipped)
This indicator light illuminates:
[Green] When the system operat-
ing conditions are satisfied fo](/img/35/14899/w960_14899-198.png)
3-52
Convenient features of your vehicle
Lane Keeping Assist(LKA) system indicatorlight (if equipped)
This indicator light illuminates:
[Green] When the system operat-
ing conditions are satisfied for
LKA.
[White] When the system operat- ing conditions are not satisfied or
when the sensor does not detect
the lane line.
[Yellow] When there is a malfunc- tion with the lane keeping assist
system.
In this case, we recommend you
have your vehicle inspected by a
HYUNDAI authorised repairer.
For more details, refer to “Lane
Keeping Assist (LKA) system” in
chapter 5.
LCD display messages
Shift to P
This warning message is displayed if
you try to turn off the vehicle with the
gear in the N (Neutral) position.
At this time, the POWER button
changes to the ACC position (If you
press the POWER button once more,
it will turn to the ON position).
Low Key Battery
This warning message is displayed if
the battery of the smart key is dis-
charged whilst changing the POWER
button to the OFF position.
Press POWER button whileturning wheel
This warning message is displayed if
the steering wheel does not unlock
normally when the POWER button is
pressed.
You should press the POWER button
whilst turning the steering wheel right
and left.
Check Steering Wheel LockSystem
This warning message is displayed if
the steering wheel does not lock nor-
mally whilst the POWER button
changes to the OFF position.
Press brake pedal to start vehicle
This warning message is displayed if
the POWER button changes to the
ACC position twice by pressing the
button repeatedly without depressing
the brake pedal.
You can start the vehicle by depress-
ing the brake pedal.
Key not in vehicle
This warning message is displayed if
the smart key is not in the vehicle
when you press the POWER button.
When attempting to start the vehicle,
always have the smart key with you.
Page 228 of 526
3-81
Convenient features of your vehicle
3
Battery saver function
The purpose of this feature is to pre-
vent the battery from being dis-
charged. The system automatically
turns off the position lamp when the
driver turns the vehicle off and opens
the driver-side door.
With this feature , the position lamps
will turn off automatically if the driver
parks on the side of road at night.
If necessary, to keep the lamps on
when the vehicle is turned off, perform
the following:
1) Open the driver-side door.
2) Turn the position lamps OFF and
ON again using the light switch on
the steering column.
Headlamp delay function (if equipped)
If you place the POWER button in to
the ACC or OFF position with the
headlamps ON, the headlamps
(and/or position l amps) remain on for
about 5 minutes. However, with the
vehicle off if the driver’s door is
opened and closed, the headlamps
(and/or position lamp s) are turned off
after 15 seconds.
The headlamps (and/or position
lamps) can be turned off by pressing
the lock button on the smart key
twice or turning the light switch to the
OFF or AUTO position. However, if
you turn the light switch to the AUTO
position when it is dark outside, the
headlamps will not be turned off.
You can activate or deactivate the
Headlamp Delay function from the
User Settings Mode on the LCD dis-
play. For more details, refer to
"LCD Display" in this chapter. If the driver gets out of the vehicle
through other doors (except dri-
ver's door), the battery saver func-
tion does not operate and the
headlamp delay function does not
turn off automatically. Therefore, It
causes the battery to be dis-
charged. In this case, make sure to
turn off the lamp before getting out
of the vehicle.
Daytime running light (DRL)
The Daytime Running Lights (DRL)
can make it easier for others to see
the front of your vehicle during the
day, especially after dawn and before
sunset.
The DRL system will turn the dedi-
cated lamp OFF when:
1. The headlights are in the ON posi-
tion.
2. the vehicle is turned off.
NOTICE
Page 231 of 526
3-84
Convenient features of your vehicle
Interior lights
Do not use the interior lights for
extended periods when the vehi-
cle is turned off or the battery will
discharge.
Interior lamp AUTO cut
The interior lamps will automatically
go off approximately 20 minutes after
the vehicle is turned off and the
doors closed. If a door is opened, the
lamp will go off 40 minutes after the
vehicle is turned off. If the doors are
locked by the smart key and the vehi-
cle enters the armed stage of the
theft alarm system, the lamps will go
off five seconds later.
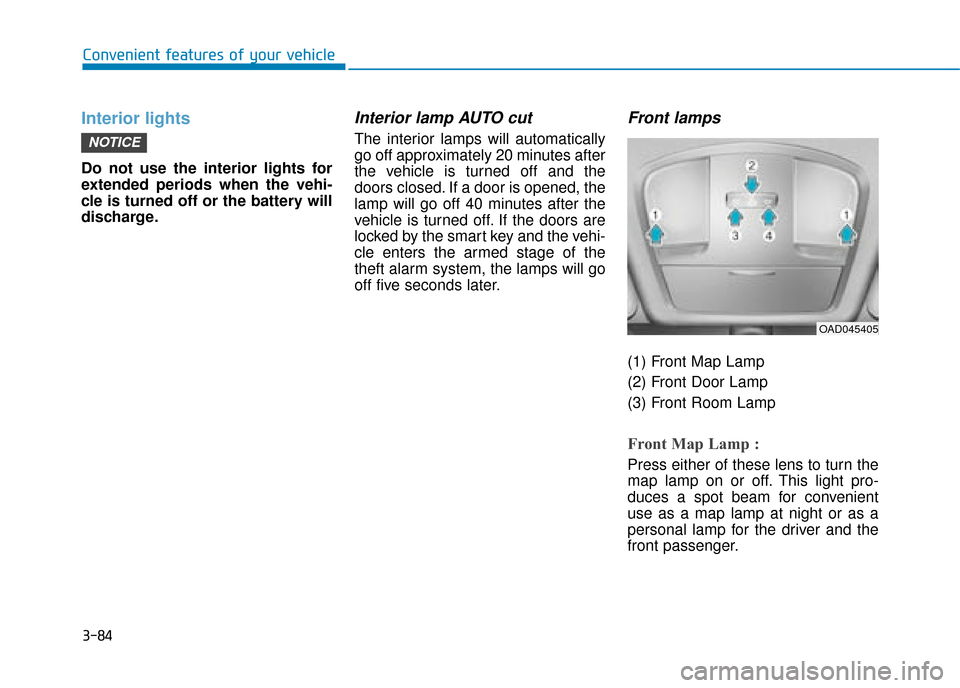
Front lamps
(1) Front Map Lamp
(2) Front Door Lamp
(3) Front Room Lamp
Front Map Lamp :
Press either of these lens to turn the
map lamp on or off. This light pro-
duces a spot beam for convenient
use as a map lamp at night or as a
personal lamp for the driver and the
front passenger.
NOTICE
OAD045405
Page 233 of 526
3-86
Convenient features of your vehicle
Vanity mirror lamp
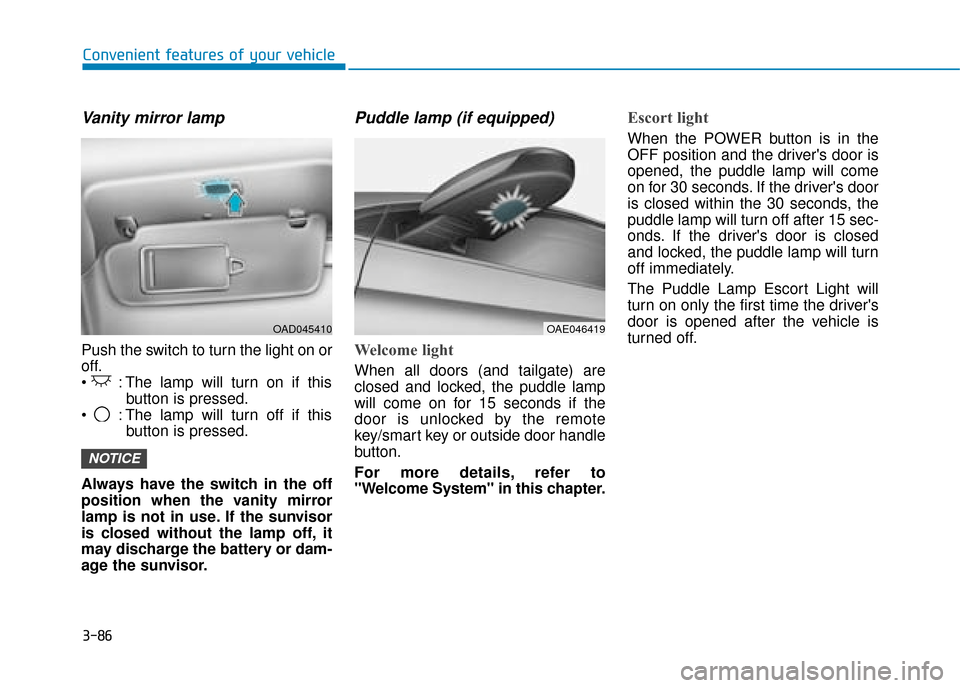
Push the switch to turn the light on or
off.
: The lamp will turn on if thisbutton is pressed.
: The lamp will turn off if this button is pressed.
Always have the switch in the off
position when the vanity mirror
lamp is not in use. If the sunvisor
is closed without the lamp off, it
may discharge the battery or dam-
age the sunvisor.
Puddle lamp (if equipped)
Welcome light
When all doors (and tailgate) are
closed and locked, the puddle lamp
will come on for 15 seconds if the
door is unlocked by the remote
key/smart key or outside door handle
button.
For more details, refer to
"Welcome System" in this chapter.
Escort light
When the POWER button is in the
OFF position and the driver's door is
opened, the puddle lamp will come
on for 30 seconds. If the driver's door
is closed within the 30 seconds, the
puddle lamp will turn off after 15 sec-
onds. If the driver's door is closed
and locked, the puddle lamp will turn
off immediately.
The Puddle Lamp Escort Light will
turn on only the first time the driver's
door is opened after the vehicle is
turned off.
NOTICE
OAD045410OAE046419
Page 268 of 526
3-121
Convenient features of your vehicle
3
To prevent damage to the Power
Outlets :
Use the power outlet only whenthe vehicle is in the ready ( )
mode and remove the accessory
plug after use. Using the acces-
sory plug for prolonged periods
of time with the vehicle off could
cause the battery to discharge.
Only use 12V electric accessories which are less than 180 W(Watt) in
electric capacity.
Adjust the air-conditioner or heater to the lowest operating
level when using the power outlet.
Close the cover when not in use.
Some electronic devices can cause electronic interference
when plugged into a vehicle’s
power outlet. These devices may
cause excessive audio static
and malfunctions in other elec-
tronic systems or devices used
in your vehicle.
(Continued)(Continued)
Push the plug in as far as it will
go. If good contact is not made,
the plug may overheat and the
fuse may open.
Plug in battery equipped electri- cal/electronic devices with
reverse current protection. The
current from the battery may
flow into the vehicle's electri-
cal/electronic system and cause
system malfunction.
Wireless mobile phone charg-
ing system (if equipped)
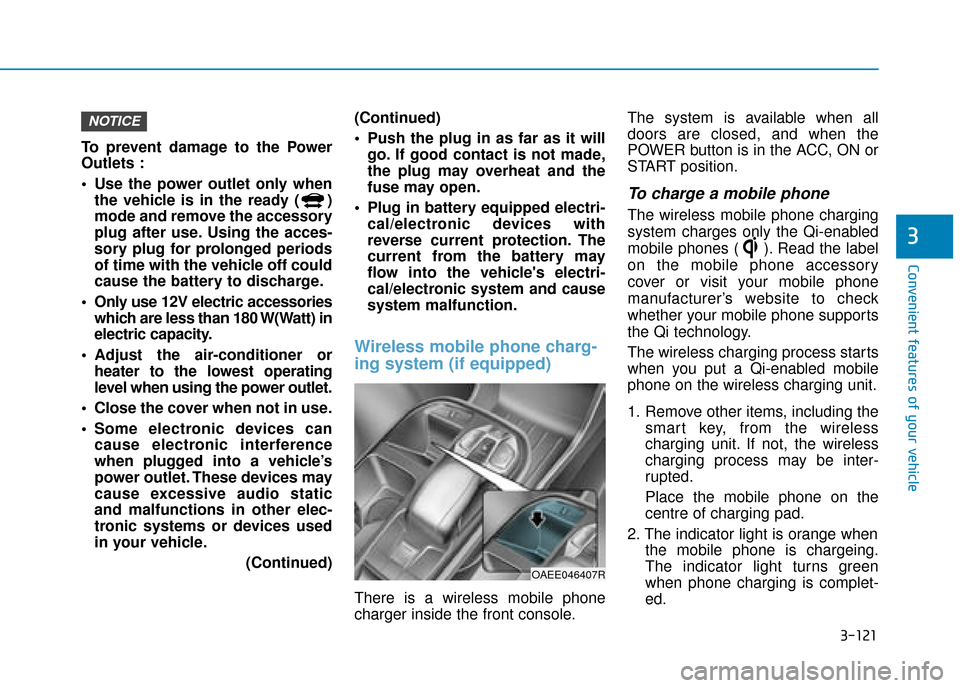
There is a wireless mobile phone
charger inside the front console. The system is available when all
doors are closed, and when the
POWER button is in the ACC, ON or
START position.
To charge a mobile phone
The wireless mobile phone charging
system charges only the Qi-enabled
mobile phones ( ). Read the label
on the mobile phone accessory
cover or visit your mobile phone
manufacturer’s website to check
whether your mobile phone supports
the Qi technology.
The wireless charging process starts
when you put a Qi-enabled mobile
phone on the wireless charging unit.
1. Remove other items, including the
smart key, from the wireless
charging unit. If not, the wireless
charging process may be inter-
rupted.
Place the mobile phone on the
centre of charging pad.
2. The indicator light is orange when the mobile phone is chargeing.
The indicator light turns green
when phone charging is complet-
ed.
NOTICE
OAEE046407R