boot Hyundai Ioniq Electric 2019 Owner's Manual
[x] Cancel search | Manufacturer: HYUNDAI, Model Year: 2019, Model line: Ioniq Electric, Model: Hyundai Ioniq Electric 2019Pages: 555, PDF Size: 20.1 MB
Page 257 of 555
4-34
Multimedia System
Even if your device supports
Bluetooth®Wireless Technology, a
Bluetooth®Wireless Technology con-
nection cannot be established if
the device’s
Bluetooth®Wireless
Technology function is switched off.
Search and connect with the
Bluetooth®Wireless Technology
function enabled.
Pair or connect
Bluetooth®Wireless
Technology de vices to the audio
system with the vehicle at a stand-
still.
If a
Bluetooth®Wireless Technology
connection is lost due to abnormal
conditions while a
Bluetooth®
Wireless Technology de vice is con-
nected (communication range
exceeded, device power OFF,
communication errors, etc.), the
disconnected
Bluetooth®Wireless
Technology de vice is searched for
and automatically reconnected.
If you want to disable the
Bluetooth®
Wireless Technology device auto-
connect function, turn the
Bluetooth®
Wireless Technology function OFF on
your device. Consult the user manu-
als for individual devices to see
whether
Bluetooth®Wireless
Technology is supported. Handsfree call quality and volume
may vary depending on the type of
Bluetooth®Wireless Technology
device.
Some
Bluetooth®Wireless
Technology de vices are subject to
intermittent
Bluetooth®Wireless
Technology connection failures. In
this case, use the following
method.
1) Turn the
Bluetooth®Wireless
Technology function off on your
Bluetooth®Wireless Technology
device ➟Turn it on and try again.
2) Delete the paired device from both the audio system and
Bluetooth®Wireless Technology
device, then pair again.
3) Power down your
Bluetooth®
Wireless Technology de vice ➟
Turn it on and try again.
4) Completely remove the battery from your
Bluetooth®Wireless
Technology de vice; reinsert it,
reboot, and attempt connection.
5) Restart the vehicle and reat- tempt connection.
Pairing a Bluetooth®Wireless
Technology device
Information on pairing Bluetooth®
Wireless Technology devices
Pairing refers to the process of pair-
ing
Bluetooth®Wireless Technology
cell phones or devices with the sys-
tem prior to connection. This is a nec-
essary procedure for
Bluetooth®
Wireless Technology connection and
usage.
Up to five devices can be paired.
Pairing Bluetooth
®device is not
allowed while vehicle is moving.
Pairing the first Bluetooth®Wireless
Technology device
Press the [PHONE]button on the
audio system or the [CALL] button
on the steering wheel remote control
➟ Search for the vehicle from the
Bluetooth®Wireless Technology
device, and pair ➟ Enter the passkey
on the
Bluetooth®Wireless Technology
device or approve passkey ➟
Bluetooth®Wireless Technologypair-
ing completed.
Page 266 of 555
![Hyundai Ioniq Electric 2019 Owners Manual 4-43
Multimedia System
4
System
Press the [SETUP]button on the
audio system ➟ Select [System].
• Memory Information: View My Music memory usage.
Language: Change the user lan- guage.
System Info Hyundai Ioniq Electric 2019 Owners Manual 4-43
Multimedia System
4
System
Press the [SETUP]button on the
audio system ➟ Select [System].
• Memory Information: View My Music memory usage.
Language: Change the user lan- guage.
System Info](/img/35/14897/w960_14897-265.png)
4-43
Multimedia System
4
System
Press the [SETUP]button on the
audio system ➟ Select [System].
• Memory Information: View My Music memory usage.
Language: Change the user lan- guage.
System Information: At the System Information screen, Software version
information, updates are available.
- System Update: At the SystemInformation screen, insert the
USB memory with the latest file
downloaded, and then select the
[Update] to begin updating. The
system with then reboot auto-
matically.Information
• This product needs supplementedsoftware updates and additional
functions, which collectively may
take some time to complete, depend-
ing on the amount of data.
• If the Power is disconnected or the USB is removed during an update,
the data might be damaged. Please
wait until the update is complete
while engine is on.
Screen Saver
Set the information displayed when
the audio system is switched off or
the screen is turned off.
Press the [SETUP] button on the audio
system ➟Select [Screen Saver].
Analog: An analog clock is dis- played.
Digital: A digital clock is displayed.
None: No information is displayed.
Display Off
To prevent glare, the screen can be
turned off with the audio system in
operation.
Press the [SETUP]button on the
audio system ➟ Select [Display Off].
Information
Use ‘Screen Saver’ to set the informa-
tion to be displayed when the screen is
turned off.
i
i
Page 275 of 555
5-8
Driving your vehicle
Starting the VehicleInformation
• The vehicle will start by pressing the
POWER button, only when the
smart key is in the vehicle.
• Even if the smart key is in the vehi- cle, and when it is far away from the
driver, the vehicle may not start.
• When the POWER button is in the ACC or ON position, any door is
open, the system checks for the
smart key. When the smart key is
not in the vehicle, the " " indica-
tor will blink and the warning "Key
not in vehicle" will come on. When
all doors are closed, the chime will
also sound for about 5 seconds.
Keep the smart key in the vehicle
when in the ACC position or if the
vehicle is in the ready ( ) mode. 1. Always carry the smart key with
you.
2. Make sure the parking brake is applied.
3. Make sure the gear is in P (Park).
4. Depress the brake pedal.
5. Press the POWER button. If the vehicle starts, the " " indicator
will come on.
Information
• Always start the vehicle with yourfoot on the brake pedal.
• If ambient temperature is low, the " " indicator may remain illumi-
nated longer than the normal amount
of time.
i
i
Always wear appropriate shoes
when operating your vehicle.
Unsuitable shoes, such as high
heels, ski boots, sandals, flip-
flops, etc., may interfere with
your ability to use the brake
and accelerator pedals.
Do not start the vehicle with the
accelerator pedal depressed.
The vehicle can move and
lead to an accident.
WARNING
Page 406 of 555
7-9
7
Maintenance
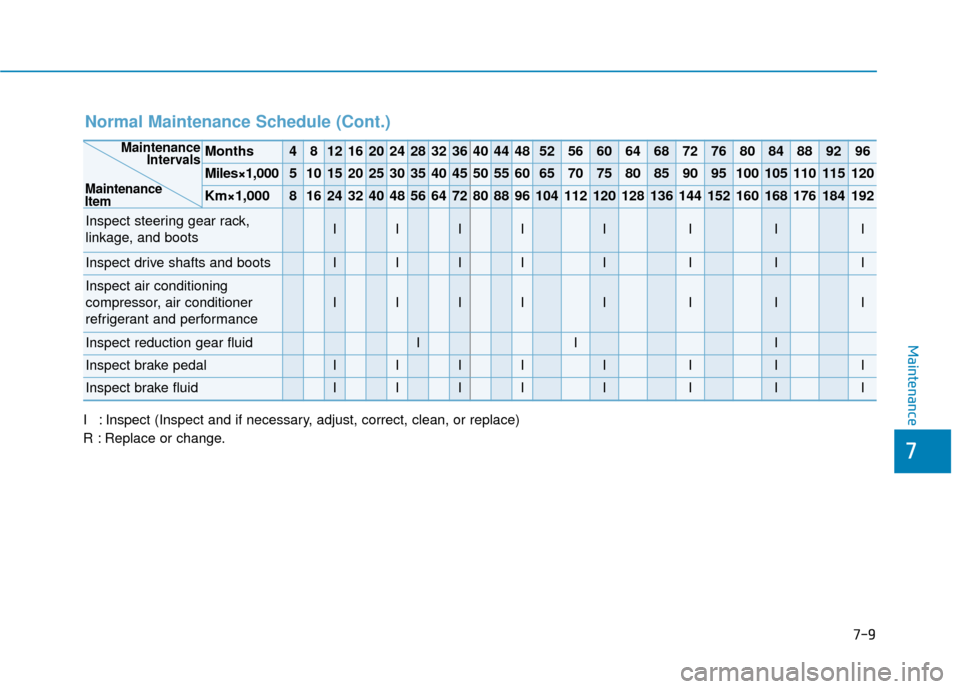
Normal Maintenance Schedule (Cont.)
I : Inspect (Inspect and if necessary, adjust, correct, clean, or replace)
R : Replace or change.
Months4812162024283236404448525660646872768084889296
Miles×1,0005101520253035404550556065707580859095100105110115120
Km×1,00081624324048566472808896104112120128136144152160168176184192
Inspect steering gear rack,
linkage, and bootsIIIIIIII
Inspect drive shafts and bootsIIIIIIII
Inspect air conditioning
compressor, air conditioner
refrigerant and performance
IIIIIIII
Inspect reduction gear fluidIII
Inspect brake pedalIIIIIIII
Inspect brake fluidIIIIIIII
Maintenance Intervals
Maintenance
Item
Page 407 of 555
7-10
Maintenance
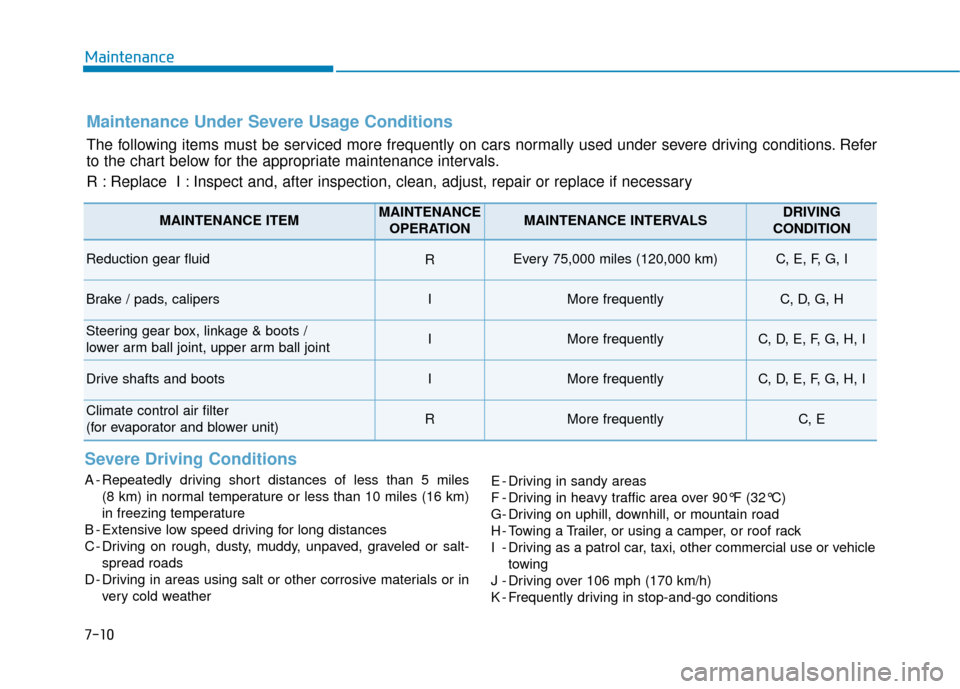
Maintenance Under Severe Usage Conditions
The following items must be serviced more frequently on cars normally used under severe driving conditions. Refer
to the chart below for the appropriate maintenance intervals.
R : Replace I : Inspect and, after inspection, clean, adjust, repair or replace if neces\
sary
Severe Driving Conditions
A - Repeatedly driving short distances of less than 5 miles (8 km) in normal temperature or less than 10 miles (16 km)
in freezing temperature
B - Extensive low speed driving for long distances
C - Driving on rough, dusty, muddy, unpaved, graveled or salt- spread roads
D - Driving in areas using salt or other corrosive materials or in very cold weather E - Driving in sandy areas
F - Driving in heavy traffic area over 90°F (32°C)
G- Driving on uphill, downhill, or mountain road
H - Towing a Trailer, or using a camper, or roof rack
I - Driving as a patrol car, taxi, other commercial use or vehicle
towing
J - Driving over 106 mph (170 km/h)
K - Frequently driving in stop-and-go conditions
MAINTENANCE ITEMMAINTENANCE OPERATIONMAINTENANCE INTERVALSDRIVING
CONDITION
Reduction gear fluid REvery 75,000 miles (120,000 km) C, E, F, G, I
Brake / pads, calipersIMore frequentlyC, D, G, H
Steering gear box, linkage & boots /
lower arm ball joint, upper arm ball jointIMore frequentlyC, D, E, F, G, H, I
Drive shafts and bootsIMore frequentlyC, D, E, F, G, H, I
Climate control air filter
(for evaporator and blower unit)RMore frequentlyC, E
Page 408 of 555
7-11
7
Maintenance
E
EX
X P
PL
LA
A N
N A
AT
TI
IO
O N
N
O
O F
F
S
S C
C H
H E
ED
D U
U L
LE
E D
D
M
M A
AI
IN
N T
TE
EN
N A
AN
N C
CE
E
I
IT
T E
EM
M S
S
Cooling System
Check cooling system components,
such as radiator, coolant reservoir,
hoses and connections for leakage
and damage. Replace any damaged
parts.
Coolant
The coolant should be changed at
the intervals specified in the mainte-
nance schedule.
Reduction Gear Fluid
Inspect the reduction gear fluid
according to the maintenance sched-
ule.
Brake Hoses and Lines
Visually check for proper installation,
chafing, cracks, deterioration and
any leakage. Replace any deteriorat-
ed or damaged parts immediately.
Brake Fluid
Check brake fluid level in the brake
fluid reservoir. The level should be
between the MIN and the MAX
marks on the side of the reservoir.
Use only hydraulic brake fluid con-
forming to DOT 3 or DOT 4 specifi-
cation.
Brake Discs, Pads, Calipers
and Rotors
Check the pads for excessive wear,
discs for run out and wear, and
calipers for fluid leakage.
Suspension Mounting Bolts
Check the suspension connections
for looseness or damage. Retighten
to the specified torque.
Steering Gear Box, Linkage &
Boots/Lower Arm Ball Joint
With the vehicle stopped and the
vehicle off, check for excessive free-
play in the steering wheel. Check the
linkage for bends or damage. Check
the dust boots and ball joints for
deterioration, cracks, or damage.
Replace any damaged parts.
Drive Shafts and Boots
Check the drive shafts, boots and
clamps for cracks, deterioration, or
damage. Replace any damaged
parts and, if necessary, repack the
grease.
Air Conditioning Refrigerant
Check the air conditioning lines and
connections for leakage and dam-
age.
Page 462 of 555
7-65
7
Maintenance
A
AP
PP
PE
EA
A R
RA
A N
N C
CE
E
C
C A
A R
RE
E
Exterior Care
Exterior general caution
It is very important to follow the label
directions when using any chemical
cleaner or polish. Read all warning
and caution statements that appear
on the label.
High-pressure washing
When using high-pressure wash-
ers, make sure to maintain suffi-
cient distance from the vehicle.
Insufficient clearance or excessive
pressure can lead to component
damage or water penetration.
Do not spray the camera, sensors or its surrounding area directly with
a high pressure washer. Shock
applied from high pressure water
may cause the device to not oper-
ate normally.
Do not bring the nozzle tip close to boots (rubber or plastic covers)or
connectors as they may be dam-
aged if they come into contact with
high pressure water.
Do not use any high-pressure noz- zles, which induce either one-
direct water stream or water
swirling.
Protecting your vehicle’s finish
Washing
To help protect your vehicle’s finish
from rust and deterioration, wash it
thoroughly and frequently at least
once a month with lukewarm or cold
water.
If you use your vehicle for off-road
driving, you should wash it after each
off-road trip. Pay special attention to
the removal of any accumulation of
salt, dirt, mud, and other foreign
materials. Make sure the drain holes
in the lower edges of the doors and
rocker panels are kept clear and
clean.
Insects, tar, tree sap, bird droppings,
industrial pollution and similar
deposits can damage your vehicle’s
finish if not removed immediately.
Even prompt washing with plain
water may not completely remove all
these deposits. A mild soap, safe for
use on painted surfaces, should be
used.