change wheel Hyundai Ioniq Hybrid 2019 User Guide
[x] Cancel search | Manufacturer: HYUNDAI, Model Year: 2019, Model line: Ioniq Hybrid, Model: Hyundai Ioniq Hybrid 2019Pages: 603, PDF Size: 21.91 MB
Page 323 of 603
5-27
Driving your vehicle
5
ABS is an electronic braking system
that helps prevent a braking skid.
ABS allows the driver to steer and
brake at the same time.
Using ABS
To obtain the maximum benefit from
your ABS in an emergency situation,
do not attempt to modulate your
brake pressure and do not try to
pump your brakes. Depress your
brake pedal as hard as possible.
When you apply your brakes under
conditions which may lock the
wheels, you may hear sounds from
the brakes, or feel a corresponding
sensation in the brake pedal. This is
normal and it means your ABS is
active.
ABS does not reduce the time or dis-
tance it takes to stop the vehicle.
Always maintain a safe distance from
the vehicle in front of you.
ABS will not prevent a skid that
results from sudden changes in
direction, such as trying to take a
corner too fast or making a sudden
lane change. Always drive at a safe
speed for the road and weather con-
ditions.ABS cannot prevent a loss of stabili-
ty. Always steer moderately when
braking hard. Severe or sharp steer-
ing wheel movement can still cause
your vehicle to veer into oncoming
traffic or off the road.
On loose or uneven road surfaces,
operation of the anti-lock brake sys-
tem may result in a longer stopping
distance than for vehicles equipped
with a conventional brake system.
The ABS warning light ( ) will stay
on for several seconds after the
Engine Start/Stop button is in the ON
position. During that time, the ABS
will go through self-diagnosis and the
light will go off if everything is nor-
mal. If the light stays on, you may
have a problem with your ABS.
Contact an authorized HYUNDAI
dealer as soon as possible.(Continued)
Drive your vehicle at reduced
speeds during the following
conditions:
Rough, gravel or snow-cov-
ered roads.
On roads where the road sur-
face is pitted or has different
surface height.
Tire chains are installed on
your vehicle.
The safety features of an ABS
or ESC equipped vehicle should
not be tested by high speed
driving or cornering. This could
endanger the safety of yourself
or others.
Page 354 of 603
5-58
Driving your vehicle
Information
If the indicator (white) is activated
from the previous ignition cycle, the
system will turn ON without any addi-
tional control. If you press the LKA
system button again, the indicator on
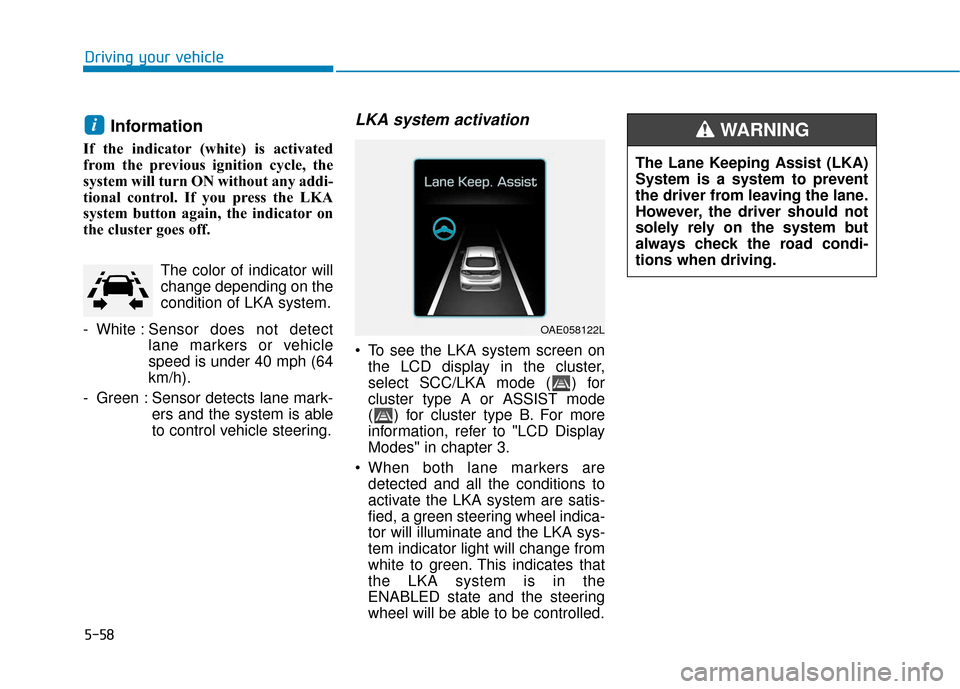
the cluster goes off. The color of indicator will
change depending on the
condition of LKA system.
- White : Sensor does not detect
lane markers or vehicle
speed is under 40 mph (64
km/h).
- Green : Sensor detects lane mark- ers and the system is able
to control vehicle steering.
LKA system activation
To see the LKA system screen onthe LCD display in the cluster,
select SCC/LKA mode ( ) for
cluster type A or ASSIST mode
( ) for cluster type B. For more
information, refer to "LCD Display
Modes" in chapter 3.
When both lane markers are detected and all the conditions to
activate the LKA system are satis-
fied, a green steering wheel indica-
tor will illuminate and the LKA sys-
tem indicator light will change from
white to green. This indicates that
the LKA system is in the
ENABLED state and the steering
wheel will be able to be controlled.
i
OAE058122L
The Lane Keeping Assist (LKA)
System is a system to prevent
the driver from leaving the lane.
However, the driver should not
solely rely on the system but
always check the road condi-
tions when driving.
WARNING
Page 355 of 603
5-59
Driving your vehicle
5
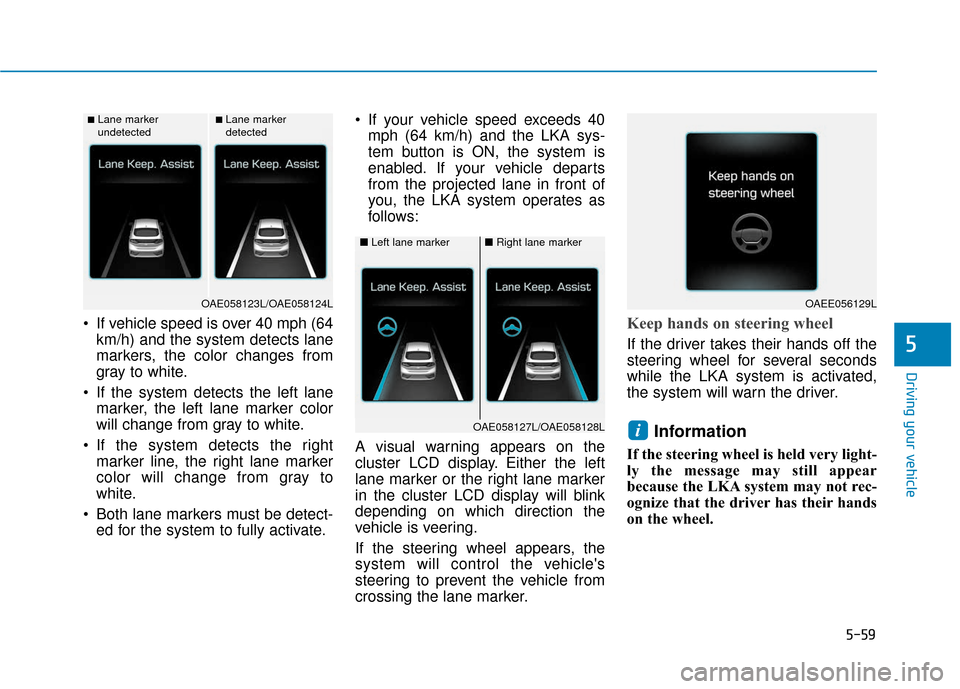
If vehicle speed is over 40 mph (64km/h) and the system detects lane
markers, the color changes from
gray to white.
If the system detects the left lane marker, the left lane marker color
will change from gray to white.
If the system detects the right marker line, the right lane marker
color will change from gray to
white.
Both lane markers must be detect- ed for the system to fully activate. If your vehicle speed exceeds 40
mph (64 km/h) and the LKA sys-
tem button is ON, the system is
enabled. If your vehicle departs
from the projected lane in front of
you, the LKA system operates as
follows:
A visual warning appears on the
cluster LCD display. Either the left
lane marker or the right lane marker
in the cluster LCD display will blink
depending on which direction the
vehicle is veering.
If the steering wheel appears, the
system will control the vehicle's
steering to prevent the vehicle from
crossing the lane marker.Keep hands on steering wheel
If the driver takes their hands off the
steering wheel for several seconds
while the LKA system is activated,
the system will warn the driver.
Information
If the steering wheel is held very light-
ly the message may still appear
because the LKA system may not rec-
ognize that the driver has their hands
on the wheel.
i
■Lane marker
undetected■Lane marker
detected
OAE058123L/OAE058124L
■ Left lane marker■Right lane marker
OAE058127L/OAE058128L
OAEE056129L
Page 358 of 603
5-62
The system will be cancelled when:
You change lanes with the turn sig-nal.
- Using the turn signal to changelanes.
- If you change lanes without the turn signal on, the steering wheel
might be controlled.
LKA system can transit to steering assist mode when the car is near
to middle of the lane after system
on or the lane was changed. LKA
system can not assist steering if
the vehicle follows lane marker too
close continuously before transi-
tion to steering assist mode.
The control of ESC (Electronic Stability Control) or VSM (Vehicle
Stability Management) is activated.
The steering will not be assisted when your drive fast on a sharp
curve.
The steering will not be assisted when vehicle speed is below 40
mph (64 km/h) and over 110 mph
(177 kph).
The steering will not be assisted when you change lanes fast. The steering will not be assisted
when you brake suddenly.
The steering will not be assisted when the lane is very wide or nar-
row.
The steering will not be assisted when only one side lane marker is
detected.
There are more than two lane markers such as a construction
area.
Radius of a curve is too small.
When you turn steering wheel sud- denly, the LKA system will be dis-
abled temporarily.
Driving on a steep slope or hill.
DRIVER'S ATTENTION
The driver must be cautious in the
below situations may not work prop-
erly when recognition of the lane
marker is poor or limited :
When lane and road condition is
poor
It is difficult to distinguish the lane marker from road when the lane
marker is covered with dust or
sand.
It is difficult to distinguish the color of the lane marker from road.
There is something looks like a lane marker.
The lane marker is indistinct or damaged.
The number of lanes increases/ decreases or the lane lines are
crossing (Driving through a toll
plaza/toll gate, merged/divided
lane).
There are more than two lane markers.
The lane marker is very thick or thin.
Driving your vehicle
Page 375 of 603
5-79
Driving your vehicle
5
To decrease the Smart CruiseControl set speed
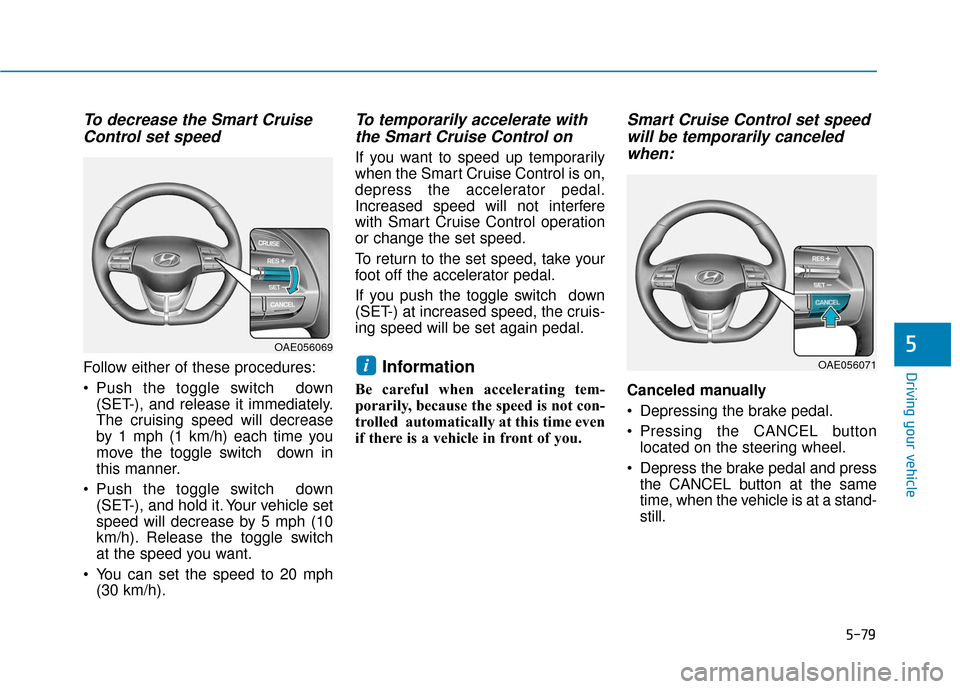
Follow either of these procedures:
Push the toggle switch down
(SET-), and release it immediately.
The cruising speed will decrease
by 1 mph (1 km/h) each time you
move the toggle switch down in
this manner.
Push the toggle switch down (SET-), and hold it. Your vehicle set
speed will decrease by 5 mph (10
km/h). Release the toggle switch
at the speed you want.
You can set the speed to 20 mph (30 km/h).
To temporarily accelerate withthe Smart Cruise Control on
If you want to speed up temporarily
when the Smart Cruise Control is on,
depress the accelerator pedal.
Increased speed will not interfere
with Smart Cruise Control operation
or change the set speed.
To return to the set speed, take your
foot off the accelerator pedal.
If you push the toggle switch down
(SET-) at increased speed, the cruis-
ing speed will be set again pedal.
Information
Be careful when accelerating tem-
porarily, because the speed is not con-
trolled automatically at this time even
if there is a vehicle in front of you.
Smart Cruise Control set speedwill be temporarily canceledwhen:
Canceled manually
Depressing the brake pedal.
Pressing the CANCEL button
located on the steering wheel.
Depress the brake pedal and press the CANCEL button at the same
time, when the vehicle is at a stand-
still.
i
OAE056069
OAE056071
Page 389 of 603
5-93
Driving your vehicle
5
Hazardous Driving Conditions
When hazardous driving elements
are encountered such as water,
snow, ice, mud and sand, take the
below suggestions:
Drive cautiously and keep a longerbraking distance.
Avoid abrupt braking or steering.
When your vehicle is stuck in snow, mud, or sand, use second gear.
Accelerate slowly to avoid unnec-
essary wheel spin.
Put sand, rock salt, tire chains or other non-slip materials under the
wheels to provide additional trac-
tion while the vehicle becomes
stuck in ice, snow, or mud.
Rocking the Vehicle
If it is necessary to rock the vehicle
to free it from snow, sand, or mud,
first turn the steering wheel right and
left to clear the area around your
front wheels. Then, shift back and
forth between R (Reverse) and a for-
ward gear.
Try to avoid spinning the wheels, and
do not race the engine.
To prevent transmission wear, wait
until the wheels stop spinning before
shifting gears. Release the accelera-
tor pedal while shifting, and press
lightly on the accelerator pedal while
the transmission is in gear. Slowly
spinning the wheels in forward and
reverse directions causes a rocking
motion that may free the vehicle.
S SP
P E
EC
CI
IA
A L
L
D
D R
RI
IV
V I
IN
N G
G
C
C O
O N
ND
DI
IT
T I
IO
O N
NS
S
Downshifting with an dual
clutch transmission while driv-
ing on slippery surfaces can
cause an accident. The sudden
change in tire speed could
cause the tires to skid. Be care-
ful when downshifting on slip-
pery surfaces.
WARNING
If the vehicle is stuck and
excessive wheel spin occurs,
the temperature in the tires can
increase very quickly. If the tires
become damaged, a tire blow
out or tire explosion can occur.
This condition is dangerous -
you and others may be injured.
Do not attempt this procedure if
people or objects are anywhere
near the vehicle.
If you attempt to free the vehicle,
the vehicle can overheat quickly,
possibly causing an engine
compartment fire or other dam-
age. Try to avoid spinning the
wheels as much as possible to
prevent overheating of either the
tires or the engine. DO NOT
allow the vehicle to spin the
wheels above 35 mph (56 km/h).
WARNING
Page 394 of 603
5-98
Driving your vehicle
- When using tire chains:
Wrong size chains or improperly installed chains can damage
your vehicle's brake lines, sus-
pension, body and wheels.
Use SAE "S" class or wire chains.
If you hear noise caused by chains contacting the body,
retighten the chain to prevent
contact with the vehicle body.
To prevent body damage, retighten the chains after driving
0.3~0.6 miles (0.5~1.0 km).
Do not use tire chains on vehi- cles equipped with aluminum
wheels. If unavoidable, use a
wire type chain.
Use wire chains less than 0.47 inch (12 mm) wide to prevent
damage to the chain's connec-
tion.
Winter Precautions
Use high quality ethylene glycolcoolant
Your vehicle is delivered with high
quality ethylene glycol coolant in the
cooling system. It is the only type of
coolant that should be used because
it helps prevent corrosion in the cool-
ing system, lubricates the water
pump and prevents freezing. Be sure
to replace or replenish your coolant
in accordance with the maintenance
schedule in chapter 7. Before winter,
have your coolant tested to assure
that its freezing point is sufficient for
the temperatures anticipated during
the winter.
Change to "winter weight" oil ifnecessary
In some climates it is recommended
that a lower viscosity "winter weight"
oil be used during cold weather. See
chapter 8 for recommendations. If
you aren't sure what weight oil you
should use, consult an authorized
HYUNDAI dealer.
Check battery and cables
Winter puts additional burdens on
the battery system. Visually inspect
the battery and cables as described
in chapter 7. The level of charge in
your battery can be checked by an
authorized HYUNDAI dealer or a
service station.
NOTICE
Page 422 of 603
6-21
What to do in an emergency
6
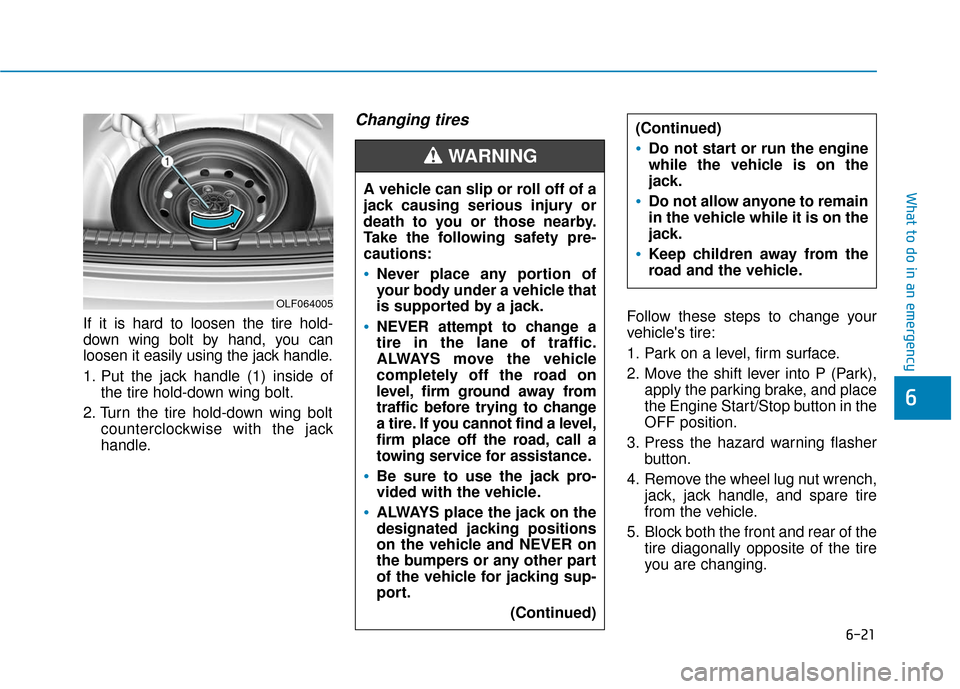
If it is hard to loosen the tire hold-
down wing bolt by hand, you can
loosen it easily using the jack handle.
1. Put the jack handle (1) inside ofthe tire hold-down wing bolt.
2. Turn the tire hold-down wing bolt counterclockwise with the jack
handle.
Changing tires
Follow these steps to change your
vehicle's tire:
1. Park on a level, firm surface.
2. Move the shift lever into P (Park),apply the parking brake, and place
the Engine Start/Stop button in the
OFF position.
3. Press the hazard warning flasher button.
4. Remove the wheel lug nut wrench, jack, jack handle, and spare tire
from the vehicle.
5. Block both the front and rear of the tire diagonally opposite of the tire
you are changing.
A vehicle can slip or roll off of a
jack causing serious injury or
death to you or those nearby.
Take the following safety pre-
cautions:
Never place any portion of
your body under a vehicle that
is supported by a jack.
NEVER attempt to change a
tire in the lane of traffic.
ALWAYS move the vehicle
completely off the road on
level, firm ground away from
traffic before trying to change
a tire. If you cannot find a level,
firm place off the road, call a
towing service for assistance.
Be sure to use the jack pro-
vided with the vehicle.
ALWAYS place the jack on the
designated jacking positions
on the vehicle and NEVER on
the bumpers or any other part
of the vehicle for jacking sup-
port.
(Continued)
(Continued)
Do not start or run the engine
while the vehicle is on the
jack.
Do not allow anyone to remain
in the vehicle while it is on the
jack.
Keep children away from the
road and the vehicle.
WARNING
OLF064005
Page 425 of 603
6-24
What to do in an emergency
Check the tire pressure as soon
as possible after installing a spare
tire. Adjust it to the recommended
pressure.
If any of the equipment such as the
jack, lug nuts, studs, or other equip-
ment is damaged or in poor condi-
tion, do not attempt to change the
tire and call for assistance.
Use of compact spare tires
(if equipped)
Compact spare tires are designed for
emergency use only. Drive carefully
on the compact spare tire and
always follow the safety precautions. When driving with the compact spare
tire mounted to your vehicle:
Check the tire pressure after
installing the compact spare tire.
The compact spare tire should be
inflated to 60 psi (420 kPa).
Do not take this vehicle through an automatic car wash while the com-
pact spare tire is installed.
Do not use the compact spare tire on any other vehicle because this
tire has been designed especially
for your vehicle.
The compact spare tire’s tread life is shorter than a regular tire.
Inspect your compact spare tire
regularly and replace worn com-
pact spare tires with the same size
and design, mounted on the same
wheel.
Do not use more than one compact spare tire at a time.
NOTICE
Your vehicle has metric threads
on the studs and lug nuts. Make
certain during tire changing
that the same nuts that were
removed are reinstalled. If you
have to replace your lug nuts
make sure they have metric
threads to avoid damaging the
studs and ensure the wheel is
properly secured to the hub.
Consult an authorized
HYUNDAI dealer for assistance.
CAUTION
To prevent compact spare tire
failure and loss of control pos-
sibly resulting in an accident:
Use the compact spare tire
only in an emergency.
NEVER operate your vehicle
over 50 mph (80 km/h).
Do not exceed the vehicle's
maximum load rating or the
load carrying capacity shown
on the sidewall of the com-
pact spare tire.
Do not use the compact spare
tire continuously. Repair or
replace the original tire as
soon as possible to avoid fail-
ure of the compact spare tire.
WARNING
Page 452 of 603
7-7
7
Maintenance
How to Disconnect the (-)
Cable for Regular Maintenance
(Hybrid vehicle)
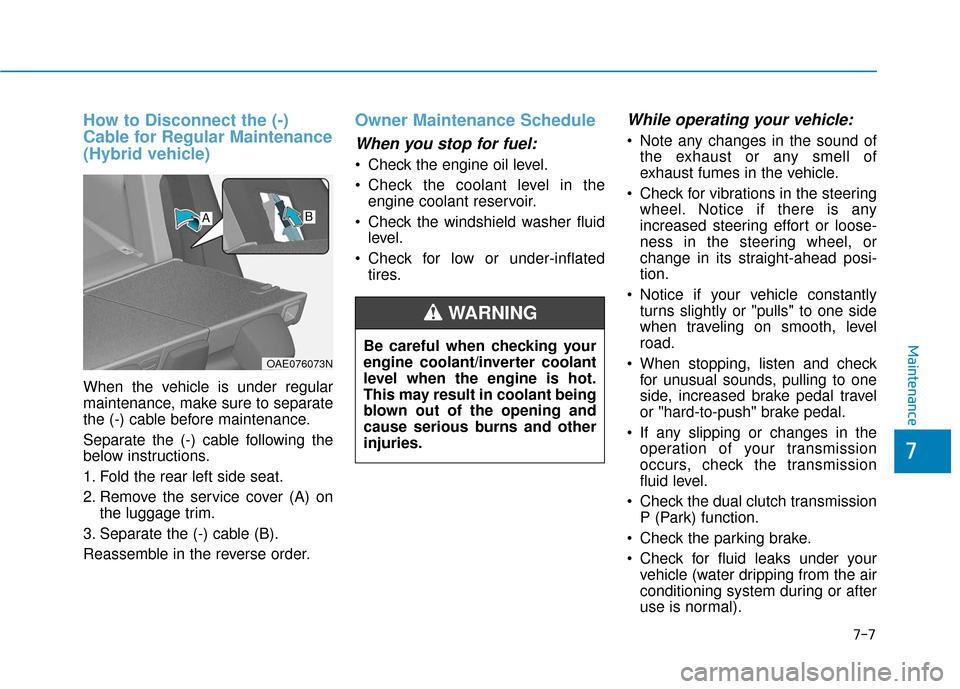
When the vehicle is under regular
maintenance, make sure to separate
the (-) cable before maintenance.
Separate the (-) cable following the
below instructions.
1. Fold the rear left side seat.
2. Remove the service cover (A) onthe luggage trim.
3. Separate the (-) cable (B).
Reassemble in the reverse order.
Owner Maintenance Schedule
When you stop for fuel:
• Check the engine oil level.
Check the coolant level in the engine coolant reservoir.
Check the windshield washer fluid level.
Check for low or under-inflated tires.
While operating your vehicle:
Note any changes in the sound ofthe exhaust or any smell of
exhaust fumes in the vehicle.
Check for vibrations in the steering wheel. Notice if there is any
increased steering effort or loose-
ness in the steering wheel, or
change in its straight-ahead posi-
tion.
Notice if your vehicle constantly turns slightly or "pulls" to one side
when traveling on smooth, level
road.
When stopping, listen and check for unusual sounds, pulling to one
side, increased brake pedal travel
or "hard-to-push" brake pedal.
If any slipping or changes in the operation of your transmission
occurs, check the transmission
fluid level.
Check the dual clutch transmission P (Park) function.
Check the parking brake.
Check for fluid leaks under your vehicle (water dripping from the air
conditioning system during or after
use is normal).
Be careful when checking your
engine coolant/inverter coolant
level when the engine is hot.
This may result in coolant being
blown out of the opening and
cause serious burns and other
injuries.
WARNING
OAE076073N
AB