display Hyundai Ioniq Plug-in Hybrid 2018 Repair Manual
[x] Cancel search | Manufacturer: HYUNDAI, Model Year: 2018, Model line: Ioniq Plug-in Hybrid, Model: Hyundai Ioniq Plug-in Hybrid 2018Pages: 589, PDF Size: 21.53 MB
Page 205 of 589

3-113
Convenient features of your vehicle
3
Timer (3)
The timer is the total driving timesince the last timer reset.
To reset the timer, press the OK button on the steering wheel for
more than 1 second when the timer
is displayed.
Information
The timer will continue to be counted
while the engine is still running (for
example, when the vehicle is in traffic
or stopped at a stop light.)
Digital speedometer
This message shows the speed of
the vehicle.
Drive Info display
At the end of each driving cycle, the
Driving Info message is displayed.
This display shows the trip distance
(1), average fuel economy (2), remain-
ing vehicle range (3), and charging
status (4).
This information is displayed for a few
seconds when you turn off the vehicle,
and then goes off automatically. The
information is calculated for each time
the vehicle is turned on.
Information
If sunroof open warning is displayed
in the cluster, the Driving Info mes-
sage will not be displayed.
i
i
OTLA045193/OAEE046153R
■ Type A■Type B
OAEPH047195N/OAEPH047538N
■Type A■Type B
Page 206 of 589

3-114
Convenient features of your vehicle
Driving style
The driving style is displayed when
you are driving in ECO mode.
When you drive in SPORT mode,
each driving category will be dis-
played with "--".
Energy flow
The hybrid system informs the driv-
ers its energy flow in various operat-
ing modes. While driving, the current
energy flow is specified in 11 modes.
For more information, refer to HEV
Energy Flow in the "Hybrid System
Overview" provided in front of the
owner's manual.
Engine coolant temperature
This gauge indicates the tempera-
ture of the engine coolant when the
engine is running.
When the gauge indicator gets out
of the normal range, toward the "H
(Hot)" position, it indicates over-
heating of the engine. It may dam-
age the engine.
Do not continue driving with the
overheated engine. For further
information, refer to "If the Engine
Overheats" in the chapter 6.
NOTICE
OAE046148L/OAE046124L
■Type A■Type B■Type A■Type B
OAE046149L/OAEQ046001LOAE046125L
■Type B
Page 210 of 589

3-118
Convenient features of your vehicle
One-touch turn signal function
To activate the One Touch Turn
Signal function, push the turn signal
lever up or down to position (B) and
then release it.
The lane change signals will blink 3,
5 or 7 times.
You can activate or deactivate the
One Touch Turn Signal function or
choose the number of blinks (3, 5, or
7) from the User Settings mode
(Light) on the LCD display.
For more information, refer to the
"LCD Display" section in this
chapter.
Battery saver function
The purpose of this feature is to pre-
vent the battery from being dis-
charged. The system automatically
turns off the parking lamp when the
driver turns the vehicle off and opens
the driver-side door.
With this feature, the parking lamps
will turn off automatically if the driver
parks on the side of road at night.
If necessary, to keep the lamps on
when the vehicle is turned off, per-
form the following:
1) Open the driver-side door.
2) Turn the parking lamps OFF andON again using the light switch on
the steering column.
Headlamp delay function (if equipped)
If the Engine Start/Stop button is
placed in the ACC position or the
OFF position with the headlamps
ON, the headlamps (and/or parking
lamps) remain on for about 5 min-
utes. However, if the driver's door is
opened and closed, the headlights
are turned off after 15 seconds. Also,
with the vehicle off if the driver's door
is opened and closed, the head-
lamps (and/or parking lamps) are
turned off after 15 seconds.
The headlamps (and/or parking
lamps) can be turned off by pressing
the lock button on the smart key
twice or turning the light switch to the
OFF or AUTO position.
You can activate or deactivate the
Headlamp Delay function from the
User Settings mode (Light) on the
LCD display.
For more information, refer to the
"LCD Display" section in this
chapter.
Page 214 of 589

3-122
Convenient features of your vehicle
Welcome System (if equipped)
Welcome light (if equipped)
Door handle lamp (if equipped)
When all the doors (and liftgate) are
closed and locked, the door handle
lamp will come on for about 15 sec-
onds if any of the below is performed.
When the door unlock button ispressed on the smart key.
When the button of the outside door handle is pressed with the
smart key in possession.
When the vehicle is approached with the smart key in possession.
Headlamp and parking lamp
When the headlamp (with the lamp
switch in the headlamp or AUTO
position) is on and all doors (and
trunk) are locked and closed, the
parking lamp and headlamp will
come on for 15 seconds when the
door unlock button is pressed on the
smart key.
At this time, if you press the door lock
or unlock button on the smart key the
parking lamp and headlamp will turn
off immediately.
You can activate or deactivate the
Welcome Light from the User
Settings mode on the LCD display.
For more details, refer to "LCD
Display" in this chapter.
Interior lamp
When the interior lamp switch is in
the DOOR position and all doors (and
tailgate) are closed and locked, the
room lamp will come on for 30 sec-
onds if any of the below is performed.
When the door unlock button ispressed on the smart key.
When the button of the outside door handle is pressed.
At this time, if you press the door lock
or unlock button, the room lamp will
turn off immediately.
OAE046409N
Page 217 of 589

3-125
Convenient features of your vehicle
3
D
DR
RI
IV
V E
ER
R
A
A S
SS
SI
IS
S T
T
S
S Y
Y S
ST
T E
EM
M
Rear View Camera
The Rear View Camera will activate
when the vehicle is in the ready ( )
mode and when you shift to the R
(Reverse) position. This is a supplemental system that
helps provide a view of the area
behind the vehicle through the A/V
display while the vehicle is in the R
(Reverse) position.
Always keep the camera lens
clean. The camera may not work
normally if the lens is covered
with dirt, water or snow.
NOTICE
The Rear View Camera is not a
safety device. It only serves to
assist the driver in identifying
objects directly behind the mid-
dle of the vehicle. The camera
does NOT cover the complete
area behind the vehicle.
WARNING
Never rely solely on the Rear
View Camera when backing-
up.
ALWAYS look around your
vehicle to make sure there are
no objects or obstacles before
moving the vehicle in any
direction to prevent a collision.
Always pay close attention
when the vehicle is driven
close to objects, particularly
pedestrians, and especially
children.
WARNING
OAE046407N
OAE046406
Page 226 of 589

3-134
Convenient features of your vehicle
Temperature control
Turn the knob to the right to increase
the temperature. Turn the knob to the
left to decrease temperature.
The temperature will increase or
decrease by 1°F/0.5°C.
Temperature conversion
If the battery has been discharged or
disconnected, the temperature mode
display will reset to Fahrenheit.
To change the temperature unit from
°F to °C or °C to °F:
- On the instrument cluster, go toUser Settings Mode ➝ Other
(Features) ➝Temperature Unit.
- Press and hold the AUTO and OFF buttons on the climate control unit
for 3 seconds.
The temperature unit on both on the
cluster LCD display and climate con-
trol information screen will change.
Sync button
Adjusting the driver and passenger
side temperature equally
Press the "SYNC" button to oper- ate the driver and passenger side
temperature equally.
The passenger side temperature
will be set to the same temperature
as the driver side temperature.
Turn the left temperature control knob. The driver and passenger
side temperature will be adjusted
equally.
■ Driver’s side■Front passenger’s side
OAE046310OAE046311
Page 236 of 589
3-144
When the Auto Defogging
System operates, the indi-
cator will illuminate.
If high levels of moisture are sensed in
the vehicle, the Auto Defogging System
will operate in the following order:
Step 1 : Outside air position
Step 2 : Operating the air conditioning
Step 3 : Blowing air toward the wind- shield
Step 4 : Increasing air flow toward the windshield
If the air conditioning is off or recircu-
lated air position is manually select-
ed while Auto Defogging System is
ON, the Auto Defogging System
Indicator will blink 3 times to signal
that the manual operation has been
canceled.To cancel or reset the
Auto Defogging System
Press the front windshield defroster
button for 3 seconds when the
Engine Start/Stop button is in the ON
position. When the Auto Defogging
System is canceled, the ADS OFF
symbol will blink 3 times and ADS
OFF will be displayed on the climate
control information screen.
When the Auto Defogging System is
reset, the ADS OFF symbol will blink
6 times without a signal.
Information
• When the air conditioning is turned on by Auto defogging system, if you
try to turn off the air conditioning, the
indicator will blink 3 times and the air
conditioning will not be turned off.
• For efficiency, do not select recircu- lated air position while the Auto
defogging system is operating.
• When Auto defogging mode is selected, fan speed, temperature and
intake mode which is adjusted man-
ually are canceled for better defog-
ging result. Do not remove the sensor cover
located on the upper end of the
windshield glass.
Damage to system parts could
occur and may not be covered by
your vehicle warranty.
NOTICE
i
Convenient features of your vehicle
Page 242 of 589
3-150
Convenient features of your vehicle
To prevent damage to the Power
Outlets :
Use the power outlet only when the vehicle is in the ready ( )
mode and remove the accessory
plug after use. Using the acces-
sory plug for prolonged periods
of time with the vehicle off could
cause the battery to discharge.
Only use 12V electric acces- sories which are less than 180 W
(Watts) in electric capacity.
Adjust the air-conditioner or heater to the lowest operating
level when using the power outlet.
Close the cover when not in use. (Continued)(Continued)
Some electronic devices can
cause electronic interference
when plugged into a vehicle’s
power outlet. These devices may
cause excessive audio static
and malfunctions in other elec-
tronic systems or devices used
in your vehicle.
Push the plug in as far as it will go. If good contact is not made,
the plug may overheat and the
fuse may open.
Plug in battery equipped electri- cal/electronic devices with
reverse current protection. The
current from the battery may
flow into the vehicle’s electri-
cal/electronic system and cause
system malfunction.
USB Charger (if equipped)
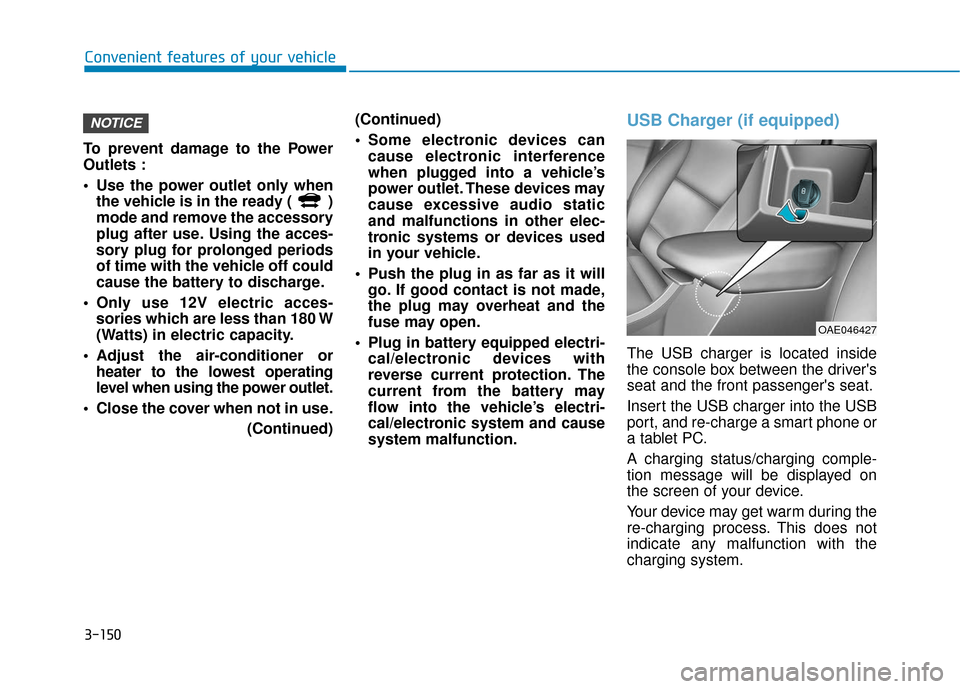
The USB charger is located inside
the console box between the driver's
seat and the front passenger's seat.
Insert the USB charger into the USB
port, and re-charge a smart phone or
a tablet PC.
A charging status/charging comple-
tion message will be displayed on
the screen of your device.
Your device may get warm during the
re-charging process. This does not
indicate any malfunction with the
charging system.
NOTICE
OAE046427
Page 243 of 589
3-151
Convenient features of your vehicle
3
A device that requires a specific re-
charging method may not properly
re-charge with this USB charger. If
this is the case, use the specified
charger for your device.
This USB charging terminal will not
allow you to play your media on the
AVN unit. To connect your media to
the AVN unit, use the USB port in the
multi box and follow steps in the Car
Multimedia User's Manual that is
supplied with the vehicle.Wireless Cellular Phone
Charging System (if equipped)
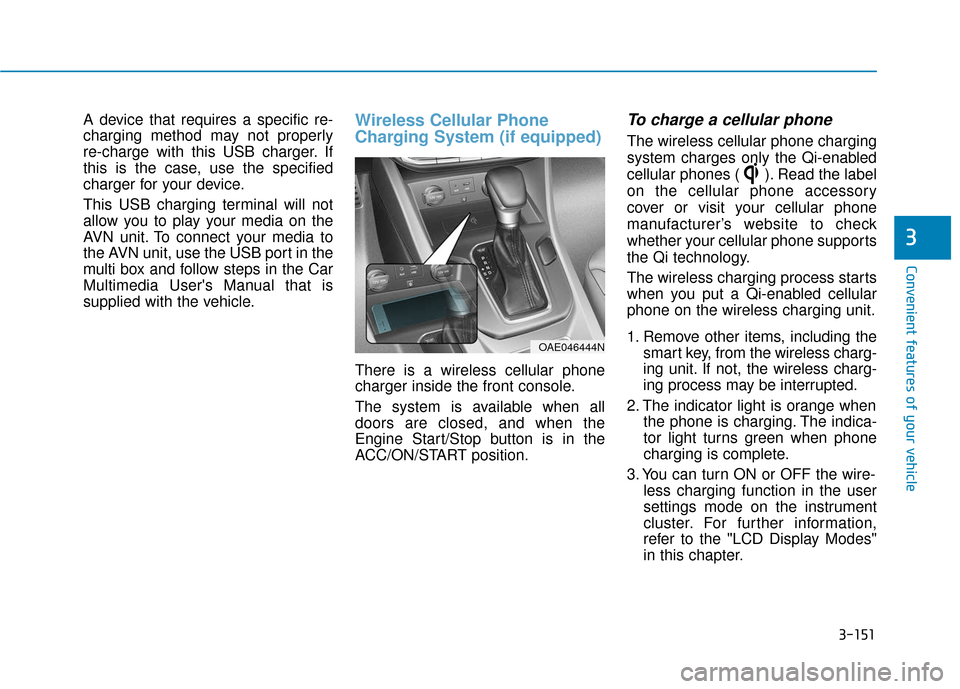
There is a wireless cellular phone
charger inside the front console.
The system is available when all
doors are closed, and when the
Engine Start/Stop button is in the
ACC/ON/START position.
To charge a cellular phone
The wireless cellular phone charging
system charges only the Qi-enabled
cellular phones ( ). Read the label
on the cellular phone accessory
cover or visit your cellular phone
manufacturer’s website to check
whether your cellular phone supports
the Qi technology.
The wireless charging process starts
when you put a Qi-enabled cellular
phone on the wireless charging unit.
1. Remove other items, including thesmart key, from the wireless charg-
ing unit. If not, the wireless charg-
ing process may be interrupted.
2. The indicator light is orange when the phone is charging. The indica-
tor light turns green when phone
charging is complete.
3. You can turn ON or OFF the wire- less charging function in the user
settings mode on the instrument
cluster. For further information,
refer to the "LCD Display Modes"
in this chapter.
OAE046444N
Page 244 of 589
3-152
Convenient features of your vehicle
If your phone is not charging:
- Slightly change the position of the cellular phone on the charging pad.
- Make sure the indicator light is orange.
Depending on the cellular phone type,
the indicator light may not turn green
even though the charging is complete.
The indicator light will blink orange for
10 seconds if there is a malfunction in
the wireless charging system.
In this case, temporarily stop the
charging process, and re-attempt to
wirelessly charge your cellular phone
again.
The system warns you with a message
on the LCD display if the cellular phone
is still on the wireless charging unit
after the Engine Start/Stop button is in
the OFF position and the front door is
opened.
The wireless cellular phone charging system may not sup-
port certain cellular phones,
which are not verified for the Qi
specification ( ).
(Continued)(Continued)
Locate your cell phone well in
the middle of the wireless cellu-
lar phone charging system.
Even when your cell phone
locates slightly to one side, the
charging speed may decrease.
The wireless charging process may temporarily stop, when a
smart key function operates (i.e.
starting the vehicle, opening the
doors, closing the doors).
For certain cell phones, the indi- cator color may not change to
green, even when the wireless
charging process is properly
completed.
The wireless charging process may temporarily stop, when tem-
perature abnormally increases
inside the wireless cellular
phone charging system. The
wireless charging process
restarts, when temperature falls
to a certain level.
The wireless charging process may temporarily stop when
there is any metallic item, such
as a coin, between the wireless
cellular phone charging system
and a cellular phone.
Clock
Vehicles with Audio system
Select the [SETUP] button on the
audio system ➟ Select [Date/Time].
Set time: Set the time displayed on the audio screen.
Time format: Choose between 12- hour and 24-hour time formats.
Vehicles with Navigation system
Select the Settings menu on the
Navigation system ➟Select
[Date/Time].
GPS time: Displays time according to the received GNSS time.
24-hour: Switches to 12 hour or 24 hour.
NOTICE
Do not adjust the clock while
driving, you may lose your
steering control and cause an
accident that results in severe
personal injury or death.
WARNING