lights HYUNDAI IX35 2014 Owner's Manual
[x] Cancel search | Manufacturer: HYUNDAI, Model Year: 2014, Model line: IX35, Model: HYUNDAI IX35 2014Pages: 1534, PDF Size: 39.76 MB
Page 163 of 1534
491
Features of your vehicle
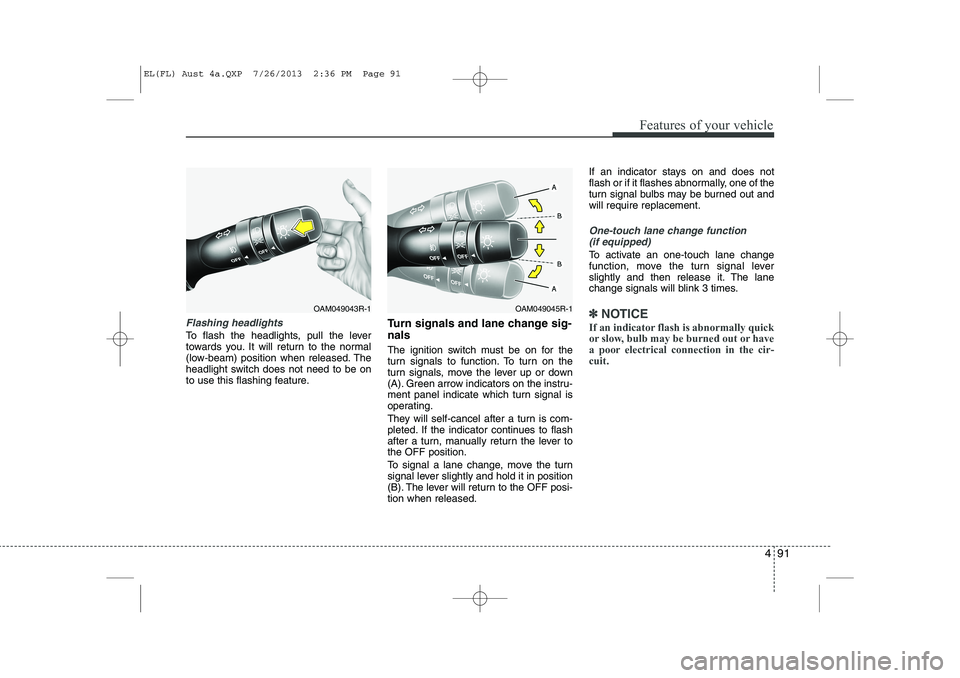
Flashing headlights
To flash the headlights, pull the lever
towards you. It will return to the normal
(low-beam) position when released. The
headlight switch does not need to be on
to use this flashing feature.Turn signals and lane change sig- nals
The ignition switch must be on for the
turn signals to function. To turn on the
turn signals, move the lever up or down
(A). Green arrow indicators on the instru-
ment panel indicate which turn signal is
operating.
They will self-cancel after a turn is com-
pleted. If the indicator continues to flash
after a turn, manually return the lever tothe OFF position.
To signal a lane change, move the turn
signal lever slightly and hold it in position
(B). The lever will return to the OFF posi-tion when released.If an indicator stays on and does not
flash or if it flashes abnormally, one of the
turn signal bulbs may be burned out andwill require replacement.
One-touch lane change function
(if equipped)
To activate an one-touch lane change
function, move the turn signal lever
slightly and then release it. The lane
change signals will blink 3 times.
✽✽ NOTICE
If an indicator flash is abnormally quick
or slow, bulb may be burned out or have
a poor electrical connection in the cir-cuit.OAM049045R-1OAM049043R-1
EL(FL) Aust 4a.QXP 7/26/2013 2:36 PM Page 91
Page 164 of 1534
Features of your vehicle
92
4
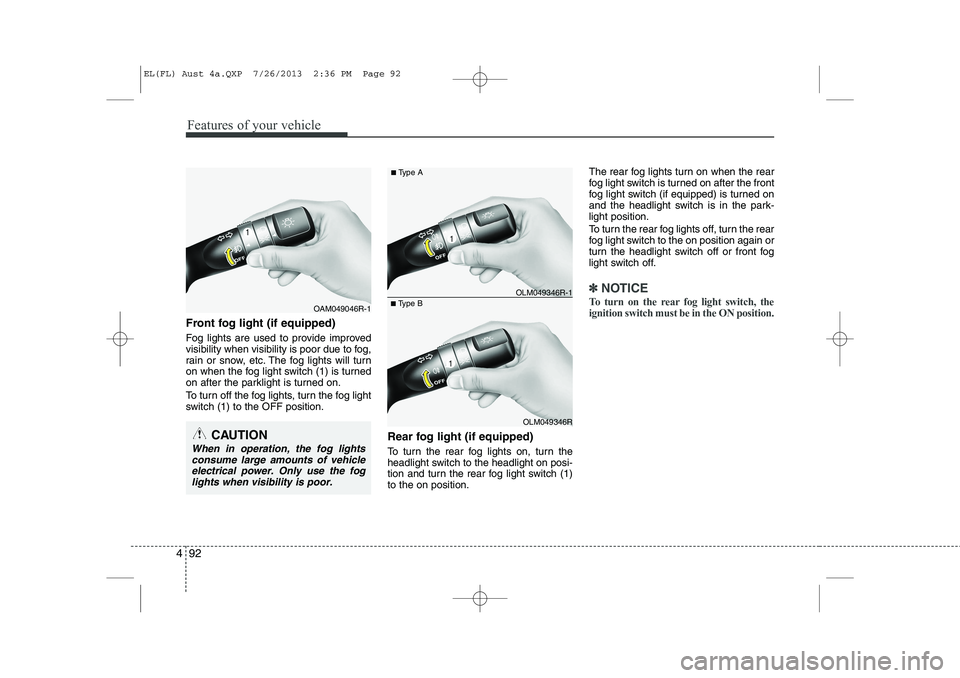
Front fog light (if equipped)
Fog lights are used to provide improved
visibility when visibility is poor due to fog,
rain or snow, etc. The fog lights will turn
on when the fog light switch (1) is turned
on after the parklight is turned on.
To turn off the fog lights, turn the fog light
switch (1) to the OFF position.
Rear fog light (if equipped)
To turn the rear fog lights on, turn the
headlight switch to the headlight on posi-
tion and turn the rear fog light switch (1)to the on position.The rear fog lights turn on when the rear
fog light switch is turned on after the front
fog light switch (if equipped) is turned on
and the headlight switch is in the park-light position.
To turn the rear fog lights off, turn the rear
fog light switch to the on position again or
turn the headlight switch off or front fog
light switch off.
✽✽
NOTICE
To turn on the rear fog light switch, the ignition switch must be in the ON position.
CAUTION
When in operation, the fog lights consume large amounts of vehicleelectrical power. Only use the foglights when visibility is poor.
OLM049346R
■
Type B OLM049346R-1
■
Type A
OAM049046R-1
EL(FL) Aust 4a.QXP 7/26/2013 2:36 PM Page 92
Page 165 of 1534
493
Features of your vehicle
Daytime running light (if equipped)
Daytime Running Lights (DRL) can make
it easier for others to see the front of your
vehicle during the day. DRL can be help-
ful in many different driving conditions,
and it is especially helpful after dawn and
before sunset.
The DRL system will make the head-
lights turn OFF when:
1. The headlight switch is ON.
2. The front fog light switch is ON.
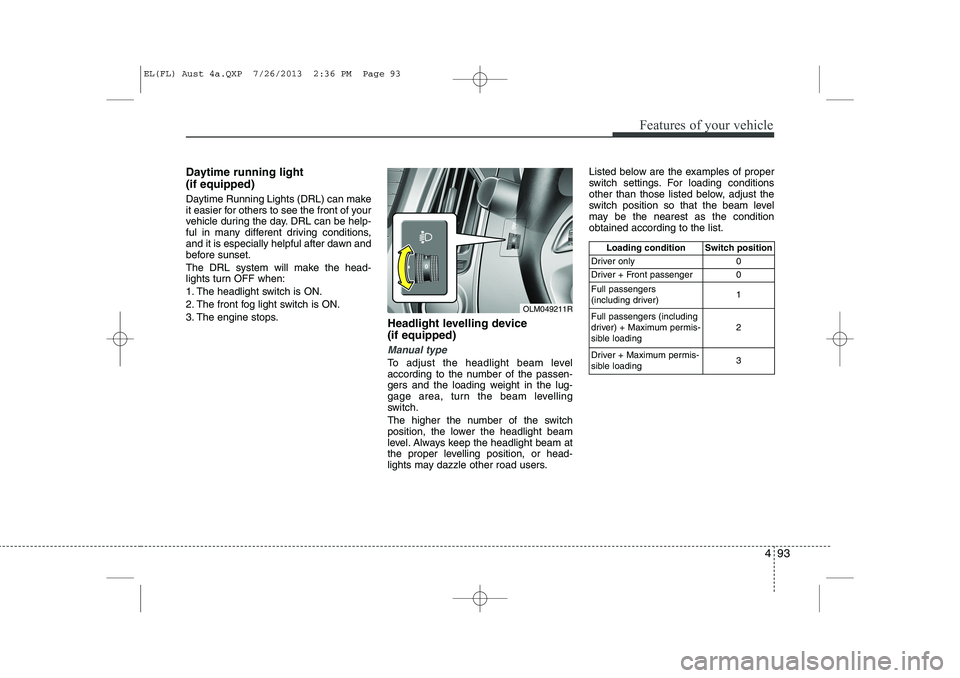
3. The engine stops.Headlight levelling device (if equipped)
Manual type
To adjust the headlight beam level
according to the number of the passen-
gers and the loading weight in the lug-
gage area, turn the beam levelling
switch.
The higher the number of the switch
position, the lower the headlight beam
level. Always keep the headlight beam at
the proper levelling position, or head-
lights may dazzle other road users.Listed below are the examples of proper
switch settings. For loading conditions
other than those listed below, adjust the
switch position so that the beam level
may be the nearest as the conditionobtained according to the list.
Loading condition Switch position
Driver only 0
Driver + Front passenger 0 Full passengers
(including driver) 1
Full passengers (including
driver) + Maximum permis-
sible loading 2
Driver + Maximum permis-
sible loading 3
OLM049211R
EL(FL) Aust 4a.QXP 7/26/2013 2:36 PM Page 93
Page 170 of 1534
Features of your vehicle
98
4
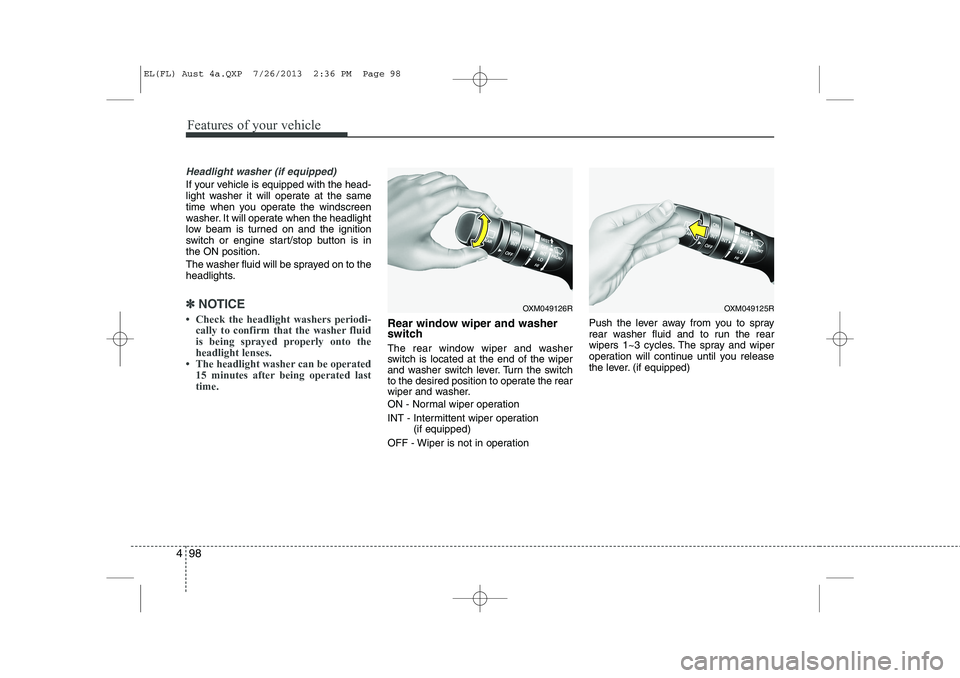
Headlight washer (if equipped)
If your vehicle is equipped with the head-
light washer it will operate at the same
time when you operate the windscreen
washer. It will operate when the headlight
low beam is turned on and the ignition
switch or engine start/stop button is inthe ON position.
The washer fluid will be sprayed on to the
headlights.
✽✽
NOTICE
Page 171 of 1534
499
Features of your vehicle
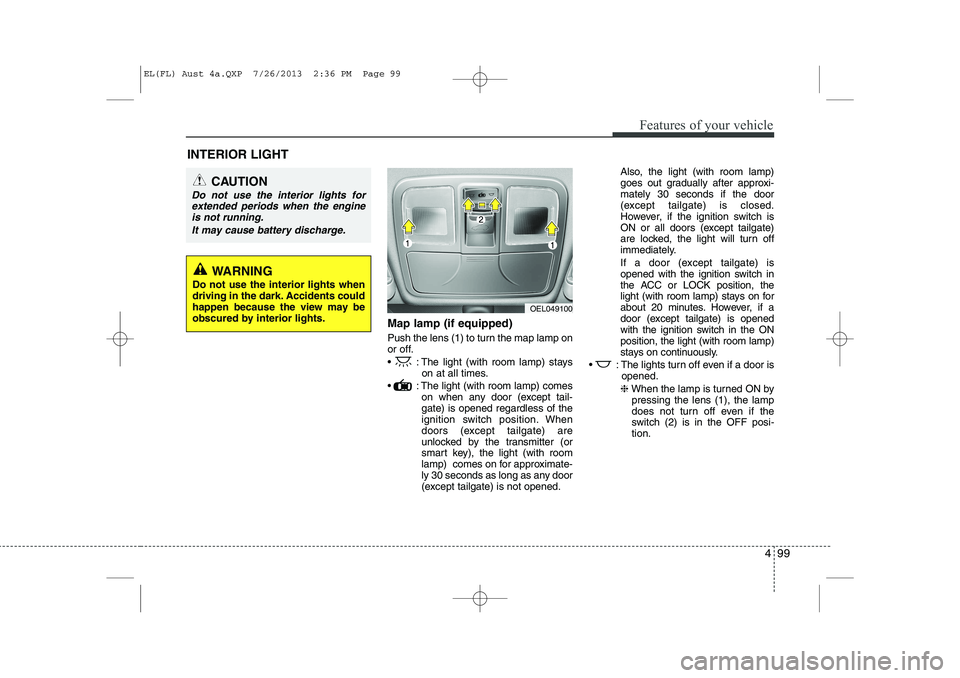
Map lamp (if equipped)
Push the lens (1) to turn the map lamp on
or off.
: The light (with room lamp) stayson at all times.
: The light (with room lamp) comes on when any door (except tail- gate) is opened regardless of the
ignition switch position. When
doors (except tailgate) are
unlocked by the transmitter (or
smart key), the light (with room
lamp) comes on for approximate-
ly 30 seconds as long as any door
(except tailgate) is not opened. Also, the light (with room lamp)
goes out gradually after approxi-mately 30 seconds if the door
(except tailgate) is closed.
However, if the ignition switch is
ON or all doors (except tailgate)
are locked, the light will turn off
immediately.
If a door (except tailgate) is
opened with the ignition switch in
the ACC or LOCK position, the
light (with room lamp) stays on for
about 20 minutes. However, if a
door (except tailgate) is opened
with the ignition switch in the ONposition, the light (with room lamp)
stays on continuously.
: The lights turn off even if a door is opened.
❈ When the lamp is turned ON by
pressing the lens (1), the lamp
does not turn off even if the
switch (2) is in the OFF posi-tion.
INTERIOR LIGHT
CAUTION
Do not use the interior lights for
extended periods when the engine
is not running.
It may cause battery discharge.
OEL049100
WARNING
Do not use the interior lights when
driving in the dark. Accidents could
happen because the view may be
obscured by interior lights.
EL(FL) Aust 4a.QXP 7/26/2013 2:36 PM Page 99
Page 173 of 1534
4 101
Features of your vehicle
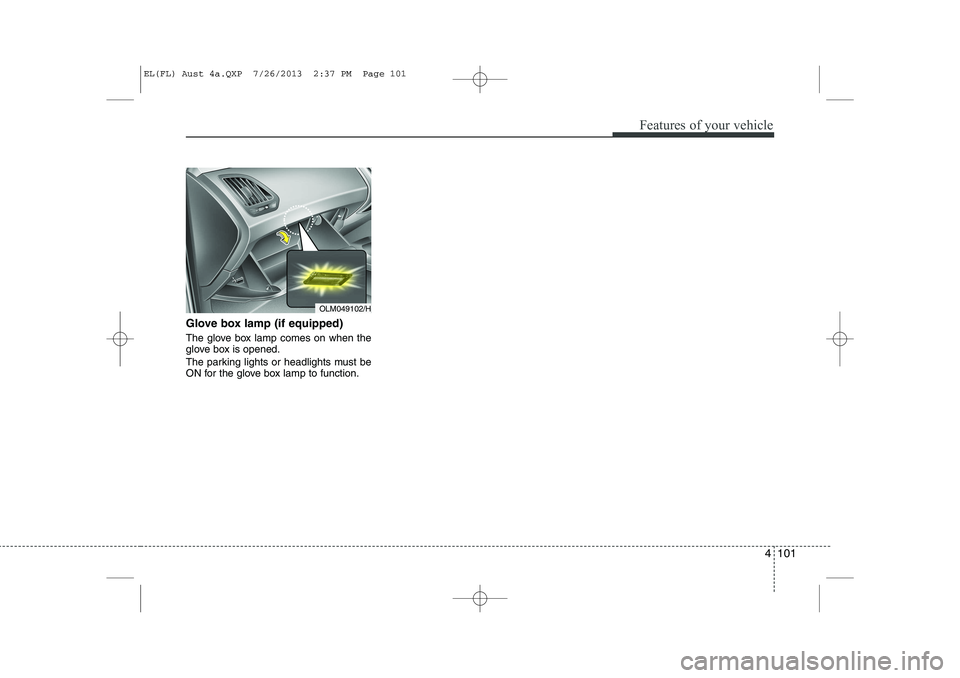
Glove box lamp (if equipped)
The glove box lamp comes on when the
glove box is opened.
The parking lights or headlights must be
ON for the glove box lamp to function.
OLM049102/H
EL(FL) Aust 4a.QXP 7/26/2013 2:37 PM Page 101
Page 209 of 1534
Driving your vehicle
4
5
Before entering vehicle
• Be sure that all windows, outside mir-
ror(s), and outside lights are clean.
Check the condition of the tyres.
Check under the vehicle for any sign of leaks.
Be sure there are no obstacles behind you if you intend to back up. Necessary inspections
Fluid levels, such as engine oil, engine
coolant, brake fluid, and washer fluid
should be checked on a regular basis,
with the exact interval depending on the
fluid. Further details are provided in
Section 7, “Maintenance”.
Before starting
Close and lock all doors.
Position the seat so that all controls are
easily reached.
Adjust the inside and outside rearview mirrors.
Be sure that all lights work.
Check all gauges.
Check the operation of warning lights when the ignition switch is turned to the ON position.
Release the parking brake and make sure the brake warning light goes out.
For safe operation, be sure you are famil-
iar with your vehicle and its equipment.
BEFORE DRIVING
WARNING
All passengers must be properly
belted whenever the vehicle is mov-
ing. Refer to “Seat belts” in section
3 for more information on their
proper use.
WARNING
Always check the surrounding
areas near your vehicle for people,
especially children, before putting a
vehicle into “Drive” or “Reverse”.
WARNING
Driving whilst distracted can result
in a loss of vehicle control, that
may lead to an accident, severe
personal injury, and death. The dri-
ver’s primary responsibility is in
the safe and legal operation of a
vehicle, and use of any handheld
devices, other equipment, or vehi-
cle systems which take the driver’s
eyes, attention and focus away
from the safe operation of a vehicle
or which are not permissible by law
should never be used during oper-
ation of the vehicle.
EL(FL) Aust 5.QXP 7/26/2013 2:08 PM Page 4
Page 211 of 1534
Driving your vehicle
6
5
Ignition switch position
LOCK
The steering wheel locks to protect
against theft. The ignition key can be
removed only in the LOCK position.
When turning the ignition switch to the
LOCK position, push the key inward at
the ACC position and turn the key towardthe LOCK position.
ACC (Accessory)
The steering wheel is unlocked and elec-
trical accessories are operative.
✽✽
NOTICE
If difficulty is experienced turning the
ignition switch to the ACC position, turnthe key whilst turning the steering wheel
right and left to release the tension.
ON
The warning lights can be checked
before the engine is started. This is the
normal running position after the engine
is started.
Do not leave the ignition switch ON if the engine is not running to prevent battery discharge.
START
Turn the ignition key to the START posi-
tion to start the engine. The engine will
crank until you release the key; then it
returns to the ON position. The brake
warning lamp can be checked in thisposition.
WARNING - Ignition key
Never turn the ignition switch to LOCK or ACC whilst the vehicle is
moving. This would result in loss
of directional control and braking
function, which could cause anaccident.
The anti-theft steering column lock is not a substitute for the parking
brake. Before leaving the driver’s
seat, always make sure the shift
lever is engaged in 1 st
gear for the
manual transaxle or P (Park) for
the automatic transaxle, set the
parking brake fully and shut the
engine off. Unexpected and sud-
den vehicle movement may occurif these precautions are not taken.
Never reach for the ignition switch, or any other controls through the
steering wheel whilst the vehicle is
in motion. The presence of yourhand or arm in this area could
cause a loss of vehicle control, an
accident and serious bodily injuryor death.
Do not place any movable objects around the driver’s seat as they
may move whilst driving, interferewith the driver and lead to an acci-dent.
EL(FL) Aust 5.QXP 7/26/2013 2:08 PM Page 6
Page 224 of 1534
519
Driving your vehicle
For smooth operation, depress the brakepedal when shifting from N (Neutral) to aforward or reverse gear.Transaxle ranges
The indicator lights in the instrument
cluster displays the shift lever position
when the ignition switch is in the ONposition.
P (Park)
Always come to a complete stop before
shifting into P (Park). This position locks
the transaxle and prevents the frontwheels from rotating.
WARNING - Automatic
transaxle
Always check the surrounding areas near your vehicle for peo-
ple, especially children, before
shifting a vehicle into D (Drive) or
R (Reverse).
Before leaving the driver’s seat, always make sure the shift lever
is in the P (Park) position; then
set the parking brake fully and
shut the engine off. Unexpected
and sudden vehicle movementcan occur if these precautions
are not followed in the order iden-tified.
CAUTION
To avoid damage to your
transaxle, do not accelerate the
engine in R (Reverse) or any for-ward gear position with thebrakes on.
When stopped on an upgrade, do not hold the vehicle stationarywith engine power. Use the serv- ice brake or the parking brake.
Do not shift from N (Neutral) or P (Park) into D (Drive), or R
(Reverse) when the engine isabove idle speed.
EL(FL) Aust 5.QXP 7/26/2013 2:08 PM Page 19
Page 242 of 1534
537
Driving your vehicle
The Electronic Stability Control (ESC) system is an electronic system designed
to help the driver maintain vehicle control
under adverse conditions. It is not a sub-
stitute for safe driving practices.
Factors including speed, road conditions
and driver steering input can all affect
whether ESC will be effective in prevent-
ing a loss of control. It is still your respon-
sibility to drive and corner at reasonable
speeds and to leave a sufficient margin
of safety.
When you apply your brakes under con-
ditions which may lock the wheels, you
may hear a “tik-tik’’ sound from the
brakes, or feel a corresponding sensation
in the brake pedal. This is normal and it
means your ESC is active.
✽✽NOTICE
A click sound may be heard in the engine compartment when the vehicle
begins to move after the engine is start-
ed. These conditions are normal and
indicate that the Electronic Stability
Program System is functioning proper-
ly.
ESC operation
ESC ON condition
When the ignition is turnedON, ESC and ESC OFF indi-
cator lights illuminate for
approximately 3 seconds,
then ESC is turned on.
Press the ESC OFF button for at least half a second after
turning the ignition ON to turn
ESC off. (ESC OFF indicator
will illuminate). To turn theESC on, press the ESC OFF
button (ESC OFF indicatorlight will go off).
When starting the engine, you may hear a slight ticking
sound. This is the ESC per-
forming an automatic system
self-check and does not indi-
cate a problem. When operating
When the ESC is in operation,
ESP indicator light blinks.
When the Electronic StabilityControl is operating properly,
you can feel a slight pulsation
in the vehicle. This is only the
effect of brake control and
indicates nothing unusual.
When moving out of the mud or slippery road, pressing the
accelerator pedal may not
cause the engine rpm (revo-
lutions per minute) to
increase.
-
EL(FL) Aust 5.QXP 7/26/2013 2:09 PM Page 37