clock HYUNDAI IX35 2014 Owners Manual
[x] Cancel search | Manufacturer: HYUNDAI, Model Year: 2014, Model line: IX35, Model: HYUNDAI IX35 2014Pages: 1534, PDF Size: 39.76 MB
Page 11 of 1534
23
Your vehicle at a glance
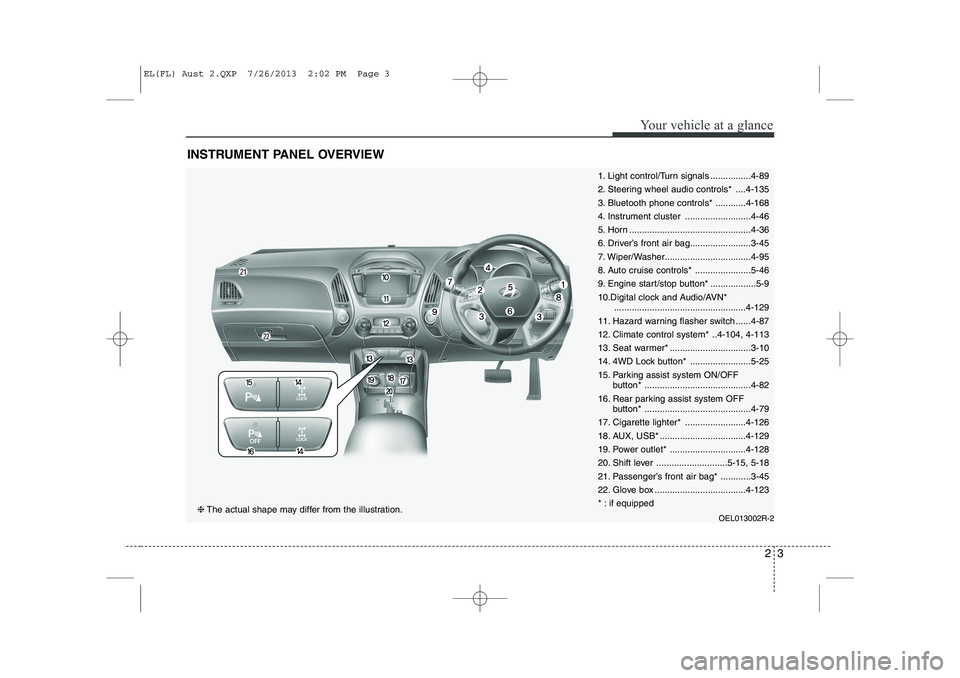
INSTRUMENT PANEL OVERVIEW
1. Light control/Turn signals ................4-89
2. Steering wheel audio controls* ....4-135
3. Bluetooth phone controls* ............4-168
4. Instrument cluster ..........................4-46
5. Horn ................................................4-36
6. Driver’s front air bag........................3-45
7. Wiper/Washer..................................4-95
8. Auto cruise controls* ......................5-46
9. Engine start/stop button* ..................5-9
10.Digital clock and Audio/AVN*....................................................4-129
11. Hazard warning flasher switch ......4-87
12. Climate control system* ..4-104, 4-113
13. Seat warmer* ................................3-10
14. 4WD Lock button* ........................5-25
15. Parking assist system ON/OFF button* ..........................................4-82
16. Rear parking assist system OFF button* ..........................................4-79
17. Cigarette lighter* ........................4-126
18. AUX, USB* ..................................4-129
19. Power outlet* ..............................4-128
20. Shift lever ............................5-15, 5-18
21. Passenger’s front air bag* ............3-45
22. Glove box ....................................4-123
* : if equipped
OEL013002R-2
❈The actual shape may differ from the illustration.
EL(FL) Aust 2.QXP 7/26/2013 2:02 PM Page 3
Page 99 of 1534
427
Features of your vehicle
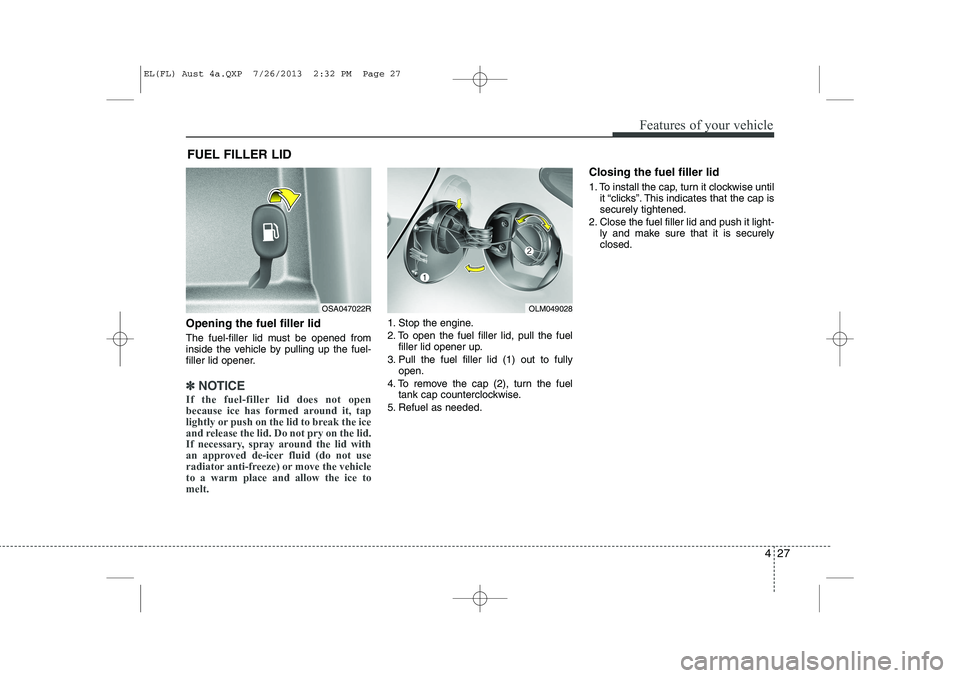
Opening the fuel filler lid
The fuel-filler lid must be opened from
inside the vehicle by pulling up the fuel-
filler lid opener.
✽✽NOTICE
If the fuel-filler lid does not open
because ice has formed around it, tap
lightly or push on the lid to break the ice
and release the lid. Do not pry on the lid.
If necessary, spray around the lid with
an approved de-icer fluid (do not use
radiator anti-freeze) or move the vehicleto a warm place and allow the ice tomelt.
1. Stop the engine.
2. To open the fuel filler lid, pull the fuel filler lid opener up.
3. Pull the fuel filler lid (1) out to fully open.
4. To remove the cap (2), turn the fuel tank cap counterclockwise.
5. Refuel as needed. Closing the fuel filler lid
1. To install the cap, turn it clockwise until
it “clicks”. This indicates that the cap is securely tightened.
2. Close the fuel filler lid and push it light- ly and make sure that it is securelyclosed.
FUEL FILLER LID
OLM049028OSA047022R
EL(FL) Aust 4a.QXP 7/26/2013 2:32 PM Page 27
Page 201 of 1534
4 129
Features of your vehicle
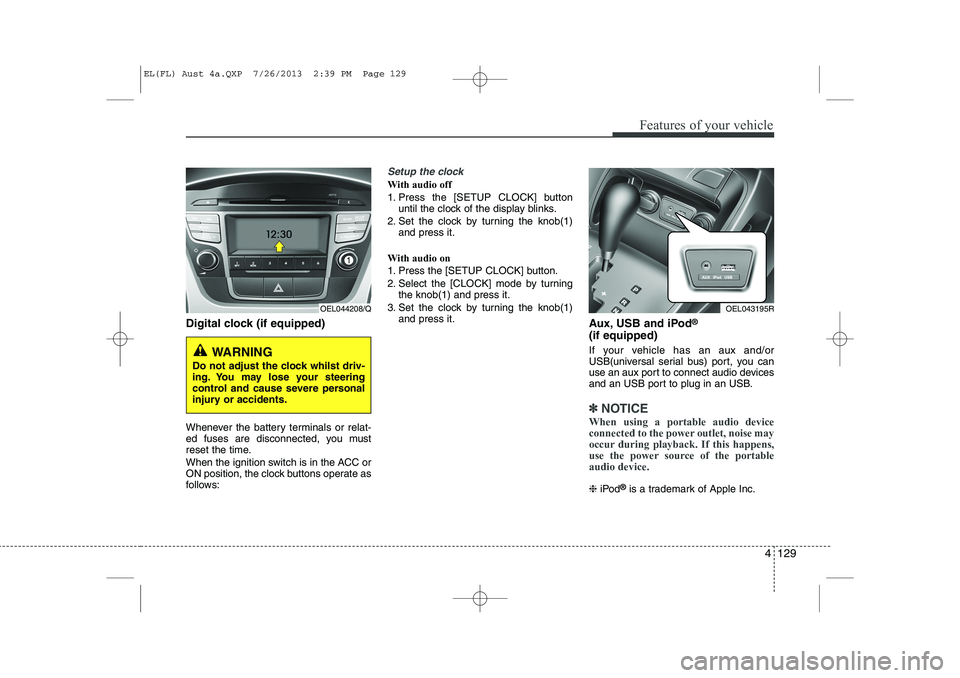
Digital clock (if equipped)
Whenever the battery terminals or relat-
ed fuses are disconnected, you must
reset the time.
When the ignition switch is in the ACC or
ON position, the clock buttons operate as
follows:
Setup the clock
With audio off
1. Press the [SETUP CLOCK] buttonuntil the clock of the display blinks.
2. Set the clock by turning the knob(1) and press it.
With audio on
1. Press the [SETUP CLOCK] button.
2. Select the [CLOCK] mode by turning the knob(1) and press it.
3. Set the clock by turning the knob(1) and press it. Aux, USB and iPod®
(if equipped)
If your vehicle has an aux and/or
USB(universal serial bus) port, you can
use an aux port to connect audio devices
and an USB port to plug in an USB.
✽✽ NOTICE
When using a portable audio device
connected to the power outlet, noise may
occur during playback. If this happens,
use the power source of the portableaudio device.
❈ iPod ®
is a trademark of Apple Inc.
OEL044208/Q
WARNING
Do not adjust the clock whilst driv-
ing. You may lose your steering
control and cause severe personal
injury or accidents.
OEL043195R
EL(FL) Aust 4a.QXP 7/26/2013 2:39 PM Page 129
Page 285 of 1534
69
What to do in an emergency
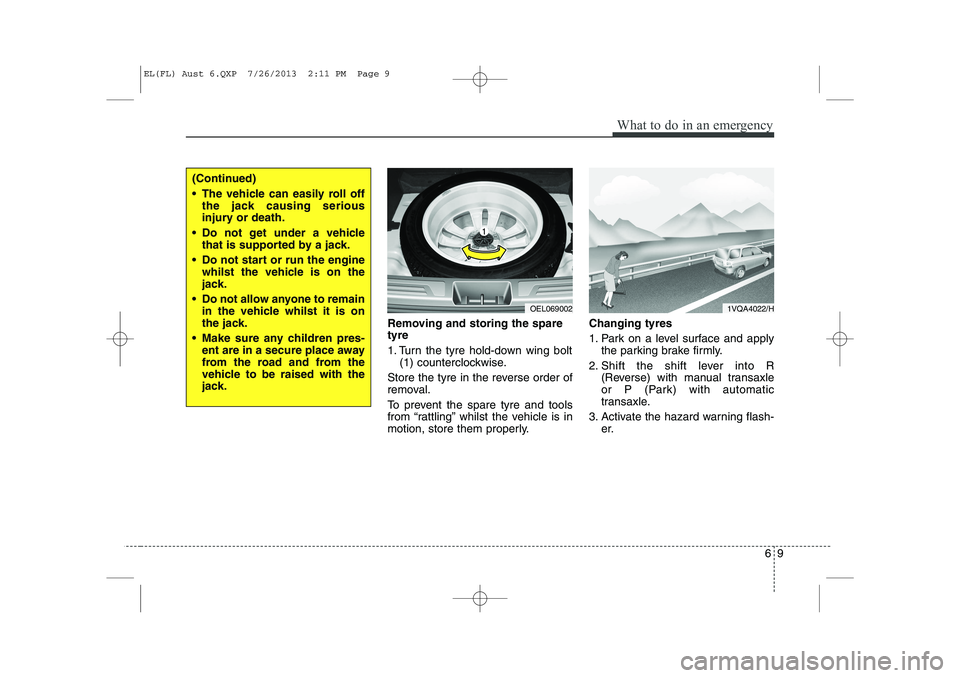
Removing and storing the spare tyre
1. Turn the tyre hold-down wing bolt(1) counterclockwise.
Store the tyre in the reverse order of
removal.
To prevent the spare tyre and tools
from “rattling” whilst the vehicle is in
motion, store them properly. Changing tyres
1. Park on a level surface and apply
the parking brake firmly.
2. Shift the shift lever into R (Reverse) with manual transaxle
or P (Park) with automatic
transaxle.
3. Activate the hazard warning flash- er.
OEL069002
(Continued)
The vehicle can easily roll offthe jack causing serious
injury or death.
Do not get under a vehicle that is supported by a jack.
Do not start or run the engine whilst the vehicle is on the
jack.
Do not allow anyone to remain in the vehicle whilst it is on
the jack.
Make sure any children pres- ent are in a secure place away
from the road and from the
vehicle to be raised with the
jack.
1VQA4022/H
EL(FL) Aust 6.QXP 7/26/2013 2:11 PM Page 9
Page 286 of 1534
What to do in an emergency
10
6
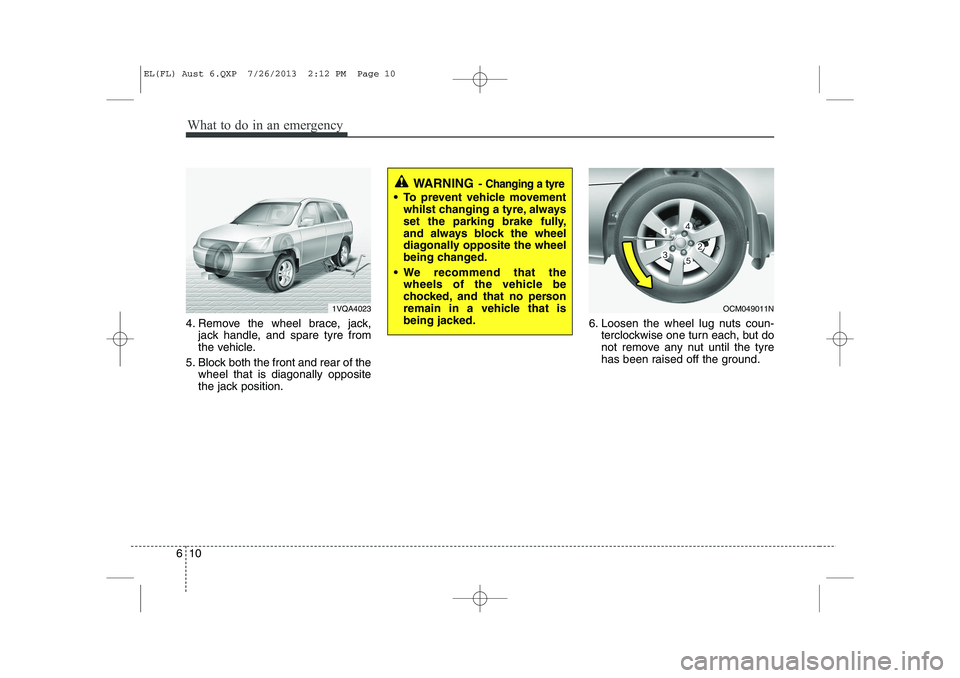
4. Remove the wheel brace, jack,
jack handle, and spare tyre from
the vehicle.
5. Block both the front and rear of the wheel that is diagonally opposite
the jack position. 6. Loosen the wheel lug nuts coun-
terclockwise one turn each, but do
not remove any nut until the tyre
has been raised off the ground.
WARNING - Changing a tyre
To prevent vehicle movement
whilst changing a tyre, always
set the parking brake fully,
and always block the wheel
diagonally opposite the wheel
being changed.
We recommend that the wheels of the vehicle be
chocked, and that no person
remain in a vehicle that is
being jacked.
1VQA4023OCM049011N
EL(FL) Aust 6.QXP 7/26/2013 2:12 PM Page 10
Page 287 of 1534
611
What to do in an emergency
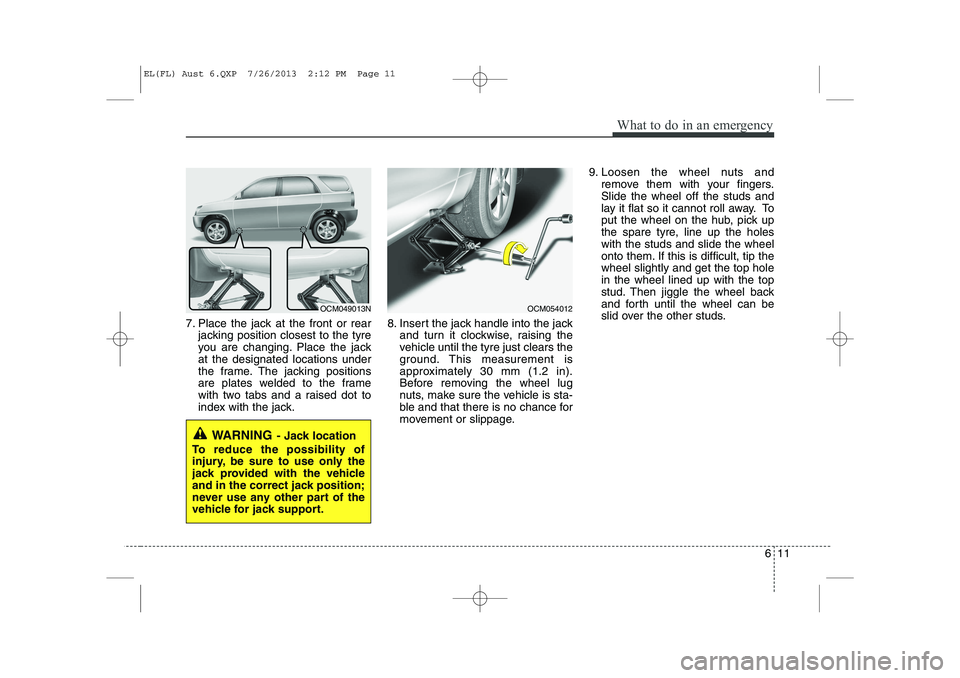
7. Place the jack at the front or rearjacking position closest to the tyre
you are changing. Place the jackat the designated locations under
the frame. The jacking positions
are plates welded to the frame
with two tabs and a raised dot to
index with the jack. 8. Insert the jack handle into the jack
and turn it clockwise, raising the
vehicle until the tyre just clears the
ground. This measurement is
approximately 30 mm (1.2 in).
Before removing the wheel lug
nuts, make sure the vehicle is sta-
ble and that there is no chance for
movement or slippage. 9. Loosen the wheel nuts and
remove them with your fingers.Slide the wheel off the studs and
lay it flat so it cannot roll away. To
put the wheel on the hub, pick up
the spare tyre, line up the holeswith the studs and slide the wheel
onto them. If this is difficult, tip thewheel slightly and get the top holein the wheel lined up with the top
stud. Then jiggle the wheel back
and forth until the wheel can be
slid over the other studs.
WARNING - Jack location
To reduce the possibility of
injury, be sure to use only the
jack provided with the vehicle
and in the correct jack position;
never use any other part of the
vehicle for jack support.
OCM049013NOCM054012
EL(FL) Aust 6.QXP 7/26/2013 2:12 PM Page 11
Page 288 of 1534
What to do in an emergency
12
6
10. To reinstall the wheel, hold it on
the studs, put the wheel nuts on the studs and tighten them finger
tight. The nuts should be installedwith their tapered small diameter
ends directed inward. Jiggle thetyre to be sure it is completely
seated, then tighten the nuts as
much as possible with your fin-gers again.
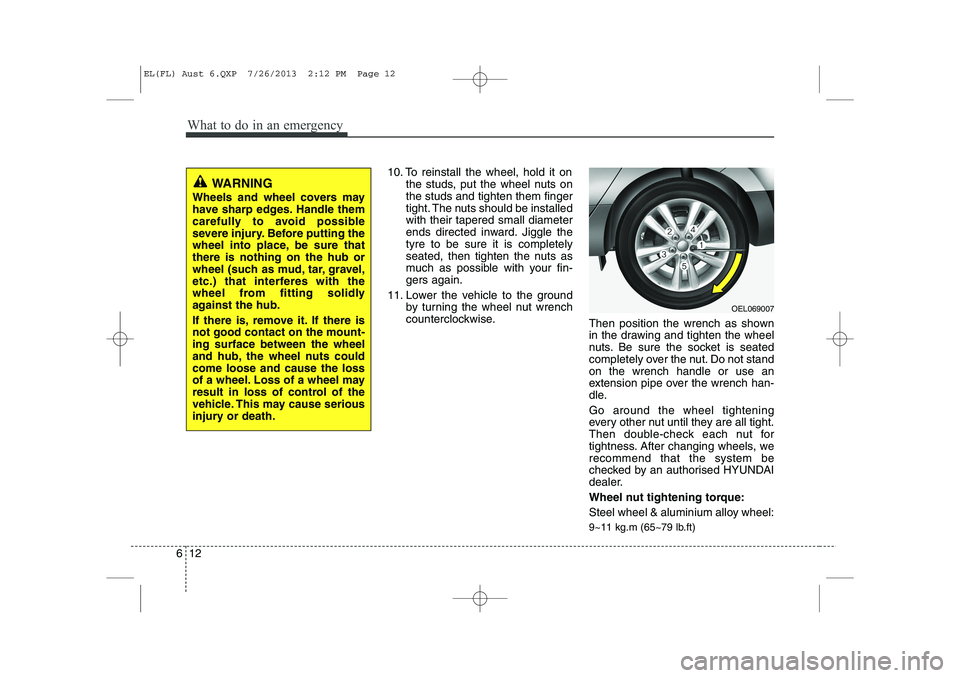
11. Lower the vehicle to the ground by turning the wheel nut wrench
counterclockwise. Then position the wrench as shown
in the drawing and tighten the wheel
nuts. Be sure the socket is seated
completely over the nut. Do not standon the wrench handle or use an
extension pipe over the wrench han-
dle. Go around the wheel tightening
every other nut until they are all tight.
Then double-check each nut for
tightness. After changing wheels, werecommend that the system be
checked by an authorised HYUNDAI
dealer.
Wheel nut tightening torque:
Steel wheel & aluminium alloy wheel:
9~11 kg.m (65~79 lb.ft)
WARNING
Wheels and wheel covers may
have sharp edges. Handle them
carefully to avoid possible
severe injury. Before putting the
wheel into place, be sure thatthere is nothing on the hub or
wheel (such as mud, tar, gravel,
etc.) that interferes with the
wheel from fitting solidly
against the hub.
If there is, remove it. If there is not good contact on the mount-ing surface between the wheel
and hub, the wheel nuts couldcome loose and cause the loss
of a wheel. Loss of a wheel may
result in loss of control of the
vehicle. This may cause serious
injury or death.
OEL069007
EL(FL) Aust 6.QXP 7/26/2013 2:12 PM Page 12
Page 291 of 1534
615
What to do in an emergency
When towing your vehicle in an emer- gency without wheel dollies :
1. Set the ignition switch in the ACC posi-tion.
2. Place the transaxle shift lever in N (Neutral).
3. Release the parking brake.
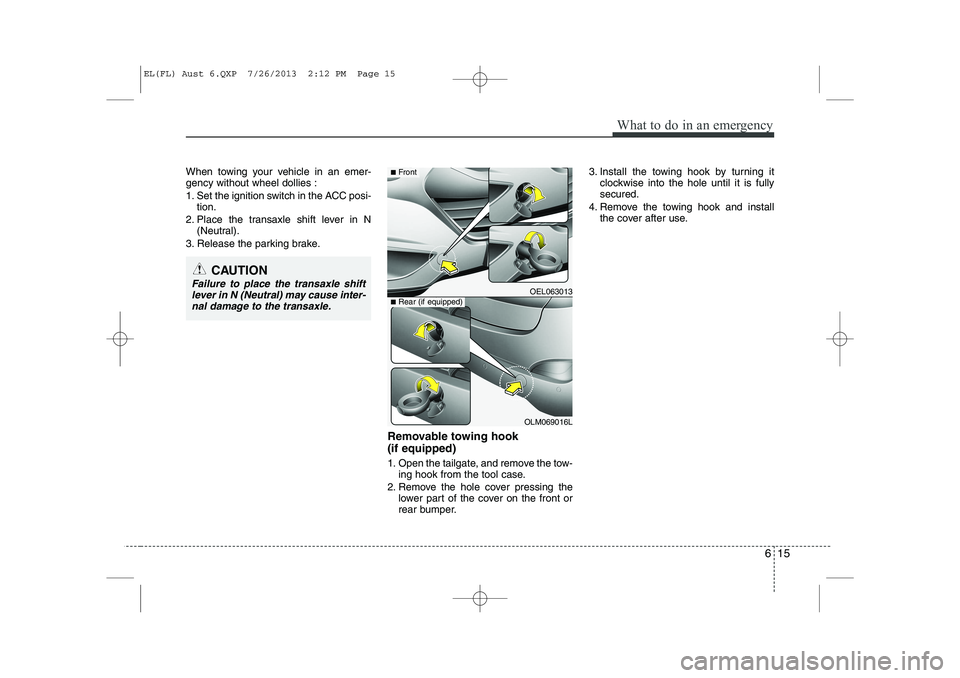
Removable towing hook (if equipped)
1. Open the tailgate, and remove the tow-ing hook from the tool case.
2. Remove the hole cover pressing the lower part of the cover on the front or
rear bumper. 3. Install the towing hook by turning it
clockwise into the hole until it is fullysecured.
4. Remove the towing hook and install the cover after use.
CAUTION
Failure to place the transaxle shift
lever in N (Neutral) may cause inter-
nal damage to the transaxle.OEL063013
OLM069016L
■ Front
■Rear (if equipped)
EL(FL) Aust 6.QXP 7/26/2013 2:12 PM Page 15
Page 317 of 1534
723
Maintenance
ENGINE COOLANT
Changing the engine oil and filter
We recommend that the engine oil and
filter be replaced by an authorised
HYUNDAI dealer. The high-pressure cooling system has a
reservoir filled with year-round antifreeze
coolant. The reservoir is filled at the fac-
tory.
Check the antifreeze protection and
coolant concentration level at least once
a year, at the beginning of the winter sea-
son, and before travelling to a colder cli-
mate.
Checking the coolant level
WARNING
Removing radiatorcap
Never attempt to remove the radi- ator cap whilst the engine is
operating or hot. Doing so mightlead to cooling system and
engine damage and could result
in serious personal injury fromescaping hot coolant or steam.
Turn the engine off and wait until it cools down. Use extreme care
when removing the radiator cap.
Wrap a thick towel around it, and
turn it counterclockwise slowly to
the first stop.
(Continued)
(Continued)Step back whilst the pressure is
released from the cooling sys-
tem. When you are sure all thepressure has been released,
press down on the cap, using a
thick towel, and continue turning
counterclockwise to remove it.
Even if the engine is not operat- ing, do not remove the radiatorcap or the drain plug whilst the
engine and radiator are hot. Hot
coolant and steam may still blow
out under pressure, causing seri-
ous injury.
WARNING
Used engine oil may cause irrita- tion or cancer of the skin if left in
contact with the skin for prolonged
periods of time. Used engine oil
contains chemicals that have
caused cancer in laboratory ani-
mals. Always protect your skin by
washing your hands thoroughlywith soap and warm water as soon
as possible after handling used oil.
EL(FL) Aust 7.QXP 7/26/2013 2:22 PM Page 23
Page 333 of 1534
739
Maintenance
Battery recharging
Your vehicle has a maintenance-free,
calcium-based battery.
If the battery becomes discharged in ashort time (because, for example, the
headlights or interior lights were left on
whilst the vehicle was not in use),
recharge it by slow charging (trickle)
for 10 hours.
If the battery gradually discharges because of high electric load whilst the
vehicle is being used, recharge it at 20-
30A for two hours. Reset items
Items should be reset after the battery
has been discharged or the battery hasbeen disconnected.
Auto up/down window (See section 4)
Sunroof (See section 4)
Trip computer (See section 4)
Climate control system
(See section 4)
Clock (See section 4)
Audio (See section 4)(Continued)
Before performing maintenance or recharging the battery, turn off all accessories and stop the
engine.
The negative battery cable must be removed first and installed
last when the battery is discon-nected.WARNING - Recharging
battery
When recharging the battery,
observe the following precautions:
The battery must be removed from the vehicle and placed in an area with good ventilation.
Do not allow cigarettes, sparks, or flame near the battery.
Watch the battery during charg- ing, and stop or reduce the charg-
ing rate if the battery cells begin
gassing (boiling) violently or if
the temperature of the electrolyte
of any cell exceeds 49°C (120°F).
Wear eye protection when check- ing the battery during charging.
Disconnect the battery charger in the following order.
1. Turn off the battery charger main switch.
2. Unhook the negative clamp from the negative battery ter- minal.
3. Unhook the positive clamp from the positive battery termi-nal.
(Continued)
EL(FL) Aust 7.QXP 7/26/2013 2:24 PM Page 39