tow HYUNDAI IX35 2014 Owners Manual
[x] Cancel search | Manufacturer: HYUNDAI, Model Year: 2014, Model line: IX35, Model: HYUNDAI IX35 2014Pages: 1534, PDF Size: 39.76 MB
Page 6 of 1534
Introduction
6
1
As with other vehicles of this type, failure
to operate this vehicle correctly mayresult in loss of control, an accident or
vehicle rollover.
Specific design characteristics (higher
ground clearance, track, etc.) give this
vehicle a higher centre of gravity than
other types of vehicles. In other words
they are not designed for cornering at the
same speeds as conventional 2-wheel
drive vehicles. Avoid sharp turns or
abrupt manoeuvres. Again, failure to
operate this vehicle correctly may result
in loss of control, an accident or vehicle
rollover. Be sure to read the “Reducing
the risk of a rollover” driving guide-
lines, in section 5 of this manual. No special run-in period is needed. By
following a few simple precautions for the
first 1,000 km (600 miles) you may add to
the performance, economy and life of
your vehicle.
Do not race the engine.
Whilst driving, keep your engine speed
(rpm, or revolutions per minute)
between 2,000 rpm and 4,000 rpm.
Do not maintain a single speed for long
periods of time, either fast or slow.
Varying engine speed is needed to
properly run-in the engine.
Avoid hard stops, except in emergen- cies, to allow the brakes to seat prop-
erly.
Don't let the engine idle longer than 3
minutes at one time.
Don't tow a trailer during the first 2,000 km (1,200 miles) of operation.
VEHICLE RUN-IN PROCESS
VEHICLE HANDLING
INSTRUCTIONS
EL(FL) Aust 1.QXP 7/26/2013 2:00 PM Page 6
Page 28 of 1534
315
Safety features of your vehicle
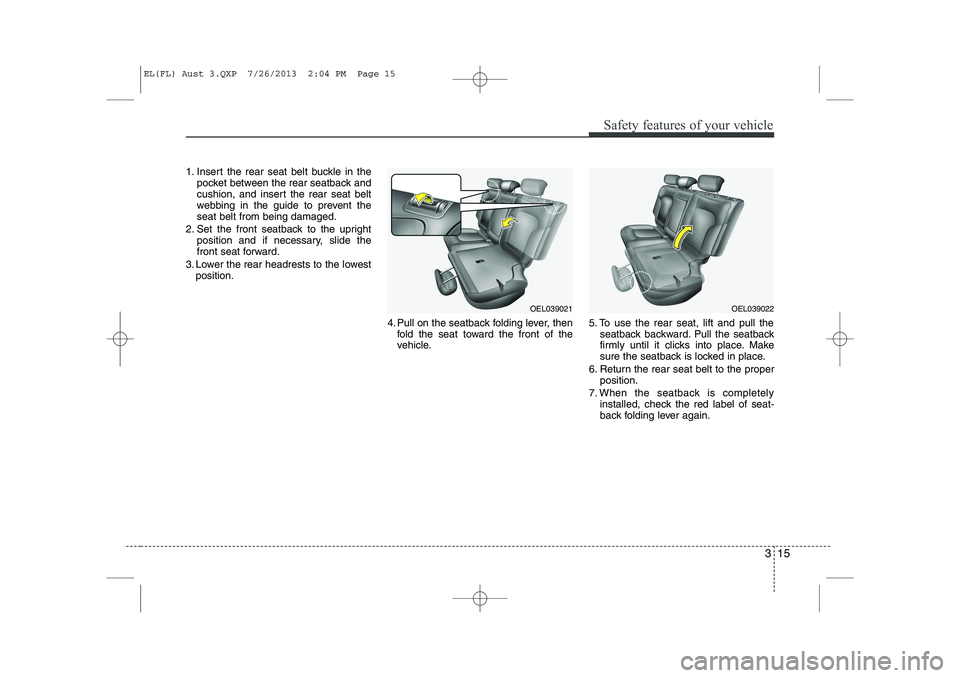
1. Insert the rear seat belt buckle in thepocket between the rear seatback and
cushion, and insert the rear seat belt
webbing in the guide to prevent theseat belt from being damaged.
2. Set the front seatback to the upright position and if necessary, slide the
front seat forward.
3. Lower the rear headrests to the lowest position.
4. Pull on the seatback folding lever, thenfold the seat toward the front of the
vehicle. 5. To use the rear seat, lift and pull the
seatback backward. Pull the seatback
firmly until it clicks into place. Make
sure the seatback is locked in place.
6. Return the rear seat belt to the proper position.
7. When the seatback is completely installed, check the red label of seat-
back folding lever again.
OEL039021OEL039022
EL(FL) Aust 3.QXP 7/26/2013 2:04 PM Page 15
Page 36 of 1534
323
Safety features of your vehicle
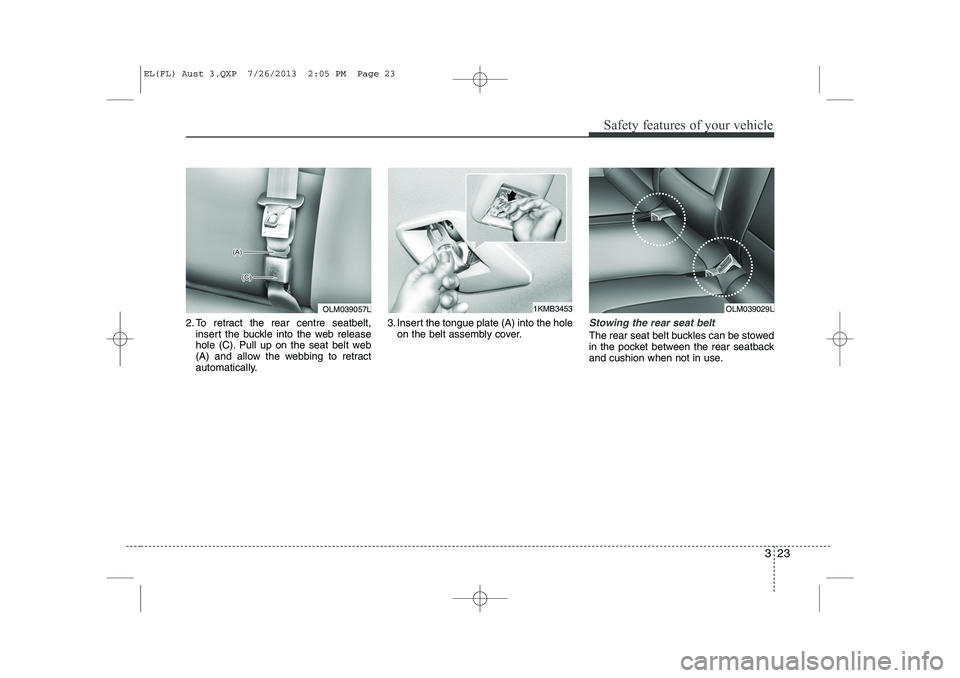
2. To retract the rear centre seatbelt,insert the buckle into the web release
hole (C). Pull up on the seat belt web
(A) and allow the webbing to retract
automatically. 3. Insert the tongue plate (A) into the hole
on the belt assembly cover.Stowing the rear seat belt
The rear seat belt buckles can be stowed
in the pocket between the rear seatback
and cushion when not in use.
OLM039057L1KMB3453OLM039029L
EL(FL) Aust 3.QXP 7/26/2013 2:05 PM Page 23
Page 47 of 1534
Safety features of your vehicle
34
3
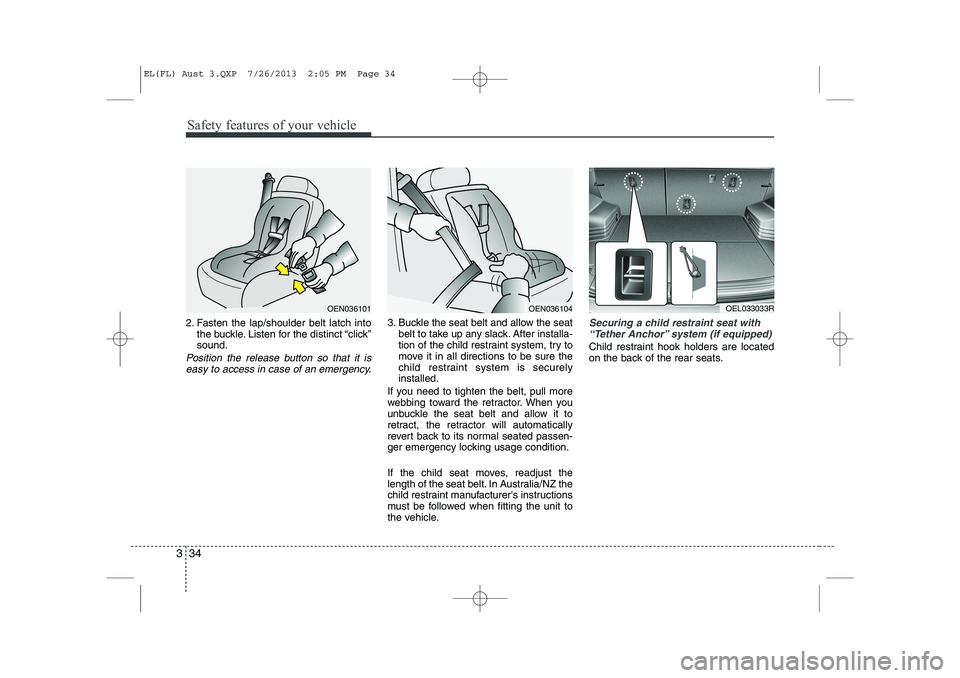
2. Fasten the lap/shoulder belt latch into
the buckle. Listen for the distinct “click” sound.
Position the release button so that it is
easy to access in case of an emergency.
3. Buckle the seat belt and allow the seat belt to take up any slack. After installa-
tion of the child restraint system, try to
move it in all directions to be sure the
child restraint system is securelyinstalled.
If you need to tighten the belt, pull more
webbing toward the retractor. When you
unbuckle the seat belt and allow it to
retract, the retractor will automatically
revert back to its normal seated passen-
ger emergency locking usage condition.
If the child seat moves, readjust the
length of the seat belt. In Australia/NZ the
child restraint manufacturer's instructions
must be followed when fitting the unit to
the vehicle.Securing a child restraint seat with “Tether Anchor” system (if equipped)
Child restraint hook holders are located
on the back of the rear seats.
OEN036101OEN036104OEL033033R
EL(FL) Aust 3.QXP 7/26/2013 2:05 PM Page 34
Page 87 of 1534
415
Features of your vehicle
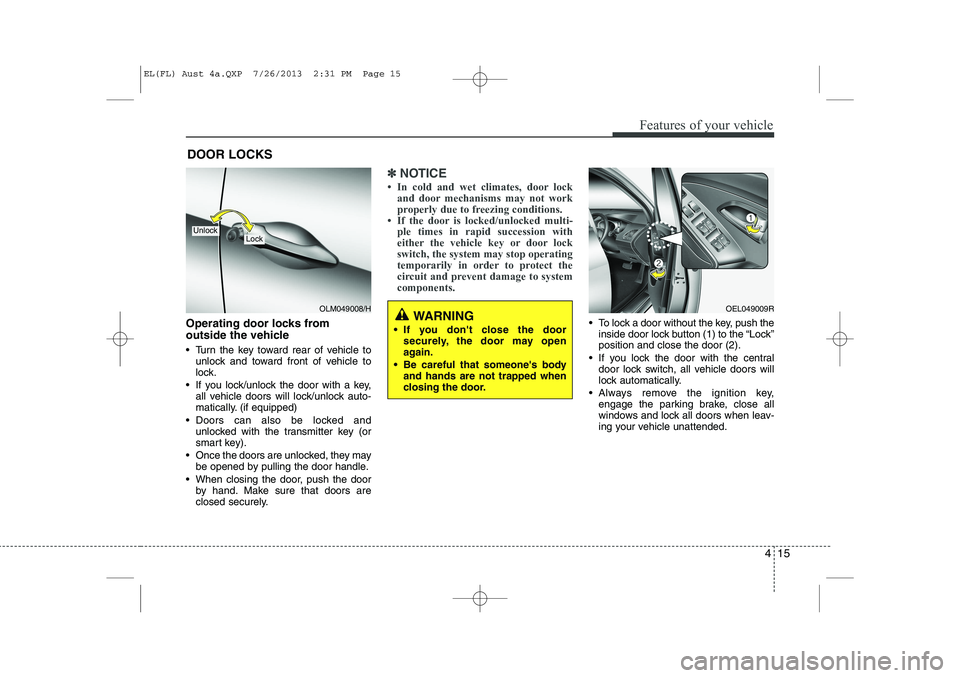
Operating door locks from
outside the vehicle
Turn the key toward rear of vehicle tounlock and toward front of vehicle to
lock.
If you lock/unlock the door with a key, all vehicle doors will lock/unlock auto-
matically. (if equipped)
Doors can also be locked and unlocked with the transmitter key (or
smart key).
Once the doors are unlocked, they may be opened by pulling the door handle.
When closing the door, push the door by hand. Make sure that doors are
closed securely.
✽✽ NOTICE
Page 110 of 1534
Features of your vehicle
38
4
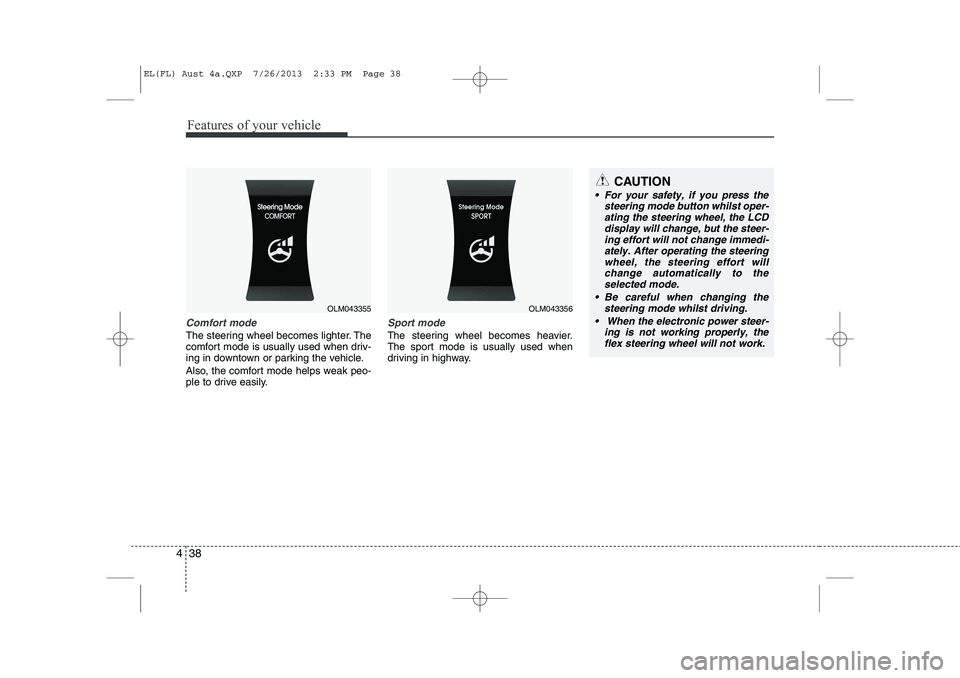
Comfort mode
The steering wheel becomes lighter. The
comfort mode is usually used when driv-
ing in downtown or parking the vehicle.
Also, the comfort mode helps weak peo-
ple to drive easily.
Sport mode
The steering wheel becomes heavier.
The sport mode is usually used when
driving in highway.
OLM043355OLM043356
CAUTION
For your safety, if you press the
steering mode button whilst oper-
ating the steering wheel, the LCD display will change, but the steer-ing effort will not change immedi-ately. After operating the steering
wheel, the steering effort willchange automatically to the selected mode.
Be careful when changing the steering mode whilst driving.
When the electronic power steer- ing is not working properly, theflex steering wheel will not work.
EL(FL) Aust 4a.QXP 7/26/2013 2:33 PM Page 38
Page 111 of 1534
439
Features of your vehicle
Inside rearview mirror
Adjust the rearview mirror to centre on
the view through the rear window. Make
this adjustment before you start driving.
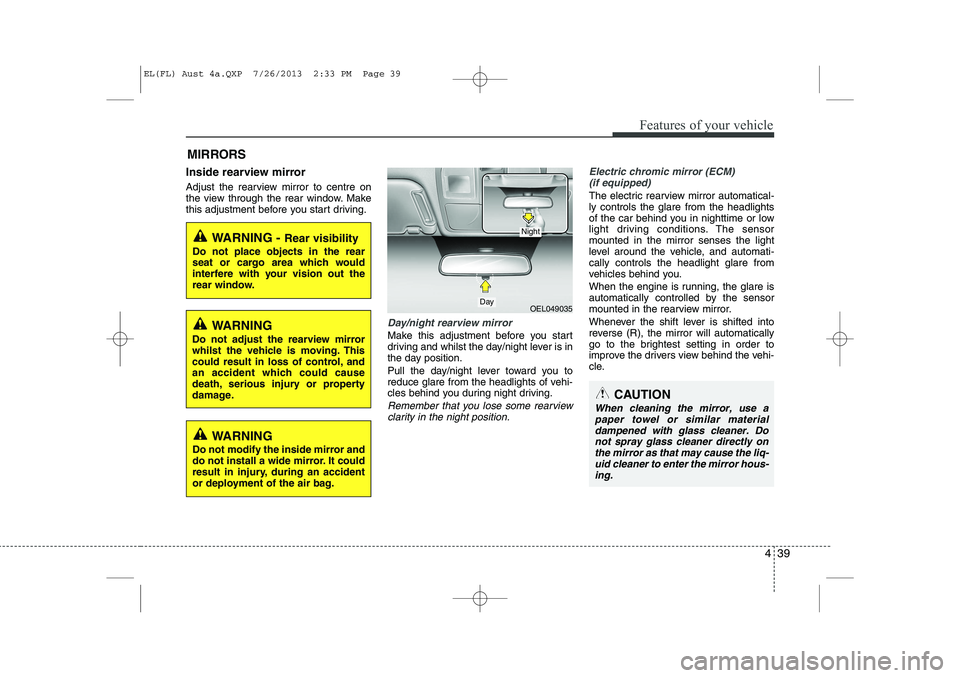
Day/night rearview mirror
Make this adjustment before you start
driving and whilst the day/night lever is in
the day position.
Pull the day/night lever toward you to
reduce glare from the headlights of vehi-
cles behind you during night driving.
Remember that you lose some rearviewclarity in the night position.
Electric chromic mirror (ECM) (if equipped)
The electric rearview mirror automatical- ly controls the glare from the headlights
of the car behind you in nighttime or low
light driving conditions. The sensormounted in the mirror senses the light
level around the vehicle, and automati-cally controls the headlight glare from
vehicles behind you.
When the engine is running, the glare is
automatically controlled by the sensor
mounted in the rearview mirror.
Whenever the shift lever is shifted into
reverse (R), the mirror will automatically
go to the brightest setting in order to
improve the drivers view behind the vehi-
cle.
MIRRORS
WARNING -
Rear visibility
Do not place objects in the rear
seat or cargo area which would
interfere with your vision out the
rear window.
OEL049035
CAUTION
When cleaning the mirror, use a paper towel or similar materialdampened with glass cleaner. Do not spray glass cleaner directly on
the mirror as that may cause the liq- uid cleaner to enter the mirror hous-ing.
Day
Night
WARNING
Do not adjust the rearview mirror
whilst the vehicle is moving. This
could result in loss of control, and
an accident which could cause
death, serious injury or property
damage.
WARNING
Do not modify the inside mirror and
do not install a wide mirror. It could
result in injury, during an accident
or deployment of the air bag.
EL(FL) Aust 4a.QXP 7/26/2013 2:33 PM Page 39
Page 114 of 1534
Features of your vehicle
42
4
3. Setting the compass zone
1. Find your current location and vari-
ance zone number on the zone map.
2. Press and hold the button for more than 6 but less than 9 seconds. The
current zone number will appear in the
display.
3. Press the button until the new zone number appears in the display. After
you stop pressing the button in, the
display will show a compass direction
within a few seconds. 4. Changing Mirror Angle setting
(if equipped):
Due to mirror positions being angled
towards the driver, the compass mirror
can also compensate for drivers seated
on the Left Hand side of the vehicle
(steering wheel on the LH side of the
vehicle) or Right Hand side of the vehicle
(steering wheel on the RH side of the
vehicle).
To adjust the Left Hand, “L” or Right
Hand, “R”, setting:
1. Press and hold the button for more than 12 seconds.
2. Release then press the button to tog- gle between “L” and “R”.
✽✽ NOTICE
This procedure also causes the compass to be de-calibrated.
3. To re-calibrate the compass, drive the vehicle in 2 complete circles at less than 8km/h (5mph).
CAUTION
1. Do not install the ski rack, anten-
na, etc. which are attached to thevehicle by means of a magnet.They affect the operation of thecompass.
2. If the compass deviates from the correct indication soon after
repeated adjustment, we recom-mend that the system be checked by an authorised HYUNDAI dealer.
3. The compass may not indicate the correct compass point in tun-nels or whilst driving up or down a steep hill.
(The compass returns to the cor-rect compass point when thevehicle moves to an area wherethe geomagnetism is stabilized.)
4. When cleaning the mirror, use a paper towel or similar material
dampened with glass cleaner. Do not spray glass cleaner directlyon the mirror as that may causethe liquid cleaner to enter the mir-
ror housing.
EL(FL) Aust 4a.QXP 7/26/2013 2:33 PM Page 42
Page 116 of 1534
Features of your vehicle
44
4
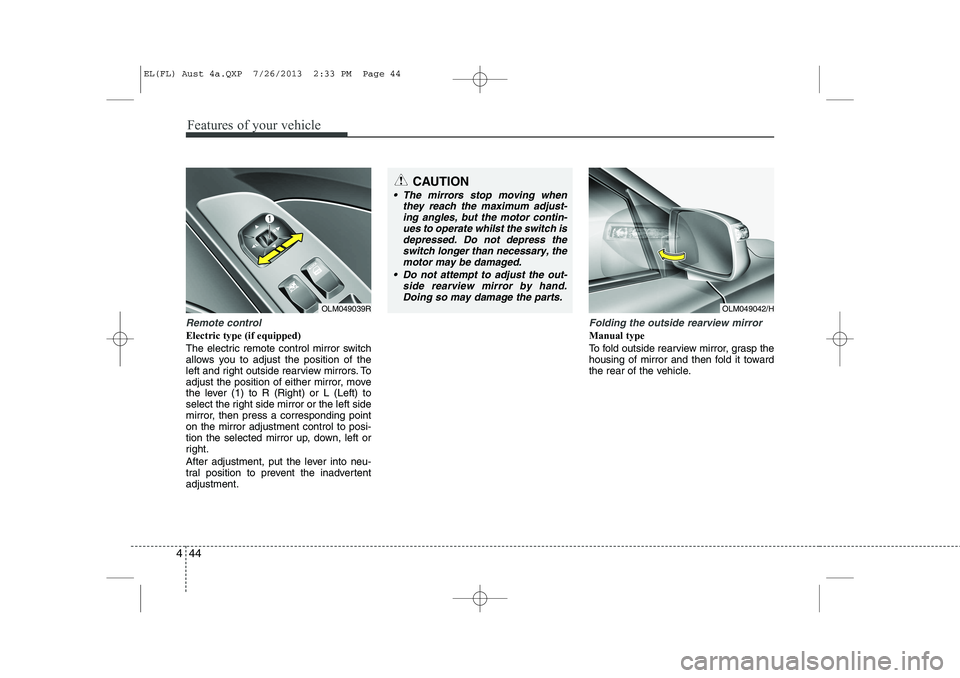
Remote control
Electric type (if equipped)
The electric remote control mirror switch
allows you to adjust the position of the
left and right outside rearview mirrors. To
adjust the position of either mirror, move
the lever (1) to R (Right) or L (Left) to
select the right side mirror or the left side
mirror, then press a corresponding pointon the mirror adjustment control to posi-
tion the selected mirror up, down, left or
right.
After adjustment, put the lever into neu-
tral position to prevent the inadvertentadjustment.
Folding the outside rearview mirror
Manual type
To fold outside rearview mirror, grasp the
housing of mirror and then fold it toward
the rear of the vehicle.
CAUTION
The mirrors stop moving when
they reach the maximum adjust-
ing angles, but the motor contin- ues to operate whilst the switch isdepressed. Do not depress theswitch longer than necessary, the
motor may be damaged.
Do not attempt to adjust the out- side rearview mirror by hand.Doing so may damage the parts.
OLM049039ROLM049042/H
EL(FL) Aust 4a.QXP 7/26/2013 2:33 PM Page 44
Page 121 of 1534
449
Features of your vehicle
The tachometer pointer may move slight-
ly when the ignition switch is in ACC or
ON position with the engine OFF. This
movement is normal and will not affect
the accuracy of the tachometer once the
engine is running.
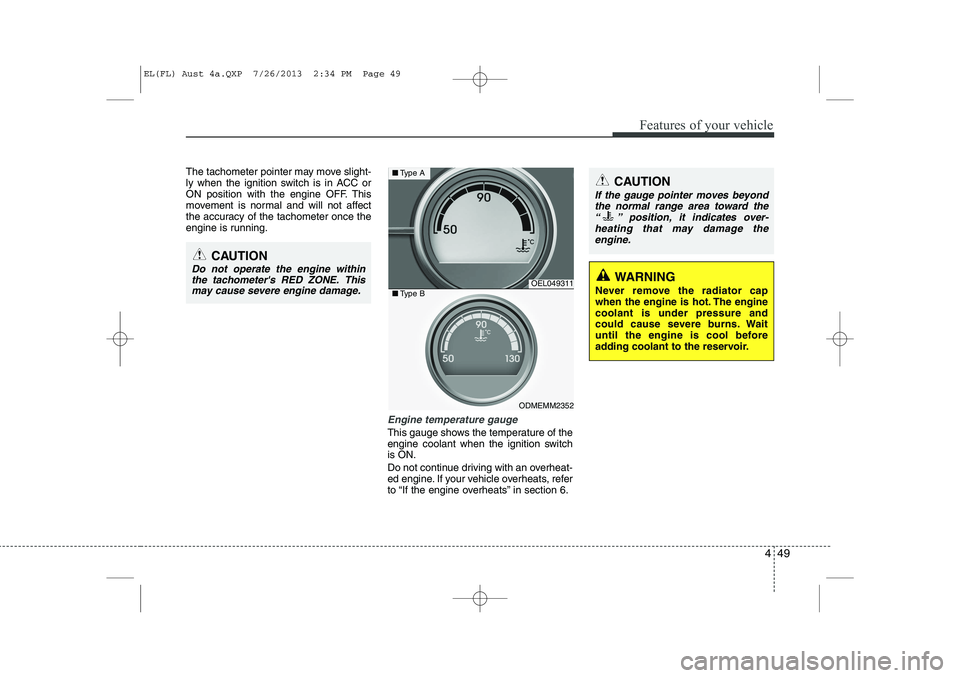
Engine temperature gauge
This gauge shows the temperature of the
engine coolant when the ignition switchis ON.
Do not continue driving with an overheat-
ed engine. If your vehicle overheats, refer
to “If the engine overheats” in section 6.
CAUTION
Do not operate the engine withinthe tachometer's RED ZONE. This may cause severe engine damage.
OEL049311
ODMEMM2352
■ Type A
■Type B
CAUTION
If the gauge pointer moves beyond
the normal range area toward the
“ ” position, it indicates over- heating that may damage theengine.
WARNING
Never remove the radiator cap
when the engine is hot. The enginecoolant is under pressure and
could cause severe burns. Wait
until the engine is cool before
adding coolant to the reservoir.
EL(FL) Aust 4a.QXP 7/26/2013 2:34 PM Page 49