turn signal HYUNDAI IX35 2015 Owners Manual
[x] Cancel search | Manufacturer: HYUNDAI, Model Year: 2015, Model line: IX35, Model: HYUNDAI IX35 2015Pages: 550, PDF Size: 11.23 MB
Page 11 of 550
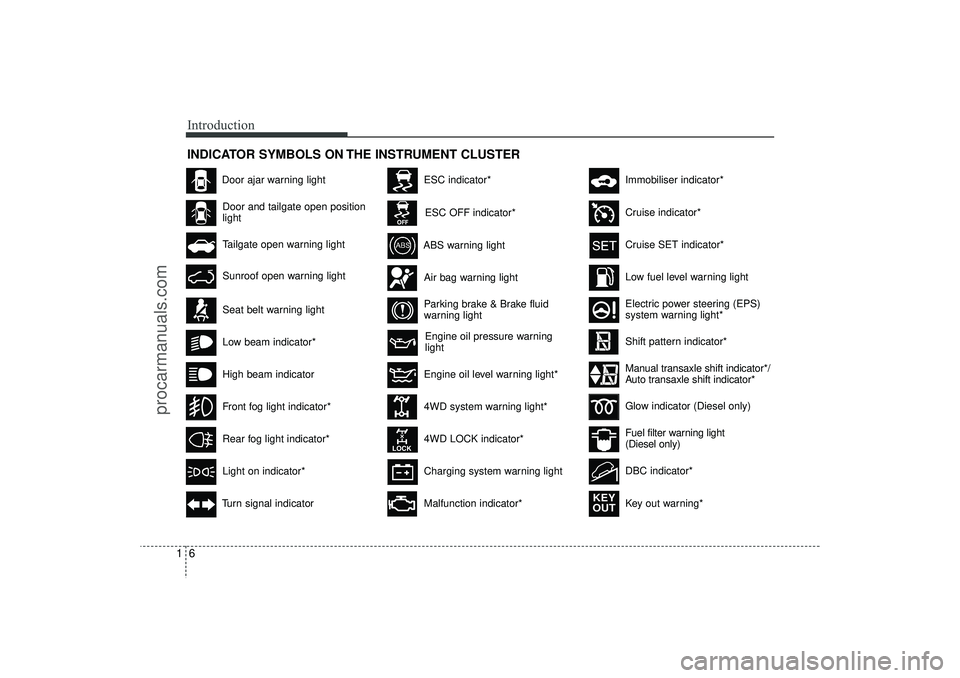
Introduction61INDICATOR SYMBOLS ON THE INSTRUMENT CLUSTER
Engine oil pressure warning
light
Seat belt warning lightDoor and tailgate open position
lightHigh beam indicatorLight on indicator*Turn signal indicator
ABS warning lightParking brake & Brake fluid
warning light4WD system warning light*
4WD LOCK indicator*Malfunction indicator*Air bag warning light
Cruise SET indicator*Low fuel level warning light
Charging system warning light
Door ajar warning light
Glow indicator (Diesel only)Fuel filter warning light
(Diesel only)
Cruise indicator*
ESC indicator*ESC OFF indicator*
Immobiliser indicator*Shift pattern indicator*
Front fog light indicator*Rear fog light indicator*Low beam indicator*
Electric power steering (EPS)
system warning light*
Key out warning*
KEY
OUT
DBC indicator*
Tailgate open warning lightSunroof open warning light
Engine oil level warning light*
Manual transaxle shift indicator*/
Auto transaxle shift indicator*
EL(FL) UK 1.QXP 12/16/2014 8:50 PM Page 6
procarmanuals.com
Page 15 of 550
23
Your vehicle at a glance
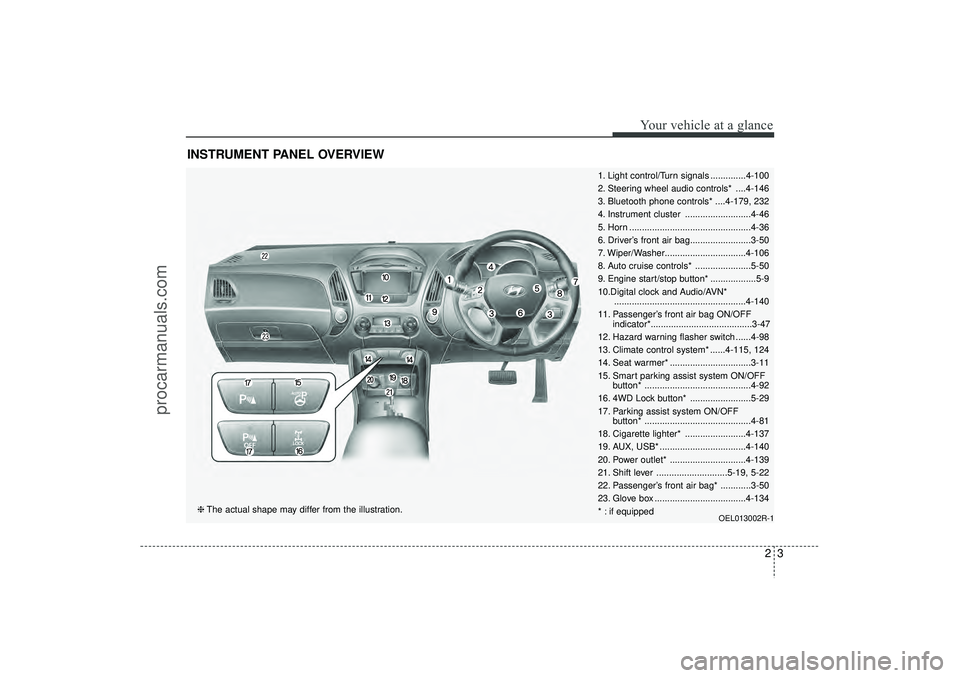
INSTRUMENT PANEL OVERVIEW
1. Light control/Turn signals ..............4-100
2. Steering wheel audio controls* ....4-146
3. Bluetooth phone controls* ....4-179, 232
4. Instrument cluster ..........................4-46
5. Horn ................................................4-36
6. Driver’s front air bag........................3-50
7. Wiper/Washer................................4-106
8. Auto cruise controls* ......................5-50
9. Engine start/stop button* ..................5-9
10.Digital clock and Audio/AVN*....................................................4-140
11. Passenger’s front air bag ON/OFF indicator*........................................3-47
12. Hazard warning flasher switch ......4-98
13. Climate control system* ......4-115, 124
14. Seat warmer* ................................3-11
15. Smart parking assist system ON/OFF button* ..........................................4-92
16. 4WD Lock button* ........................5-29
17. Parking assist system ON/OFF button* ..........................................4-81
18. Cigarette lighter* ........................4-137
19. AUX, USB* ..................................4-140
20. Power outlet* ..............................4-139
21. Shift lever ............................5-19, 5-22
22. Passenger’s front air bag* ............3-50
23. Glove box ....................................4-134
* : if equipped
OEL013002R-1
❈ The actual shape may differ from the illustration.
EL(FL) UK 2.QXP 2/11/2015 4:17 PM Page 3
procarmanuals.com
Page 87 of 550
4
LCD display . . . . . . . . . . . . . . . . . . . . . . . . . . . . . . 4-54• LCD Modes . . . . . . . . . . . . . . . . . . . . . . . . . . . . . . . . . 4-54
• Information Mode . . . . . . . . . . . . . . . . . . . . . . . . . . . . 4-55
• User Settings Mode . . . . . . . . . . . . . . . . . . . . . . . . . . . 4-56
• Warning Messages . . . . . . . . . . . . . . . . . . . . . . . . . . . 4-58Trip computer . . . . . . . . . . . . . . . . . . . . . . . . . . . . . 4-64• Overview . . . . . . . . . . . . . . . . . . . . . . . . . . . . . . . . . . . 4-\
64
• Trip Modes . . . . . . . . . . . . . . . . . . . . . . . . . . . . . . . . . . 4-64\
• Trip A/B . . . . . . . . . . . . . . . . . . . . . . . . . . . . . . . . . . . . \
4-65
• Fuel Economy . . . . . . . . . . . . . . . . . . . . . . . . . . . . . . . 4-66
• Warnings and indicators. . . . . . . . . . . . . . . . . . . . . . . 4-68
• Indicator Lights . . . . . . . . . . . . . . . . . . . . . . . . . . . . . . 4-77Parking assist system . . . . . . . . . . . . . . . . . . . . . . 4-81• Rear parking assist system type . . . . . . . . . . . . . . . . 4-81
• Front/Rear parking assist system type . . . . . . . . . . . 4-85Smart parking assist system . . . . . . . . . . . . . . . . 4-87• Operating condition . . . . . . . . . . . . . . . . . . . . . . . . . . 4-88
• Non-operational conditions . . . . . . . . . . . . . . . . . . . . 4-88
• Operation way . . . . . . . . . . . . . . . . . . . . . . . . . . . . . . . 4-91
• System cancellation whilst parking . . . . . . . . . . . . . . 4-95
• Additional introductions . . . . . . . . . . . . . . . . . . . . . . . 4-96
• System malfunction warning . . . . . . . . . . . . . . . . . . . 4-97Rearview camera . . . . . . . . . . . . . . . . . . . . . . . . . . 4-98Hazard warning flasher . . . . . . . . . . . . . . . . . . . . . 4-98
Lighting . . . . . . . . . . . . . . . . . . . . . . . . . . . . . . . . . 4-99
• Battery saver function . . . . . . . . . . . . . . . . . . . . . . . 4-99
• Headlight escort function . . . . . . . . . . . . . . . . . . . . . 4-99
• Headlight welcome function . . . . . . . . . . . . . . . . . . . 4-99
• Lighting control . . . . . . . . . . . . . . . . . . . . . . . . . . . . . 4-100
• High - beam operation . . . . . . . . . . . . . . . . . . . . . . . 4-101
• Turn signals and lane change signals . . . . . . . . . . . 4-102
• Front fog light . . . . . . . . . . . . . . . . . . . . . . . . . . . . . 4-103
• Rear fog light . . . . . . . . . . . . . . . . . . . . . . . . . . . . . . 4-103
• Daytime running light . . . . . . . . . . . . . . . . . . . . . . . 4-104
• Headlight levelling device . . . . . . . . . . . . . . . . . . . . 4-104Wipers and washers . . . . . . . . . . . . . . . . . . . . . . . 4-106• Windscreen wipers . . . . . . . . . . . . . . . . . . . . . . . . . . 4-107
• Windscreen washers . . . . . . . . . . . . . . . . . . . . . . . . 4-108
• Rear window wiper and washer switch . . . . . . . . . 4-109Interior light . . . . . . . . . . . . . . . . . . . . . . . . . . . . . 4-110• Map lamp . . . . . . . . . . . . . . . . . . . . . . . . . . . . . . . . . 4-110
• Room lamp . . . . . . . . . . . . . . . . . . . . . . . . . . . . . . . . 4-111
• Vanity mirror lamp . . . . . . . . . . . . . . . . . . . . . . . . . . 4-111
• Luggage room lamp . . . . . . . . . . . . . . . . . . . . . . . . . 4-111
• Glove box lamp . . . . . . . . . . . . . . . . . . . . . . . . . . . . . 4-112Defroster . . . . . . . . . . . . . . . . . . . . . . . . . . . . . . . . 4-113• Rear window defroster . . . . . . . . . . . . . . . . . . . . . . . 4-113
EL(FL) UK 4A.QXP 2/9/2015 9:02 PM Page 2
procarmanuals.com
Page 90 of 550
45
Features of your vehicle
Immobiliser systemYour vehicle may be equipped with an
electronic engine immobiliser system to
reduce the risk of unauthorised vehicle
use.
Your immobiliser system is comprised of
a small transponder in the ignition key
and electronic devices inside the vehicle.
With the immobiliser system, whenever
you insert your ignition key into the igni-
tion switch and turn it to ON, it checks
and determines and verifies if the ignition
key is valid or not.
If the key is determined to be valid, the
engine will start.
If the key is determined to be invalid, the
engine will not start.
To deactivate the immobiliser sys-tem:Insert the ignition key into the key cylin-
der and turn it to the ON position.To activate the immobiliser system:Turn the ignition key to the OFF position.
The immobiliser system activates auto-
matically. Without a valid ignition key for
your vehicle, the engine will not start.
✽ ✽ NOTICEThe immobiliser system detects the
presence of a key in the ignition switch.
To ensure the system performs correct-
ly, the keys should be separated after
delivery of the vehicle so that only one
key is near the ignition switch when
using the vehicle. The engine may not
start or may stop shortly after starting if
more than one key is near the ignition
switch.✽ ✽NOTICEIf you need additional keys or lose your
keys, we recommend that you consult a
HYUNDAI authorised repairer.
WARNING
In order to prevent theft of your
vehicle, do not leave spare keys
anywhere in your vehicle. Your
immobiliser password is a cus-
tomer unique password and should
be kept confidential. Do not leave
this number anywhere in your vehi-
cle.
CAUTION
Do not put metal accessories near
the ignition switch.
The engine may not start for themetal accessories may interrupt the transponder signal from normallytransmitting.
EL(FL) UK 4A.QXP 2/9/2015 9:02 PM Page 5
procarmanuals.com
Page 97 of 550
Features of your vehicle12
4Smart key precautions✽
✽
NOTICE• If, for some reason, you happen to lose
your smart key, you will not be able to
start the engine. Tow the vehicle, if
necessary. We recommend that you
contact a HYUNDAI authorised
repairer.
• A maximum of 2 smart keys can be registered to a single vehicle. If you
lose a smart key, you should immedi-
ately take the vehicle and key and we
recommend that you contact a
HYUNDAI authorised repairer.
• The smart key will not work if any of the following occurs:
- The smart key is close to a radiotransmitter such as a radio station or
an airport which can interfere with
normal operation of the smart key.
- The smart key is near a mobile two- way radio system or a mobile phone.
- Another vehicle’s smart key is being operated close to your vehicle.
When the smart key does not work
properly, open and close the door with
the mechanical key. If you have a
problem with the smart key, we rec-
ommend that you contact a
HYUNDAI authorised repairer. (Continued)(Continued)
• If the smart key is in close proximity
to your cell phone or smart phone, the
signal from the smart key could be
blocked by normal operation of your
cell phone or smart phone. This is
especially important when the phone
is active such as making call, receiving
calls, text messaging, and/or sending/
receiving emails. Avoid placing the
smart key and your cell phone or
smart phone in the same pants or
jacket pocket and maintain adequate
distance between the two devices.
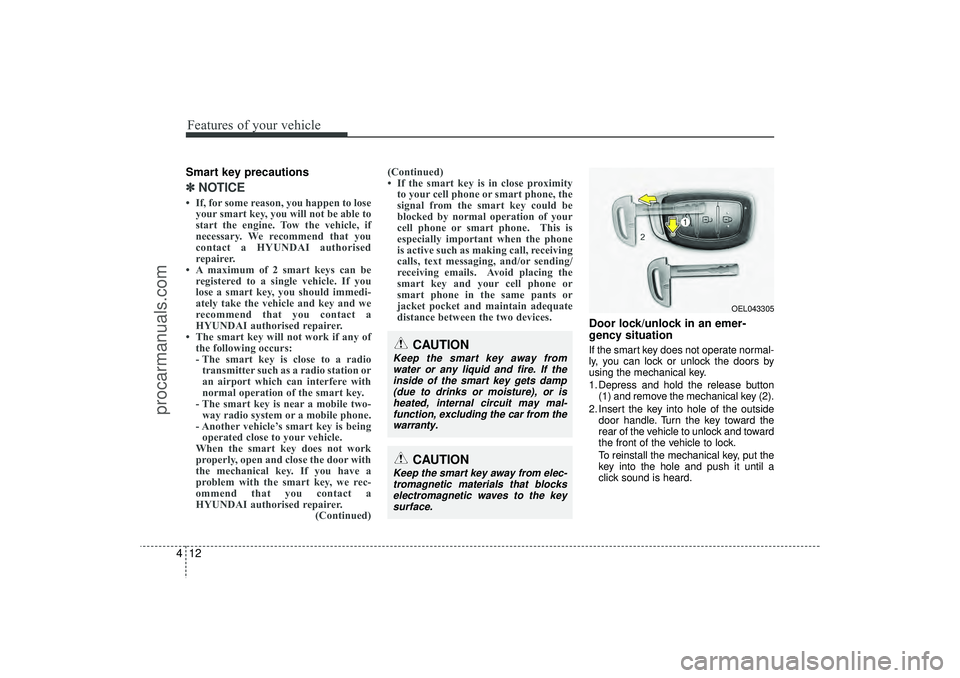
Door lock/unlock in an emer-
gency situationIf the smart key does not operate normal-
ly, you can lock or unlock the doors by
using the mechanical key.
1. Depress and hold the release button
(1) and remove the mechanical key (2).
2. Insert the key into hole of the outside door handle. Turn the key toward the
rear of the vehicle to unlock and toward
the front of the vehicle to lock.
To reinstall the mechanical key, put the
key into the hole and push it until a
click sound is heard.
CAUTION
Keep the smart key away fromwater or any liquid and fire. If theinside of the smart key gets damp(due to drinks or moisture), or is heated, internal circuit may mal-function, excluding the car from the warranty.
OEL043305
CAUTION
Keep the smart key away from elec-tromagnetic materials that blockselectromagnetic waves to the key surface.
EL(FL) UK 4A.QXP 2/9/2015 9:02 PM Page 12
procarmanuals.com
Page 155 of 550
Features of your vehicle70
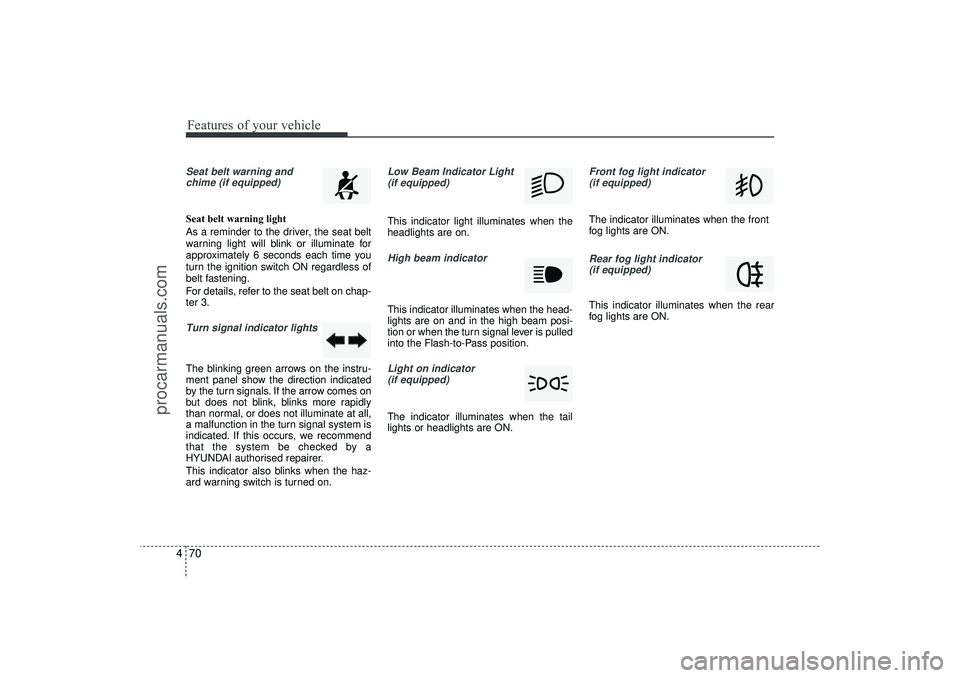
4Seat belt warning and
chime (if equipped)Seat belt warning light
As a reminder to the driver, the seat belt
warning light will blink or illuminate for
approximately 6 seconds each time you
turn the ignition switch ON regardless of
belt fastening.
For details, refer to the seat belt on chap-
ter 3.Turn signal indicator lightsThe blinking green arrows on the instru-
ment panel show the direction indicated
by the turn signals. If the arrow comes on
but does not blink, blinks more rapidly
than normal, or does not illuminate at all,
a malfunction in the turn signal system is
indicated. If this occurs, we recommend
that the system be checked by a
HYUNDAI authorised repairer.
This indicator also blinks when the haz-
ard warning switch is turned on.
Low Beam Indicator Light
(if equipped) This indicator light illuminates when the
headlights are on.High beam indicator This indicator illuminates when the head-
lights are on and in the high beam posi-
tion or when the turn signal lever is pulled
into the Flash-to-Pass position.Light on indicator (if equipped)The indicator illuminates when the tail
lights or headlights are ON.
Front fog light indicator (if equipped)The indicator illuminates when the front
fog lights are ON.Rear fog light indicator (if equipped)This indicator illuminates when the rear
fog lights are ON.
EL(FL) UK 4A.QXP 2/9/2015 9:05 PM Page 70
procarmanuals.com
Page 183 of 550
Features of your vehicle98
4
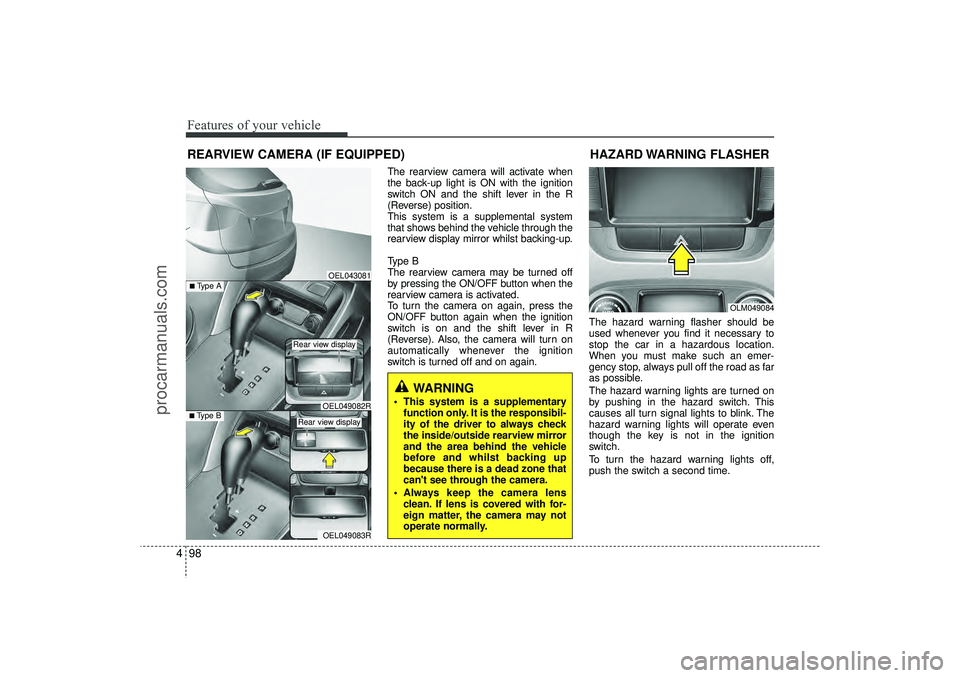
The rearview camera will activate when
the back-up light is ON with the ignition
switch ON and the shift lever in the R
(Reverse) position.
This system is a supplemental system
that shows behind the vehicle through the
rearview display mirror whilst backing-up.
Type B
The rearview camera may be turned off
by pressing the ON/OFF button when the
rearview camera is activated.
To turn the camera on again, press the
ON/OFF button again when the ignition
switch is on and the shift lever in R
(Reverse). Also, the camera will turn on
automatically whenever the ignition
switch is turned off and on again. The hazard warning flasher should be
used whenever you find it necessary to
stop the car in a hazardous location.
When you must make such an emer-
gency stop, always pull off the road as far
as possible.
The hazard warning lights are turned on
by pushing in the hazard switch. This
causes all turn signal lights to blink. The
hazard warning lights will operate even
though the key is not in the ignition
switch.
To turn the hazard warning lights off,
push the switch a second time.
REARVIEW CAMERA (IF EQUIPPED)
WARNING
This system is a supplementary
function only. It is the responsibil-
ity of the driver to always check
the inside/outside rearview mirror
and the area behind the vehicle
before and whilst backing up
because there is a dead zone that
can't see through the camera.
Always keep the camera lens clean. If lens is covered with for-
eign matter, the camera may not
operate normally.
OEL043081
OLM049084
HAZARD WARNING FLASHER
OEL049083R
■Type B
OEL049082R
■Type A
Rear view display Rear view display
EL(FL) UK 4A.QXP 2/9/2015 9:06 PM Page 98
procarmanuals.com
Page 187 of 550
Features of your vehicle102
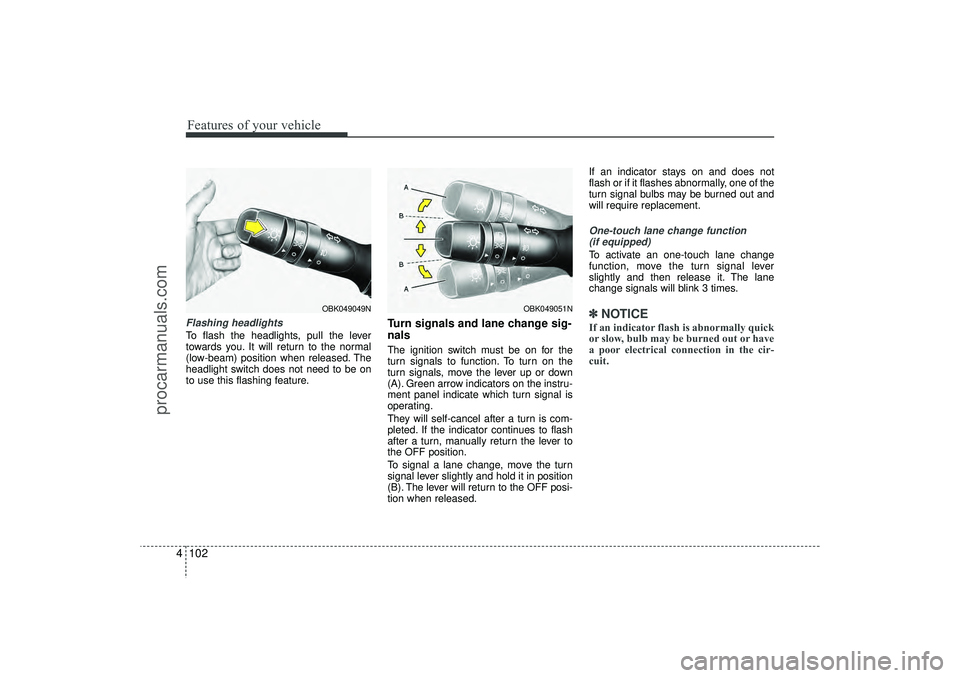
4Flashing headlights To flash the headlights, pull the lever
towards you. It will return to the normal
(low-beam) position when released. The
headlight switch does not need to be on
to use this flashing feature.
Turn signals and lane change sig-
nalsThe ignition switch must be on for the
turn signals to function. To turn on the
turn signals, move the lever up or down
(A). Green arrow indicators on the instru-
ment panel indicate which turn signal is
operating.
They will self-cancel after a turn is com-
pleted. If the indicator continues to flash
after a turn, manually return the lever to
the OFF position.
To signal a lane change, move the turn
signal lever slightly and hold it in position
(B). The lever will return to the OFF posi-
tion when released. If an indicator stays on and does not
flash or if it flashes abnormally, one of the
turn signal bulbs may be burned out and
will require replacement.
One-touch lane change function
(if equipped)To activate an one-touch lane change
function, move the turn signal lever
slightly and then release it. The lane
change signals will blink 3 times.✽ ✽ NOTICEIf an indicator flash is abnormally quick
or slow, bulb may be burned out or have
a poor electrical connection in the cir-
cuit.
OBK049051N
OBK049049N
EL(FL) UK 4A.QXP 2/9/2015 9:06 PM Page 102
procarmanuals.com
Page 230 of 550
4 145
Features of your vehicle
✽
✽NOTICE• If you install an aftermarket HID
head lamp, your vehicle’s audio and
electronic device may malfunction.
• Prevent chemicals such as perfume, cosmetic oil, sun cream, hand cleaner,
and air freshener from contacting the
interior parts because they may cause
damage or discoloration.
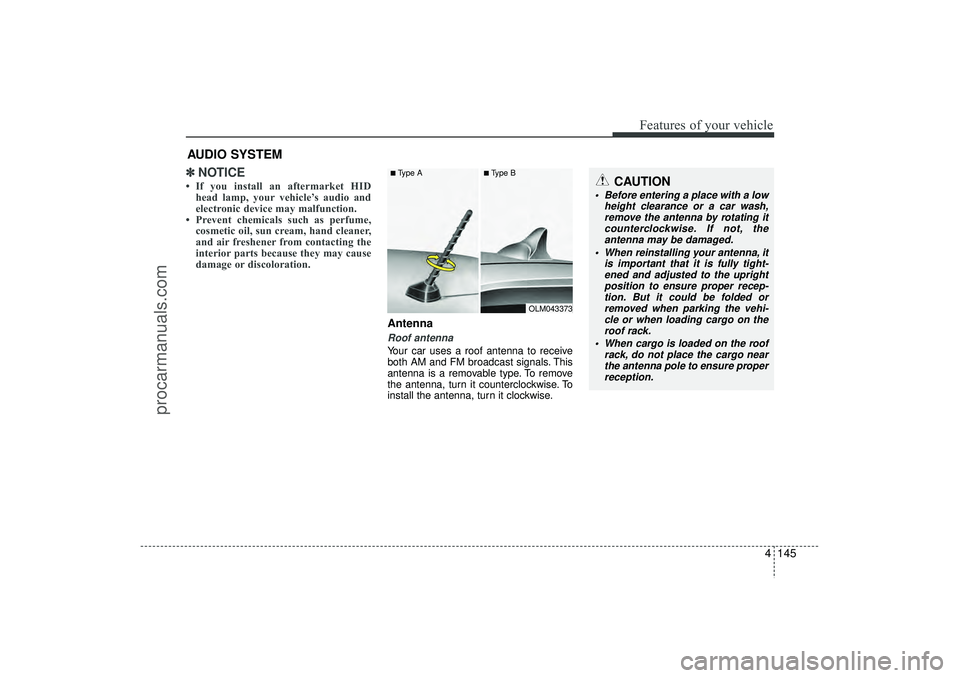
AntennaRoof antenna Your car uses a roof antenna to receive
both AM and FM broadcast signals. This
antenna is a removable type. To remove
the antenna, turn it counterclockwise. To
install the antenna, turn it clockwise.
AUDIO SYSTEM
CAUTION
• Before entering a place with a low
height clearance or a car wash,remove the antenna by rotating itcounterclockwise. If not, theantenna may be damaged.
When reinstalling your antenna, it is important that it is fully tight-ened and adjusted to the upright position to ensure proper recep-tion. But it could be folded or removed when parking the vehi-cle or when loading cargo on the roof rack.
When cargo is loaded on the roof rack, do not place the cargo nearthe antenna pole to ensure properreception.
■Type A
■Type B
OLM043373
EL(FL) UK 4B AUDIO.QXP 3/13/2015 4:18 PM Page 145
procarmanuals.com
Page 266 of 550
4 181
Features of your vehicle
✽
✽NOTICE -
USING THE
Bluetooth
®Wireless Technology
MOBILE PHONE
• Do not use a mobile phone or perform Bluetooth® Wireless Technology set-
tings (e.g. pairing a phone) whilst
driving.
• Some Bluetooth
®Wireless Technology
-enabled phones may not be recog-
nized by the system or fully compati-
ble with the system.
• Before using Bluetooth
®
Wireless
Technology related features of the
audio system, refer your phone’s
User’s Manual for phone-side
Bluetooth
®Wireless Technology oper-
ations.
• The phone must be paired to the audio system to use Bluetooth
®Wireless
Technology related features.
• You will not be able to use the hands- free feature when your phone (in the
car) is outside of the mobile service
area (e.g. in a tunnel, in a under-
ground, in a mountainous area, etc.). (Continued)(Continued)
• If the mobile phone signal is poor or
the vehicles interior noise is too loud,
it may be difficult to hear the other
person’s voice during a call.
• Do not place the phone near or inside metallic objects, otherwise communi-
cations with Bluetooth
®
Wireless
Technology system or mobile service
stations can be disturbed.
• Whilst a phone is connected through Bluetooth
®Wireless Technology your
phone may discharge quicker than
usual for additional Bluetooth
®
Wireless Technology-related opera-
tions.
• Some mobile phones or other devices may cause interference noise or mal-
function to audio system. In this case,
store the device in a different location
may resolve the condition.
• Phone contact names should be saved in English or they may not be dis-
played correctly. (Continued)(Continued)
• If Priority is set upon vehicle igni-
tion(IGN/ACC ON), the Bluetooth
®
Wireless Technology phone will be
automatically connected.
Even if you are outside, the Bluetooth
®
Wireless Technology phone will be
automatically connected once you are
in the vicinity of the vehicle.
If you do not want automatic
Bluetooth
®Wireless Technology con-
nection, turn the Bluetooth
®Wireless
Technology feature off.
• The hands-free call volume and quali- ty may differ depending on the mobile
phone type.
• Bluetooth
®Wireless Technology fea-
tures can be used only when the
mobile phone has been paired and
connected with the device. For more
information on pairing and connect-
ing Bluetooth
®Wireless Technology
enabled mobile phones, refer to the
“Phone Setup” section. (Continued)
EL(FL) UK 4B AUDIO.QXP 3/13/2015 4:19 PM Page 181
procarmanuals.com