fog light HYUNDAI IX35 2015 Owners Manual
[x] Cancel search | Manufacturer: HYUNDAI, Model Year: 2015, Model line: IX35, Model: HYUNDAI IX35 2015Pages: 550, PDF Size: 9.92 MB
Page 11 of 550
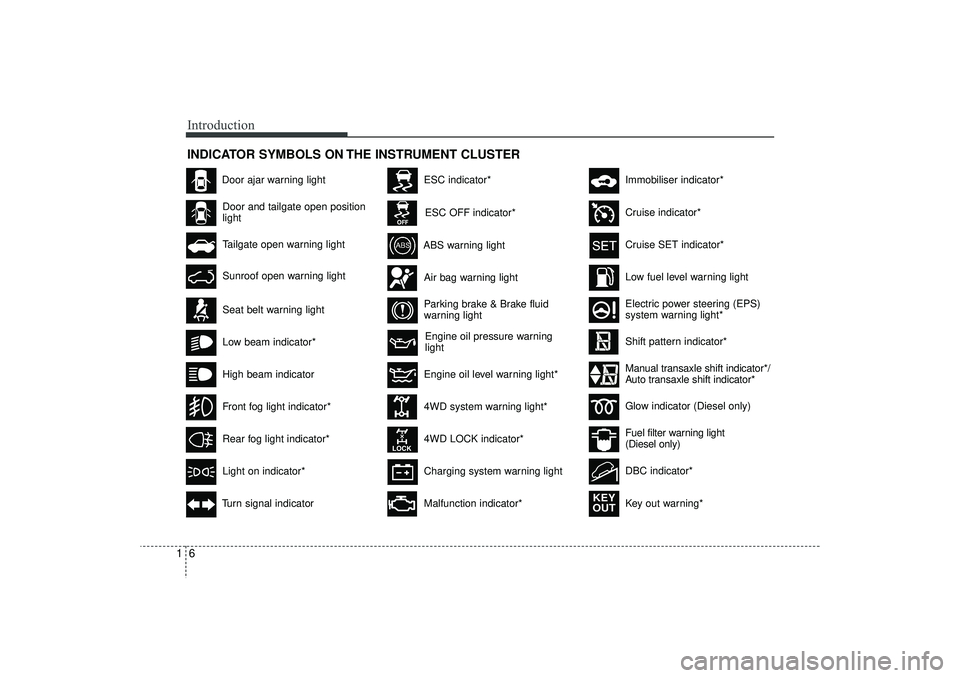
Introduction61INDICATOR SYMBOLS ON THE INSTRUMENT CLUSTER
Engine oil pressure warning
light
Seat belt warning lightDoor and tailgate open position
lightHigh beam indicatorLight on indicator*Turn signal indicator
ABS warning lightParking brake & Brake fluid
warning light4WD system warning light*
4WD LOCK indicator*Malfunction indicator*Air bag warning light
Cruise SET indicator*Low fuel level warning light
Charging system warning light
Door ajar warning light
Glow indicator (Diesel only)Fuel filter warning light
(Diesel only)
Cruise indicator*
ESC indicator*ESC OFF indicator*
Immobiliser indicator*Shift pattern indicator*
Front fog light indicator*Rear fog light indicator*Low beam indicator*
Electric power steering (EPS)
system warning light*
Key out warning*
KEY
OUT
DBC indicator*
Tailgate open warning lightSunroof open warning light
Engine oil level warning light*
Manual transaxle shift indicator*/
Auto transaxle shift indicator*
EL(FL) UK 1.QXP 12/16/2014 8:50 PM Page 6
Page 87 of 550
4
LCD display . . . . . . . . . . . . . . . . . . . . . . . . . . . . . . 4-54• LCD Modes . . . . . . . . . . . . . . . . . . . . . . . . . . . . . . . . . 4-54
• Information Mode . . . . . . . . . . . . . . . . . . . . . . . . . . . . 4-55
• User Settings Mode . . . . . . . . . . . . . . . . . . . . . . . . . . . 4-56
• Warning Messages . . . . . . . . . . . . . . . . . . . . . . . . . . . 4-58Trip computer . . . . . . . . . . . . . . . . . . . . . . . . . . . . . 4-64• Overview . . . . . . . . . . . . . . . . . . . . . . . . . . . . . . . . . . . 4-\
64
• Trip Modes . . . . . . . . . . . . . . . . . . . . . . . . . . . . . . . . . . 4-64\
• Trip A/B . . . . . . . . . . . . . . . . . . . . . . . . . . . . . . . . . . . . \
4-65
• Fuel Economy . . . . . . . . . . . . . . . . . . . . . . . . . . . . . . . 4-66
• Warnings and indicators. . . . . . . . . . . . . . . . . . . . . . . 4-68
• Indicator Lights . . . . . . . . . . . . . . . . . . . . . . . . . . . . . . 4-77Parking assist system . . . . . . . . . . . . . . . . . . . . . . 4-81• Rear parking assist system type . . . . . . . . . . . . . . . . 4-81
• Front/Rear parking assist system type . . . . . . . . . . . 4-85Smart parking assist system . . . . . . . . . . . . . . . . 4-87• Operating condition . . . . . . . . . . . . . . . . . . . . . . . . . . 4-88
• Non-operational conditions . . . . . . . . . . . . . . . . . . . . 4-88
• Operation way . . . . . . . . . . . . . . . . . . . . . . . . . . . . . . . 4-91
• System cancellation whilst parking . . . . . . . . . . . . . . 4-95
• Additional introductions . . . . . . . . . . . . . . . . . . . . . . . 4-96
• System malfunction warning . . . . . . . . . . . . . . . . . . . 4-97Rearview camera . . . . . . . . . . . . . . . . . . . . . . . . . . 4-98Hazard warning flasher . . . . . . . . . . . . . . . . . . . . . 4-98
Lighting . . . . . . . . . . . . . . . . . . . . . . . . . . . . . . . . . 4-99
• Battery saver function . . . . . . . . . . . . . . . . . . . . . . . 4-99
• Headlight escort function . . . . . . . . . . . . . . . . . . . . . 4-99
• Headlight welcome function . . . . . . . . . . . . . . . . . . . 4-99
• Lighting control . . . . . . . . . . . . . . . . . . . . . . . . . . . . . 4-100
• High - beam operation . . . . . . . . . . . . . . . . . . . . . . . 4-101
• Turn signals and lane change signals . . . . . . . . . . . 4-102
• Front fog light . . . . . . . . . . . . . . . . . . . . . . . . . . . . . 4-103
• Rear fog light . . . . . . . . . . . . . . . . . . . . . . . . . . . . . . 4-103
• Daytime running light . . . . . . . . . . . . . . . . . . . . . . . 4-104
• Headlight levelling device . . . . . . . . . . . . . . . . . . . . 4-104Wipers and washers . . . . . . . . . . . . . . . . . . . . . . . 4-106• Windscreen wipers . . . . . . . . . . . . . . . . . . . . . . . . . . 4-107
• Windscreen washers . . . . . . . . . . . . . . . . . . . . . . . . 4-108
• Rear window wiper and washer switch . . . . . . . . . 4-109Interior light . . . . . . . . . . . . . . . . . . . . . . . . . . . . . 4-110• Map lamp . . . . . . . . . . . . . . . . . . . . . . . . . . . . . . . . . 4-110
• Room lamp . . . . . . . . . . . . . . . . . . . . . . . . . . . . . . . . 4-111
• Vanity mirror lamp . . . . . . . . . . . . . . . . . . . . . . . . . . 4-111
• Luggage room lamp . . . . . . . . . . . . . . . . . . . . . . . . . 4-111
• Glove box lamp . . . . . . . . . . . . . . . . . . . . . . . . . . . . . 4-112Defroster . . . . . . . . . . . . . . . . . . . . . . . . . . . . . . . . 4-113• Rear window defroster . . . . . . . . . . . . . . . . . . . . . . . 4-113
EL(FL) UK 4A.QXP 2/9/2015 9:02 PM Page 2
Page 88 of 550
Manual climate control system . . . . . . . . . . . . . 4-115• Heating and air conditioning . . . . . . . . . . . . . . . . . . 4-116
• System operation . . . . . . . . . . . . . . . . . . . . . . . . . . . . 4-120
• Climate control air filter . . . . . . . . . . . . . . . . . . . . . 4-122
• Checking the amount of air conditioner refrigerant and compressor lubricant . . . . . . . . . . . . . . . . . . . 4-123Automatic climate control system . . . . . . . . . . . 4-124• Automatic heating and air conditioning . . . . . . . . . 4-125
• Manual heating and air conditioning . . . . . . . . . . . 4-126Windscreen defrosting and defogging . . . . . . . 4-131• Manual climate control system . . . . . . . . . . . . . . . . 4-131
• Automatic climate control system . . . . . . . . . . . . . . 4-133Storage compartment . . . . . . . . . . . . . . . . . . . . . . 4-134• Centre console storage . . . . . . . . . . . . . . . . . . . . . . . 4-134
• Glove box . . . . . . . . . . . . . . . . . . . . . . . . . . . . . . . . . . 4-13\
4
• Cool box . . . . . . . . . . . . . . . . . . . . . . . . . . . . . . . . . . . 4-\
135
• Sunglass holder . . . . . . . . . . . . . . . . . . . . . . . . . . . . . 4-135Interior features . . . . . . . . . . . . . . . . . . . . . . . . . 4-137• Cigarette lighter . . . . . . . . . . . . . . . . . . . . . . . . . . . . 4-137
• Ashtray . . . . . . . . . . . . . . . . . . . . . . . . . . . . . . . . . . . 4-\
137
• Cup holder . . . . . . . . . . . . . . . . . . . . . . . . . . . . . . . . . 4-138
• Sunvisor . . . . . . . . . . . . . . . . . . . . . . . . . . . . . . . . . . . 4-\
138
• Power outlet . . . . . . . . . . . . . . . . . . . . . . . . . . . . . . . . 4-139
• Digital clock . . . . . . . . . . . . . . . . . . . . . . . . . . . . . . . 4-140
• Aux, USB and iPod
®. . . . . . . . . . . . . . . . . . . . . . . . . 4-140 • Floor mat anchor(s) . . . . . . . . . . . . . . . . . . . . . . . . . 4-141
• Luggage net (holder) . . . . . . . . . . . . . . . . . . . . . . . . 4-141
• Cargo security screen . . . . . . . . . . . . . . . . . . . . . . . 4-142
Exterior features . . . . . . . . . . . . . . . . . . . . . . . . . . 4-144• Roof rack . . . . . . . . . . . . . . . . . . . . . . . . . . . . . . . . . . 4-14\
4Audio system . . . . . . . . . . . . . . . . . . . . . . . . . . . . . 4-145
4
EL(FL) UK 4A.QXP 2/9/2015 9:02 PM Page 3
Page 155 of 550
Features of your vehicle70
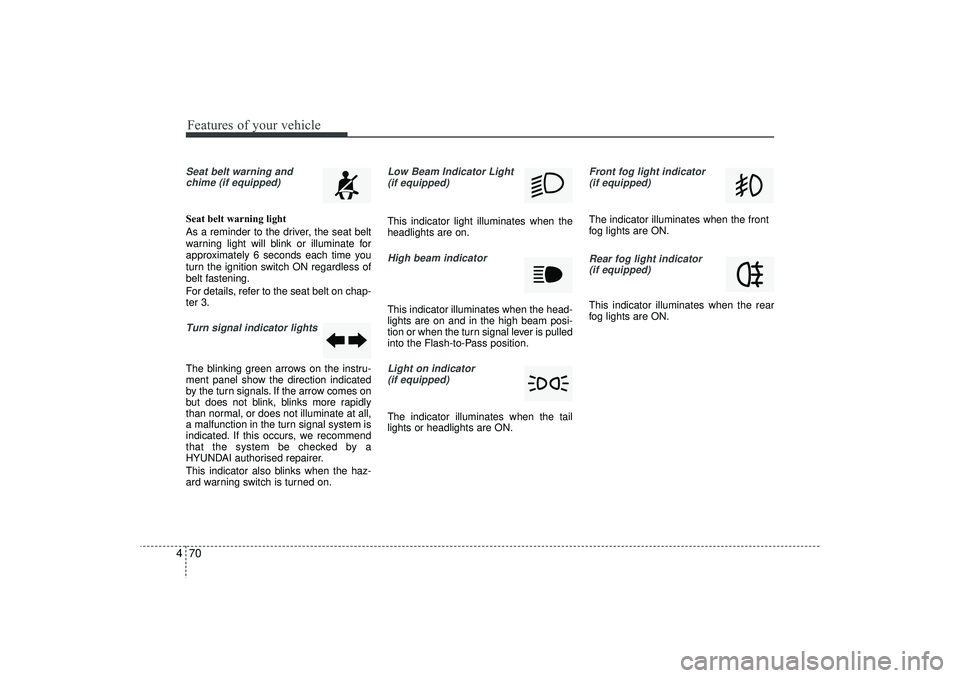
4Seat belt warning and
chime (if equipped)Seat belt warning light
As a reminder to the driver, the seat belt
warning light will blink or illuminate for
approximately 6 seconds each time you
turn the ignition switch ON regardless of
belt fastening.
For details, refer to the seat belt on chap-
ter 3.Turn signal indicator lightsThe blinking green arrows on the instru-
ment panel show the direction indicated
by the turn signals. If the arrow comes on
but does not blink, blinks more rapidly
than normal, or does not illuminate at all,
a malfunction in the turn signal system is
indicated. If this occurs, we recommend
that the system be checked by a
HYUNDAI authorised repairer.
This indicator also blinks when the haz-
ard warning switch is turned on.
Low Beam Indicator Light
(if equipped) This indicator light illuminates when the
headlights are on.High beam indicator This indicator illuminates when the head-
lights are on and in the high beam posi-
tion or when the turn signal lever is pulled
into the Flash-to-Pass position.Light on indicator (if equipped)The indicator illuminates when the tail
lights or headlights are ON.
Front fog light indicator (if equipped)The indicator illuminates when the front
fog lights are ON.Rear fog light indicator (if equipped)This indicator illuminates when the rear
fog lights are ON.
EL(FL) UK 4A.QXP 2/9/2015 9:05 PM Page 70
Page 188 of 550
4 103
Features of your vehicle
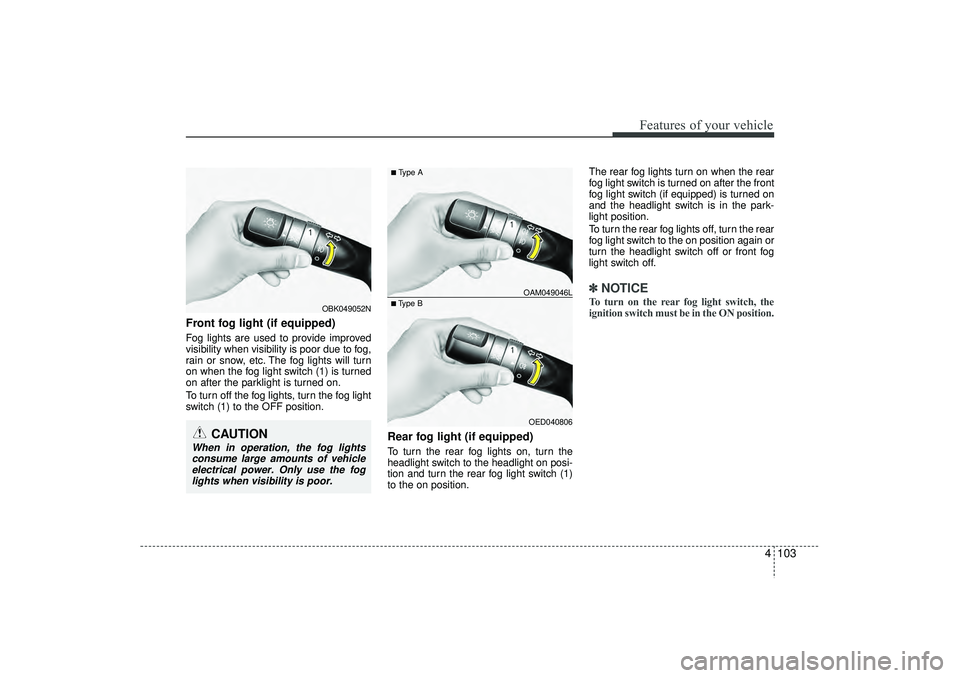
Front fog light (if equipped) Fog lights are used to provide improved
visibility when visibility is poor due to fog,
rain or snow, etc. The fog lights will turn
on when the fog light switch (1) is turned
on after the parklight is turned on.
To turn off the fog lights, turn the fog light
switch (1) to the OFF position.
Rear fog light (if equipped) To turn the rear fog lights on, turn the
headlight switch to the headlight on posi-
tion and turn the rear fog light switch (1)
to the on position.The rear fog lights turn on when the rear
fog light switch is turned on after the front
fog light switch (if equipped) is turned on
and the headlight switch is in the park-
light position.
To turn the rear fog lights off, turn the rear
fog light switch to the on position again or
turn the headlight switch off or front fog
light switch off.
✽ ✽
NOTICETo turn on the rear fog light switch, the
ignition switch must be in the ON position.
OED040806
■Type B OAM049046L■Type A
OBK049052N
CAUTION
When in operation, the fog lights
consume large amounts of vehicle electrical power. Only use the foglights when visibility is poor.
EL(FL) UK 4A.QXP 2/9/2015 9:06 PM Page 103
Page 205 of 550
Features of your vehicle120
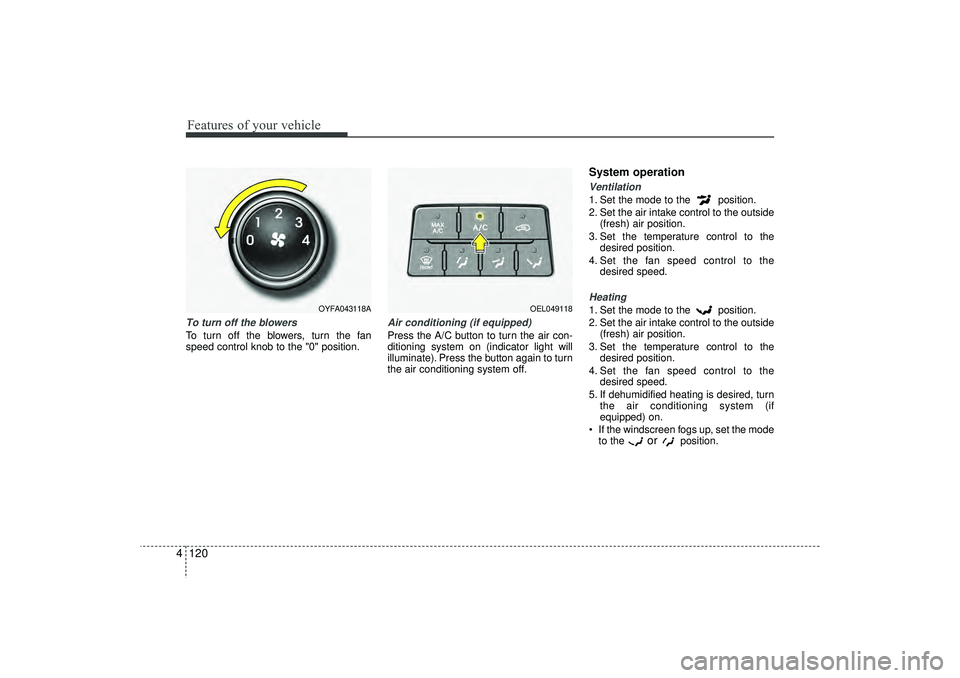
4To turn off the blowersTo turn off the blowers, turn the fan
speed control knob to the "0" position.
Air conditioning (if equipped) Press the A/C button to turn the air con-
ditioning system on (indicator light will
illuminate). Press the button again to turn
the air conditioning system off.
System operationVentilation1. Set the mode to the position.
2. Set the air intake control to the outside
(fresh) air position.
3. Set the temperature control to the desired position.
4. Set the fan speed control to the desired speed.Heating1. Set the mode to the position.
2. Set the air intake control to the outside(fresh) air position.
3. Set the temperature control to the desired position.
4. Set the fan speed control to the desired speed.
5. If dehumidified heating is desired, turn the air conditioning system (if
equipped) on.
If the windscreen fogs up, set the mode to the
or
position.
OEL049118
OYFA043118A
EL(FL) UK 4A.QXP 2/9/2015 9:08 PM Page 120
Page 462 of 550
Fuses . . . . . . . . . . . . . . . . . . . . . . . . . . . . . . . . . . . . \
7-44• Fuse/relay panel description. . . . . . . . . . . . . . . . . . . . 7-49Light bulbs . . . . . . . . . . . . . . . . . . . . . . . . . . . . . . . 7-56• Headlight, position light, turn signal light, front fog light bulb replacement . . . . . . . . . . . . . . . 7-57
• Headlight and front fog light aiming (for europe) . . 7-60
• Side repeater light bulb replacement . . . . . . . . . . . . 7-65
• Rear combination light bulb replacement . . . . . . . . 7-65
• Rear fog light . . . . . . . . . . . . . . . . . . . . . . . . . . . . . . . . 7-67
• High mounted stop light bulb replacement . . . . . . . 7-67
• License plate light bulb replacement . . . . . . . . . . . . 7-68
• Interior light bulb replacement . . . . . . . . . . . . . . . . . 7-69Appearance care . . . . . . . . . . . . . . . . . . . . . . . . . . . 7-70• Exterior care . . . . . . . . . . . . . . . . . . . . . . . . . . . . . . . . 7-70
• Interior care . . . . . . . . . . . . . . . . . . . . . . . . . . . . . . . . . 7-75Emission control system . . . . . . . . . . . . . . . . . . . . 7-76• Crankcase emission control system . . . . . . . . . . . . . . 7-76
• Evaporative emission control system . . . . . . . . . . . . 7-76
• Exhaust emission control system . . . . . . . . . . . . . . . . 7-77
7
EL(FL) UK 7.QXP 3/4/2015 9:04 PM Page 2
Page 511 of 550
751
Maintenance
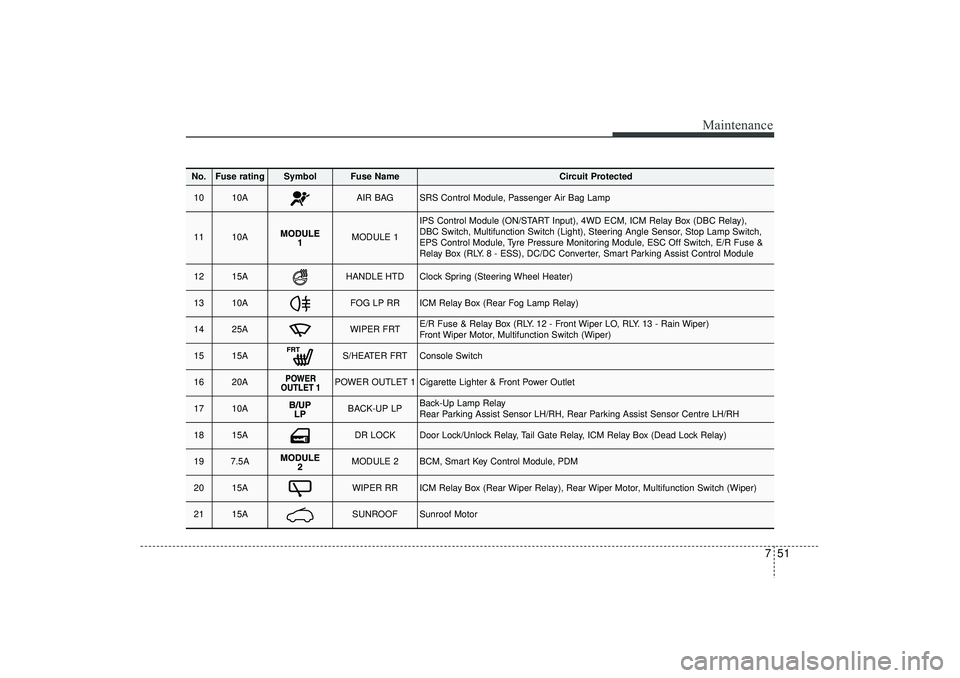
No.
Fuse rating
Symbol
Fuse Name
Circuit Protected
10
10A
AIR BAG
SRS Control Module, Passenger Air Bag Lamp
11
10A
MODULE 1
IPS Control Module (ON/START Input), 4WD ECM, ICM Relay Box (DBC Relay),
DBC Switch, Multifunction Switch (Light), Steering Angle Sensor, Stop Lamp Switch,
EPS Control Module, Tyre Pressure Monitoring Module, ESC Off Switch, E/R Fuse &
Relay Box (RLY. 8 - ESS), DC/DC Converter, Smart Parking Assist Control Module
12
15A
HANDLE HTD
Clock Spring (Steering Wheel Heater)
13
10A
FOG LP RR
ICM Relay Box (Rear Fog Lamp Relay)
14
25A
WIPER FRT
E/R Fuse & Relay Box (RLY. 12 - Front Wiper LO, RLY. 13 - Rain Wiper)
Front Wiper Motor, Multifunction Switch (Wiper)
15
15A
S/HEATER FRT
Console Switch
16
20A
POWER OUTLET 1
Cigarette Lighter & Front Power Outlet
17
10A
BACK-UP LP
Back-Up Lamp Relay
Rear Parking Assist Sensor LH/RH, Rear Parking Assist Sensor Centre LH/RH
18
15A
DR LOCK
Door Lock/Unlock Relay, Tail Gate Relay, ICM Relay Box (Dead Lock Relay)
19
7.5A
MODULE 2
BCM, Smart Key Control Module, PDM
20
15A
WIPER RR
ICM Relay Box (Rear Wiper Relay), Rear Wiper Motor, Multifunction Switch (Wiper)
21
15A
SUNROOF
Sunroof Motor
EL(FL) UK 7.QXP 3/4/2015 9:07 PM Page 51
Page 517 of 550
757
Maintenance
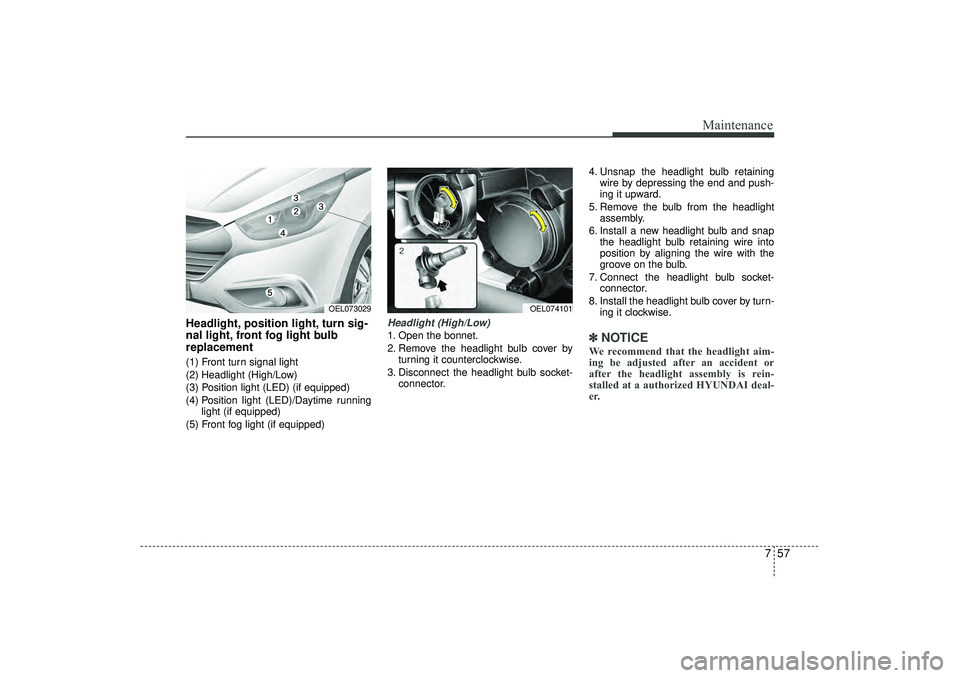
Headlight, position light, turn sig-
nal light, front fog light bulb
replacement(1) Front turn signal light
(2) Headlight (High/Low)
(3) Position light (LED) (if equipped)
(4) Position light (LED)/Daytime runninglight (if equipped)
(5) Front fog light (if equipped)
Headlight (High/Low)1. Open the bonnet.
2. Remove the headlight bulb cover by turning it counterclockwise.
3. Disconnect the headlight bulb socket- connector. 4. Unsnap the headlight bulb retaining
wire by depressing the end and push-
ing it upward.
5. Remove the bulb from the headlight assembly.
6. Install a new headlight bulb and snap the headlight bulb retaining wire into
position by aligning the wire with the
groove on the bulb.
7. Connect the headlight bulb socket- connector.
8. Install the headlight bulb cover by turn- ing it clockwise.
✽ ✽NOTICEWe recommend that the headlight aim-
ing be adjusted after an accident or
after the headlight assembly is rein-
stalled at a authorized HYUNDAI deal-
er.
OEL073029
OEL074101
EL(FL) UK 7.QXP 3/4/2015 9:07 PM Page 57
Page 520 of 550
Maintenance60
7Front fog light bulbs (if equipped)1. Remove the front bumper under cover.
2. Reach your hand into the back of the
front bumper.
3. Disconnect the power connector from the socket.
4. Remove the bulb-socket from the housing by turning the socket counter
clockwise until the tabs on the socket
align with the slots on the housing.
5. Install the new bulb-socket into the housing by aligning the tabs on the
socket with the slots in the housing.
Push the socket into the housing and
turn the socket clockwise.
6. Connect the power connector to the socket.
7. Reinstall the front bumper under cover.
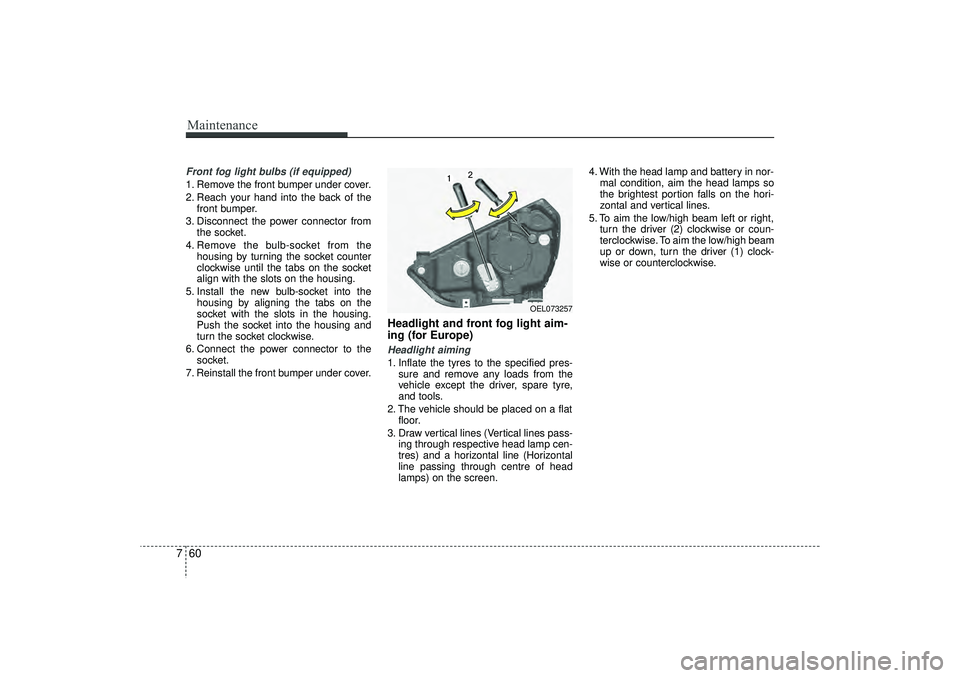
Headlight and front fog light aim-
ing (for Europe)Headlight aiming1. Inflate the tyres to the specified pres- sure and remove any loads from the
vehicle except the driver, spare tyre,
and tools.
2. The vehicle should be placed on a flat floor.
3. Draw vertical lines (Vertical lines pass- ing through respective head lamp cen-
tres) and a horizontal line (Horizontal
line passing through centre of head
lamps) on the screen. 4. With the head lamp and battery in nor-
mal condition, aim the head lamps so
the brightest portion falls on the hori-
zontal and vertical lines.
5. To aim the low/high beam left or right, turn the driver (2) clockwise or coun-
terclockwise. To aim the low/high beam
up or down, turn the driver (1) clock-
wise or counterclockwise.
OEL073257
EL(FL) UK 7.QXP 3/4/2015 9:07 PM Page 60