run flat Hyundai Kona 2018 - RHD (UK, Australia) User Guide
[x] Cancel search | Manufacturer: HYUNDAI, Model Year: 2018, Model line: Kona, Model: Hyundai Kona 2018Pages: 497, PDF Size: 11.7 MB
Page 402 of 497

6-40
What to do in an emergency
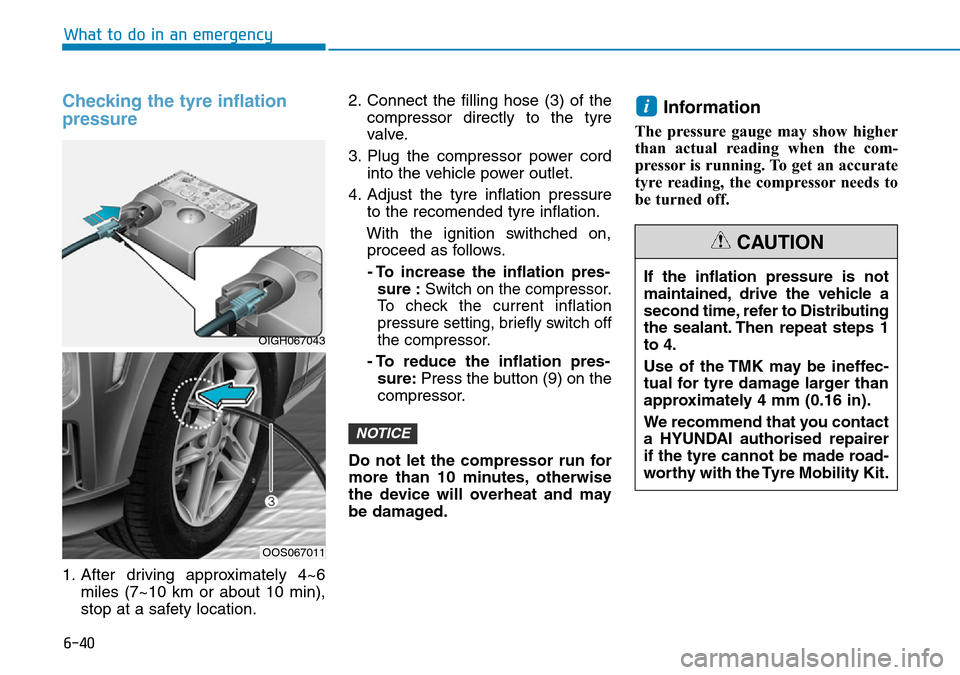
Checking the tyre inflation
pressure
1. After driving approximately 4~6miles (7~10 km or about 10 min),
stop at a safety location. 2. Connect the filling hose (3) of the
compressor directly to the tyre
valve.
3. Plug the compressor power cord into the vehicle power outlet.
4. Adjust the tyre inflation pressure to the recomended tyre inflation.
With the ignition swithched on, proceed as follows.
- To increase the inflation pres- sure : Switch on the compressor.
To check the current inflation
pressure setting, briefly switch off
the compressor.
- To reduce the inflation pres- sure: Press the button (9) on the
compressor.
Do not let the compressor run for
more than 10 minutes, otherwise
the device will overheat and may
be damaged.
Information
The pressure gauge may show higher
than actual reading when the com-
pressor is running. To get an accurate
tyre reading, the compressor needs to
be turned off.
i
NOTICE
OIGH067043
OOS067011
If the inflation pressure is not
maintained, drive the vehicle a
second time, refer to Distributing
the sealant. Then repeat steps 1
to 4.
Use of the TMK may be ineffec-
tual for tyre damage larger than
approximately 4 mm (0.16 in).
We recommend that you contact
a HYUNDAI authorised repairer
if the tyre cannot be made road-
worthy with the Tyre Mobility Kit.
CAUTION
Page 412 of 497

7-5
7
Maintenance
OWNER MAINTENANCE
The following lists are vehicle checks
and inspections that should be per-
formed by the owner or a HYUNDAI
authorised repairer at the frequencies
indicated to help ensure safe, depend-
able operation of your vehicle.
Any adverse conditions should be
brought to the attention of your dealer
as soon as possible.
These Owner Maintenance vehicle
checks are generally not covered by
warranties and you may be charged
for labour, parts and lubricants used.
Owner maintenance schedule
When you stop for fuel:
• Check the engine oil level.
• Check the coolant level in theengine coolant reservoir.
• Check the windscreen washer fluid level.
• Check for low or under-inflated tyres.
Performing maintenance work
on a vehicle can be dangerous.
If you lack sufficient knowledge
and experience or the proper
tools and equipment to do the
work, we
recommend that the
system be serviced by a
HYUNDAI authorised repairer.
ALWAYS follow these precau-
tions for performing mainte-
nance work:
•Park your vehicle on level
ground, move the shift lever
into the P (Park, dual clutch
transmission vehicle) or neu-
tral (for manual transmission
vehicle) position, apply the
parking brake, and place the
ignition switch in the LOCK/
OFF position.
•Block the tyres (front and
back) to prevent the vehicle
from moving.
Remove loose clothing or jew-
ellery that can become entan-
gled in moving parts.
WARNING •If you must run the engine
during maintenance, do so
out doors or in an area with
plenty of ventilation.
•Keep flames, sparks, or smok-
ing materials away from the
battery and fuel-related parts.
Be careful when checking your
engine coolant level when the
engine is hot. This may result in
coolant being blown out of the
opening and cause serious
burns and other injuries.
WARNING
Page 466 of 497

7-59
7
Maintenance
5. Insert a new bulb by inserting itinto the socket and rotating it until
it locks into place.
6. Install the socket in the assembly by aligning the tabs on the socket
with the slots in the assembly.
7. Push the socket into the assembly and turn the socket clockwise.
Position lamp and daytime running
light
If the LED lamp does not operate, we
recommend that you have the vehicle
checked by a HYUNDAI authorised
repairer.
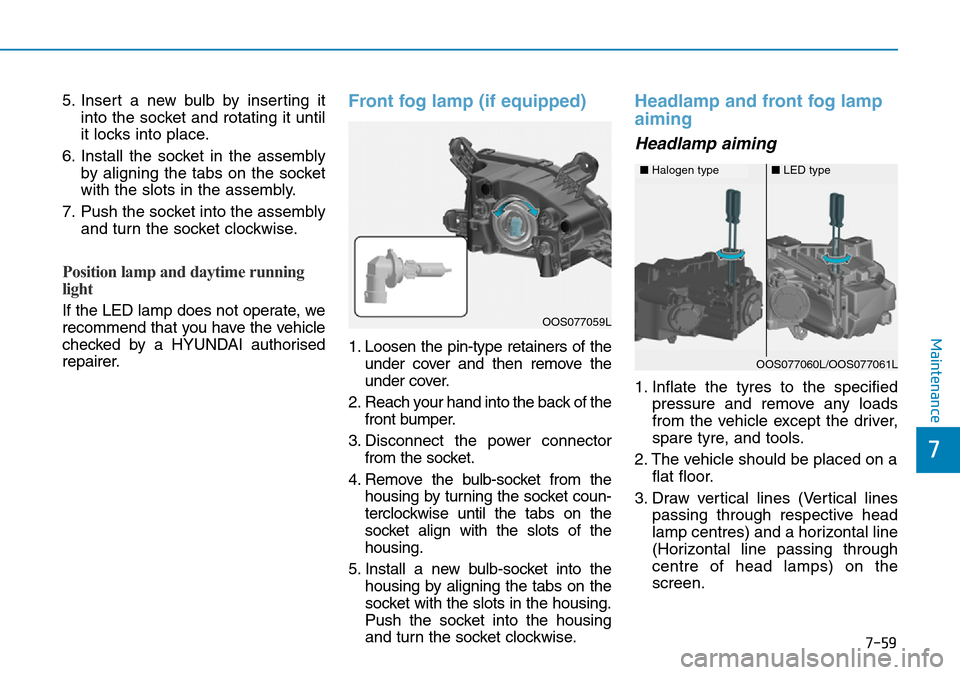
Front fog lamp (if equipped)
1. Loosen the pin-type retainers of theunder cover and then remove the
under cover.
2. Reach your hand into the back of the front bumper.
3. Disconnect the power connector from the socket.
4. Remove the bulb-socket from the housing by turning the socket coun-
terclockwise until the tabs on the
socket align with the slots of the
housing.
5. Install a new bulb-socket into the housing by aligning the tabs on the
socket with the slots in the housing.
Push the socket into the housing
and turn the socket clockwise.
Headlamp and front fog lamp
aiming
Headlamp aiming
1. Inflate the tyres to the specified pressure and remove any loads
from the vehicle except the driver,
spare tyre, and tools.
2. The vehicle should be placed on a flat floor.
3. Draw vertical lines (Vertical lines passing through respective head
lamp centres) and a horizontal line
(Horizontal line passing through
centre of head lamps) on the
screen.
OOS077059L
■Halogen type■LED type
OOS077060L/OOS077061L