air condition Hyundai Kona 2018 - RHD (UK, Australia) Owner's Guide
[x] Cancel search | Manufacturer: HYUNDAI, Model Year: 2018, Model line: Kona, Model: Hyundai Kona 2018Pages: 497, PDF Size: 11.7 MB
Page 199 of 497
3-121
Convenient features of your vehicle
3
Operation Tips
• To keep dust or unpleasant fumesfrom entering the vehicle through
the ventilation system, temporarily
set the air intake control to the
recirculated air position. Be sure to
return the control to the fresh air
position when the irritation has
passed to keep fresh air in the
vehicle. This will help keep the driv-
er alert and comfortable.
• To prevent interior fog on the wind- screen, set the air intake control to
the fresh air position and fan speed
to the desired position, turn on the air
conditioning system, and adjust the
temperature control to the desired
temperature.
Air conditioning
HYUNDAI Air Conditioning Systems
are filled with R-134a or R-1234yf
refrigerant.
1. Start the engine. Push the air con- ditioning button.
2. Set the mode to the position.
3. Set the air intake control to the out- side air or recirculated air position. 4. Adjust the fan speed control and
temperature control to maintain
maximum comfort.
Information
Your vehicle is filled with R-134a or
R-1234yf according to the regulation
in your country at the time of produc-
tion. You can find out which air condi-
tioning refrigerant is applied to your
vehicle on the label located inside of
the bonnet. Refer to chapter 8 for the
location of the air conditioning refrig-
erant label.
• The refrigerant system shouldonly be serviced by trained and
certified technicians to insure
proper and safe operation.
• The refrigerant system should be serviced in a well-ventilated
place. • The air conditioning evaporator
(cooling coil) shall never be
repaired or replaced with one
removed from a used or salvaged
vehicle and new replacement
MAC evaporators shall be certi-
fied (and labeled) as meeting SAE
Standard J2842.
• When using the air conditioning system, monitor the temperature
gauge closely whilst driving up
hills or in heavy traffic when out-
side temperatures are high. Air
conditioning system operation
may cause engine overheating.
Continue to use the fan but turn
the air conditioning system off if
the temperature gauge indicates
engine overheating.
• When opening the windows in humid weather air conditioning
may create water droplets inside
the vehicle. Since excessive
water droplets may cause dam-
age to electrical equipment, air
conditioning should only be
used with the windows closed.
NOTICE
NOTICE
i
Page 200 of 497
3-122
Convenient features of your vehicle
Air conditioning system operation
tips
• If the vehicle has been parked indirect sunlight during hot weather,
open the windows for a short time
to let the hot air inside the vehicle
escape.
• After sufficient cooling has been achieved, switch back from the
recirculated air to the fresh outside
air position.
• To help reduce moisture inside of the windows on rainy or humid
days, decrease the humidity inside
the vehicle by operating the air con-
ditioning system with the windows
and sunroof closed.
• Use the air conditioning system every month for a few minutes to
ensure maximum system perform-
ance.
• If you operate the air conditioner excessively, the difference between
the temperature of the outside air
and that of the windscreen could
cause the outer surface of the wind-
screen to fog up, causing loss of
visibility. In this case, set the mode
selection button to the position
and set the fan speed control knob
to the lowest speed setting.
System maintenance
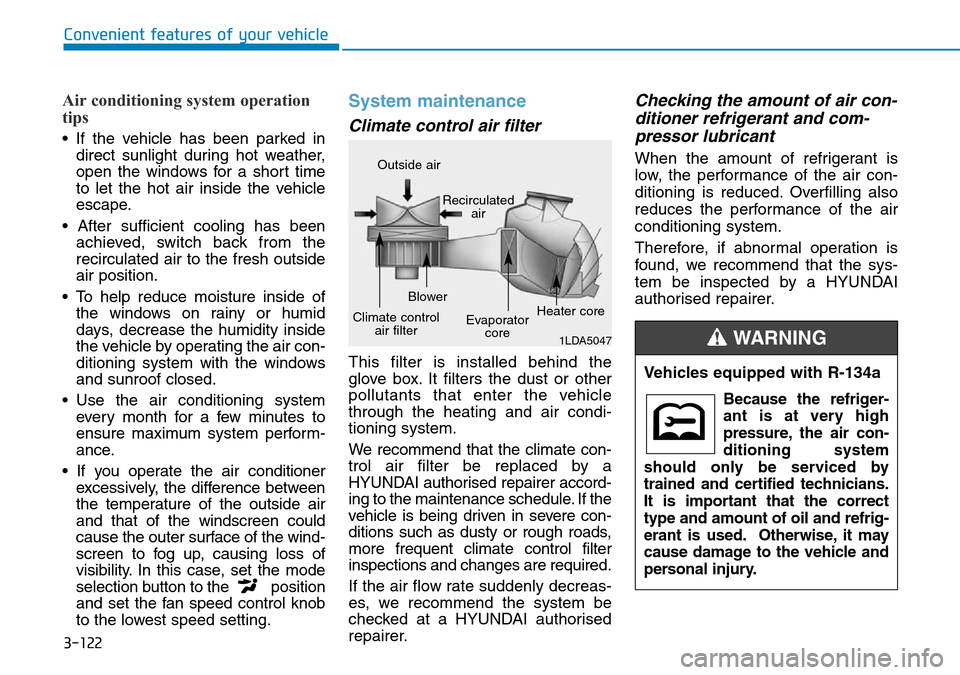
Climate control air filter
This filter is installed behind the
glove box. It filters the dust or other
pollutants that enter the vehicle
through the heating and air condi-
tioning system.
We recommend that the climate con-
trol air filter be replaced by a
HYUNDAI authorised repairer accord-
ing to the maintenance schedule. If the
vehicle is being driven in severe con-
ditions such as dusty or rough roads,
more frequent climate control filter
inspections and changes are required.
If the air flow rate suddenly decreas-
es, we recommend the system be
checked at a HYUNDAI authorised
repairer.
Checking the amount of air con-
ditioner refrigerant and com-pressor lubricant
When the amount of refrigerant is
low, the performance of the air con-
ditioning is reduced. Overfilling also
reduces the performance of the air
conditioning system.
Therefore, if abnormal operation is
found, we recommend that the sys-
tem be inspected by a HYUNDAI
authorised repairer.
1LDA5047
Outside air
Recirculatedair
Climate control air filter Blower
Evaporatorcore Heater core
Vehicles equipped with R-134a
Because the refriger-
ant is at very high
pressure, the air con-
ditioning system
should only be serviced by
trained and certified technicians.
It is important that the correct
type and amount of oil and refrig-
erant is used. Otherwise, it may
cause damage to the vehicle and
personal injury.
WARNING
Page 201 of 497
3-123
Convenient features of your vehicle
3
We recommend the air conditioning
system be serviced by a HYUNDAI
authorised repairer.
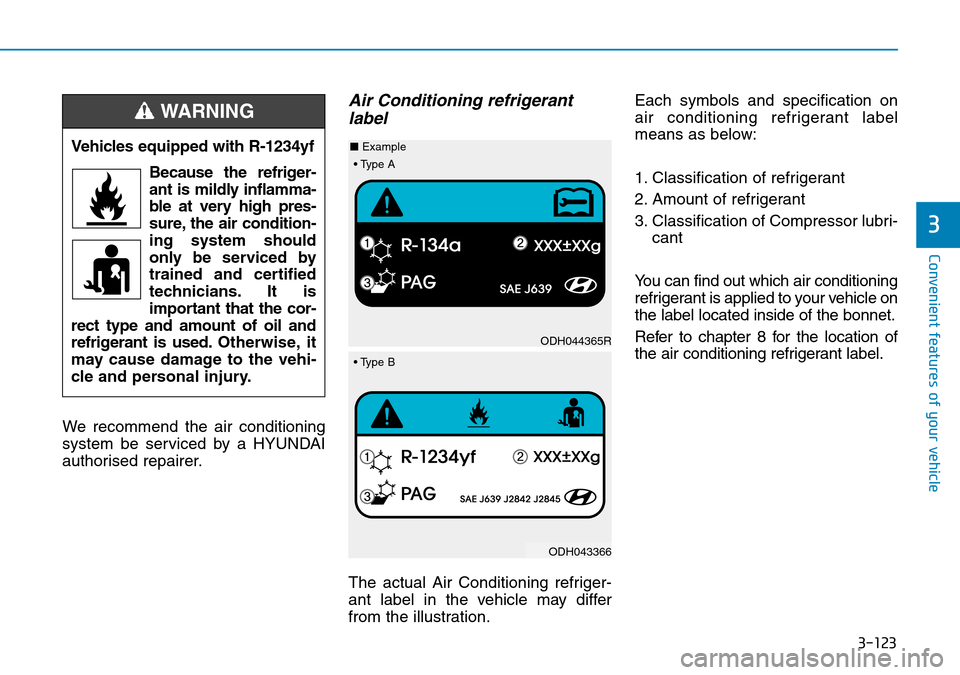
Air Conditioning refrigerantlabel
The actual Air Conditioning refriger-
ant label in the vehicle may differ
from the illustration. Each symbols and specification on
air conditioning refrigerant label
means as below:
1. Classification of refrigerant
2. Amount of refrigerant
3. Classification of Compressor lubri-
cant
You can find out which air conditioning
refrigerant is applied to your vehicle on
the label located inside of the bonnet.
Refer to chapter 8 for the location of
the air conditioning refrigerant label.
Vehicles equipped with R-1234yf
Because the refriger-
ant is mildly inflamma-
ble at very high pres-
sure, the air condition-
ing system should
only be serviced by
trained and certified
technicians. It is
important that the cor-
rect type and amount of oil and
refrigerant is used. Otherwise, it
may cause damage to the vehi-
cle and personal injury.
WARNING
ODH044365R
ODH043366
■
Example
• Type B• Type A
Page 202 of 497
3-124
WINDSCREEN DEFROSTING AND DEFOGGING
Convenient features of your vehicle• For maximum windscreen defrost-ing, set the temperature control
knob to the highest temperature
setting and the fan control knob to
the highest fan speed. Select the
front defrost button on the climate
control display. After the engine
warm-up period, warm air will be
directed to the front windscreen.
• If warm air to the floor is desired whilst defrosting or defogging, set
the mode to the floor-defrost posi-
tion.
• Before driving, clear all snow and ice from the windscreen, rear win-
dow, outside rear view mirrors, and
all side windows.
• Clear all snow and ice from the bon- net and air inlet in the cowl grill to
improve heater and defroster effi-
ciency and to reduce the probability
of fogging up inside of the wind-
screen.
Information
If the engine temperature is still cold
after starting, then a brief engine warm
up period may be required for the
vented air flow to become warm or hot.
Manual climate control system
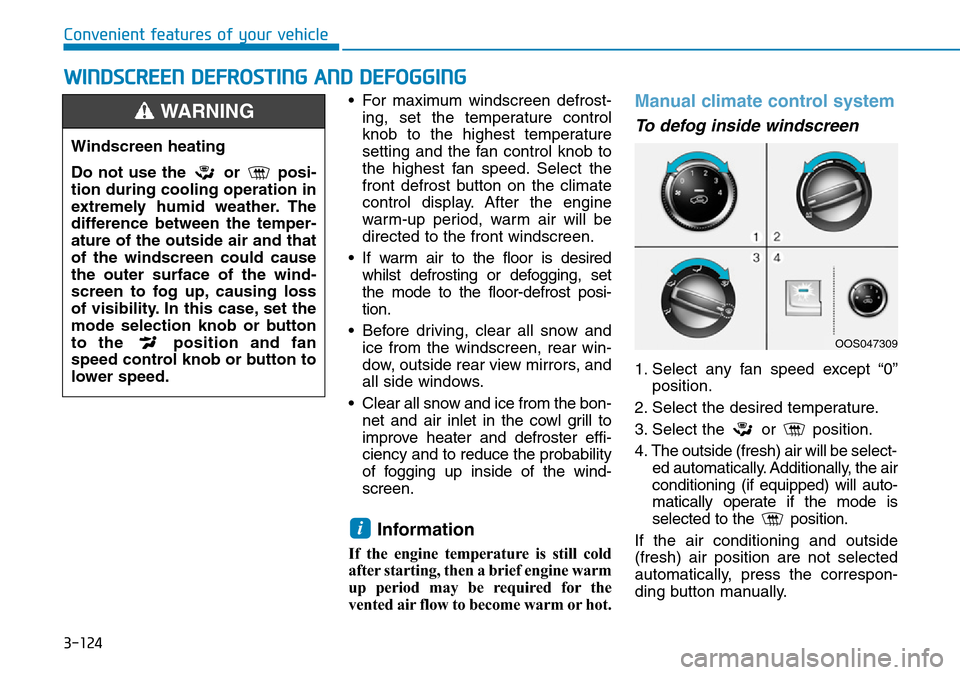
To defog inside windscreen
1. Select any fan speed except “0” position.
2. Select the desired temperature.
3. Select the or position.
4. The outside (fresh) air will be select- ed automatically. Additionally, the air
conditioning (if equipped) will auto-
matically operate if the mode is
selected to the position.
If the air conditioning and outside
(fresh) air position are not selected
automatically, press the correspon-
ding button manually.
i
Windscreen heating
Do not use the or posi-
tion during cooling operation in
extremely humid weather. The
difference between the temper-
ature of the outside air and that
of the windscreen could cause
the outer surface of the wind-
screen to fog up, causing loss
of visibility. In this case, set the
mode selection knob or button
to the position and fan
speed control knob or button to
lower speed.
WARNING
OOS047309
Page 203 of 497
3-125
Convenient features of your vehicle
3
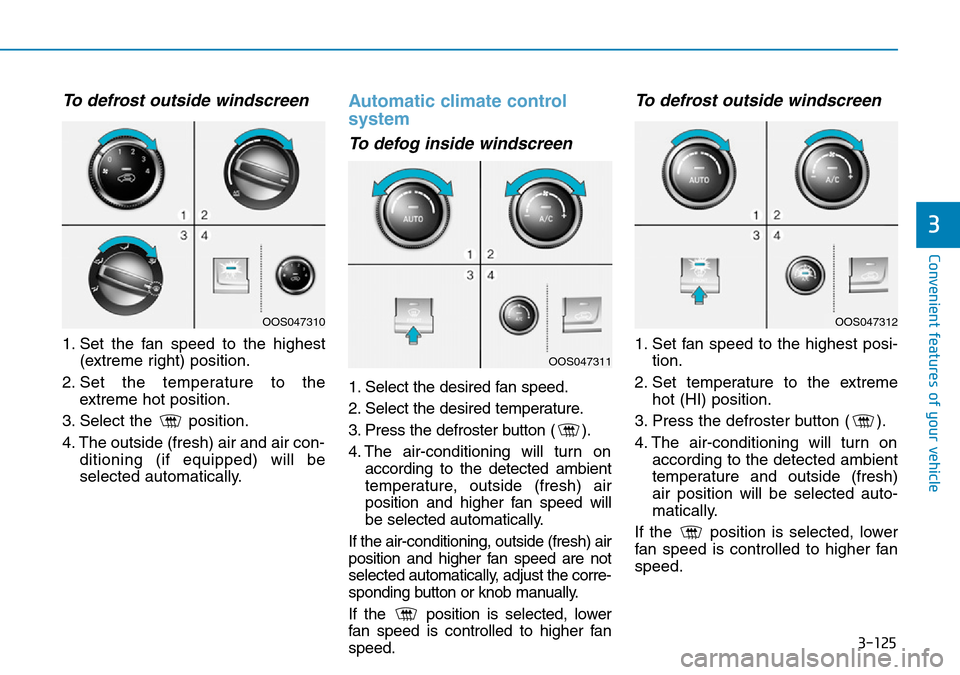
To defrost outside windscreen
1. Set the fan speed to the highest(extreme right) position.
2. Set the temperature to the extreme hot position.
3. Select the position.
4. The outside (fresh) air and air con- ditioning (if equipped) will be
selected automatically.
Automatic climate control
system
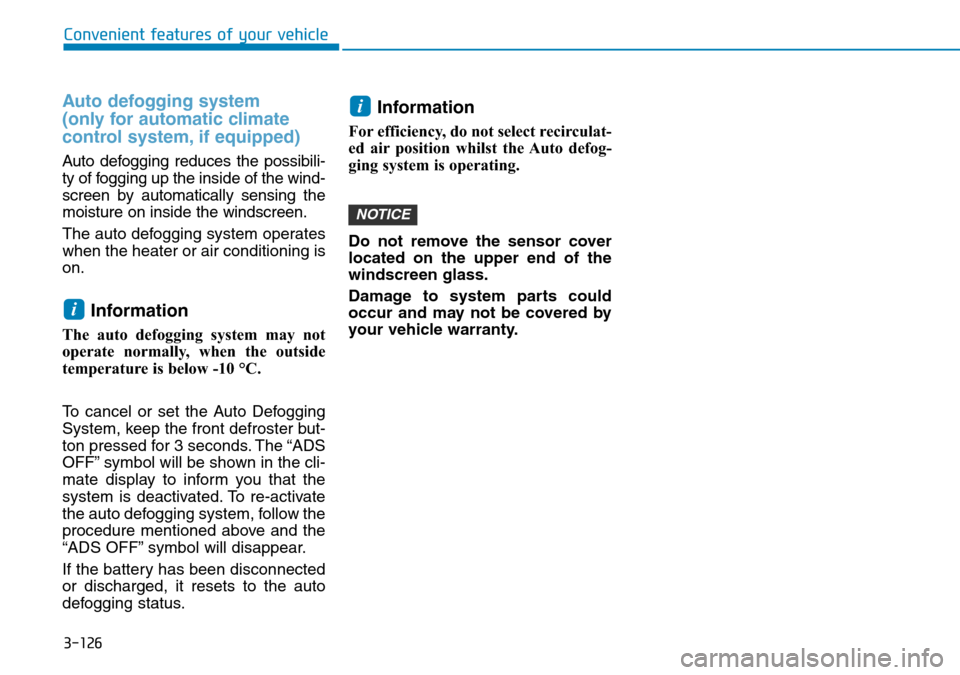
To defog inside windscreen
1. Select the desired fan speed.
2. Select the desired temperature.
3. Press the defroster button ( ).
4. The air-conditioning will turn onaccording to the detected ambient
temperature, outside (fresh) air
position and higher fan speed will
be selected automatically.
If the air-conditioning, outside (fresh) air
position and higher fan speed are not
selected automatically, adjust the corre-
sponding button or knob manually.
If the position is selected, lower
fan speed is controlled to higher fan
speed.
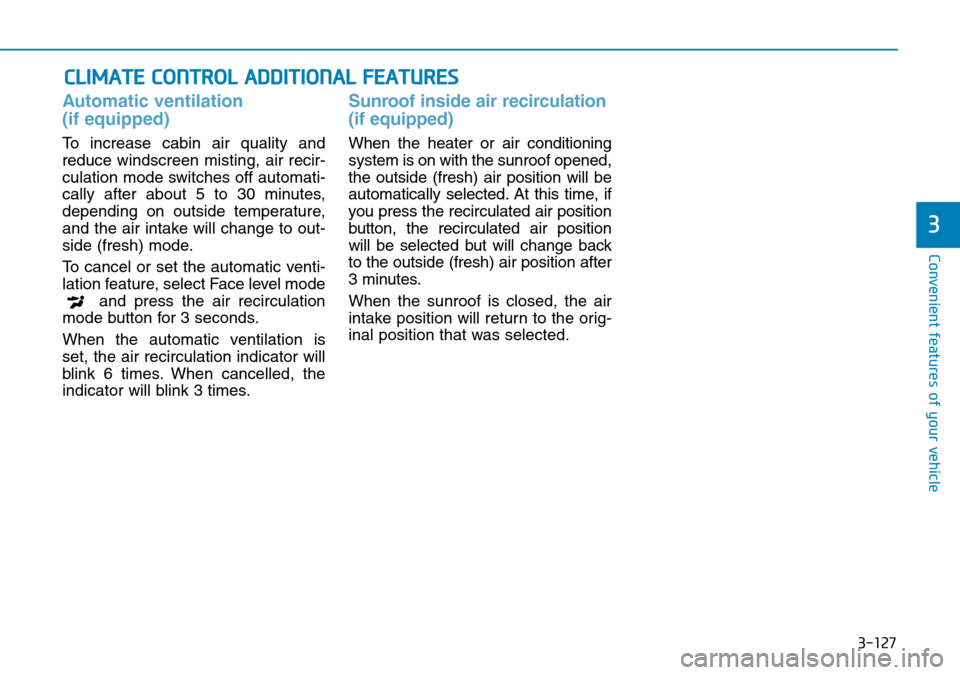
To defrost outside windscreen
1. Set fan speed to the highest posi- tion.
2. Set temperature to the extreme hot (HI) position.
3. Press the defroster button ( ).
4. The air-conditioning will turn on according to the detected ambient
temperature and outside (fresh)
air position will be selected auto-
matically.
If the position is selected, lower
fan speed is controlled to higher fan
speed.
OOS047310
OOS047311
OOS047312
Page 204 of 497
3-126
Auto defogging system
(only for automatic climate
control system, if equipped)
Auto defogging reduces the possibili-
ty of fogging up the inside of the wind-
screen by automatically sensing the
moisture on inside the windscreen.
The auto defogging system operates
when the heater or air conditioning is
on.
Information
The auto defogging system may not
operate normally, when the outside
temperature is below -10 °C.
To cancel or set the Auto Defogging
System, keep the front defroster but-
ton pressed for 3 seconds. The “ADS
OFF” symbol will be shown in the cli-
mate display to inform you that the
system is deactivated. To re-activate
the auto defogging system, follow the
procedure mentioned above and the
“ADS OFF” symbol will disappear.
If the battery has been disconnected
or discharged, it resets to the auto
defogging status.
Information
For efficiency, do not select recirculat-
ed air position whilst the Auto defog-
ging system is operating.
Do not remove the sensor cover
located on the upper end of the
windscreen glass.
Damage to system parts could
occur and may not be covered by
your vehicle warranty.
NOTICE
i
i
Convenient features of your vehicle
Page 205 of 497
3-127
Convenient features of your vehicle
Automatic ventilation
(if equipped)
To increase cabin air quality and
reduce windscreen misting, air recir-
culation mode switches off automati-
cally after about 5 to 30 minutes,
depending on outside temperature,
and the air intake will change to out-
side (fresh) mode.
To cancel or set the automatic venti-
lation feature, select Face level modeand press the air recirculation
mode button for 3 seconds.
When the automatic ventilation is
set, the air recirculation indicator will
blink 6 times. When cancelled, the
indicator will blink 3 times.
Sunroof inside air recirculation
(if equipped)
When the heater or air conditioning
system is on with the sunroof opened,
the outside (fresh) air position will be
automatically selected. At this time, if
you press the recirculated air position
button, the recirculated air position
will be selected but will change back
to the outside (fresh) air position after
3 minutes.
When the sunroof is closed, the air
intake position will return to the orig-
inal position that was selected.
CLIMATE CONTROL ADDITIONAL FEATURES
3
Page 210 of 497
3-132
Convenient features of your vehicle
Sunvisor
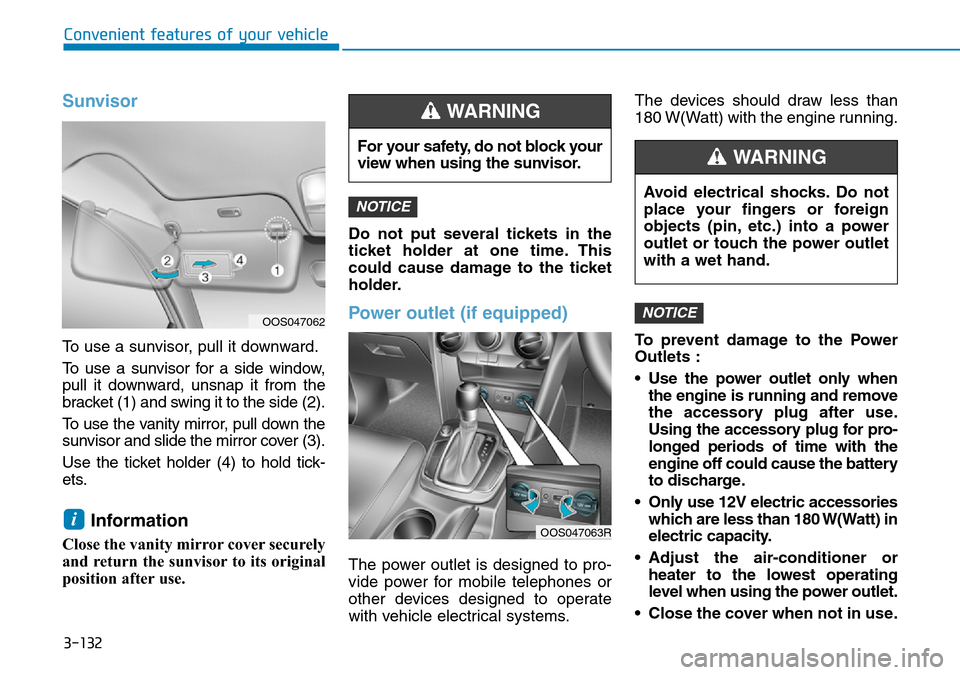
To use a sunvisor, pull it downward.
To use a sunvisor for a side window,
pull it downward, unsnap it from the
bracket (1) and swing it to the side (2).
To use the vanity mirror, pull down the
sunvisor and slide the mirror cover (3).
Use the ticket holder (4) to hold tick-
ets.
Information
Close the vanity mirror cover securely
and return the sunvisor to its original
position after use.Do not put several tickets in the
ticket holder at one time. This
could cause damage to the ticket
holder.
Power outlet (if equipped)
The power outlet is designed to pro-
vide power for mobile telephones or
other devices designed to operate
with vehicle electrical systems.The devices should draw less than
180 W(Watt) with the engine running.
To prevent damage to the Power
Outlets :
• Use the power outlet only when
the engine is running and remove
the accessory plug after use.
Using the accessory plug for pro-
longed periods of time with the
engine off could cause the battery
to discharge.
• Only use 12V electric accessories which are less than 180 W(Watt) in
electric capacity.
• Adjust the air-conditioner or heater to the lowest operating
level when using the power outlet.
• Close the cover when not in use.
NOTICE
NOTICE
i
For your safety, do not block your
view when using the sunvisor.
WARNING
OOS047062
OOS047063R
Avoid electrical shocks. Do not
place your fingers or foreign
objects (pin, etc.) into a power
outlet or touch the power outlet
with a wet hand.
WARNING
Page 240 of 497
4-24
Multimedia System
Precautions when connecting
Bluetooth®devices
• The vehicle supports the followingBluetooth®functions. Some
Bluetooth®devices may not sup-
port some functions.
1) Bluetooth
®Handsfree phone
calls
2) Operations during a call (Private, Switch, Mic Vol. con-
trols)
3) Download call history saved to the Bluetooth
®device
4) Download contacts saved to the Bluetooth
®device
5) Automatic contacts/call history download when Bluetooth
®is
connected
6) Automatic Bluetooth
®device
connection when the vehicle is
started
7) Bluetooth
®audio streaming
playback
• Before connecting the audio sys- tem to your device, make sure your
device supports Bluetooth
®. • Even if your device supports
Bluetooth
®, a Bluetooth®connec-
tion cannot be established if the
device’s Bluetooth
®function is
switched off. Search and connect
with the Bluetooth
®function
enabled.
• Pair or connect Bluetooth
®devices
to the audio system with the vehi-
cle at a standstill.
• If a Bluetooth
®connection is lost
due to abnormal conditions whilst
a Bluetooth
®device is connected
(communication range exceeded,
device power OFF, communication
errors, etc.), the disconnected
Bluetooth
®device is searched for
and automatically reconnected.
• If you want to disable the Bluetooth
®device auto-connect
function, turn the Bluetooth®func-
tion OFF on your device. Consult
the user manuals for individual
devices to see whether Bluetooth
®
is supported.
• Handsfree call quality and volume may vary depending on the type of
Bluetooth
®device. • Some Bluetooth
®devices are sub-
ject to intermittent Bluetooth®con-
nection failures. In this case, use
the following method.
1) Turn the Bluetooth
®function off
on your Bluetooth®device ➟
Turn it on and try again.
2) Delete the paired device from both the audio system and
Bluetooth
®device, then pair
again.
3) Power down your Bluetooth
®
device ➟Turn it on and try
again.
4) Completely remove the battery from your Bluetooth
®device;
reinsert it, reboot, and attempt
connection.
5) Restart the vehicle and reat- tempt connection.
Page 279 of 497
5-30
Driving your vehicle
Disc brakes wear indicator
When your brake pads are worn and
new pads are required, you will hear
a high pitched warning sound from
your front or rear brakes. You may
hear this sound come and go or it
may occur whenever you depress
the brake pedal.
Note that some driving conditions or
climates may cause a brake squeal
when you first apply (or lightly apply)
the brakes. This is normal and does
not indicate a problem with your
brakes.
To avoid costly brake repairs, do
not continue to drive with worn
brake pads.
Information
Always replace brake pads as com-
plete front or rear axle sets.
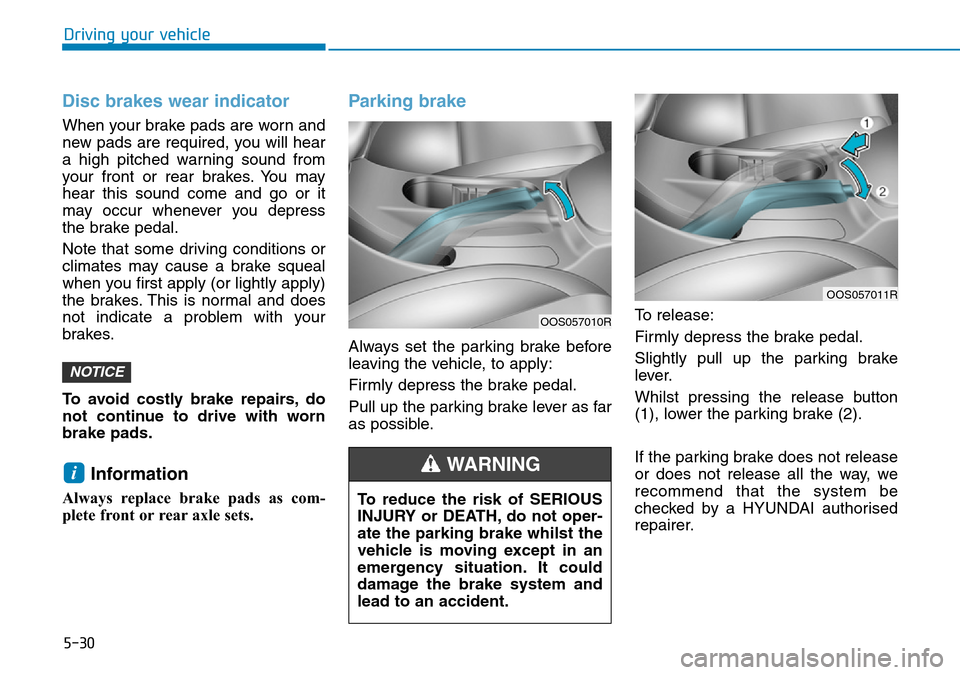
Parking brake
Always set the parking brake before
leaving the vehicle, to apply:
Firmly depress the brake pedal.
Pull up the parking brake lever as far
as possible.To release:
Firmly depress the brake pedal.
Slightly pull up the parking brake
lever.
Whilst pressing the release button
(1), lower the parking brake (2).
If the parking brake does not release
or does not release all the way, we
recommend that the system be
checked by a HYUNDAI authorised
repairer.
i
NOTICE
To reduce the risk of SERIOUS
INJURY or DEATH, do not oper-
ate the parking brake whilst the
vehicle is moving except in an
emergency situation. It could
damage the brake system and
lead to an accident.
WARNING
OOS057010R
OOS057011R