lights Hyundai Kona 2018 - RHD (UK, Australia) Owner's Guide
[x] Cancel search | Manufacturer: HYUNDAI, Model Year: 2018, Model line: Kona, Model: Hyundai Kona 2018Pages: 497, PDF Size: 11.7 MB
Page 285 of 497
5-36
Driving your vehicle
The ESC OFF indicator light comes
on when the ESC is turned off with
the button.
Driving with wheels and tyres with
different sizes may cause the ESC
system to malfunction. Before
replacing tyres, make sure all four
tyres and wheels are the same
size. Never drive the vehicle with
different sized wheels and tyres
installed.
ESC OFF usage
When Driving
The ESC OFF mode should only be
used briefly to help free the vehicle if
stuck in snow or mud, by temporarily
stopping operation of the ESC, to
maintain wheel torque.
To turn ESC off whilst driving, press
the ESC OFF button whilst driving on
a flat road surface. To prevent damage to the trans-
mission:
• Do not allow wheel(s) of one
axle to spin excessively whilst
the ESC, ABS, and parking brake
warning lights are displayed.
The repairs would not be cov-
ered by the vehicle warranty.
Reduce engine power and do
not spin the wheel(s) excessive-
ly whilst these lights are dis-
played.
• When operating the vehicle on a dynamometer, make sure the
ESC is turned off (ESC OFF light
illuminated).
Information
Turning the ESC off does not affect
ABS or standard brake system opera-
tion.
i
NOTICE
NOTICE
When the ESC is blinking, this
indicates the ESC is active:
Drive slowly and NEVER attempt
to accelerate. NEVER turn the
ESC off whilst the ESC indicator
light is blinking or you may lose
control of the vehicle resulting in
an accident.
WARNING
Page 287 of 497
5-38
Driving your vehicle
Driving with wheels and tyres with
different sizes may cause the VSM
system to malfunction. Before
replacing tyres, make sure all four
tyres and wheels are the same
size. Never drive the vehicle with
different sized tyres and wheels
installed.
Hill-Start Assist Control (HAC)
(if equipped)
The Hill-Start Assist Control (HAC)
helps prevent the vehicle from rolling
backwards when starting a vehicle
from a stop on a hill. The system
operates the brakes automatically for
approximately 2 seconds and releas-
es the brake after 2 seconds or when
the accelerator pedal is depressed.
Information
• The HAC does not operate when the shift lever is in P (Park) or N
(Neutral).
• The HAC activates even when the ESC (Electronic Stability Control) is
off. However, it does not activate,
when the ESC does not operate nor-
mally.
Emergency Stop Signal (ESS)
(if equipped)
The Emergency Stop Signal system
alerts the driver behind by blinking
the stop lights, whilst sharply and
severely braking.
The system is activated when:
• The vehicle suddenly stops. (Thedeceleration power exceeds 7 m/s
2,
and the driving speed exceeds 34
mph (55 km/h).)
• The ABS is activated and the driv- ing speed exceeds 34 mph (55
km/h).
The hazard warning flasher automat-
ically turns ON after blinking the stop
lights:
• When the driving speed is under 25 mph (40 km/h),
• When the ABS is deactivated, and
• When the sudden braking situation is over.
i
NOTICE
If the ESC indicator light ( ) or
EPS warning light ( ) stays
or blinks, your vehicle may have
a malfunction with the VSM sys-
tem. When the warning light illu-
minates we recommend that the
vehicle be checked by a
HYUNDAI authorised repairer
as soon as possible.
WARNING
Always be ready to depress the
accelerator pedal when starting
off on a incline. The HAC acti-
vates only for approximately 2
seconds.
WARNING
Page 297 of 497
5-48
The ISG system is to reduce the fuel
consumption by automatically shut-
ting down the engine, when the vehi-
cle is at a standstill (i.e. red stop light,
stop sign, and traffic jam).
The engine is automatically started
upon satisfying the starting condi-
tions.
The ISG system is always active,
when the engine is running.
Information
When the engine is automatically
started by the ISG system, some warn-
ing lights (i.e. ABS, ESC, ESC OFF,
EPS, and parking brake warning
light) may illuminate for a few sec-
onds due to the low battery voltage.
However, it does not indicate a mal-
function with the ISG system.
To activate the ISG system
Prerequisite for activation
The ISG system operates in the fol-
lowing situations.
- The driver's seatbelt is fastened.
- The driver's door and the bonnetare closed.
- The brake vacuum pressure is adequate.
- The battery is sufficiently charged.
- The outside temperature is between -20 °C and 35 °C (-4 °F and 95 °F).
- The engine coolant temperature is not too low.
- The system is not in the diagnostic mode.
- The steering wheel is not steered excessively. (for dual clutch trans-
mission vehicle)
- The vehicle is driven on a steep incline. (for dual clutch transmis-
sion vehicle)
Information
• The ISG system is not activated,when the prerequisites to activate
the ISG system are unsatisfied. In
this case, the ISG OFF button indi-
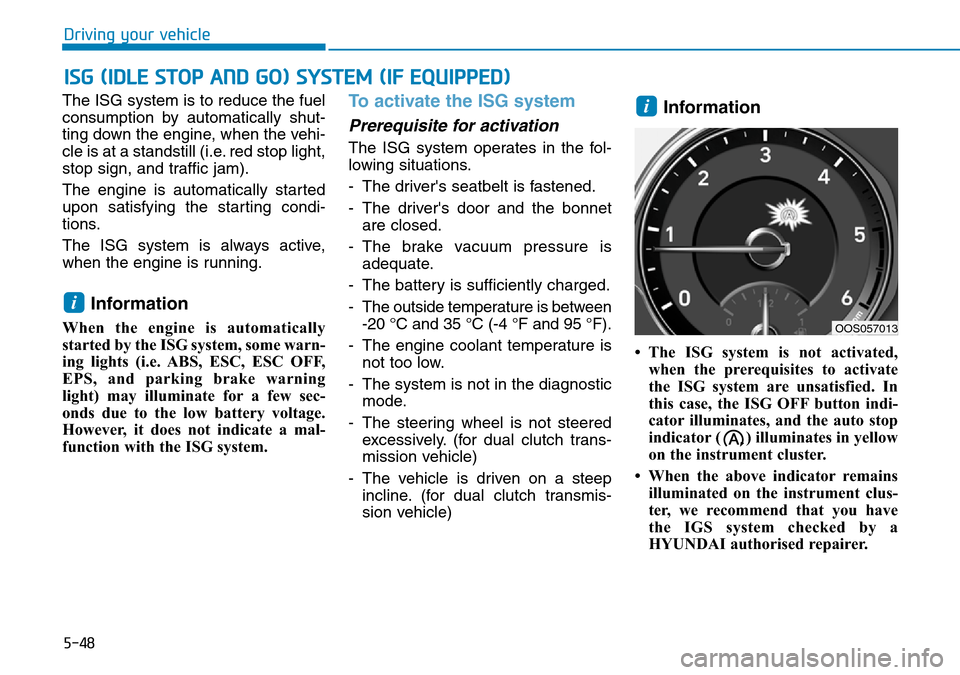
cator illuminates, and the auto stop
indicator ( ) illuminates in yellow
on the instrument cluster.
• When the above indicator remains illuminated on the instrument clus-
ter, we recommend that you have
the IGS system checked by a
HYUNDAI authorised repairer.
i
i
ISG (IDLE STOP AND GO) SYSTEM (IF EQUIPPED)
Driving your vehicle
OOS057013
Page 321 of 497
5-72
Driving your vehicle
• The driver's field of view is not well illuminated (either too dark or too
much reflection or too much back-
light that obscures the field of view)
• The vehicle in front does not have their rear lights properly turned ON.
• The outside brightness changes suddenly, for example when enter-
ing or exiting a tunnel
• When light coming from a street light or an oncoming vehicle is
reflected on a wet road surface
such as a puddle in the road
• The field of view in front is obstruct- ed by sun glare
• The windscreen glass is fogged up; a clear view of the road is obstruct-
ed
• The vehicle in front is driving errati- cally
• The vehicle is on unpaved or uneven rough surfaces, or road
with sudden gradient changes.
• The vehicle is driven near areas containing metal substances as a
construction zone, railroad, etc. • The vehicle drives inside a building,
such as a basement parking lot
• The adverse road conditions cause excessive vehicle vibrations whilst
driving
• The sensor recognition changes suddenly when passing over a
speed bump
• The vehicle in front is moving verti- cally to the driving direction
• The vehicle in front is stopped ver- tically
• The vehicle in front is driving towards your vehicle or reversing
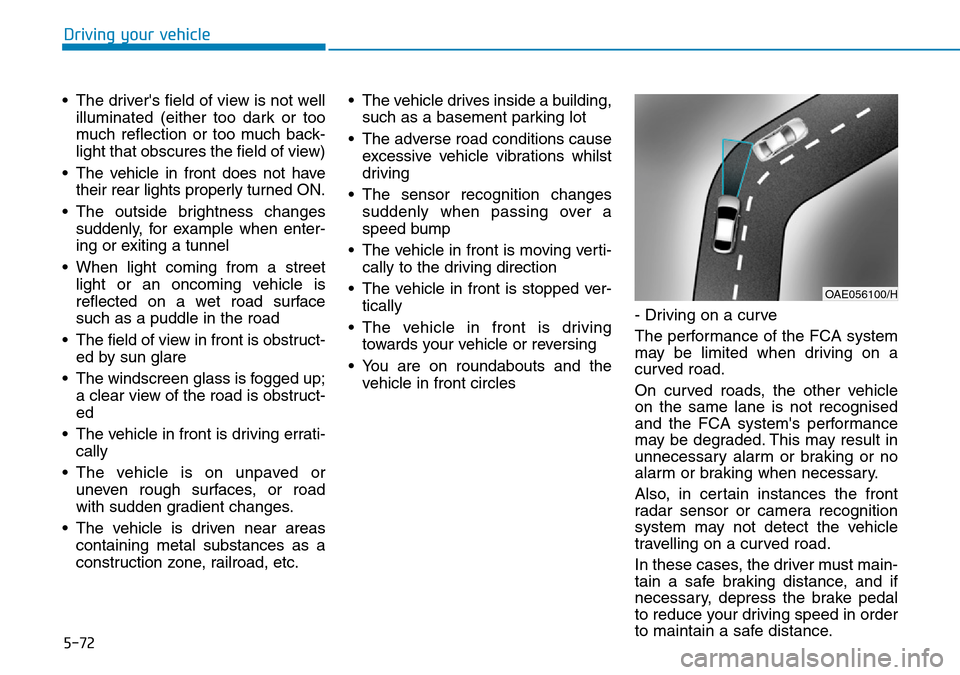
• You are on roundabouts and the vehicle in front circles - Driving on a curve
The performance of the FCA system
may be limited when driving on a
curved road.
On curved roads, the other vehicle
on the same lane is not recognised
and the FCA system's performance
may be degraded. This may result in
unnecessary alarm or braking or no
alarm or braking when necessary.
Also, in certain instances the front
radar sensor or camera recognition
system may not detect the vehicle
travelling on a curved road.
In these cases, the driver must main-
tain a safe braking distance, and if
necessary, depress the brake pedal
to reduce your driving speed in order
to maintain a safe distance.
OAE056100/H
Page 346 of 497
5-97
Driving your vehicle
5
Information
The ESC system (if equipped) must be
turned OFF before rocking the vehi-
cle.
If you are still stuck after rocking
the vehicle a few times, have the
vehicle pulled out by a tow vehicle
to avoid engine overheating, pos-
sible damage to the transmission,
and tyre damage. See "Towing" in
chapter 6.
Smooth cornering
Avoid braking or gear changing in
corners, especially when roads are
wet. Ideally, corners should always
be taken under gentle acceleration.
Driving at night
Night driving presents more hazards
than driving in the daylight. Here are
some important tips to remember:
• Slow down and keep more dis-tance between you and other vehi-
cles, as it may be more difficult to
see at night, especially in areas
where there may not be any street
lights.
• Adjust your mirrors to reduce the glare from other drivers' head-
lamps.
• Keep your headlamps clean and properly aimed. Dirty or improperly
aimed headlamps will make it
much more difficult to see at night.
• Avoid staring directly at the head- lamps of oncoming vehicles. You
could be temporarily blinded, and it
will take several seconds for your
eyes to readjust to the darkness.
Driving in the rain
Rain and wet roads can make driving
dangerous. Here are a few things to
consider when driving in the rain or
on slick pavement:
• Slow down and allow extra follow-ing distance. A heavy rainfall
makes it harder to see and increas-
es the distance needed to stop
your vehicle.
• Turn OFF your Cruise Control. (if equipped)
• Replace your windscreen wiper blades when they show signs of
streaking or missing areas on the
windscreen.
• Be sure your tyres have enough tread. If your tyres do not have
enough tread, making a quick stop
on wet pavement can cause a skid
and possibly lead to an accident.
See "Tyre Tread" in chapter 7 .
• Turn on your headlamps to make it easier for others to see you.
• Driving too fast through large pud- dles can affect your brakes. If you
must go through puddles, try to
drive through them slowly.
NOTICE
i
Page 358 of 497
5-109
Driving your vehicle
5
Driving with a trailer
Towing a trailer requires a certain
amount of experience. Before setting
out for the open road, you must get
to know your trailer. Acquaint your-
self with the feel of handling and
braking with the added weight of the
trailer. And always keep in mind that
the vehicle you are driving is now
longer and not nearly as responsive
as your vehicle is by itself.
Before you start, check the trailer
towbar and platform, safety chains,
electrical connector(s), lights, tyres
and brakes.
During your trip, occasionally check
to be sure that the load is secure,
and that the lights and trailer brakes
are still working.
Distance
Stay at least twice as far behind the
vehicle ahead as you would when
driving your vehicle without a trailer.
This can help you avoid situations
that require heavy braking and sud-
den turns.
Passing
You will need more passing distance
up ahead when you’re towing a trail-
er. And, because of the increased
vehicle length, you’ll need to go
much farther beyond the passed
vehicle before you can return to your
lane.
Backing up
Hold the bottom of the steering
wheel with one hand. Then, to move
the trailer to the left, move your hand
to the left. To move the trailer to the
right, move your hand to the right.
Always back up slowly and, if possi-
ble, have someone guide you.
Making turns
When you’re turning with a trailer,
make wider turns than normal. Do this
so your trailer won’t strike soft shoul-
ders, kerbs, road signs, trees, or other
objects. Avoid jerky or sudden
maneuvers. Signal well in advance.
Turn signals
When you tow a trailer, your vehicle
has to have a different turn signal
flasher and extra wiring. The green
arrows on your instrument panel will
flash whenever you signal a turn or
lane change. Properly connected,
the trailer lights will also flash to alert
other drivers you’re about to turn,
change lanes, or stop.
When towing a trailer, the green
arrows on your instrument panel will
flash for turns even if the bulbs on
the trailer are burned out. Thus, you
may think drivers behind you are
seeing your signals when, in fact,
they are not. It’s important to check
occasionally to be sure the trailer
bulbs are still working. You must also
check the lights every time you dis-
connect and then reconnect the
wires.
Page 365 of 497
6-3
What to do in an emergency
6
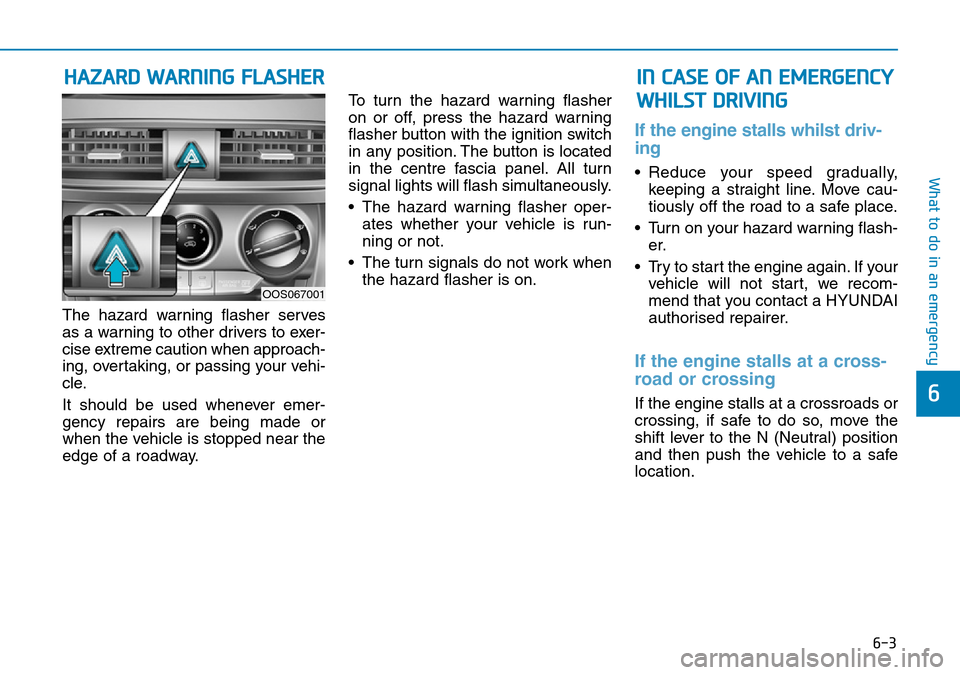
The hazard warning flasher serves
as a warning to other drivers to exer-
cise extreme caution when approach-
ing, overtaking, or passing your vehi-
cle.
It should be used whenever emer-
gency repairs are being made or
when the vehicle is stopped near the
edge of a roadway.To turn the hazard warning flasher
on or off, press the hazard warning
flasher button with the ignition switch
in any position. The button is located
in the centre fascia panel. All turn
signal lights will flash simultaneously.
• The hazard warning flasher oper-
ates whether your vehicle is run-
ning or not.
• The turn signals do not work when the hazard flasher is on.
If the engine stalls whilst driv-
ing
• Reduce your speed gradually,keeping a straight line. Move cau-
tiously off the road to a safe place.
• Turn on your hazard warning flash- er.
• Try to start the engine again. If your vehicle will not start, we recom-
mend that you contact a HYUNDAI
authorised repairer.
If the engine stalls at a cross-
road or crossing
If the engine stalls at a crossroads or
crossing, if safe to do so, move the
shift lever to the N (Neutral) position
and then push the vehicle to a safe
location.
HAZARD WARNING FLASHER IN CASE OF AN EMERGENCY
WHILST DRIVING
OOS067001
Page 368 of 497
6-6
What to do in an emergencyTo prevent damage to your vehi-
cle:
• Only use a 12-volt power supply(battery or jumper system) to
jump start your vehicle.
• Do not attempt to jump start your vehicle by push-starting.
Information
An inappropriately disposedbattery can be harmful to the
environment and human
health. Dispose of the battery
according to your local law(s)
or regulations.
Jump starting procedure
1. Position the vehicles close enough that the jumper cables will reach,
but do not allow the vehicles to
touch.
2. Avoid fans or any moving parts in the engine compartment at all
times, even when the vehicles are
turned off.
3. Turn off all electrical devices such as radios, lights, air conditioning,
etc. Put the vehicles in P (Park, for
dual clutch transmission vehicle)
or neutral (for manual transmis-
sion vehicle), and set the parking
brakes. Turn both vehicles OFF.
i
NOTICE•Do not attempt to jump start
your vehicle if your battery is
frozen.
•NEVER attempt to recharge
the battery when the vehicle’s
battery cables are connected
to the battery.
•The electrical ignition system
works with high voltage.
NEVER touch these compo-
nents with the engine running
or when the ignition switch is
in the ON position.
•Do not allow the (+) and (-)
jumper cables to touch. It may
cause sparks.
•The battery may rupture or
explode when you jump start
with a low or frozen battery.
Pb
Page 413 of 497
7-6
Maintenance
Whilst operating your vehicle:
• Note any changes in the sound ofthe exhaust or any smell of exhaust
fumes in the vehicle.
• Check for vibrations in the steering wheel. Notice if there is any
increased steering effort or loose-
ness in the steering wheel, or
change in its straight-ahead position.
• Notice if your vehicle constantly turns slightly or “pulls” to one side when
travelling on smooth, level road.
• When stopping, listen and check for unusual sounds, pulling to one side,
increased brake pedal travel or
“hard-to-push” brake pedal.
• If any slipping or changes in the operation of your transmission
occurs, check the transmission fluid
level.
• Check the dual clutch transmission P (Park) function.
• Check the parking brake.
• Check for fluid leaks under your vehicle (water dripping from the air
conditioning system during or after
use is normal).
At least monthly:
• Check coolant level in the enginecoolant reservoir.
• Check the operation of all exterior lights, including the stoplights, turn
signals and hazard warning flashers.
• Check the inflation pressures of all tyres including the spare for tyres
that are worn, show uneven wear,
or are damaged.
• Check for loose wheel lug nuts.
At least twice a year: (i.e., every Spring and Autumn)
• Check radiator, heater and air condi-
tioning hoses for leaks or damage.
• Check windscreen washer spray and wiper operation. Clean wiper
blades with a clean cloth damp-
ened with washer fluid.
• Check headlamp alignment.
• Check muffler, exhaust pipes, shields and clamps.
• Check the seat belts for wear and function.
At least once a year:
• Clean body and door drain holes.
• Lubricate door hinges and bonnethinges.
• Lubricate door and bonnet locks and latches.
• Lubricate door rubber weather strips.
• Check the air conditioning system.
• Inspect and lubricate dual clutch transmission linkage and controls.
• Clean the battery and terminals.
• Check the brake fluid level.
Page 432 of 497
7-25
7
Maintenance
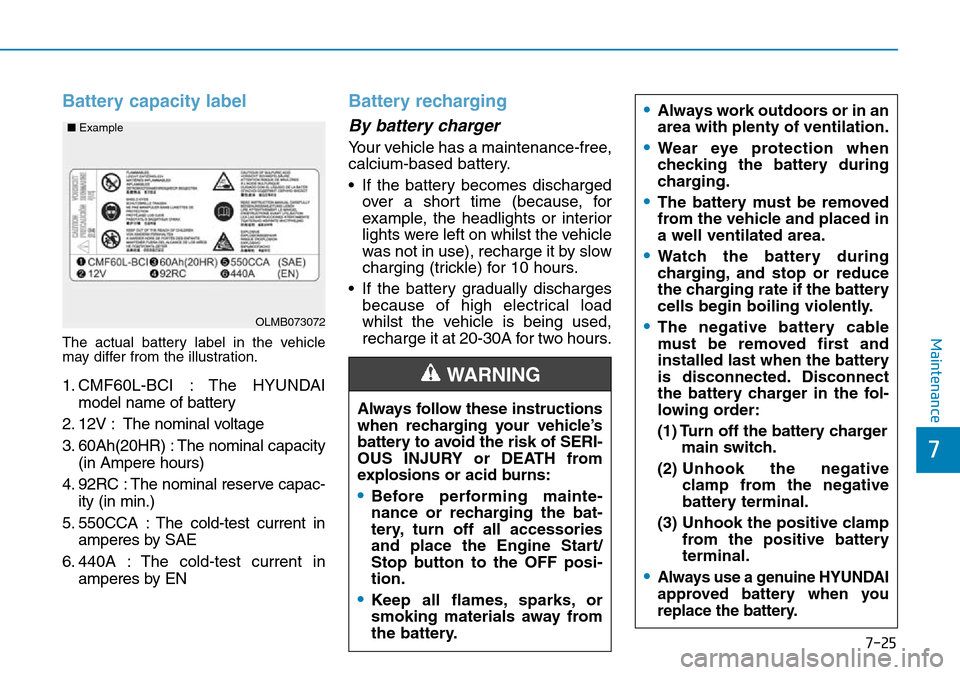
Battery capacity label
The actual battery label in the vehicle
may differ from the illustration.
1. CMF60L-BCI : The HYUNDAImodel name of battery
2. 12V : The nominal voltage
3. 60Ah(20HR) : The nominal capacity (in Ampere hours)
4. 92RC : The nominal reserve capac- ity (in min.)
5. 550CCA : The cold-test current in amperes by SAE
6. 440A : The cold-test current in amperes by EN
Battery recharging
By battery charger
Your vehicle has a maintenance-free,
calcium-based battery.
• If the battery becomes dischargedover a short time (because, for
example, the headlights or interior
lights were left on whilst the vehicle
was not in use), recharge it by slow
charging (trickle) for 10 hours.
• If the battery gradually discharges because of high electrical load
whilst the vehicle is being used,
recharge it at 20-30A for two hours.
OLMB073072
■
Example
Always follow these instructions
when recharging your vehicle’s
battery to avoid the risk of SERI-
OUS INJURY or DEATH from
explosions or acid burns:
•Before performing mainte-
nance or recharging the bat-
tery, turn off all accessories
and place the Engine Start/
Stop button to the OFF posi-
tion.
•Keep all flames, sparks, or
smoking materials away from
the battery.
WARNING
•Always work outdoors or in an
area with plenty of ventilation.
•Wear eye protection when
checking the battery during
charging.
•The battery must be removed
from the vehicle and placed in
a well ventilated area.
•Watch the battery during
charging, and stop or reduce
the charging rate if the battery
cells begin boiling violently.
•The negative battery cable
must be removed first and
installed last when the battery
is disconnected. Disconnect
the battery charger in the fol-
lowing order:
(1) Turn off the battery charger
main switch.
(2) Unhook the negative
clamp from the negative
battery terminal.
(3) Unhook the positive clamp from the positive battery
terminal.
•Always use a genuine HYUNDAI
approved battery when you
replace the battery.