lock Hyundai Kona 2018 Owner's Manual - RHD (UK, Australia)
[x] Cancel search | Manufacturer: HYUNDAI, Model Year: 2018, Model line: Kona, Model: Hyundai Kona 2018Pages: 497, PDF Size: 11.7 MB
Page 8 of 497
Use of MTBE
HYUNDAI recommends avoiding
fuels containing MTBE (Methyl
Tertiary Butyl Ether) over 15.0% vol.
(Oxygen Content 2.7% weight) in
your vehicle.
Fuel containing MTBE over 15.0%
vol. (Oxygen Content 2.7% weight)
may reduce vehicle performance and
produce vapour lock or hard starting.
Do not use methanol
Fuels containing methanol (wood
alcohol) should not be used in your
vehicle.This type of fuel can reduce
vehicle performance and damage
components of the fuel system, engine
control system and emission control
system.
Fuel Additives
HYUNDAI recommends that you use
unleaded petrol which has an octane
rating of RON (Research Octane
Number) 95 / AKI (Anti Knock Index)
91 or higher.
For customers who do not use good
quality petrols including fuel addi-
tives regularly, and have problems
starting or the engine does not run
smoothly, one bottle of additives
added to the fuel tank at every
10,000 miles (15,000km).
Additives are available from your
HYUNDAI authorised repairer along
with information on how to use them.
Do not mix other additives.
Operation in foreign countries
If you are going to drive your vehicle
in another country, be sure to:
• Observe all regulations regarding registration and insurance.
• Determine that acceptable fuel is available.
F8
Introduction
Your New Vehicle Limited
Warranty may not cover dam-
age to the fuel system and any
performance problems that are
caused by the use of fuels con-
taining methanol or fuels con-
taining MTBE (Methyl Tertiary
Butyl Ether) over 15.0% vol.
(Oxygen Content 2.7% weight.)
CAUTION
Page 14 of 497
1-4
Your vehicle at a glance
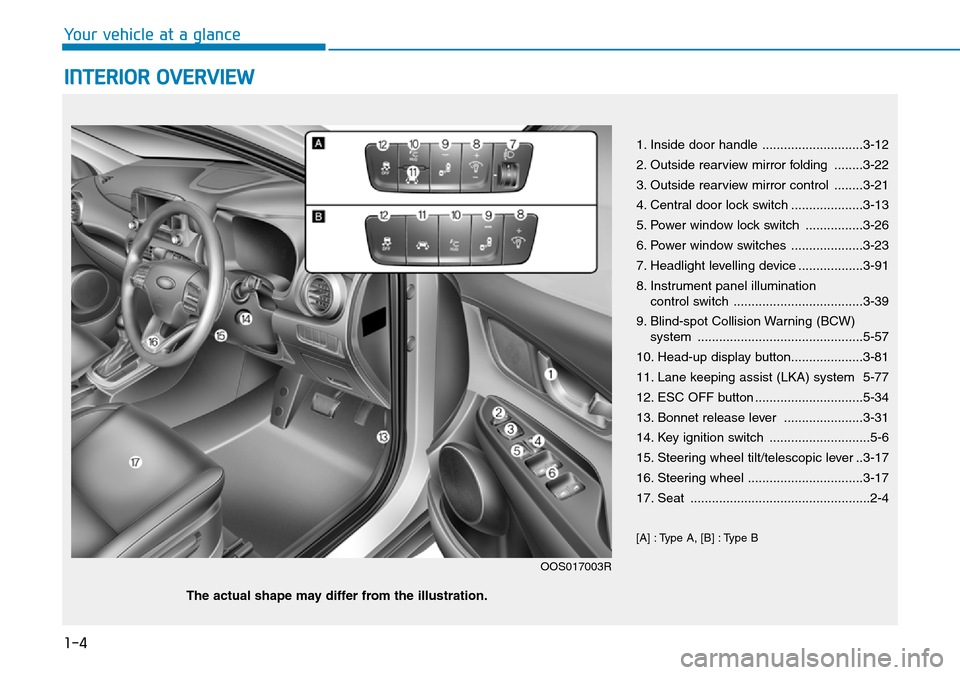
INTERIOR OVERVIEW
1. Inside door handle ............................3-12
2. Outside rearview mirror folding ........3-22
3. Outside rearview mirror control ........3-21
4. Central door lock switch ....................3-13
5. Power window lock switch ................3-26
6. Power window switches ....................3-23
7. Headlight levelling device ..................3-91
8. Instrument panel illuminationcontrol switch ....................................3-39
9. Blind-spot Collision Warning (BCW) system ..............................................5-57
10. Head-up display button....................3-81
11. Lane keeping assist (LKA) system 5-77
12. ESC OFF button ..............................5-34
13. Bonnet release lever ......................3-31
14. Key ignition switch ............................5-6
15. Steering wheel tilt/telescopic lever ..3-17
16. Steering wheel ................................3-17
17. Seat ..................................................2-4
[A] : Type A, [B] : Type B
OOS017003R
The actual shape may differ from the illustration.
Page 15 of 497
1-5
Your vehicle at a glance
1
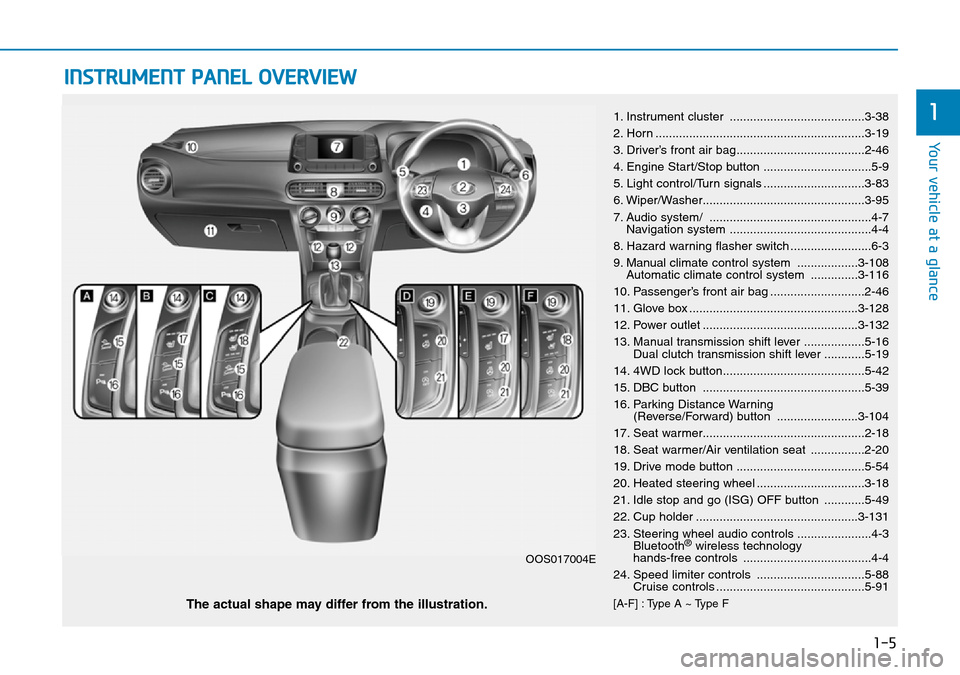
INSTRUMENT PANEL OVERVIEW
1. Instrument cluster ........................................3-38
2. Horn ..............................................................3-19
3. Driver’s front air bag......................................2-46
4. Engine Start/Stop button ................................5-9
5. Light control/Turn signals ..............................3-83
6. Wiper/Washer................................................3-95
7. Audio system/ ................................................4-7Navigation system ..........................................4-4
8. Hazard warning flasher switch ........................6-3
9. Manual climate control system ..................3-108 Automatic climate control system ..............3-116
10. Passenger’s front air bag ............................2-46
11. Glove box ..................................................3-128
12. Power outlet ..............................................3-132
13. Manual transmission shift lever ..................5-16 Dual clutch transmission shift lever ............5-19
14. 4WD lock button..........................................5-42
15. DBC button ................................................5-39
16. Parking Distance Warning (Reverse/Forward) button ........................3-104
17. Seat warmer................................................2-18
18. Seat warmer/Air ventilation seat ................2-20
19. Drive mode button ......................................5-54
20. Heated steering wheel ................................3-18
21. Idle stop and go (ISG) OFF button ............5-49
22. Cup holder ................................................3-131
23. Steering wheel audio controls ......................4-3 Bluetooth
®wireless technology
hands-free controls ......................................4-4
24. Speed limiter controls ................................5-88 Cruise controls ............................................5-91
[A-F] : Type A ~ Type FThe actual shape may differ from the illustration.
OOS017004E
Page 21 of 497
2-5
Safety system of your vehicle
2
Safety precautions
Adjusting the seats so that you are sit-
ting in a safe, comfortable position
plays an important role in driver and
passenger safety together with the
seat belts and air bags in an accident.
Air bags
You can take steps to reduce the risk
of being injured by an inflating air
bag. Sitting too close to an air bag
greatly increases the risk of injury in
the event the air bag inflates. Move
your seat as far back as possible
from front air bags, whilst still main-
taining control of the vehicle.
Seat belts
Always fasten your seat belt before
starting any trip.
At all times, passengers should sit
upright and be properly restrained.
Infants and small children must be
restrained in appropriate Child Restraint
Systems. Children who have outgrown a
booster seat and adults must be
restrained using the seat belts.
Do not use a cushion that reduces
friction between the seat and the
passenger. The passenger's hips
may slide under the lap portion
of the seat belt during an acci-
dent or a sudden stop.
Serious or fatal internal injuries
could result because the seat
belt cannot operate properly.
WARNING
To reduce the risk of serious
injury or death from an inflating
air bag, take the following pre-
cautions:
•Adjust the driver’s seat as far
to the rear as possible main-
taining the ability to control the
vehicle.
•Adjust the front passenger seat
as far to the rear as possible.
•Hold the steering wheel by the
rim with hands at the 9 o’clock
and 3 o’clock positions to min-
imise the risk of injuries to
your hands and arms.
•NEVER place anything or any-
one between you and the air
bag.
•Do not allow the front passen-
ger to place feet or legs on the
dashboard to minimise the risk
of leg injuries.
WARNING
Take the following precautions
when adjusting your seat belt:
•NEVER use one seat belt for
more than one occupant.
•Always position the seatback
upright with the lap portion of
the seat belt snug and low
across the hips.
•NEVER allow children or small
infants to ride on a passenger’s
lap.
WARNING
Page 22 of 497
2-6
Safety system of your vehicle
Front seats
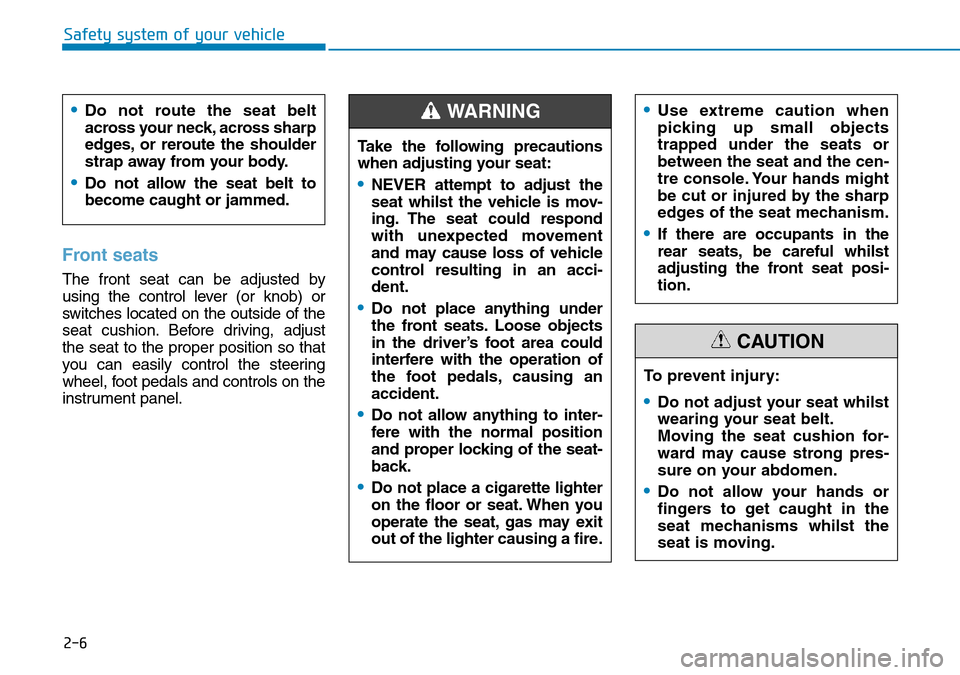
The front seat can be adjusted by
using the control lever (or knob) or
switches located on the outside of the
seat cushion. Before driving, adjust
the seat to the proper position so that
you can easily control the steering
wheel, foot pedals and controls on the
instrument panel.
•Do not route the seat belt
across your neck, across sharp
edges, or reroute the shoulder
strap away from your body.
•Do not allow the seat belt to
become caught or jammed.
To prevent injury:
•Do not adjust your seat whilst
wearing your seat belt.
Moving the seat cushion for-
ward may cause strong pres-
sure on your abdomen.
•Do not allow your hands or
fingers to get caught in the
seat mechanisms whilst the
seat is moving.
CAUTION
Take the following precautions
when adjusting your seat:
•NEVER attempt to adjust the
seat whilst the vehicle is mov-
ing. The seat could respond
with unexpected movement
and may cause loss of vehicle
control resulting in an acci-
dent.
•Do not place anything under
the front seats. Loose objects
in the driver’s foot area could
interfere with the operation of
the foot pedals, causing an
accident.
•Do not allow anything to inter-
fere with the normal position
and proper locking of the seat-
back.
•Do not place a cigarette lighter
on the floor or seat. When you
operate the seat, gas may exit
out of the lighter causing a fire.
WARNING •Use extreme caution when
picking up small objects
trapped under the seats or
between the seat and the cen-
tre console. Your hands might
be cut or injured by the sharp
edges of the seat mechanism.
•If there are occupants in the
rear seats, be careful whilst
adjusting the front seat posi-
tion.
Page 23 of 497
2-7
Safety system of your vehicle
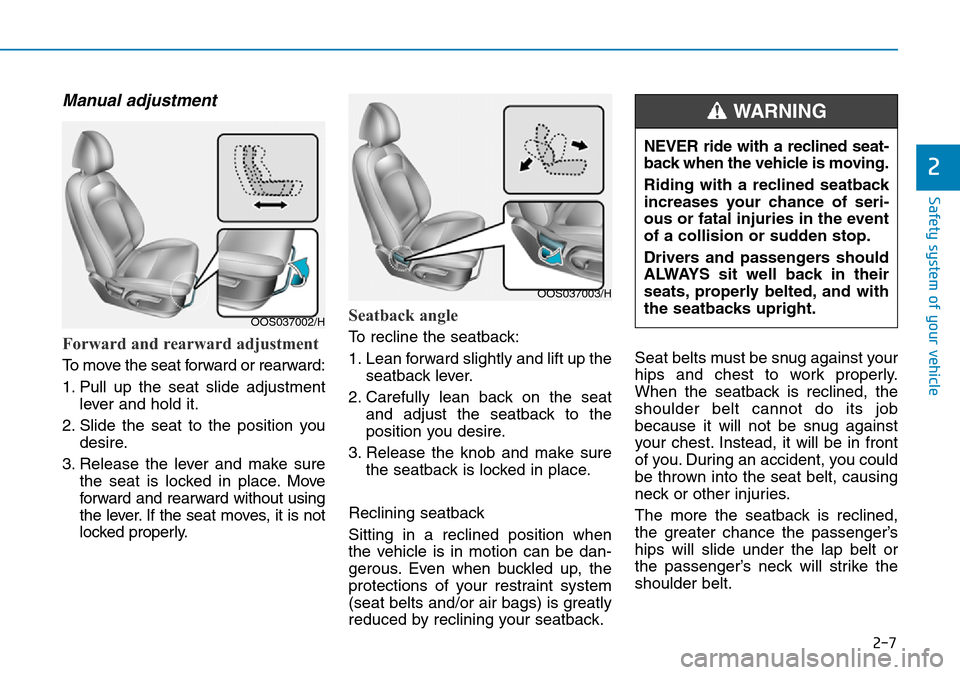
Manual adjustment
Forward and rearward adjustment
To move the seat forward or rearward:
1. Pull up the seat slide adjustmentlever and hold it.
2. Slide the seat to the position you desire.
3. Release the lever and make sure the seat is locked in place. Move
forward and rearward without using
the lever. If the seat moves, it is not
locked properly.
Seatback angle
To recline the seatback:
1. Lean forward slightly and lift up theseatback lever.
2. Carefully lean back on the seat and adjust the seatback to the
position you desire.
3. Release the knob and make sure the seatback is locked in place.
Reclining seatback
Sitting in a reclined position when
the vehicle is in motion can be dan-
gerous. Even when buckled up, the
protections of your restraint system
(seat belts and/or air bags) is greatly
reduced by reclining your seatback. Seat belts must be snug against your
hips and chest to work properly.
When the seatback is reclined, the
shoulder belt cannot do its job
because it will not be snug against
your chest. Instead, it will be in front
of you. During an accident, you could
be thrown into the seat belt, causing
neck or other injuries.
The more the seatback is reclined,
the greater chance the passenger’s
hips will slide under the lap belt or
the passenger’s neck will strike the
shoulder belt.
2
OOS037002/H
OOS037003/H
NEVER ride with a reclined seat-
back when the vehicle is moving.
Riding with a reclined seatback
increases your chance of seri-
ous or fatal injuries in the event
of a collision or sudden stop.
Drivers and passengers should
ALWAYS sit well back in their
seats, properly belted, and with
the seatbacks upright.
WARNING
Page 28 of 497
2-12
Safety system of your vehicle
2-12
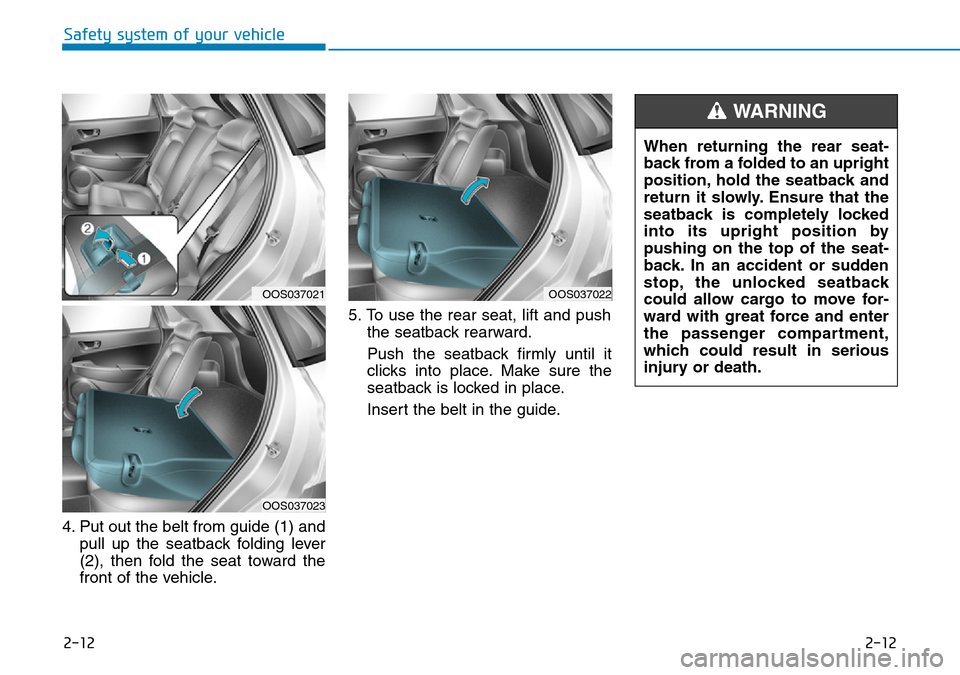
4. Put out the belt from guide (1) andpull up the seatback folding lever
(2), then fold the seat toward the
front of the vehicle. 5. To use the rear seat, lift and push
the seatback rearward.
Push the seatback firmly until it
clicks into place. Make sure the
seatback is locked in place.
Insert the belt in the guide.
OOS037022OOS037021
OOS037023
When returning the rear seat-
back from a folded to an upright
position, hold the seatback and
return it slowly. Ensure that the
seatback is completely locked
into its upright position by
pushing on the top of the seat-
back. In an accident or sudden
stop, the unlocked seatback
could allow cargo to move for-
ward with great force and enter
the passenger compartment,
which could result in serious
injury or death.
WARNING
Page 30 of 497
2-14
Safety system of your vehicle
Head restraint
The vehicle’s front and rear seats have
adjustable head restraints. The head
restraints provide comfort for passen-
gers, but more importantly they are
designed to help protect passengers
from whiplash and other neck and
spinal injuries during an accident,
especially in a rear impact collision.To prevent damage, NEVER hit or
pull on the head restraints.
NOTICE
To reduce the risk of serious
injury or death in an accident,
take the following precautions
when adjusting your head
restraints:
•Always properly adjust the
head restraints for all passen-
gers BEFORE starting the vehi-
cle.
•NEVER let anyone ride in a seat
with the head restraint
removed.
WARNING
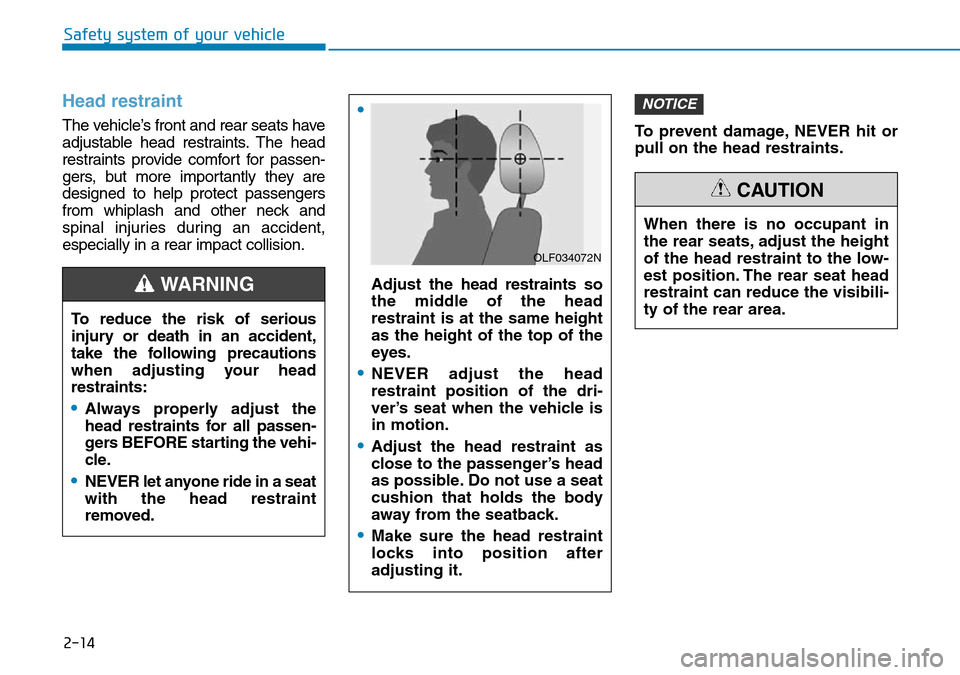
•
Adjust the head restraints so
the middle of the head
restraint is at the same height
as the height of the top of the
eyes.
•NEVER adjust the head
restraint position of the dri-
ver’s seat when the vehicle is
in motion.
•Adjust the head restraint as
close to the passenger’s head
as possible. Do not use a seat
cushion that holds the body
away from the seatback.
•Make sure the head restraint
locks into position after
adjusting it.
OLF034072N
When there is no occupant in
the rear seats, adjust the height
of the head restraint to the low-
est position. The rear seat head
restraint can reduce the visibili-
ty of the rear area.
CAUTION
Page 33 of 497
2-17
Safety system of your vehicle
2
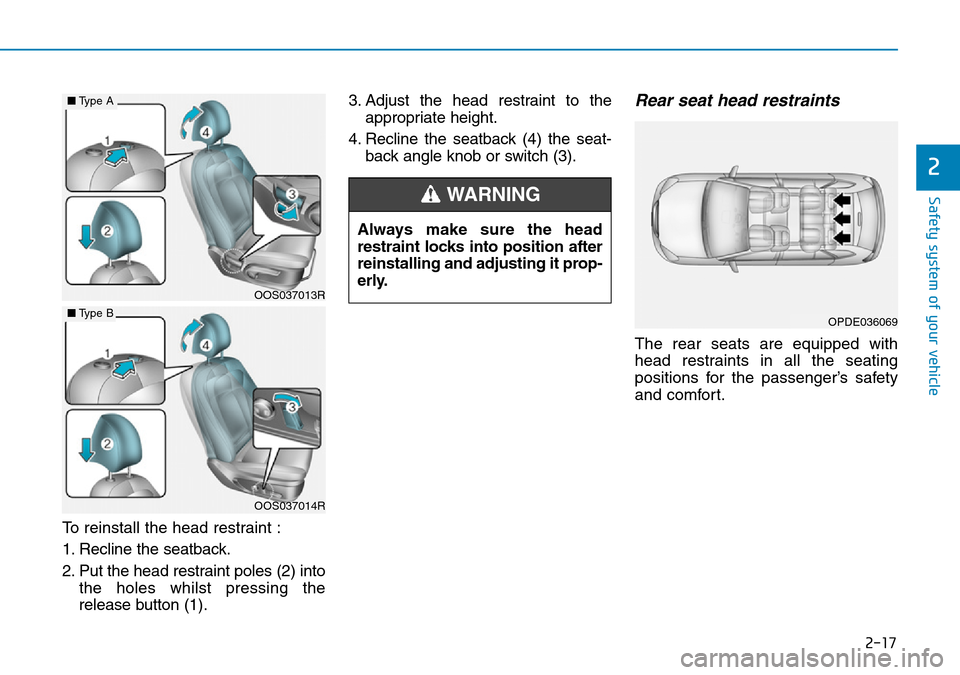
To reinstall the head restraint :
1. Recline the seatback.
2. Put the head restraint poles (2) intothe holes whilst pressing the
release button (1). 3. Adjust the head restraint to the
appropriate height.
4. Recline the seatback (4) the seat- back angle knob or switch (3).
Rear seat head restraints
The rear seats are equipped with
head restraints in all the seating
positions for the passenger’s safety
and comfort.
OPDE036069
Always make sure the head
restraint locks into position after
reinstalling and adjusting it prop-
erly.
WARNING
OOS037013R
OOS037014R
■Type A
■Type B
Page 36 of 497
2-20
Safety system of your vehicle
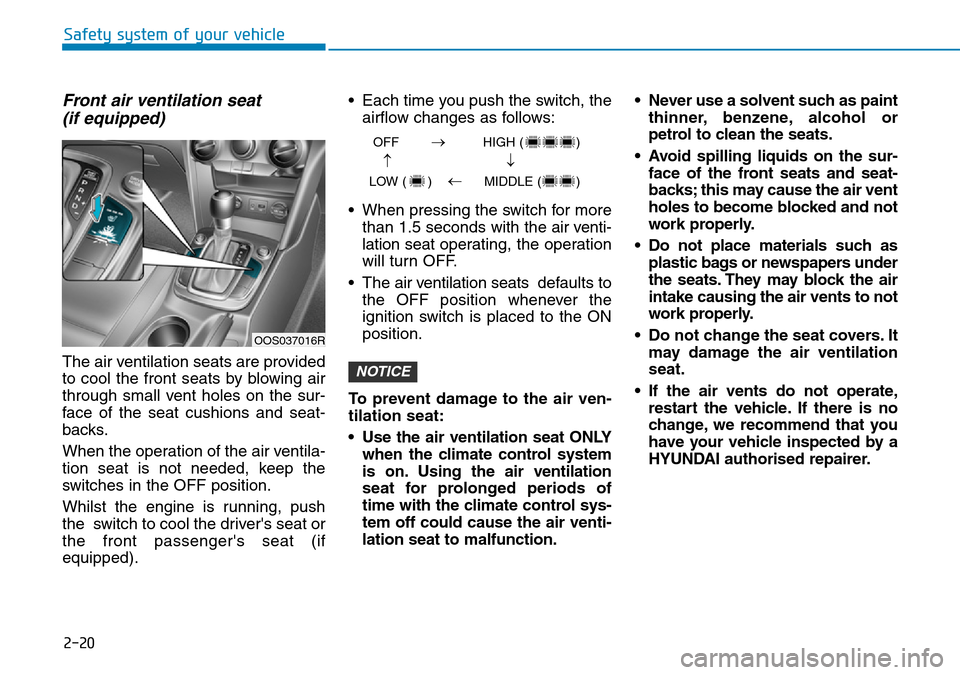
Front air ventilation seat(if equipped)
The air ventilation seats are provided
to cool the front seats by blowing air
through small vent holes on the sur-
face of the seat cushions and seat-
backs.
When the operation of the air ventila-
tion seat is not needed, keep the
switches in the OFF position.
Whilst the engine is running, push
the switch to cool the driver's seat or
the front passenger's seat (if
equipped). • Each time you push the switch, the
airflow changes as follows:
• When pressing the switch for more than 1.5 seconds with the air venti-
lation seat operating, the operation
will turn OFF.
• The air v entilation seats def aults to
the OFF position whenever the
ignition switch is placed to the ON
position.
To prevent damage to the air ven-
tilation seat:
• Use the air ventilation seat ONLY when the climate control system
is on. Using the air ventilation
seat for prolonged periods of
time with the climate control sys-
tem off could cause the air venti-
lation seat to malfunction. • Never use a solvent such as paint
thinner, benzene, alcohol or
petrol to clean the seats.
• Avoid spilling liquids on the sur- face of the front seats and seat-
backs; this may cause the air vent
holes to become blocked and not
work properly.
• Do not place materials such as plastic bags or newspapers under
the seats. They may block the air
intake causing the air vents to not
work properly.
• Do not change the seat covers. It may damage the air ventilation
seat.
• If the air vents do not operate, restart the vehicle. If there is no
change, we recommend that you
have your vehicle inspected by a
HYUNDAI authorised repairer.NOTICE
OFF HIGH ( )
LOW ( ) MIDDLE ( )
→→
→
→
OOS037016R