fuel pressure HYUNDAI KONA 2022 Owners Manual
[x] Cancel search | Manufacturer: HYUNDAI, Model Year: 2022, Model line: KONA, Model: HYUNDAI KONA 2022Pages: 579, PDF Size: 35.31 MB
Page 94 of 579
4
Instrument cluster ............................................................................................ 4-4
Instrument cluster control ...........................................................................................4-5
Instrument panel illumination ...................................................................................4-5
Gauges and meters ......................................................................................................4-5
Speedometer .............................................................................................................4-5
Tachometer ................................................................................................................4-5
Engine coolant temperature gauge ......................................................................... 4-6
Fuel gauge ................................................................................................................. 4-6
Outside temperature gauge ...................................................................................... 4-7
Odometer .................................................................................................................. 4-8
Distance to empty .................................................................................................... 4-8
Transmission shift indicator ........................................................................................ 4-9
Intelligent variable transmission .............................................................................. 4-9
Dual clutch transmission shift indicator ................................................................. 4-9
Warning and indicator lights ..................................................................................... 4-10
Seat belt warning light ............................................................................................ 4-10
Air bag warning light ............................................................................................... 4-10
Parking brake & Brake fluid warning light .............................................................. 4-10
Anti-lock Brake System (ABS) warning light ........................................................... 4-11
Electronic Brake Force Distribution (EBD) system warning light .......................... 4-11
Electric Power Steering (EPS) warning light .......................................................... 4-12
Charging system warning light ............................................................................... 4-12
Engine oil pressure warning light ........................................................................... 4-13
Low fuel level warning light .................................................................................... 4-14
Malfunction Indicator Lamp (MIL) .......................................................................... 4-14
Exhaust system (GPF) warning light (for gasoline engine) ................................... 4-14
Electronic Parking Brake (EPB) warning light ........................................................ 4-15
AUTO HOLD indicator light ..................................................................................... 4-15
Low tire pressure warning light .............................................................................. 4-15
Forward Safety warning light .................................................................................. 4-16
Lane Safety indicator light ...................................................................................... 4-16
4 Wheel Drive (4WD) warning light ........................................................................ 4-16
4 Wheel Drive (4WD) LOCK Indicator Light ............................................................4-17
LED headlight warning light .....................................................................................4-17
Electronic Stability Control (ESC) indicator light ................................................... 4-18
Electronic Stability Control (ESC) OFF indicator light ........................................... 4-18
Immobilizer Indicator Light (without smart key) .................................................. 4-18
Immobilizer Indicator Light (with smart key) ........................................................ 4-19
Downhill Brake Control (DBC) indicator light ....................................................... 4-19
AUTO STOP indicator light .....................................................................................4-20
4. Instrument cluster
Page 95 of 579

4
Turn signal indicator light ........................................................................................4-20
High beam indicator light .......................................................................................4-20
High Beam Assist indicator light ..............................................................................4-21
Cruise Indicator Light ...............................................................................................4-21
SPORT Mode Indicator Light ....................................................................................4-21
SMART Mode Indicator Light ...................................................................................4-21
Master warning light .................................................................................................4-21
LCD display messages ............................................................................................... 4-22
Shift to P (for smart key system and dual clutch transmission)............................ 4-22
Low key battery (for smart key system).................................................................. 4-22
Press START button while turning wheel (for smart key system) ......................... 4-22
Steering wheel not locked (for smart key system) ................................................ 4-22
Press brake pedal to start engine (for smart key system and dual clutch
transmission) ........................................................................................................... 4-22
Key not in vehicle (for smart key system) ............................................................... 4-22
Key not detected (for smart key system)................................................................ 4-22
Press START button again (for smart key system) ................................................ 4-22
Press START button with key (for smart key system) ........................................... 4-23
Check BRAKE SWITCH fuse (for smart key system and dual clutch
transmission) ........................................................................................................... 4-23
Shift to P or N to start engine (for smart key system and dual clutch
transmission) ........................................................................................................... 4-23
Battery discharging due to external electrical devices ......................................... 4-23
Door, Hood, Liftgate open indicator .......................................................................4-24
Sunroof open indicator ............................................................................................4-24
Low tire pressure .....................................................................................................4-24
Lights ........................................................................................................................ 4-25
Wiper ........................................................................................................................ 4-25
Heated Steering Wheel turned off .......................................................................... 4-25
Low washer fluid ...................................................................................................... 4-25
Low fuel .................................................................................................................... 4-25
Engine overheated / Engine has overheated .........................................................4-26
Check exhaust system .............................................................................................4-26
Check headlight .......................................................................................................4-26
Check turn signal .....................................................................................................4-26
Check headlamp LED ..............................................................................................4-26
Check Forward Safety system ................................................................................. 4-27
Check Lane Keeping Assist (LKA) system .............................................................. 4-27
Check Blind-Spot Safety system............................................................................. 4-27
Check Driver Attention Warning system ................................................................ 4-27
Check High Beam Assist (HBA) system .................................................................. 4-27
Check Smart Cruise Control system ....................................................................... 4-27
Page 99 of 579
Instrument cluster
4-6
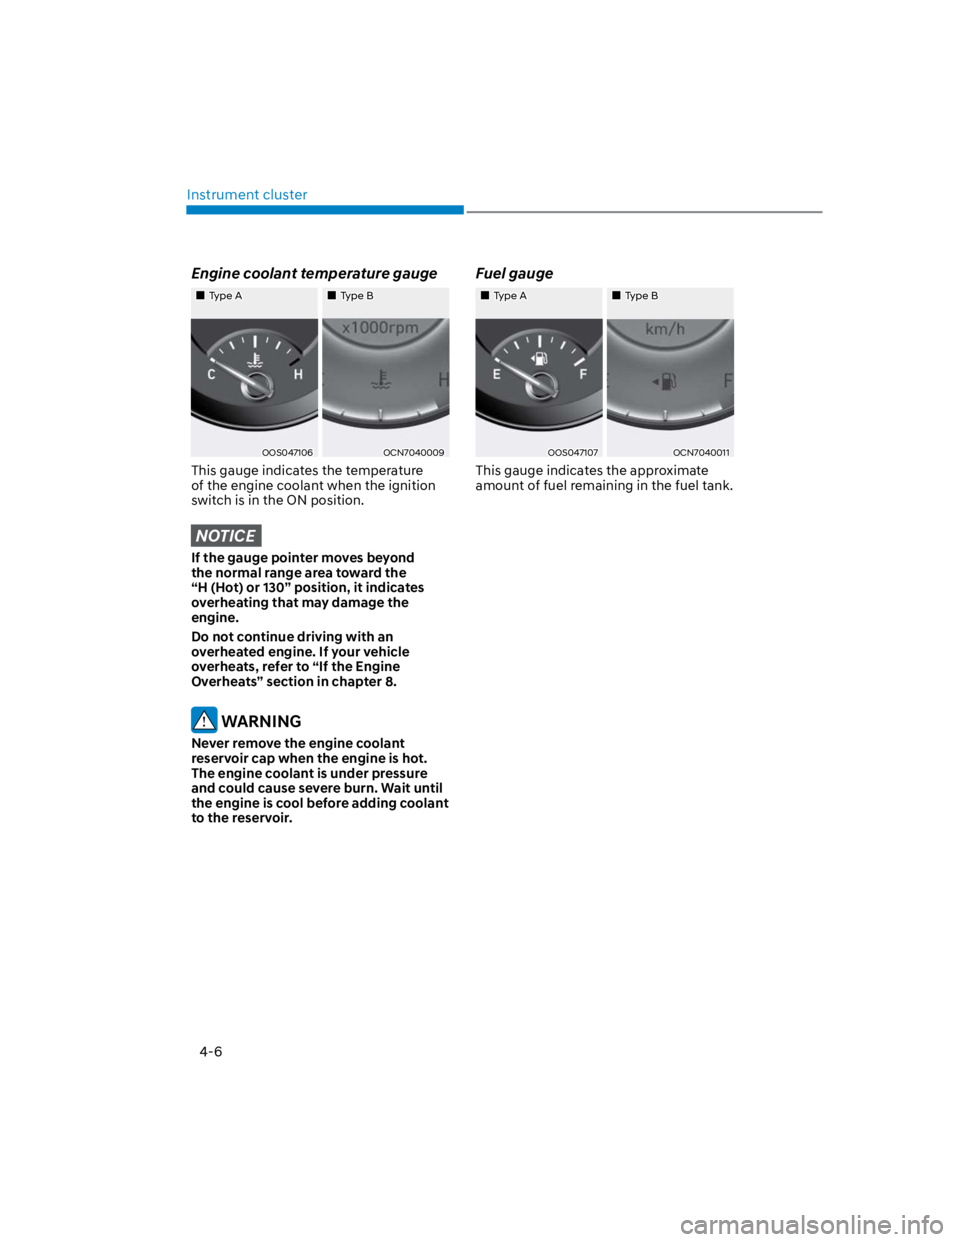
Engine coolant temperature gauge
Type AType B
OOS047106OCN7040009
This gauge indicates the temperature
of the engine coolant when the ignition
switch is in the ON position.
NOTICE
If the gauge pointer moves beyond
the normal range area toward the
“H (Hot) or 130” position, it indicates
overheating that may damage the
engine.
Do not continue driving with an
overheated engine. If your vehicle
overheats, refer to “If the Engine
Overheats” section in chapter 8.
WARNING
Never remove the engine coolant
reservoir cap when the engine is hot.
The engine coolant is under pressure
and could cause severe burn. Wait until
the engine is cool before adding coolant
to the reservoir.
Fuel gauge
Type AType B
OOS047107OCN7040011
This gauge indicates the approximate
amount of fuel remaining in the fuel tank.
Page 130 of 579
04
4-37
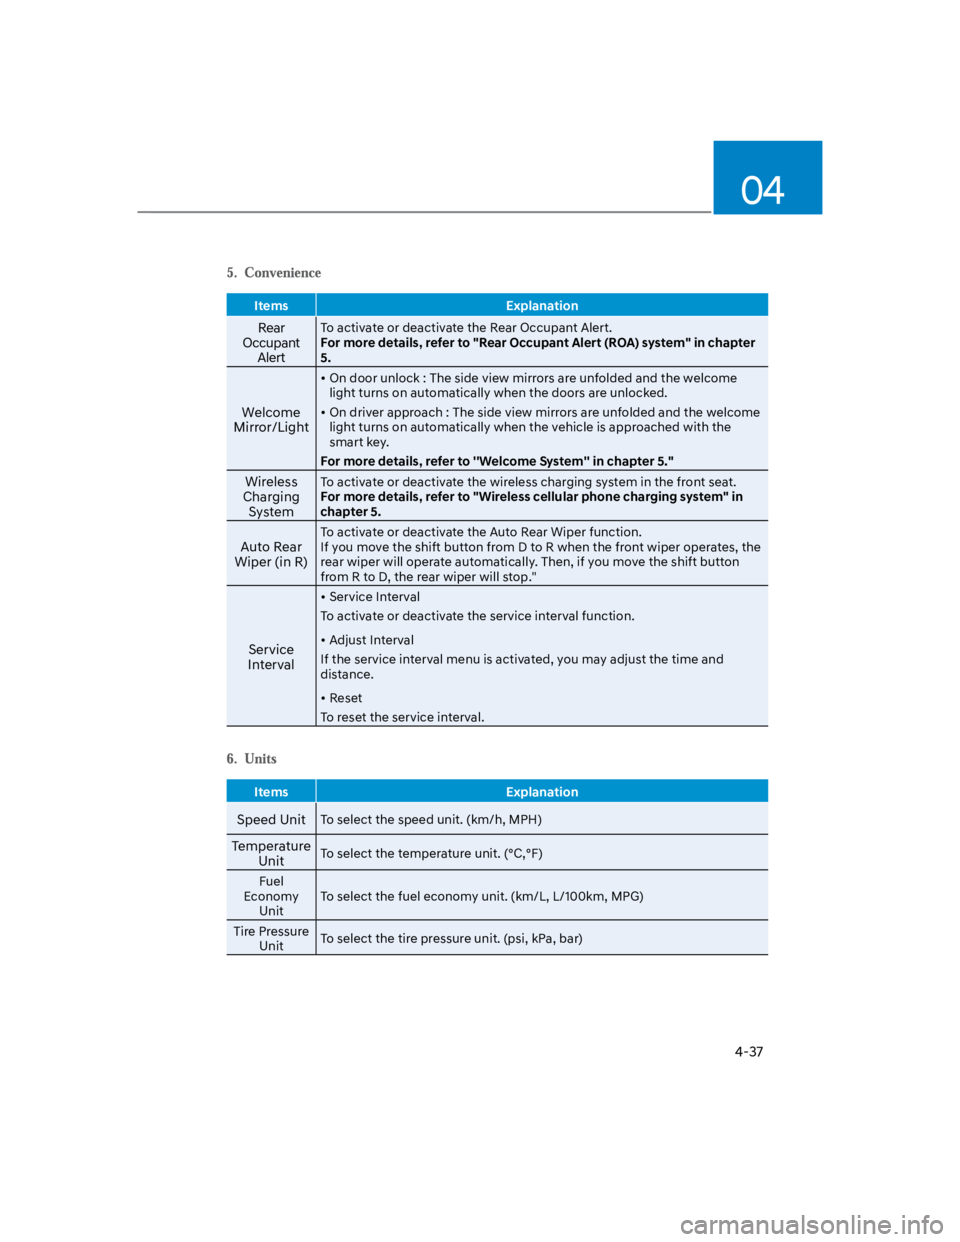
Items Explanation
Rear
Occupant
Alert
To activate or deactivate the Rear Occupant Alert.
For more details, refer to "Rear Occupant Alert (ROA) system" in chapter
5.
Welcome
Mirror/Light
On door unlock : The side view mirrors are unfolded and the welcome
light turns on automatically when the doors are unlocked.
On driver approach : The side view mirrors are unfolded and the welcome
light turns on automatically when the vehicle is approached with the
smart key.
For more details, refer to ''Welcome System'' in chapter 5."
Wireless
Charging
System
To activate or deactivate the wireless charging system in the front seat.
For more details, refer to "Wireless cellular phone charging system" in
chapter 5.
Auto Rear
Wiper (in R)
To activate or deactivate the Auto Rear Wiper function.
If you move the shift button from D to R when the front wiper operates, the
rear wiper will operate automatically. Then, if you move the shift button
from R to D, the rear wiper will stop."
Service
Interval
Service Interval
To activate or deactivate the service interval function.
Adjust Interval
If the service interval menu is activated, you may adjust the time and
distance.
Reset
To reset the service interval.
Items Explanation
Speed UnitTo select the speed unit. (km/h, MPH)
Temperature
UnitTo select the temperature unit. (°C,°F)
Fuel
Economy
Unit
To select the fuel economy unit. (km/L, L/100km, MPG)
Tire Pressure
UnitTo select the tire pressure unit. (psi, kPa, bar)
Page 155 of 579

05
5-21
Remote Start with Digital Key
When the shift button of your vehicle
is in P (Park) and all of the doors
including trunk and hood is locked
and the vehicle is off, press the Door
Lock button in the Hyundai Digital
Key app then press the Remote Start
button within 4 seconds.
You can confirm the engine is on if the
hazard warning lights blinks two times
and the chime sounds.
If you want to turn off the engine,
press Remote Engine Stop. Air
Conditioner / Heating system
maintains the same status as when
you last used the vehicle.
Unless you put the registered digital
key(smartphone) on the interior
authentication pad (wireless charger)
when the remote start function is on,
the engine will turn off.
If you do not get on the vehicle within
10 minutes after the engine turns on,
the vehicle will turn off.
For more information, refer to the Engine
Start/Stop button in chapter 6.
Vehicle information Display
The digital key application displays
the vehicle information such as
driving or door conditions through the
communication with the vehicle.
How to check : Select the vehicle
what you want to check and touch
the vehicle image, then vehicle
information display page will be
shown.
Contents : accumulated odometer,
latest fuel economy, driving range,
fuel remaining, tire pressure, doors
lock/unlock status and last data
updated time.
Displayed vehicle date could be
differed from the current vehicle
condition.
For more information, please refer to
the ‘Tutorial’ on your Digital key app.
If you change your smartphone or delete
the Hyundai Digital Key App, please refer
to the following to set up your Digital
Key:
Smartphone Change/ Reset
If you change or reset the smartphone,
the registered digital key in your previous
smartphone may not be used. Please
refer to following procedure to use the
digital key.
1. Install the digital key application and
log in.
2. If you are the owner, retry the Digital
key save process.
3. If you are the sharer, need to re-share
the key from owner.
App delete & reinstall/ Delete App data
You can re-download the digital key
from server in these cases as follow
procedure.
1. Reinstall the application and log in.
2. Input the PIN number for user
verification.
3. If PIN is correct, digital key data
will be re-downloaded to your
smartphone and you can use it
without any further registration or
sharing.
Smartphone operability with Digital Key
The digital key application may not
be available to old type smartphones.
Please check the available smartphone
models with your dealer. NFC antenna
position on the smartphone can be
confirmed on each smartphone’s manual
or contact to customer service center of
the smartphone manufacture.
Page 198 of 579
Convenient features
5-64
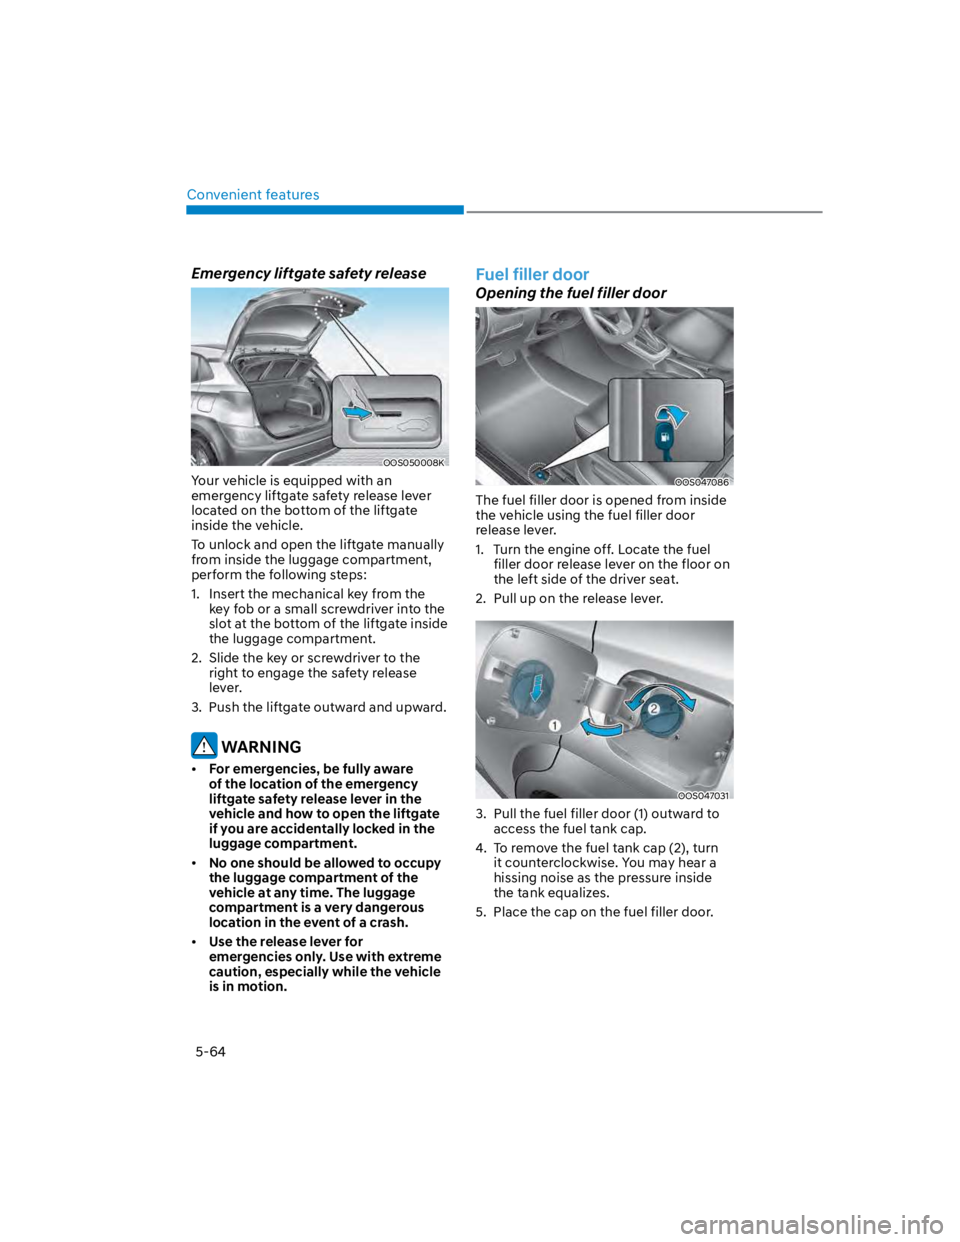
Emergency liftgate safety release
OOS050008K
Your vehicle is equipped with an
emergency liftgate safety release lever
located on the bottom of the liftgate
inside the vehicle.
To unlock and open the liftgate manually
from inside the luggage compartment,
perform the following steps:
1. Insert the mechanical key from the
key fob or a small screwdriver into the
slot at the bottom of the liftgate inside
the luggage compartment.
2. Slide the key or screwdriver to the
right to engage the safety release
lever.
3. Push the liftgate outward and upward.
WARNING
For emergencies, be fully aware
of the location of the emergency
liftgate safety release lever in the
vehicle and how to open the liftgate
if you are accidentally locked in the
luggage compartment.
No one should be allowed to occupy
the luggage compartment of the
vehicle at any time. The luggage
compartment is a very dangerous
location in the event of a crash.
Use the release lever for
emergencies only. Use with extreme
caution, especially while the vehicle
is in motion.
Fuel filler door
Opening the fuel filler door
OOS047086
The fuel filler door is opened from inside
the vehicle using the fuel filler door
release lever.
1. Turn the engine off. Locate the fuel
filler door release lever on the floor on
the left side of the driver seat.
2. Pull up on the release lever.
OOS047031
3. Pull the fuel filler door (1) outward to
access the fuel tank cap.
4. To remove the fuel tank cap (2), turn
it counterclockwise. You may hear a
hissing noise as the pressure inside
the tank equalizes.
5. Place the cap on the fuel filler door.
Page 459 of 579
08
8-9
OOS060047
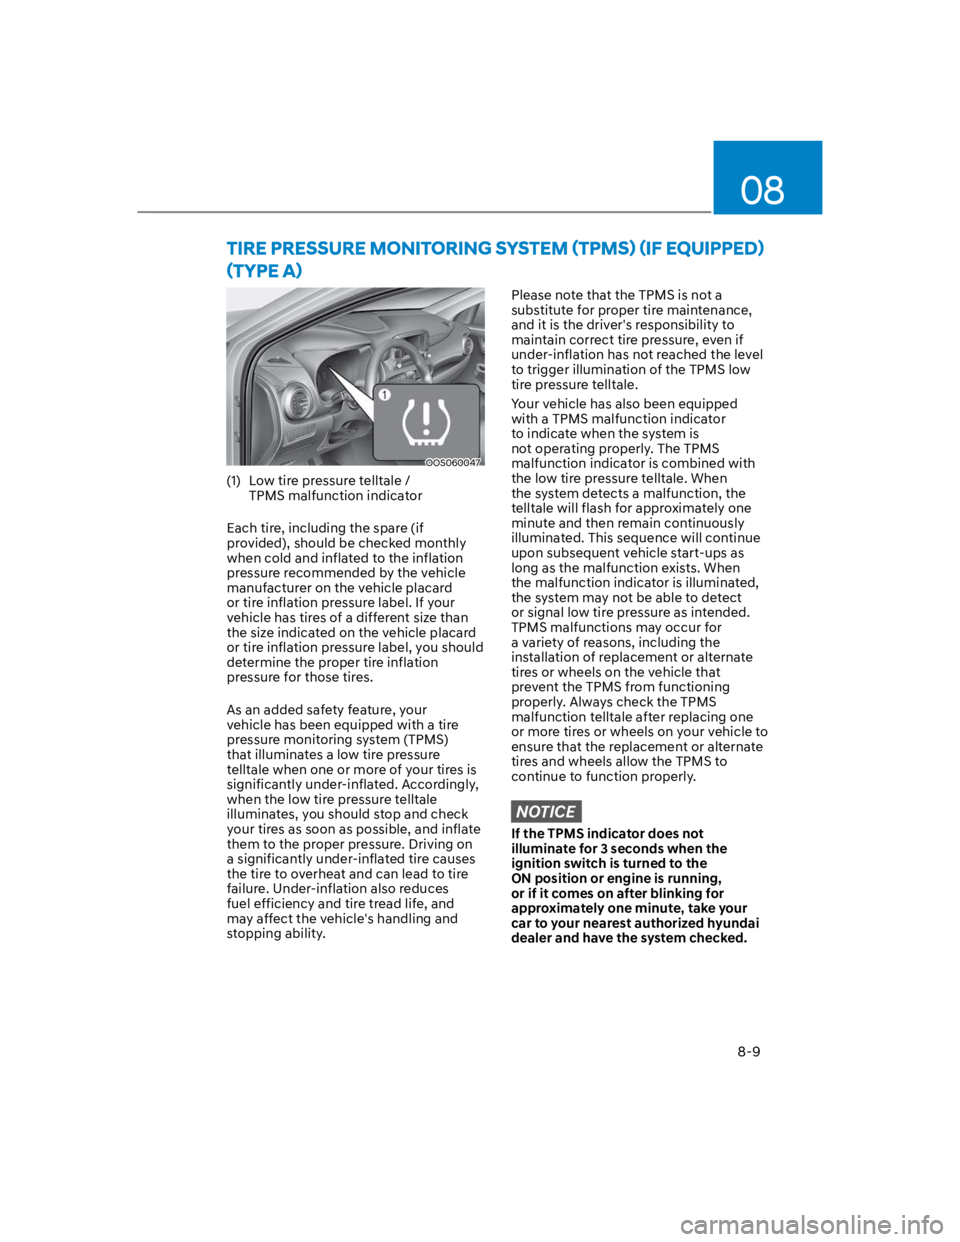
(1) Low tire pressure telltale /
TPMS malfunction indicator
Each tire, including the spare (if
provided), should be checked monthly
when cold and inflated to the inflation
pressure recommended by the vehicle
manufacturer on the vehicle placard
or tire inflation pressure label. If your
vehicle has tires of a different size than
the size indicated on the vehicle placard
or tire inflation pressure label, you should
determine the proper tire inflation
pressure for those tires.
As an added safety feature, your
vehicle has been equipped with a tire
pressure monitoring system (TPMS)
that illuminates a low tire pressure
telltale when one or more of your tires is
significantly under-inflated. Accordingly,
when the low tire pressure telltale
illuminates, you should stop and check
your tires as soon as possible, and inflate
them to the proper pressure. Driving on
a significantly under-inflated tire causes
the tire to overheat and can lead to tire
failure. Under-inflation also reduces
fuel efficiency and tire tread life, and
may affect the vehicle's handling and
stopping ability.
Please note that the TPMS is not a
substitute for proper tire maintenance,
and it is the driver's responsibility to
maintain correct tire pressure, even if
under-inflation has not reached the level
to trigger illumination of the TPMS low
tire pressure telltale.
Your vehicle has also been equipped
with a TPMS malfunction indicator
to indicate when the system is
not operating properly. The TPMS
malfunction indicator is combined with
the low tire pressure telltale. When
the system detects a malfunction, the
telltale will flash for approximately one
minute and then remain continuously
illuminated. This sequence will continue
upon subsequent vehicle start-ups as
long as the malfunction exists. When
the malfunction indicator is illuminated,
the system may not be able to detect
or signal low tire pressure as intended.
TPMS malfunctions may occur for
a variety of reasons, including the
installation of replacement or alternate
tires or wheels on the vehicle that
prevent the TPMS from functioning
properly. Always check the TPMS
malfunction telltale after replacing one
or more tires or wheels on your vehicle to
ensure that the replacement or alternate
tires and wheels allow the TPMS to
continue to function properly.
NOTICE
If the TPMS indicator does not
illuminate for 3 seconds when the
ignition switch is turned to the
ON position or engine is running,
or if it comes on after blinking for
approximately one minute, take your
car to your nearest authorized hyundai
dealer and have the system checked.
Page 464 of 579
Emergency situations
8-14
Tire pressure monitoring system
WARNING
Over-inflation or under-inflation can
reduce tire life, adversely affect vehicle
handling, and lead to sudden tire failure
that may cause loss of vehicle control
resulting in an accident.
Each tire, including the spare (if
provided), should be checked monthly
when cold and inflated to the inflation
pressure recommended by the vehicle
manufacturer on the vehicle placard
or tire inflation pressure label. (If your
vehicle has tires of a different size than
the size indicated on the vehicle placard
or tire inflation pressure label, you should
determine the proper tire inflation
pressure for those tires.)
As an added safety feature, your
vehicle has been equipped with a tire
pressure monitoring system (TPMS)
that illuminates a low tire pressure
telltale when one or more of your tires is
significantly under-inflated. Accordingly,
when the low tire pressure telltale
illuminates, you should stop and check
your tires as soon as possible, and inflate
them to the proper pressure. Driving on
a significantly under-inflated tire causes
the tire to overheat and can lead to tire
failure.
Under-inflation also reduces fuel
efficiency and tire tread life, and may
affect the vehicle’s handling and
stopping ability.
Please note that the TPMS is not a
substitute for proper tire maintenance,
and it is the driver’s responsibility to
maintain correct tire pressure, even if
under-inflation has not reached the level
to trigger illumination of the TPMS low
tire pressure telltale.
Your vehicle has also been equipped with
a TPMS malfunction indicator to indicate
when the system is not operating
properly. The TPMS malfunction
indicator is combined with the low
tire pressure telltale. When the system
detects a malfunction, the telltale will
flash for approximately one minute and
then remain continuously illuminated.
This sequence will continue upon
subsequent vehicle start-ups as long as
the malfunction exists.
When the malfunction indicator is
illuminated, the system may not be able
to detect or signal low tire pressure as
intended. TPMS malfunctions may occur
for a variety of reasons, including the
installation of replacement or alternate
tires or wheels on the vehicle that
prevent the TPMS from functioning
properly.
Always check the TPMS malfunction
telltale after replacing one or more tires
or wheels on your vehicle to ensure that
the replacement or alternate tires and
wheels allow the TPMS to continue to
function properly.
NOTICE
If any of the below happens, have
the system checked by an authorized
HYUNDAI dealer.
1. The Low Tire Pressure Telltale/ TPMS
Malfunction Indicator does not
illuminate for 3 seconds when the
Engine Start/Stop button is pressed
to the ON position or when the
engine is running.
2. The TPMS Malfunction Indicator
remains illuminated after blinking for
approximately 1 minute.
3. The Low Tire Pressure Position
Telltale remains illuminated.
Page 492 of 579

Maintenance
9-6
Owner maintenance schedule
When you stop for fuel:
Check the coolant level in the engine
coolant reservoir or the water-cooled
intercooler coolant reservoir.
Check the windshield washer fluid
level.
Check for low or under-inflated tires.
WARNING
Be careful when checking your coolant
level when the engine is hot. This may
result in coolant being blown out of the
opening and cause serious burns and
other injuries.
While operating your vehicle:
Note any changes in the sound of the
exhaust or any smell of exhaust fumes
in the vehicle.
Check for vibrations in the steering
wheel. Notice if there is any increased
steering effort or looseness in the
steering wheel, or change in its
straight-ahead position.
Notice if your vehicle constantly turns
slightly or “pulls” to one side when
traveling on smooth, level road.
When stopping, listen and check for
unusual sounds, pulling to one side,
increased brake pedal travel or “hard-
to-push” brake pedal.
If any slipping or changes in the
operation of your transmission occurs,
check the transmission fluid level.
Check the automatic transmission P
(Park) function.
Check the parking brake.
Check for fluid leaks under your
vehicle (water dripping from the air
conditioning system during or after
use is normal).
At least monthly:
Check coolant level in the engine
coolant reservoir.
Check the operation of all exterior
lights, including the stoplights, turn
signals and hazard warning flashers.
Check the inflation pressures of all
tires including the spare for tires that
are worn, show uneven wear, or are
damaged.
Check for loose wheel lug nuts.
At least twice a year: (i.e., every
Spring and Autumn)
Check radiator, heater and air
conditioning hoses for leaks or
damage.
Check windshield washer spray and
wiper operation. Clean wiper blades
with a clean cloth dampened with
washer fluid.
Check headlamp alignment.
Check muffler, exhaust pipes, shields
and clamps.
Check the seat belts for wear and
function.
At least once a year:
Clean body and door drain holes.
Lubricate door hinges and hood
hinges.
Lubricate door and hood locks and
latches.
Lubricate door rubber weather strips.
Check the air conditioning system.
Inspect and lubricate automatic
transmission linkage and controls.
Clean the battery and terminals.
Check the brake fluid level.
Page 519 of 579
09
9-33
WARNING
Tire failure may cause loss of vehicle
control resulting in an accident. To
reduce risk of SERIOUS INJURY or
DEATH, take the following precautions:
Inspect your tires monthly for proper
inflation as well as wear and damage.
The recommended cold tire pressure
for your vehicle can be found in this
manual and on the tire label located
on the driver’s side center pillar.
Always use a tire pressure gauge to
measure tire pressure. Tires with
too much or too little pressure wear
unevenly causing poor handling.
Check the pressure of the spare
every time you check the pressure of
the other tires on your vehicle.
Replace tires that are worn, show
uneven wear, or are damaged.
Worn tires can cause loss of braking
effectiveness, steering control, or
traction.
ALWAYS replace tires with the
same size, type, construction and
tread pattern as each tire that was
originally supplied with this vehicle.
Using tires and wheels other than
the recommended sizes could cause
unusual handling characteristics,
poor vehicle control, or negatively
affect your vehicle’s Anti-Lock Brake
System (ABS) resulting in a serious
accident.
Tire care
For proper maintenance, safety, and
maximum fuel economy, you must
always maintain recommended tire
inflation pressures and stay within the
load limits and weight distribution
recommended for your vehicle.
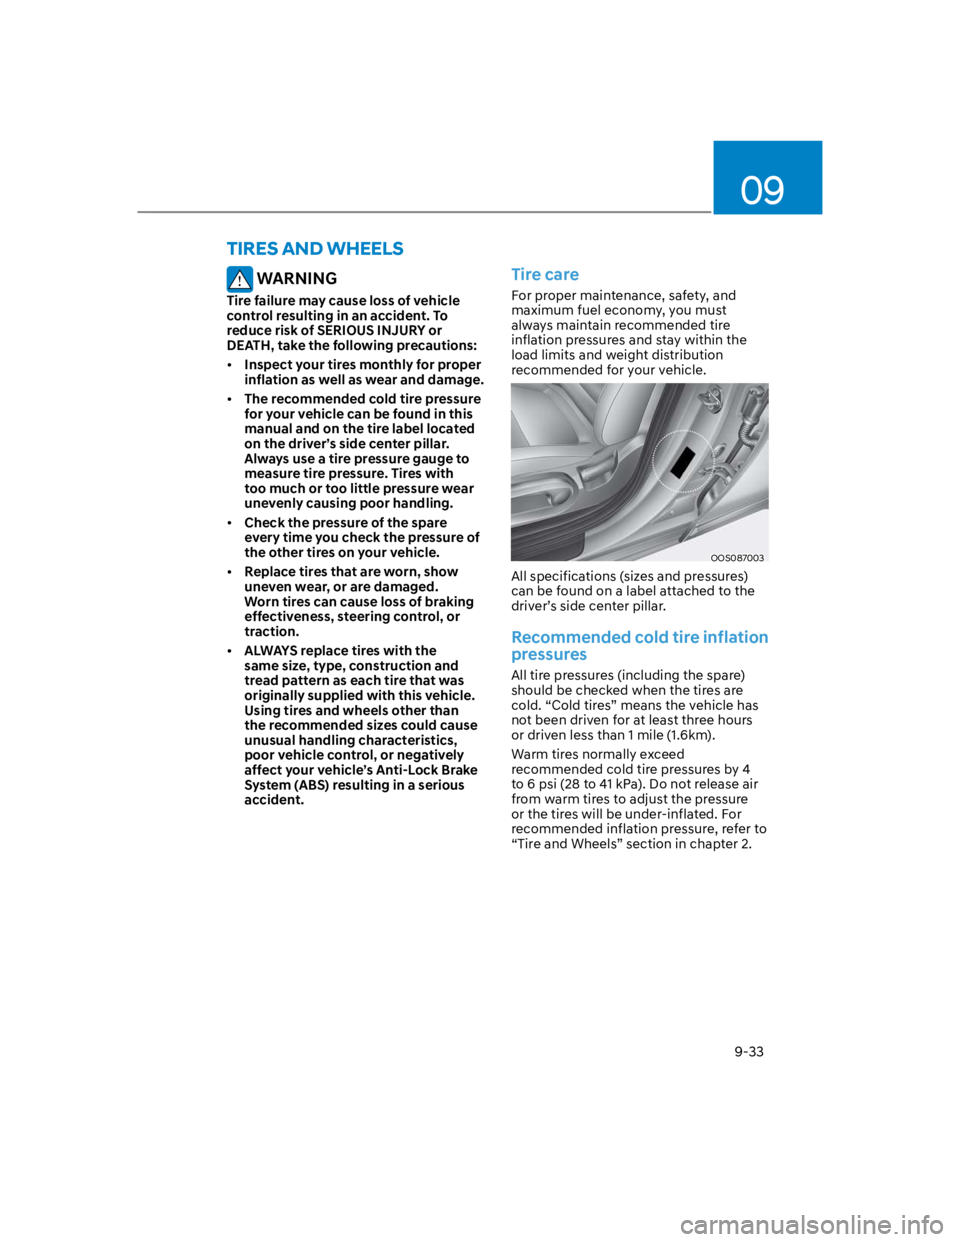
OOS087003
All specifications (sizes and pressures)
can be found on a label attached to the
driver’s side center pillar.
Recommended cold tire inflation
pressures
All tire pressures (including the spare)
should be checked when the tires are
cold. “Cold tires” means the vehicle has
not been driven for at least three hours
or driven less than 1 mile (1.6km).
Warm tires normally exceed
recommended cold tire pressures by 4
to 6 psi (28 to 41 kPa). Do not release air
from warm tires to adjust the pressure
or the tires will be under-inflated. For
recommended inflation pressure, refer to
“Tire and Wheels” section in chapter 2.
TIRES AND WHEELS