lock HYUNDAI KONA EV 2022 Owners Manual
[x] Cancel search | Manufacturer: HYUNDAI, Model Year: 2022, Model line: KONA EV, Model: HYUNDAI KONA EV 2022Pages: 548, PDF Size: 49.14 MB
Page 7 of 548
1
Charging Connector Lock ................................................................................ 1-21
Charging Connector AUTO/ LOCK Mode .................................................................. 1-21
When the Charging Connector Is Locked ...............................................................1-21
Scheduled Charging ........................................................................................ 1-22
Scheduled Charging....................................................................................................1-22
Precautions for Charging Electric Vehicle .....................................................1-23
Charging Precautions ................................................................................................. 1-23
Charging Electric Vehicle (AC Charge) ...........................................................1-25
AC Charge .................................................................................................................... 1-25
DC Charge................................................................................................................... 1-29 Portable Charge .......................................................................................................... 1-33
How to Set the Charge Level of the Portable Charger ...........................................1-33
Charging The Electric Vehicle (Abrupt stop) ..................................................1-44
Action to be taken when charging stops abruptly ...................................................1-44
Driving and Operating Information ................................................................ 1-45
How to Start the Vehicle ............................................................................................ 1-45
Virtual Engine Sound System .................................................................................... 1-46
Distance to Empty ...................................................................................................... 1-46
When destination is not set ..................................................................................... 1-46
When destination is set ............................................................................................ 1-47
Tips for Improving Distance to Empty ....................................................................... 1-47
Power/Charge Gauge ................................................................................................ 1-48
State of charge (SOC) gauge for high voltage battery ............................................1-48
Warning and Indicator Lights (related to electric vehicle) ......................................1-49
LCD display messages ............................................................................................... 1-50
Energy flow ................................................................................................................. 1-56
Vehicle stop .............................................................................................................. 1-56
EV propulsion ........................................................................................................... 1-56
Regeneration ............................................................................................................ 1-56
Aux. Battery Saver+ ..................................................................................................... 1-57
Mode .......................................................................................................................... 1-57
Safety Precautions for Electric Vehicle ..........................................................1-58
If an accident occurs .................................................................................................. 1-58
Additional Precautions ............................................................................................... 1-60
Service Interlock Connector ...................................................................................... 1-60
Service Plug ................................................................................................................ 1-60
Page 26 of 548
![HYUNDAI KONA EV 2022 Owners Manual 01
1-21
CHarging ConneCTor loCK
Charging Connector AUTO/
LOCK Mode
OOSEVQ019006
[A] : Auto mode, [B] : Lock mode
You can change the setting that locks
the charging connector to the charging
port HYUNDAI KONA EV 2022 Owners Manual 01
1-21
CHarging ConneCTor loCK
Charging Connector AUTO/
LOCK Mode
OOSEVQ019006
[A] : Auto mode, [B] : Lock mode
You can change the setting that locks
the charging connector to the charging
port](/img/35/56171/w960_56171-25.png)
01
1-21
CHarging ConneCTor loCK
Charging Connector AUTO/
LOCK Mode
OOSEVQ019006
[A] : Auto mode, [B] : Lock mode
You can change the setting that locks
the charging connector to the charging
port on the vehicle. Change the mode
using the Charging AUTO / LOCK button
located on the left of the driver side dash
panel.Press the (
) button to change
between AUTO mode and LOCK mode.
Information
The charging inlet is locked during the DC
charge regardless of AUTO/ LOCK mode.
After charging is complete the locked charging inlet is unlocked. When the Charging Connector Is
Locked
LOCK
AUTO
Before charging O X
While charging O O
Finished charging O X
• LOCK mode (button indicator off) :
The connector locks when the
charging connector is plugged into
the charging port. The connector is
locked until all doors are unlocked by
the driver. This mode can be used to
prevent charging cable theft.
- If the charge connector is not disconnected within 15 seconds
after unlocking all doors, the
connector will be automatically
locked again.
- The charge connector will automatically relock when all the
doors of the vehicle are locked.
• AUTO mode (button indicator on) :
The connector locks when charging
starts. The connector unlocks when
charging is complete. This mode can
be used when charging in a public
charging station.
Page 29 of 548
Foreword / Electric Vehicle System Overview
1-24
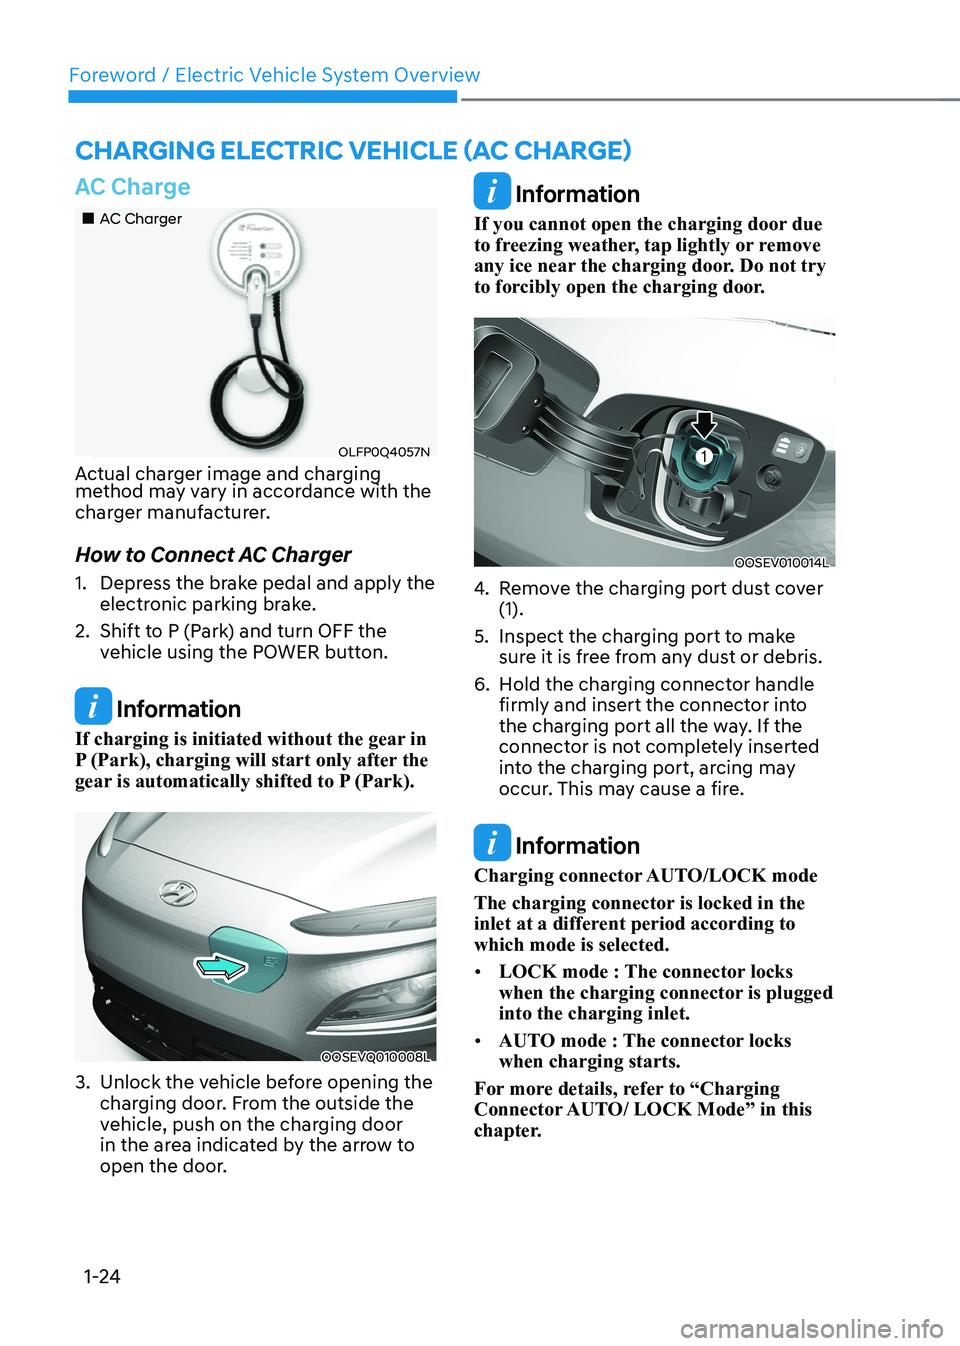
AC Charge
„„AC Charger
OLFP0Q4057N
Actual charger image and charging
method may vary in accordance with the
charger manufacturer.
How to Connect AC Charger
1. Depress the brake pedal and apply the electronic parking brake.
2. Shift to P (Park) and turn OFF the vehicle using the POWER button.
Information
If charging is initiated without the gear in
P (Park), charging will start only after the
gear is automatically shifted to P (Park).
OOSEVQ010008L
3. Unlock the vehicle before opening the charging door. From the outside the
vehicle, push on the charging door
in the area indicated by the arrow to
open the door.
Information
If you cannot open the charging door due
to freezing weather, tap lightly or remove
any ice near the charging door. Do not try
to forcibly open the charging door.
OOSEV010014L
4. Remove the charging port dust cover (1).
5. Inspect the charging port to make sure it is free from any dust or debris.
6. Hold the charging connector handle firmly and insert the connector into
the charging port all the way. If the
connector is not completely inserted
into the charging port, arcing may
occur. This may cause a fire.
Information
Charging connector AUTO/LOCK mode
The charging connector is locked in the
inlet at a different period according to which mode is selected. • LOCK mode : The connector locks
when the charging connector is plugged into the charging inlet.
• AUTO mode : The connector locks when charging starts.
For more details, refer to “Charging
Connector AUTO/ LOCK Mode” in this
chapter.
Charging ElECtriC VEhiClE (aC ChargE)
Page 32 of 548
01
1-27
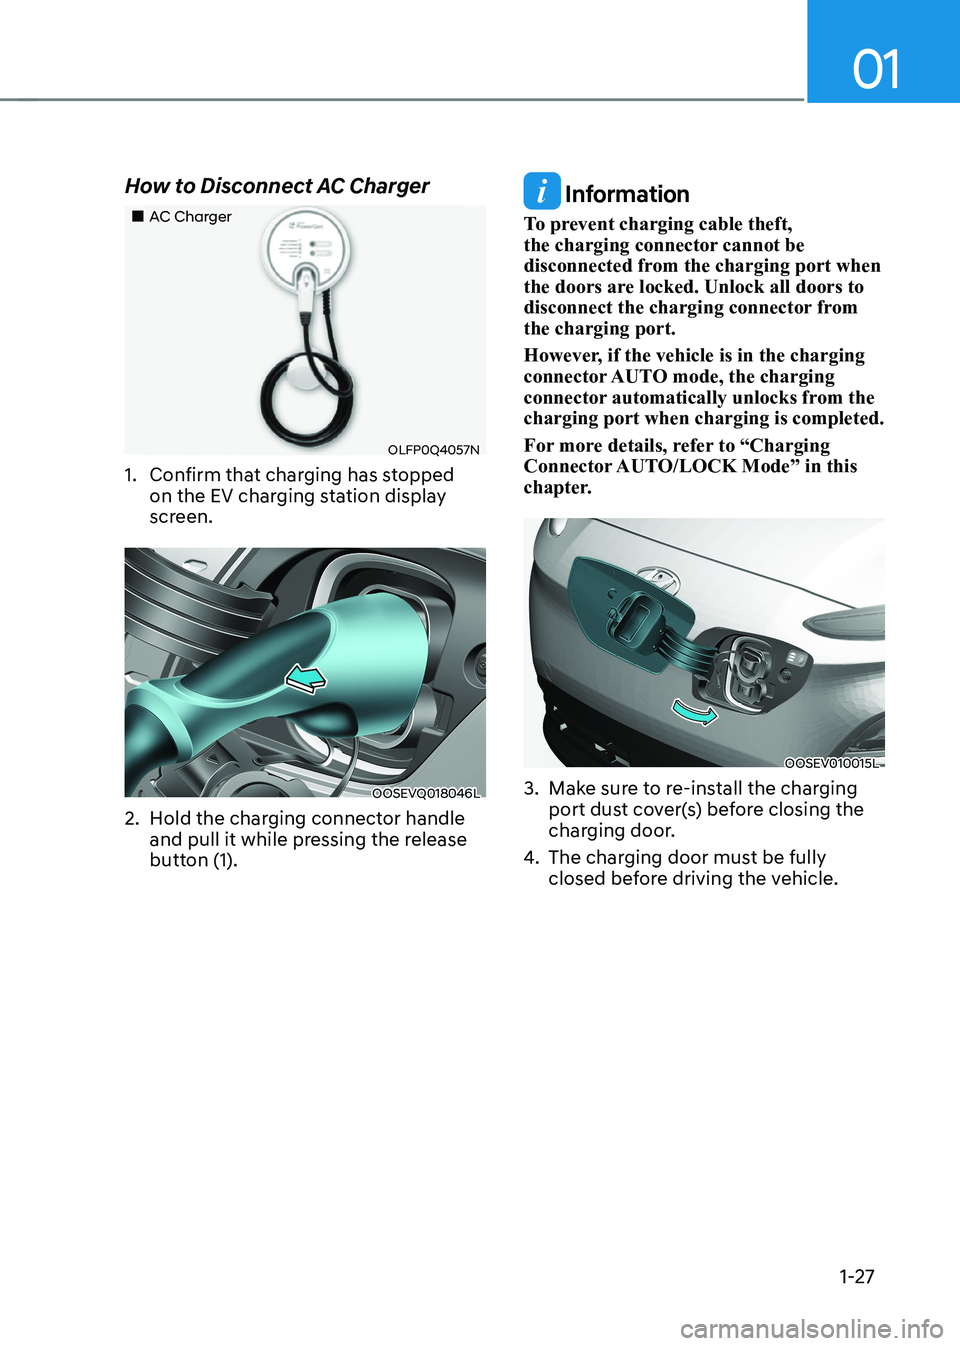
How to Disconnect AC Charger
„„AC Charger
OLFP0Q4057N
1. Confirm that charging has stopped on the EV charging station display
screen.
OOSEVQ018046L
2. Hold the charging connector handle and pull it while pressing the release
button (1).
Information
To prevent charging cable theft,
the charging connector cannot be
disconnected from the charging port when
the doors are locked. Unlock all doors to
disconnect the charging connector from the charging port.
However, if the vehicle is in the charging
connector AUTO mode, the charging
connector automatically unlocks from the charging port when charging is completed.
For more details, refer to “Charging
Connector AUTO/LOCK Mode” in this
chapter.
OOSEV010015L
3. Make sure to re-install the charging port dust cover(s) before closing the
charging door.
4. The charging door must be fully
closed before driving the vehicle.
Page 33 of 548
Foreword / Electric Vehicle System Overview
1-28
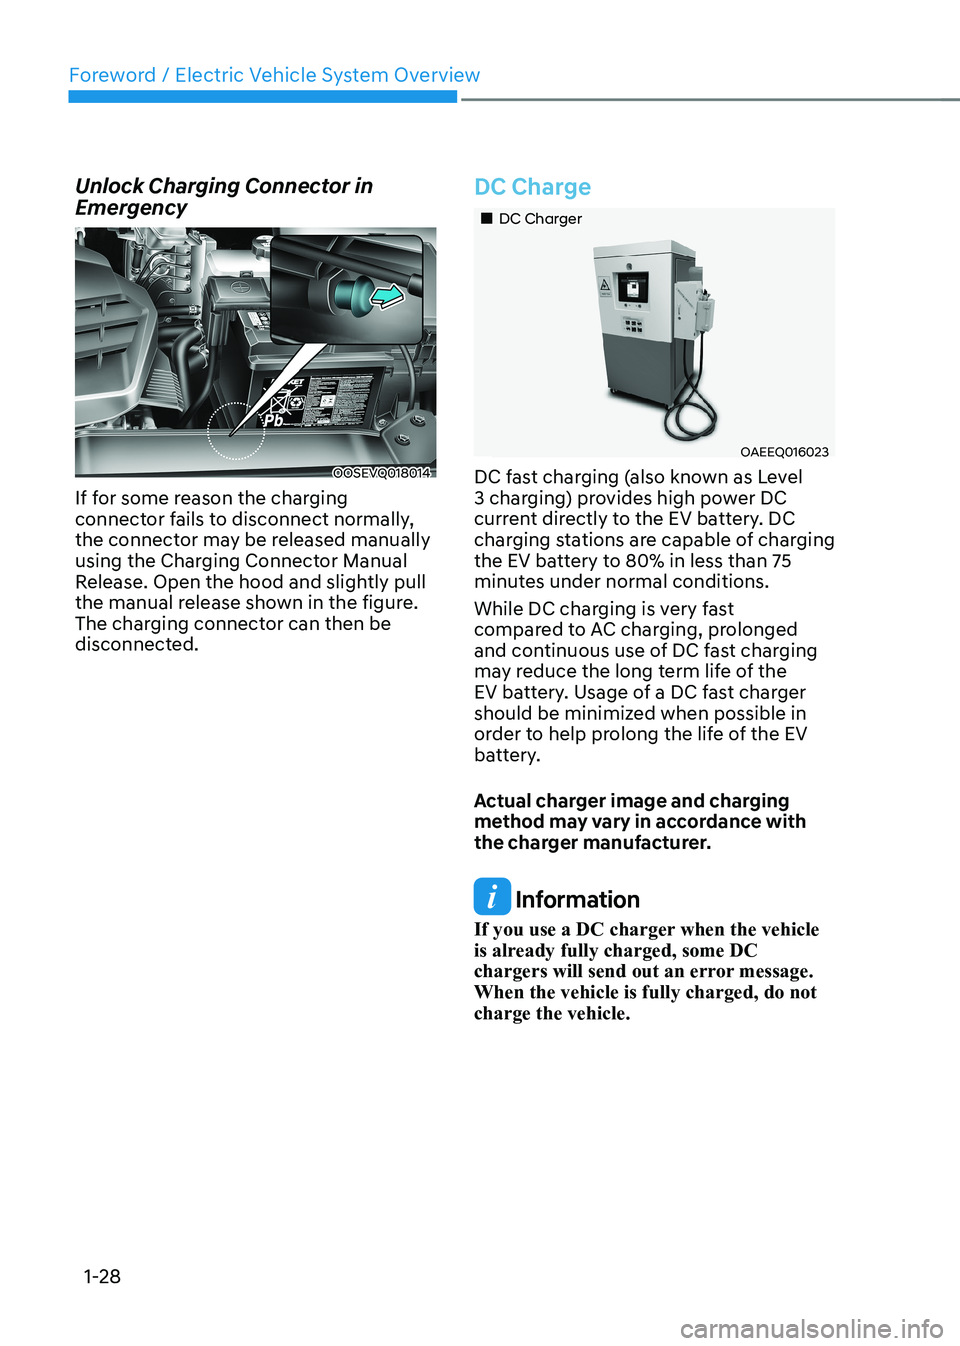
Unlock Charging Connector in
Emergency
OOSEVQ018014
If for some reason the charging
connector fails to disconnect normally,
the connector may be released manually
using the Charging Connector Manual
Release. Open the hood and slightly pull
the manual release shown in the figure.
The charging connector can then be
disconnected.
DC Charge
„„DC Charger
OAEEQ016023
DC fast charging (also known as Level
3 charging) provides high power DC
current directly to the EV battery. DC
charging stations are capable of charging
the EV battery to 80% in less than 75
minutes under normal conditions.
While DC charging is very fast
compared to AC charging, prolonged
and continuous use of DC fast charging
may reduce the long term life of the
EV battery. Usage of a DC fast charger
should be minimized when possible in
order to help prolong the life of the EV
battery.
Actual charger image and charging
method may vary in accordance with
the charger manufacturer.
Information
If you use a DC charger when the vehicle
is already fully charged, some DC
chargers will send out an error message. When the vehicle is fully charged, do not charge the vehicle.
Page 34 of 548

01
1-29
How to Connect DC Charger
1. Depress the brake pedal and apply the
electronic parking brake.
2. Shift to P (Park) and turn OFF the vehicle using the POWER button.
Information
If charging is initiated without the gear in
P (Park), charging will start only after the
gear is automatically shifted to P (Park).
OOSEVQ010008L
3. Unlock the vehicle before opening the charging door. From the outside the
vehicle, push on the charging door
in the area indicated by the arrow to
open the door.
Information
If you cannot open the charging door due
to freezing weather, tap lightly or remove
any ice near the charging door. Do not try
to forcibly open the charging door.
OOSEV011020N
4. Remove the charging port dust cover (1).
5. Inspect the charging port to make sure it is free from any dust or debris.
6. Hold the charging connector handle firmly and insert the connector into
the charging port all the way.
If the connector is not completely
inserted into the charging port, arcing
may occur. This may cause a fire.
7. Check if the charging indicator light (
) of the high voltage battery
in the instrument cluster is turned
ON. Charging is not active when the
charging indicator light (
) is OFF.
If the charging indicator light is OFF,
it may be necessary to disconnect the
charging connector from the vehicle
and repeat the connection process.
Refer to the charging station display
screen for more information.
During cold weather, DC charging
may not be available to prevent high
voltage battery degradation.
Page 40 of 548
01
1-35
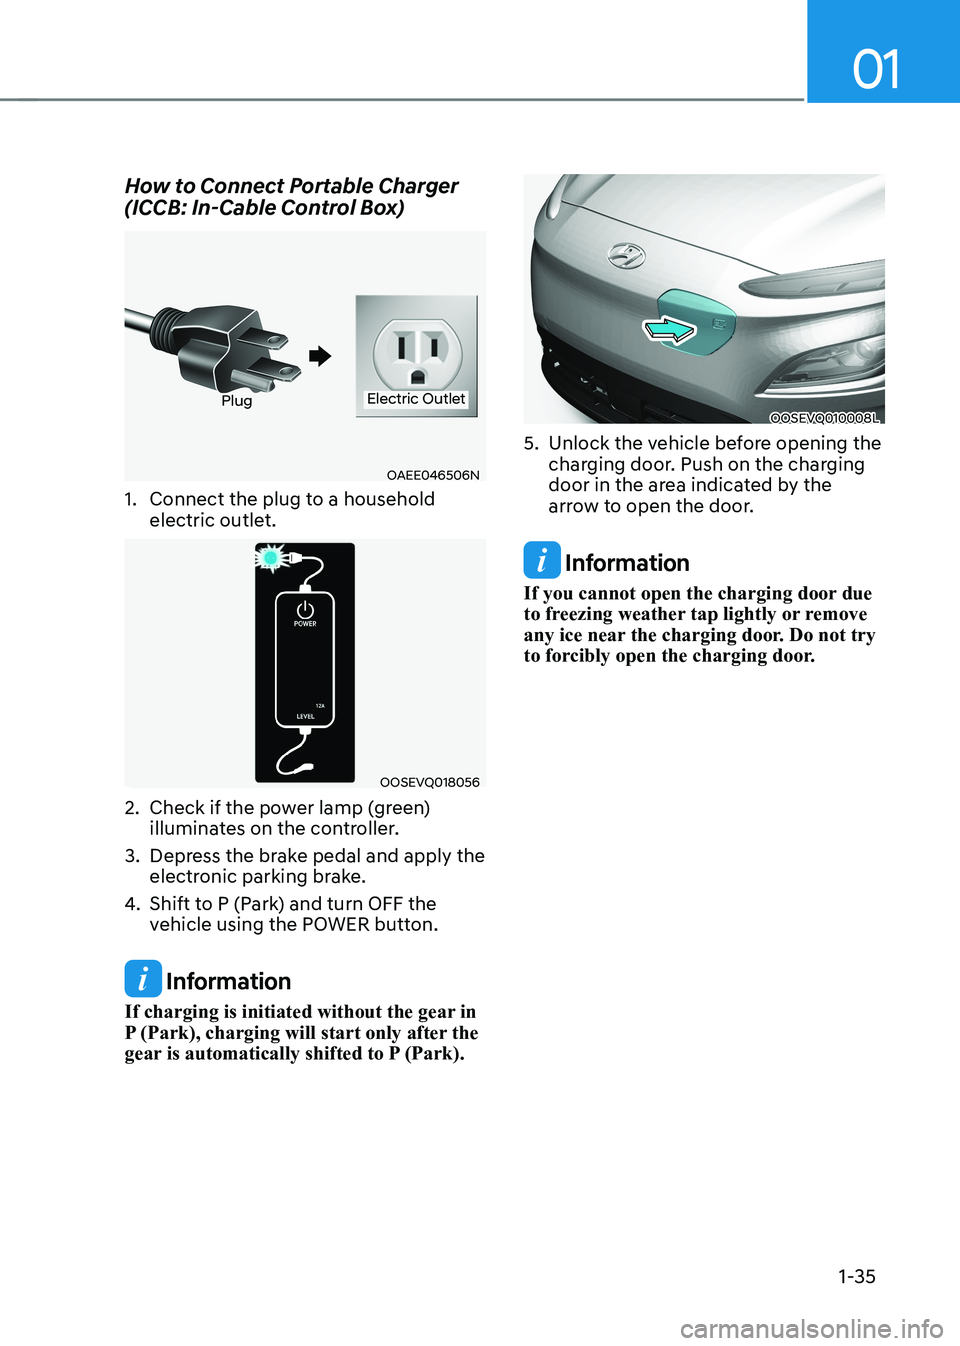
How to Connect Portable Charger
(ICCB: In-Cable Control Box)
OAEE046506N
PlugElectric Outlet
1. Connect the plug to a household electric outlet.
OOSEVQ018056
2. Check if the power lamp (green) illuminates on the controller.
3. Depress the brake pedal and apply the electronic parking brake.
4. Shift to P (Park) and turn OFF the
vehicle using the POWER button.
Information
If charging is initiated without the gear in
P (Park), charging will start only after the
gear is automatically shifted to P (Park).
OOSEVQ010008L
5. Unlock the vehicle before opening the charging door. Push on the charging
door in the area indicated by the
arrow to open the door.
Information
If you cannot open the charging door due
to freezing weather tap lightly or remove
any ice near the charging door. Do not try
to forcibly open the charging door.
Page 41 of 548
Foreword / Electric Vehicle System Overview
1-36
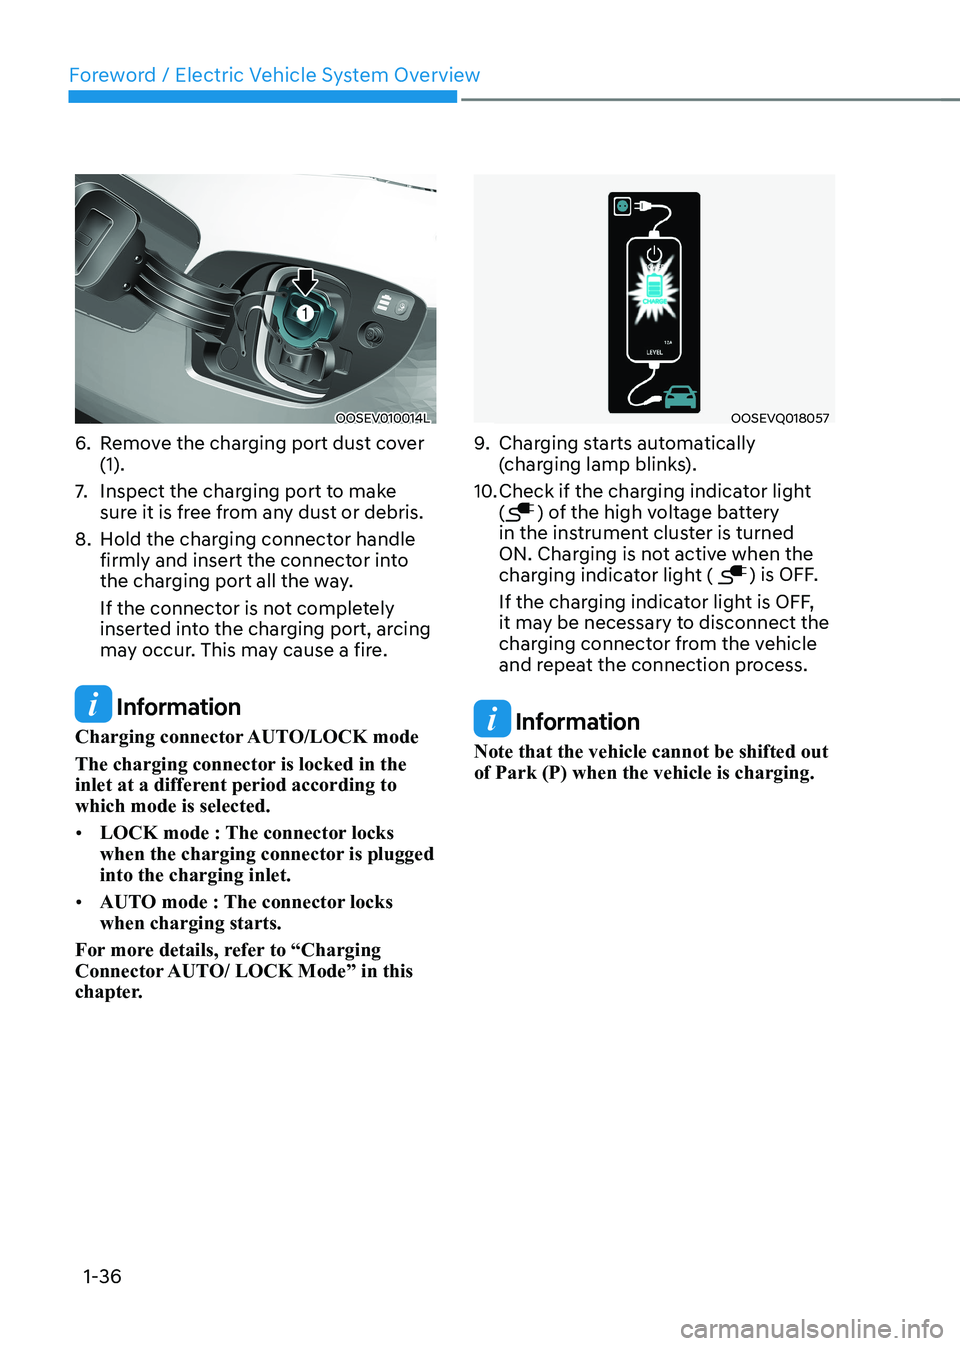
OOSEV010014L
6. Remove the charging port dust cover (1).
7. Inspect the charging port to make
sure it is free from any dust or debris.
8. Hold the charging connector handle firmly and insert the connector into
the charging port all the way.
If the connector is not completely
inserted into the charging port, arcing
may occur. This may cause a fire.
Information
Charging connector AUTO/LOCK mode
The charging connector is locked in the
inlet at a different period according to which mode is selected. • LOCK mode : The connector locks
when the charging connector is plugged into the charging inlet.
• AUTO mode : The connector locks when charging starts.
For more details, refer to “Charging
Connector AUTO/ LOCK Mode” in this
chapter.
OOSEVQ018057
9. Charging starts automatically
(charging lamp blinks).
10. Check if the charging indicator light (
) of the high voltage battery
in the instrument cluster is turned
ON. Charging is not active when the
charging indicator light (
) is OFF.
If the charging indicator light is OFF,
it may be necessary to disconnect the
charging connector from the vehicle
and repeat the connection process.
Information
Note that the vehicle cannot be shifted out of Park (P) when the vehicle is charging.
Page 47 of 548
Foreword / Electric Vehicle System Overview
1-42
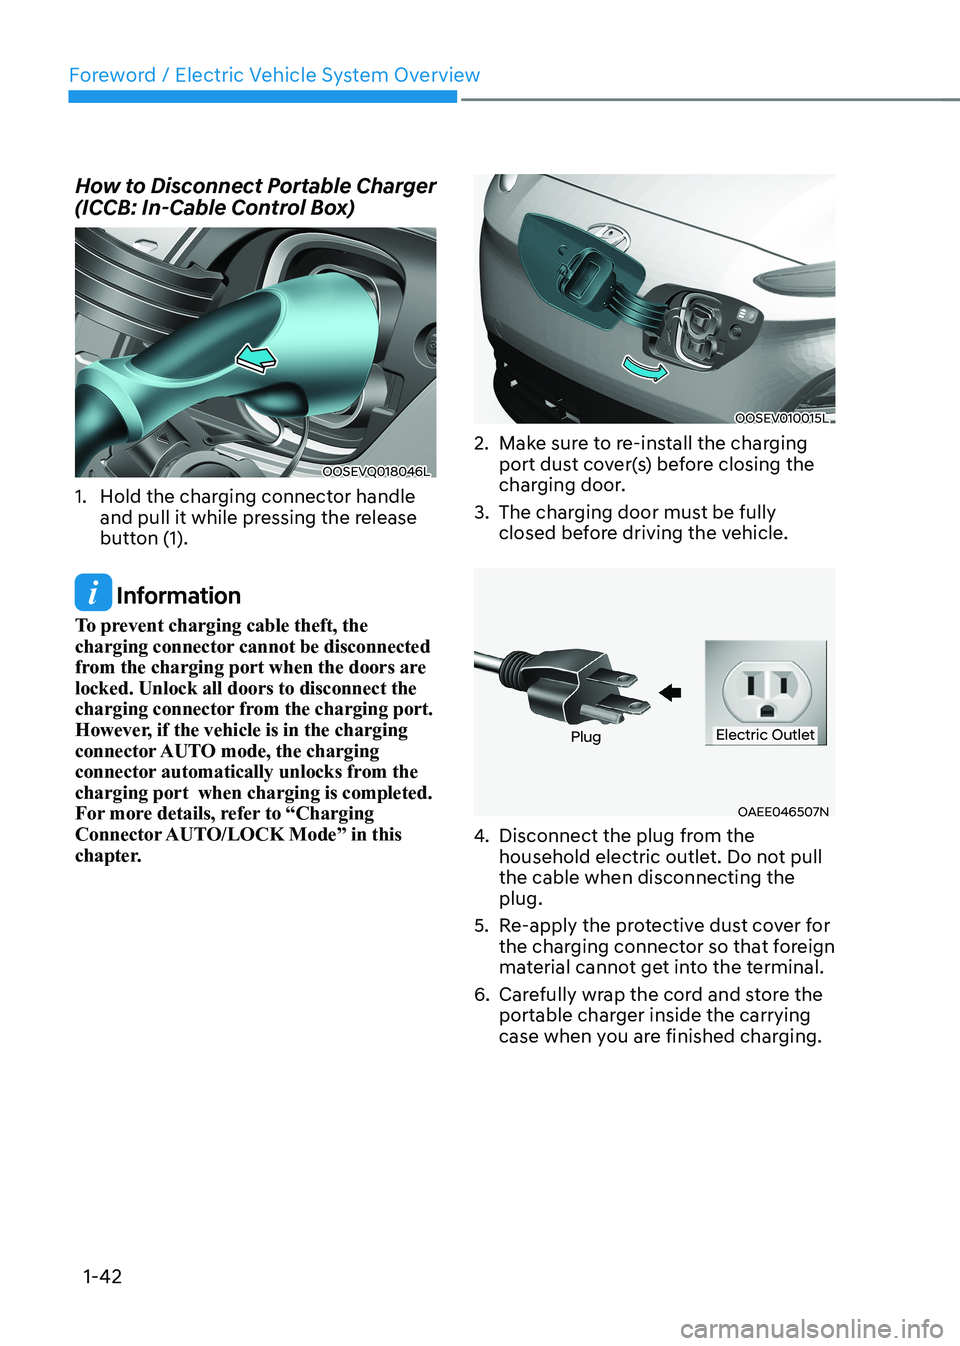
How to Disconnect Portable Charger
(ICCB: In-Cable Control Box)
OOSEVQ018046L
1. Hold the charging connector handle and pull it while pressing the release
button (1).
Information
To prevent charging cable theft, the
charging connector cannot be disconnected
from the charging port when the doors are
locked. Unlock all doors to disconnect the
charging connector from the charging port.
However, if the vehicle is in the charging
connector AUTO mode, the charging
connector automatically unlocks from the
charging port when charging is completed.
For more details, refer to “Charging
Connector AUTO/LOCK Mode” in this
chapter.
OOSEV010015L
2. Make sure to re-install the charging port dust cover(s) before closing the
charging door.
3. The charging door must be fully closed before driving the vehicle.
OAEE046507N
PlugElectric Outlet
4. Disconnect the plug from the
household electric outlet. Do not pull the cable when disconnecting the plug.
5. Re-apply the protective dust cover for the charging connector so that foreign
material cannot get into the terminal.
6. Carefully wrap the cord and store the portable charger inside the carrying
case when you are finished charging.
Page 64 of 548
01
1-59
WARNING
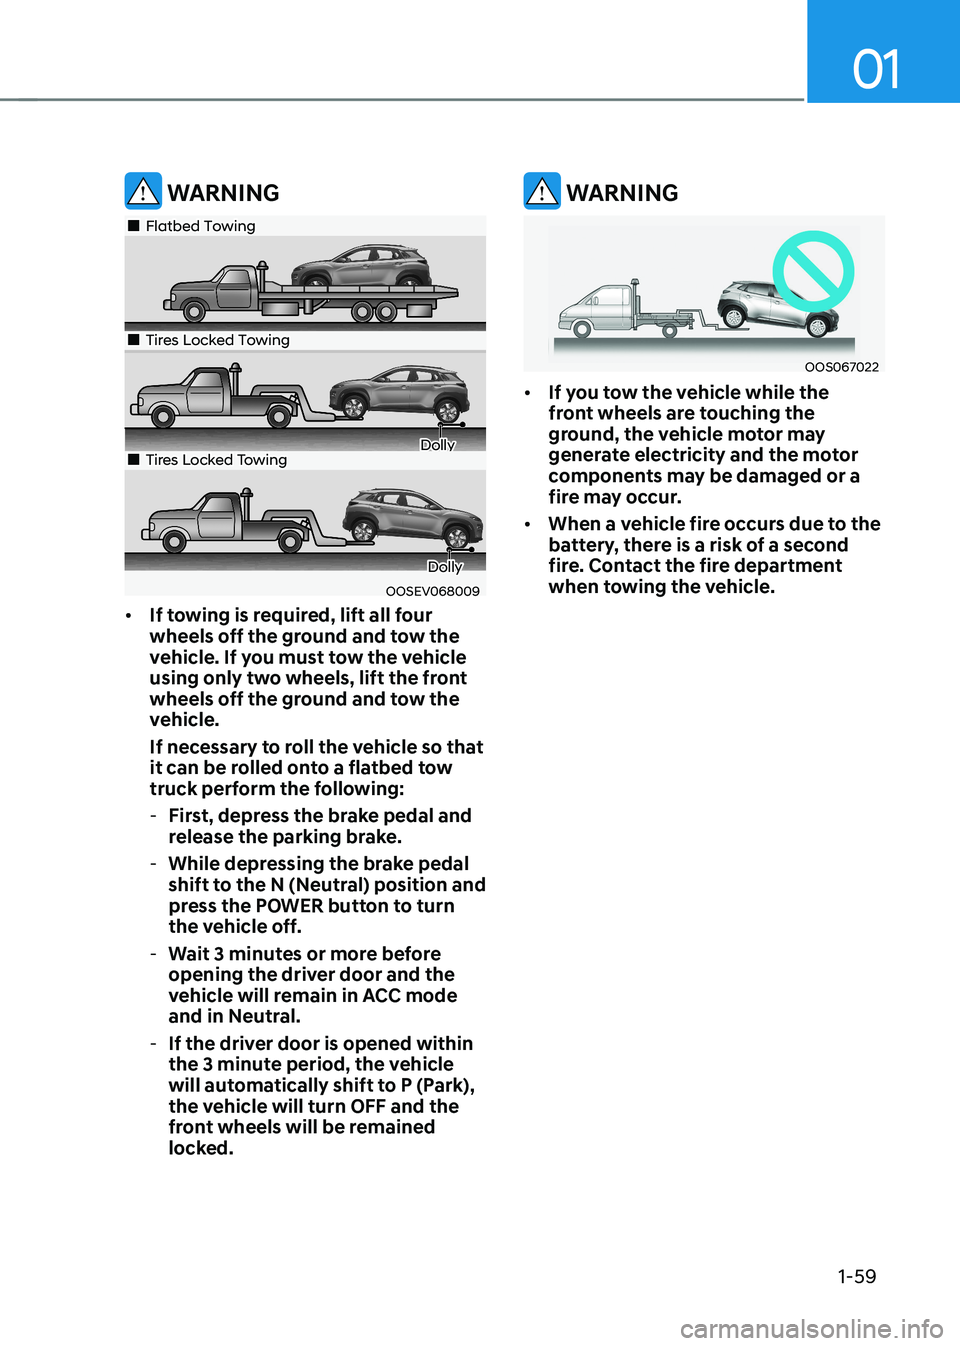
OOSEV068009
„„Flatbed Towing
„„Tires Locked Towing
Dolly„„Tires Locked Towing
Dolly
• If towing is required, lift all four
wheels off the ground and tow the
vehicle. If you must tow the vehicle
using only two wheels, lift the front
wheels off the ground and tow the
vehicle.
If necessary to roll the vehicle so that
it can be rolled onto a flatbed tow
truck perform the following:
- First, depress the brake pedal and
release the parking brake.
- While depressing the brake pedal
shift to the N (Neutral) position and
press the POWER button to turn
the vehicle off.
- Wait 3 minutes or more before
opening the driver door and the
vehicle will remain in ACC mode
and in Neutral.
- If the driver door is opened within
the 3 minute period, the vehicle
will automatically shift to P (Park),
the vehicle will turn OFF and the
front wheels will be remained
locked.
WARNING
OOS067022
• If you tow the vehicle while the
front wheels are touching the
ground, the vehicle motor may
generate electricity and the motor
components may be damaged or a
fire may occur.
• When a vehicle fire occurs due to the
battery, there is a risk of a second
fire. Contact the fire department
when towing the vehicle.