service HYUNDAI KONA EV 2023 Owner's Guide
[x] Cancel search | Manufacturer: HYUNDAI, Model Year: 2023, Model line: KONA EV, Model: HYUNDAI KONA EV 2023Pages: 548, PDF Size: 49.14 MB
Page 477 of 548

9
9. Maintenance
Motor compartment ......................................................................................... 9-3
Maintenance services ....................................................................................... 9-4
Owner’s responsibility ................................................................................................ 9-4
Owner maintenance precautions............................................................................... 9-4
Owner maintenance ......................................................................................... 9-5
Owner maintenance schedule .................................................................................... 9-5
Scheduled maintenance services ..................................................................... 9 -7
Maintenance Schedule ................................................................................................ 9 -7
Explanation of scheduled maintenance items ...............................................9-9
Cooling system ............................................................................................................ 9-9
Coolant ......................................................................................................................... 9-9
Reduction gear fluid.................................................................................................... 9-9
Brake hoses and lines.................................................................................................. 9-9Brake fluid ................................................................................................................... 9-9
Brake pads, calipers and rotors .................................................................................. 9-9
Suspension mounting bolts ........................................................................................ 9-9
Drive shafts and boots ................................................................................................ 9-9
Air conditioning refrigerant/compressor................................................................... 9-9
Coolant ............................................................................................................. 9-10
Brake fluid ......................................................................................................... 9-11
Checking the brake fluid level .................................................................................... 9-11
Washer fluid ..................................................................................................... 9-12
Checking the washer fluid level ................................................................................ 9-12
Climate control air filter................................................................................... 9-13
Filter inspection ............................................................................................... 9-13
Filter replacement ...................................................................................................... 9-13
Wiper blades .................................................................................................... 9-14
Blade inspection ......................................................................................................... 9-14
Blade replacement ................................................................................................... 9-14
Battery (12 Volt) ................................................................................................ 9-17
Battery usage.............................................................................................................. 9-18 Battery capacity label ................................................................................................ 9-18
Battery recharging ..................................................................................................... 9-18
Reset items ................................................................................................................. 9-19
Page 480 of 548
Maintenance
9-4
You should exercise the utmost care
to prevent damage to your vehicle and
injury to yourself whenever performing
any maintenance or inspection
procedures.
We recommend you have your
vehicle maintained and repaired by
an authorized HYUNDAI dealer. An
authorized HYUNDAI dealer meets
HYUNDAI’s high service quality
standards and receives technical support
from HYUNDAI in order to provide you
with a high level of service satisfaction.
Owner’s responsibility
Maintenance service and record
retention are the owner’s responsibility.
You should retain documents that show
proper maintenance has been performed
on your vehicle in accordance with
the scheduled maintenance service
charts shown on the following pages.
You need this information to establish
your compliance with the servicing
and maintenance requirements of your
vehicle warranties.
Detailed warranty information is
provided in your Service passport.
Repairs and adjustments required as a
result of improper maintenance or a lack
of required maintenance are not covered.
Owner maintenance precautions
Inadequate, incomplete or insufficient
servicing may result in operational
problems with your vehicle that could
lead to vehicle damage, an accident, or
personal injury. This chapter provides
instructions only for the maintenance
items that are easy to perform.
Several procedures can be done only
by an authorized HYUNDAI dealer with
special tools.
Your vehicle should not be modified
in any way. Such modifications may
adversely affect the performance, safety
or durability of your vehicle and may, in
addition, violate conditions of the limited
warranties covering the vehicle.
NOTICE
Improper owner maintenance during
the warranty period may affect
warranty coverage. For details, read
the separate Service Passport provided
with the vehicle. If you’re unsure
about any servicing or maintenance
procedure, we recommend that the
system be serviced by an authorized
HYUNDAI dealer.
MAINTENANCE SERVICES
Page 481 of 548

09
9-5
OWNER MAINTENANCE
WARNING
Performing maintenance work on a
vehicle can be dangerous. If you lack
sufficient knowledge and experience
or the proper tools and equipment to
do the work, we recommend that the
system be serviced by an authorized
HYUNDAI dealer. ALWAYS follow
these precautions for performing
maintenance work: • Park your vehicle on level ground,
shift to P (Park) position, apply the
parking brake, place the START/STOP
button in the OFF position.
• Block the tires (front and back) to
prevent the vehicle from moving.
Remove loose clothing or jewelry
that can become entangled in
moving parts.
• Keep flames, sparks, or smoking
materials away from the battery and
motor related parts.
The following lists are vehicle checks and
inspections that should be performed
by the owner or an authorized HYUNDAI
dealer at the frequencies indicated to
help ensure safe, dependable operation
of your vehicle.
Any adverse conditions should be
brought to the attention of your dealer as soon as possible.
These Owner Maintenance vehicle
checks are generally not covered by
warranties and you may be charged for
labor, parts and lubricants used.Owner maintenance schedule
When you stop for charging: • Check the coolant level in the coolant
reservoir.
• Check the windshield washer fluid
level.
• Check for low or under-inflated tires.
WARNING
Be careful when checking your coolant
level when the motor compartment is
hot. This may result in coolant being
blown out of the opening and cause
serious burns and other injuries.
Page 483 of 548
09
9 -7
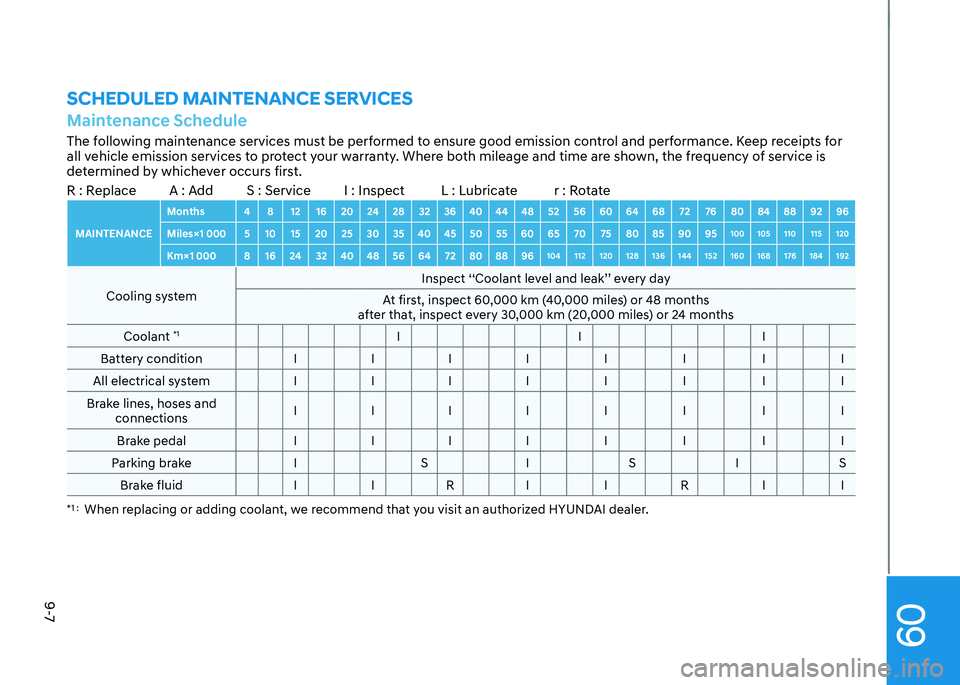
SCHEDULED MAINTENANCE SERVICESMaintenance ScheduleThe following maintenance services must be performed to ensure good emission control and performance. Keep receipts for
all vehicle emission services to protect your warranty. Where both mileage and time are shown, the frequency of service is
determined by whichever occurs first.
R : Replace A : Add S : Service I : Inspect L : Lubricate r : RotateMAINTENANCEMonths 4 8 12 16 20 24 28 32 36 40 44 48 52 56 60 64 68 72 76 80 84 88 92 96
Miles×1 000 5 10 15 20 25 30 35 40 45 50 55 60 65 70 75 80 85 90 95 100 105 110 115 120
Km×1 000 8 16 24 32 40 48 56 64 72 80 88 96 104 112 120 128 136 144 152 160 168 176 184 192
Cooling systemInspect ‘‘Coolant level and leak’’ every day
At first, inspect 60,000 km (40,000 miles) or 48 months
after that, inspect every 30,000 km (20,000 miles) or 24 months
Coolant *1
I I I
Battery condition I I I I I I I I
All electrical system I I I I I I I I
Brake lines, hoses and connections I I I I I I I I
Brake pedal I I I I I I I I
parking brake I S I S I S Brake fluid I I R I I R I I
*1 : When replacing or adding coolant, we recommend that you visit an authorized HYUNDAI dealer.
Page 484 of 548
Maintenance
9-8
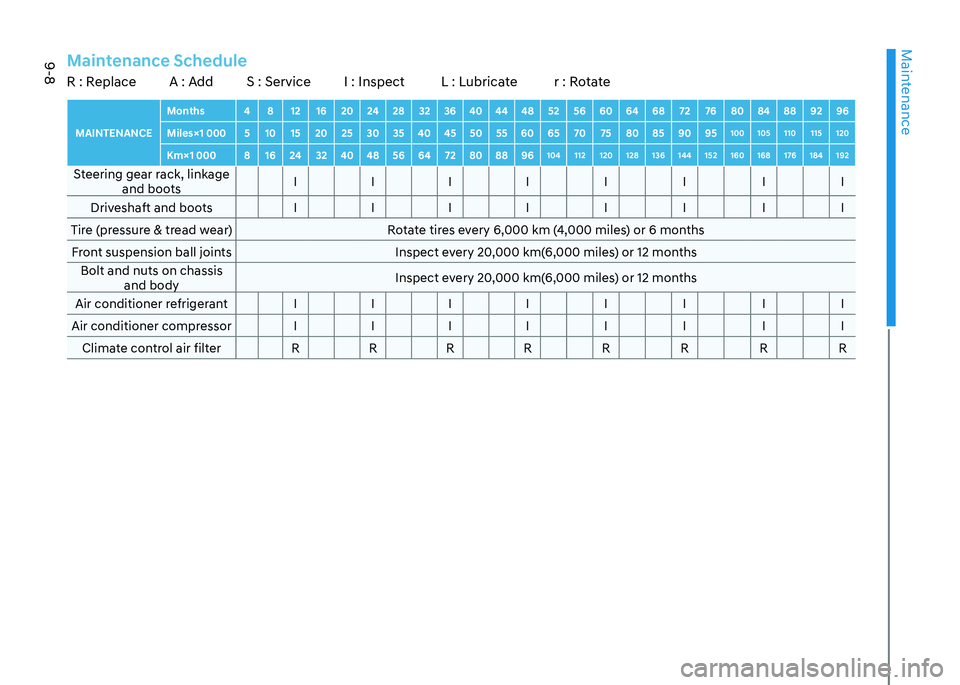
MAINTENANCEMonths 4 8 12 16 20 24 28 32 36 40 44 48 52 56 60 64 68 72 76 80 84 88 92 96
Miles×1 000 5 10 15 20 25 30 35 40 45 50 55 60 65 70 75 80 85 90 95 100 105 110 115 120
Km×1 000 8 16 24 32 40 48 56 64 72 80 88 96 104 112 120 128 136 144 152 160 168 176 184 192Steering gear rack, linkage
and boots I I I I I I I I
Driveshaft and boots I I I I I I I I
Tire (pressure & tread wear) Rotate tires every 6,000 km (4,000 miles) or 6 months Front suspension ball joints Inspect every 20,000 km(6,000 miles) or 12 months Bolt and nuts on chassis and body Inspect every 20,000 km(6,000 miles) or 12 months
Air conditioner refrigerant I I I I I I I I
Air conditioner compressor I I I I I I I I Climate control air filter R R R R R R R RMaintenance ScheduleR : Replace A : Add S : Service I : Inspect L : Lubricate r : Rotate
Page 485 of 548
09
9-9
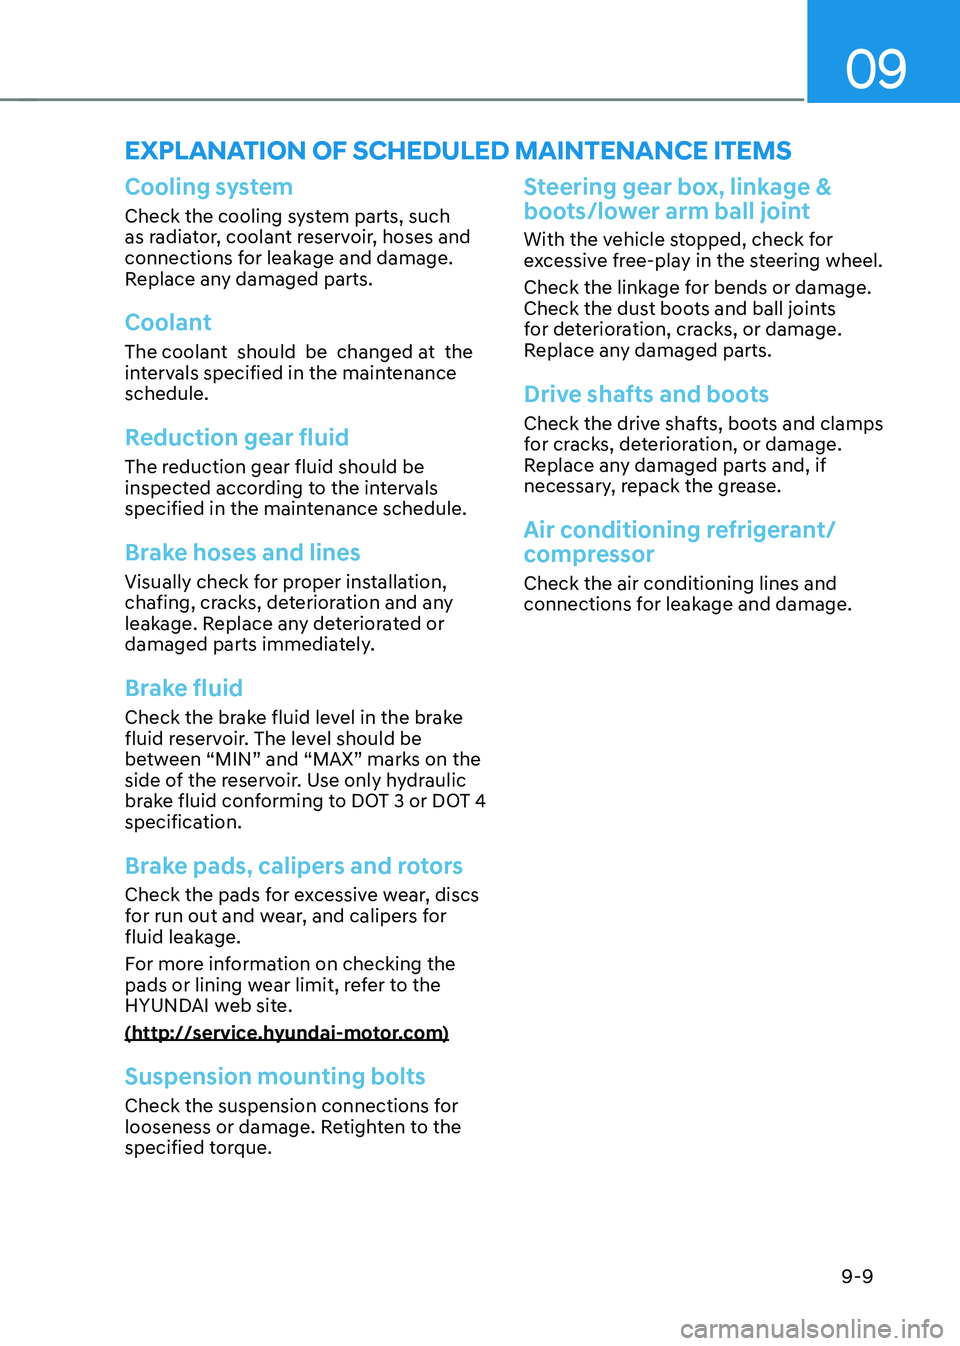
EXPLANATION OF SCHEDULED MAINTENANCE ITEMS
Cooling system
Check the cooling system parts, such
as radiator, coolant reservoir, hoses and
connections for leakage and damage.
Replace any damaged parts.
Coolant
The coolant should be changed at the
intervals specified in the maintenance schedule.
Reduction gear fluid
The reduction gear fluid should be
inspected according to the intervals
specified in the maintenance schedule.
Brake hoses and lines
Visually check for proper installation,
chafing, cracks, deterioration and any
leakage. Replace any deteriorated or
damaged parts immediately.
Brake fluid
Check the brake fluid level in the brake
fluid reservoir. The level should be
between “MIN” and “MAX” marks on the
side of the reservoir. Use only hydraulic
brake fluid conforming to DOT 3 or DOT 4
specification.
Brake pads, calipers and rotors
Check the pads for excessive wear, discs
for run out and wear, and calipers for
fluid leakage.
For more information on checking the
pads or lining wear limit, refer to the
HYUNDAI web site.
(http://service.hyundai-motor.com)
Suspension mounting bolts
Check the suspension connections for
looseness or damage. Retighten to the
specified torque.
Steering gear box, linkage &
boots/lower arm ball joint
With the vehicle stopped, check for
excessive free-play in the steering wheel.
Check the linkage for bends or damage.
Check the dust boots and ball joints
for deterioration, cracks, or damage.
Replace any damaged parts.
Drive shafts and boots
Check the drive shafts, boots and clamps
for cracks, deterioration, or damage.
Replace any damaged parts and, if
necessary, repack the grease.
Air conditioning refrigerant/
compressor
Check the air conditioning lines and
connections for leakage and damage.
Page 499 of 548
![HYUNDAI KONA EV 2023 Owners Guide 09
9-23
Tire replacement
OLMB073027
A
[A] : Tread wear indicator If the tire is worn evenly, a tread wear
indicator will appear as a solid band
across the tread. This shows there is less
than 1.6 HYUNDAI KONA EV 2023 Owners Guide 09
9-23
Tire replacement
OLMB073027
A
[A] : Tread wear indicator If the tire is worn evenly, a tread wear
indicator will appear as a solid band
across the tread. This shows there is less
than 1.6](/img/35/56170/w960_56170-498.png)
09
9-23
Tire replacement
OLMB073027
A
[A] : Tread wear indicator If the tire is worn evenly, a tread wear
indicator will appear as a solid band
across the tread. This shows there is less
than 1.6 mm (1/16 in.) of tread left on the
tire. Replace the tire when this happens.
Do not wait for the band to appear across
the entire tread before replacing the tire.
WARNING
To reduce the risk of DEATH or SERIOUS
INJURY: • Replace tires that are worn, show
uneven wear, or are damaged.
Worn tires can cause loss of braking
effectiveness, steering control, and
traction.
• Always replace tires with the same
size as each tire that was originally
supplied with this vehicle. Using
tires and wheels other than the
recommended sizes could cause
unusual handling characteristics,
poor vehicle control, or negatively
affect your vehicle’s Anti-Lock Brake
System (ABS) resulting in a serious
accident. •
When replacing tires (or wheels), it
is recommended to replace the two
front or two rear tires (or wheels)
as a pair. Replacing just one tire
can seriously affect your vehicle’s
handling. If only replacing one pair of
tires, it is recommended to install the
pair of new tires on the rear axle.
• Tires degrade over time, even when
they are not being used. Regardless
of the remaining tread, HYUNDAI
recommends that tires be replaced
after six (6) years of normal service.
• Heat caused by hot climates or
frequent high loading conditions can
accelerate the aging process. Failure
to follow this warning may cause
sudden tire failure, which could lead
to a loss of vehicle control resulting
in an accident.
Page 502 of 548
Maintenance
9-26
5. Maximum permissible inflation
pressure
This number is the greatest amount
of air pressure that should be put in
the tire. Do not exceed the maximum
permissible inflation pressure. Refer to
the Tire and Loading Information label
for recommended inflation pressure.
6. Maximum load rating
This number indicates the maximum
load in kilograms and pounds that can be
carried by the tire. When replacing the
tires on the vehicle, always use a tire that
has the same load rating as the factory
installed tire.
7. Uniform tire quality grading
Quality grades can be found where
applicable on the tire sidewall between
tread shoulder and maximum section width.
For example: TREAD WEAR 200
TRACTION AA
TEMpERATURE A
Tread wear
The tread wear grade is a comparative
rating based on the wear rate of the tire
when tested under controlled conditions
on a specified government test course.
For example, a tire graded 150 would
wear one-and-a-half times (1½) as well
on the government course as a tire
graded 100.
The relative performance of tires depends upon the actual conditions
of their use, however, and may depart
significantly from the norm due to
variations in driving habits, service
practices and differences in road
characteristics and climate.
These grades are molded on the
sidewalls of passenger vehicle tires. The
tires available as standard or optional
equipment on your vehicle may vary with
respect to grade.
Traction - AA, A, B & C
The traction grades, from highest to
lowest, are AA, A, B and C. Those grades
represent the tire’s ability to stop on wet
pavement as measured under controlled
conditions on specified government
test surfaces of asphalt and concrete.
A tire marked C may have poor traction
performance.
WARNING
The traction grade assigned to this tire
is based on straight-ahead braking
traction tests, and does not include
acceleration, cornering, hydroplaning,
or peak traction characteristics.
Page 525 of 548
09
9-49
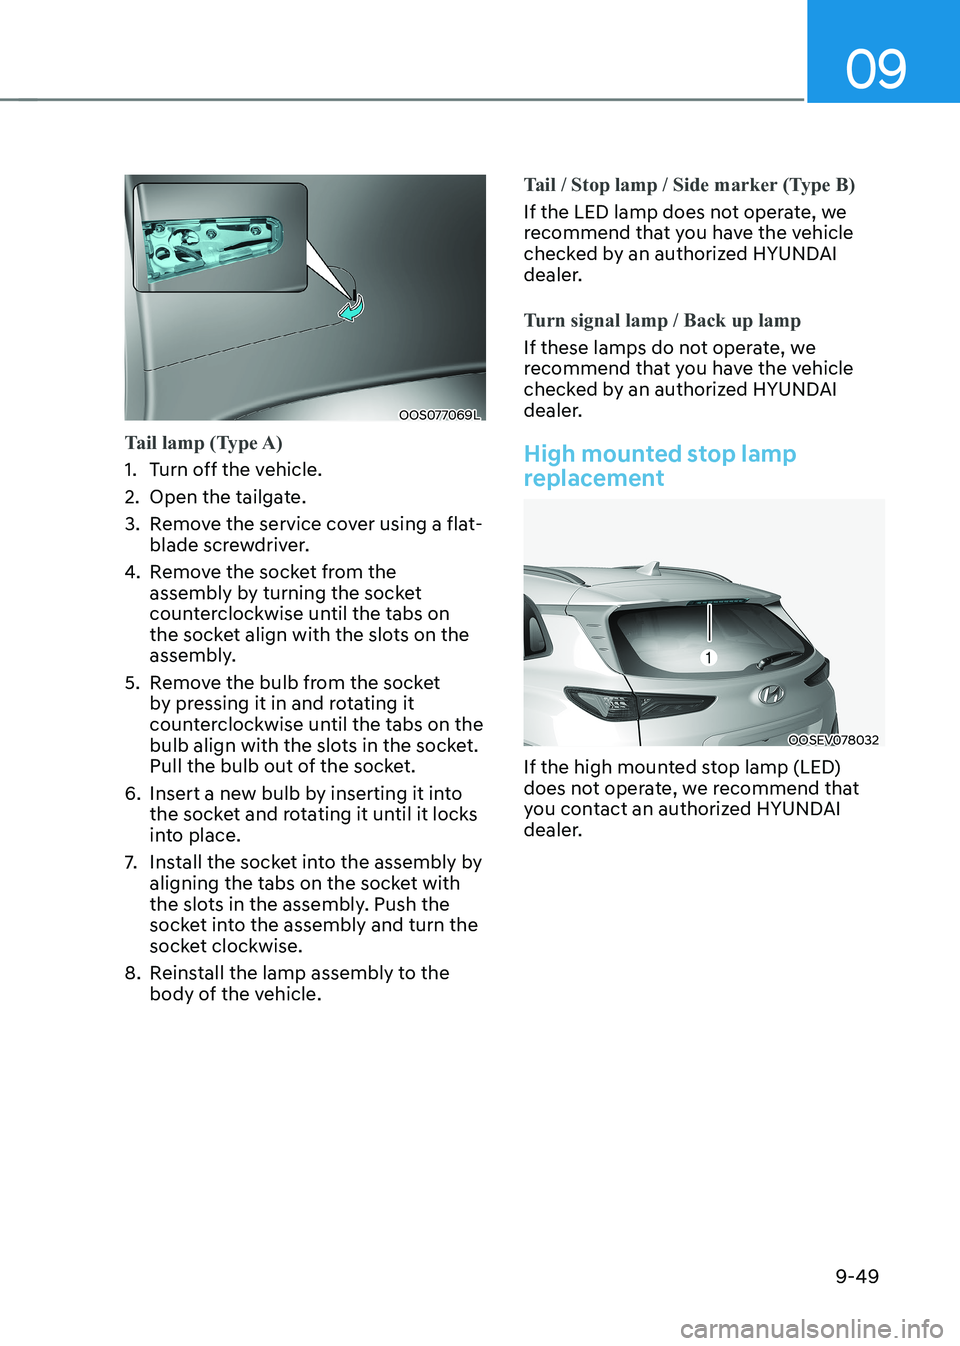
OOS077069L
Tail lamp (Type A)
1. Turn off the vehicle.
2. Open the tailgate.
3. Remove the service cover using a flat-blade screwdriver.
4. Remove the socket from the
assembly by turning the socket
counterclockwise until the tabs on
the socket align with the slots on the
assembly.
5. Remove the bulb from the socket by pressing it in and rotating it
counterclockwise until the tabs on the
bulb align with the slots in the socket.
pull the bulb out of the socket.
6. Insert a new bulb by inserting it into the socket and rotating it until it locks
into place.
7. Install the socket into the assembly by
aligning the tabs on the socket with
the slots in the assembly. push the
socket into the assembly and turn the
socket clockwise.
8. Reinstall the lamp assembly to the body of the vehicle.
Tail / Stop lamp / Side marker (Type B)
If the LED lamp does not operate, we
recommend that you have the vehicle
checked by an authorized HYUNDAI
dealer.
Turn signal lamp / Back up lamp
If these lamps do not operate, we
recommend that you have the vehicle
checked by an authorized HYUNDAI
dealer.
High mounted stop lamp
replacement
OOSEV078032
If the high mounted stop lamp (LED)
does not operate, we recommend that
you contact an authorized HYUNDAI
dealer.
Page 543 of 548
Index
I-8
Light bulbs ........................................................................................................... 9-44
Headlamp, position lamp, turn signal lamp and
daytime running light bulb replacement .........................................................9-45
High mounted stop lamp replacement ..............................................................9-49
Interior light bulb replacement ......................................................................... 9-50
License plate light bulb replacement ................................................................ 9-50
Rear combination lamp bulb replacement ........................................................9-47
Side repeater lamp replacement ....................................................................... 9-47
Lighting .............................................................................................................. 5-48
Exterior lights ................................................................................................... 5-48
Interior lights .................................................................................................... 5-52
Welcome system ............................................................................................... 5-51
M Maintenance services ............................................................................................. 9-4
Owner maintenance precautions ........................................................................ 9-4
Owner’s responsibility ....................................................................................... 9-4
Mirrors ................................................................................................................. 5-19
Inside rearview mirror ...................................................................................... 5-19
Outside rearview mirror ................................................................................... 5-30
Motor compartment ........................................................................................ 2-6/9-3
Motor number ...................................................................................................... 2-13
Navigation-Based Smart Cruise Control (NSCC) ...............................................7-80
Limitations of Navigation-based Smart Cruise Control ...................................7-83
Navigation-based Smart Cruise Control operation ..........................................7-81
Navigation-based Smart Cruise Control settings .............................................7-80
OOwner maintenance ............................................................................................... 9-5
Owner maintenance schedule ............................................................................. 9-5