check HYUNDAI PALISADE 2021 User Guide
[x] Cancel search | Manufacturer: HYUNDAI, Model Year: 2021, Model line: PALISADE, Model: HYUNDAI PALISADE 2021Pages: 612, PDF Size: 33.36 MB
Page 70 of 612
2-53
Safety system of your vehicle
2
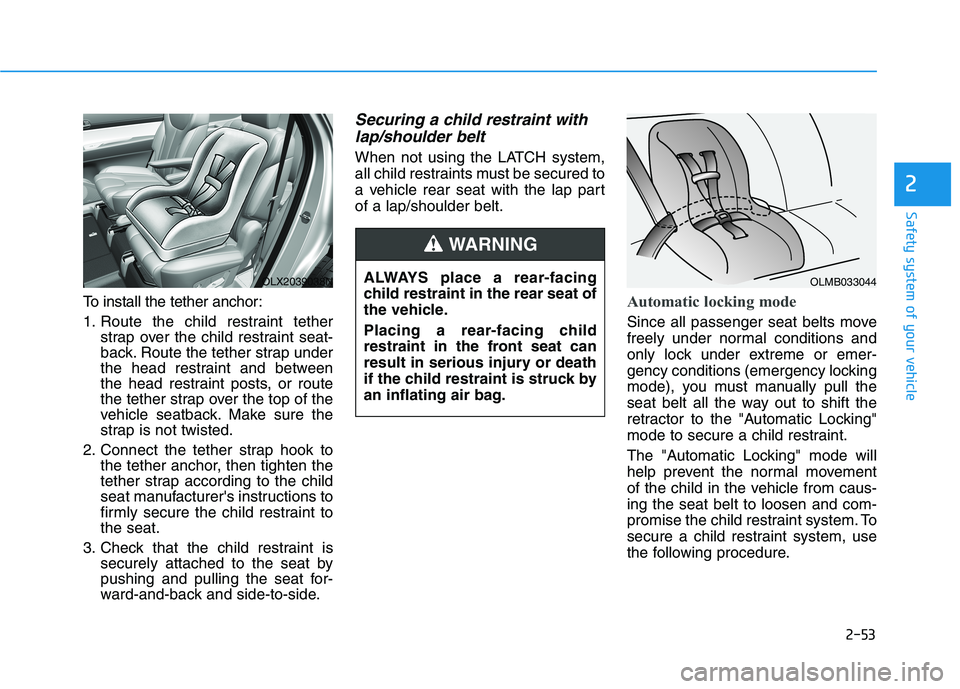
To install the tether anchor:
1. Route the child restraint tether
strap over the child restraint seat-
back. Route the tether strap under
the head restraint and between
the head restraint posts, or route
the tether strap over the top of the
vehicle seatback. Make sure the
strap is not twisted.
2. Connect the tether strap hook to
the tether anchor, then tighten the
tether strap according to the child
seat manufacturer's instructions to
firmly secure the child restraint to
the seat.
3. Check that the child restraint is
securely attached to the seat by
pushing and pulling the seat for-
ward-and-back and side-to-side.
Securing a child restraint with
lap/shoulder belt
When not using the LATCH system,
all child restraints must be secured to
a vehicle rear seat with the lap part
of a lap/shoulder belt.
Automatic locking mode
Since all passenger seat belts move
freely under normal conditions and
only lock under extreme or emer-
gency conditions (emergency locking
mode), you must manually pull the
seat belt all the way out to shift the
retractor to the "Automatic Locking"
mode to secure a child restraint.
The "Automatic Locking" mode will
help prevent the normal movement
of the child in the vehicle from caus-
ing the seat belt to loosen and com-
promise the child restraint system. To
secure a child restraint system, use
the following procedure. ALWAYS place a rear-facing
child restraint in the rear seat of
the vehicle.
Placing a rear-facing child
restraint in the front seat can
result in serious injury or death
if the child restraint is struck by
an inflating air bag.
WARNING
OLX2039038NOLMB033044
Page 72 of 612
2-55
Safety system of your vehicle
2
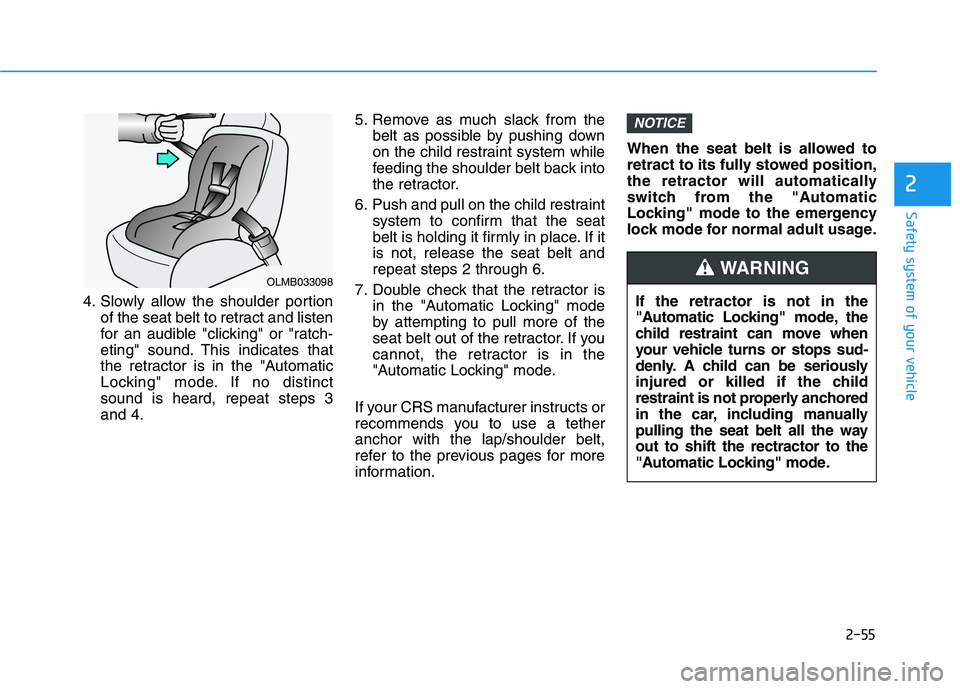
4. Slowly allow the shoulder portion
of the seat belt to retract and listen
for an audible "clicking" or "ratch-
eting" sound. This indicates that
the retractor is in the "Automatic
Locking" mode. If no distinct
sound is heard, repeat steps 3
and 4.5. Remove as much slack from the
belt as possible by pushing down
on the child restraint system while
feeding the shoulder belt back into
the retractor.
6. Push and pull on the child restraint
system to confirm that the seat
belt is holding it firmly in place. If it
is not, release the seat belt and
repeat steps 2 through 6.
7. Double check that the retractor is
in the "Automatic Locking" mode
by attempting to pull more of the
seat belt out of the retractor. If you
cannot, the retractor is in the
"Automatic Locking" mode.
If your CRS manufacturer instructs or
recommends you to use a tether
anchor with the lap/shoulder belt,
refer to the previous pages for more
information.When the seat belt is allowed to
retract to its fully stowed position,
the retractor will automatically
switch from the "Automatic
Locking" mode to the emergency
lock mode for normal adult usage.
NOTICE
OLMB033098
If the retractor is not in the
"Automatic Locking" mode, the
child restraint can move when
your vehicle turns or stops sud-
denly. A child can be seriously
injured or killed if the child
restraint is not properly anchored
in the car, including manually
pulling the seat belt all the way
out to shift the rectractor to the
"Automatic Locking" mode.
WARNING
Page 78 of 612
2-61
Safety system of your vehicle
2
The side air bags are designed to
deploy during certain side impact
collisions, depending on the crash
severity.
The side and curtain air bags on
both sides of the vehicle may deploy
if a rollover or possible rollover is
detected.
The side air bags are not designed to
deploy in all side impact or rollover
situations.Do not allow passengers to
lean their heads or bodies
onto doors, put their arms on
the doors, stretch their arms
out of the window, or place
objects between the doors
and seats.
Hold the steering wheel at the
9 o'clock and 3 o'clock posi-
tions, to minimize the risk of
injuries to your hands and
arms.
Do not use any accessory
seat covers. This could reduce
or prevent the effectiveness
of the system.
Do not place any objects over
the air bag or between the air
bag and yourself. Also, do not
attach any objects around the
area the air bag inflates such
as the door, side door glass,
front and rear pillar.
Do not place any objects
between the door and the
seat. They may become dan-
gerous projectiles if the side
air bag inflates.
Do not install any accessories
on the side or near the side air
bags.
Do not put any objects
between the side airbag label
and seat cushion. It could
cause harm if the vehicle is in
a crash severe enough to
cause the air bags to deploy.
Do not cause impact to the
doors when the ignition
switch button is in the ON
position as this may cause the
side air bags to inflate.
If the seat or seat cover is
damaged, have the vehicle
checked and repaired by an
authorized HYUNDAI dealer.To reduce the risk of serious
injury or death from an inflating
side air bag, take the following
precautions:
Seat belts must be worn at all
times to help keep occupants
positioned properly.
WARNING
Page 80 of 612
2-63
Safety system of your vehicle
2
How Does the Air Bag System
Operate?
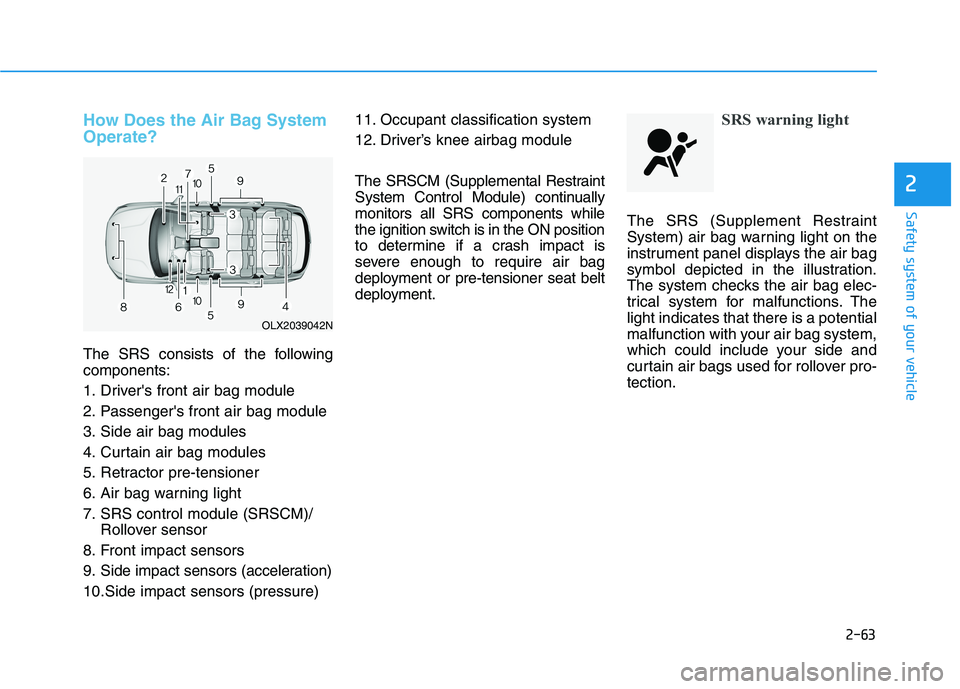
The SRS consists of the following
components:
1. Driver's front air bag module
2. Passenger's front air bag module
3. Side air bag modules
4. Curtain air bag modules
5. Retractor pre-tensioner
6. Air bag warning light
7. SRS control module (SRSCM)/
Rollover sensor
8. Front impact sensors
9. Side impact sensors (acceleration)
10.Side impact sensors (pressure)11. Occupant classification system
12. Driver’s knee airbag module
The SRSCM (Supplemental Restraint
System Control Module) continually
monitors all SRS components while
the ignition switch is in the ON position
to determine if a crash impact is
severe enough to require air bag
deployment or pre-tensioner seat belt
deployment.
SRS warning light
The SRS (Supplement Restraint
System) air bag warning light on the
instrument panel displays the air bag
symbol depicted in the illustration.
The system checks the air bag elec-
trical system for malfunctions. The
light indicates that there is a potential
malfunction with your air bag system,
which could include your side and
curtain air bags used for rollover pro-
tection.
OLX2039042N
Page 100 of 612
3-4
Convenient features of your vehicle
Remote Key (if equipped)
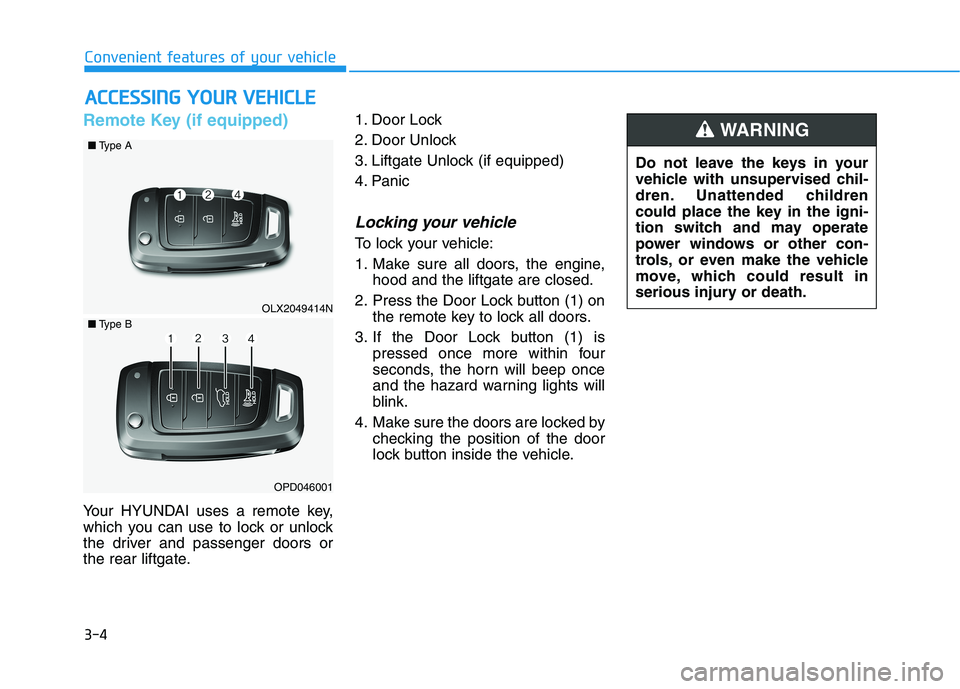
Your HYUNDAI uses a remote key,
which you can use to lock or unlock
the driver and passenger doors or
the rear liftgate.1. Door Lock
2. Door Unlock
3. Liftgate Unlock (if equipped)
4. Panic
Locking your vehicle
To lock your vehicle:
1. Make sure all doors, the engine,
hood and the liftgate are closed.
2. Press the Door Lock button (1) on
the remote key to lock all doors.
3. If the Door Lock button (1) is
pressed once more within four
seconds, the horn will beep once
and the hazard warning lights will
blink.
4. Make sure the doors are locked by
checking the position of the door
lock button inside the vehicle.
A AC
CC
CE
ES
SS
SI
IN
NG
G
Y
YO
OU
UR
R
V
VE
EH
HI
IC
CL
LE
E
Do not leave the keys in your
vehicle with unsupervised chil-
dren. Unattended children
could place the key in the igni-
tion switch and may operate
power windows or other con-
trols, or even make the vehicle
move, which could result in
serious injury or death.
WARNING
OLX2049414N
■Type A
■Type B
OPD046001
Page 104 of 612
3-8
Convenient features of your vehicle
Smart Key (if equipped)
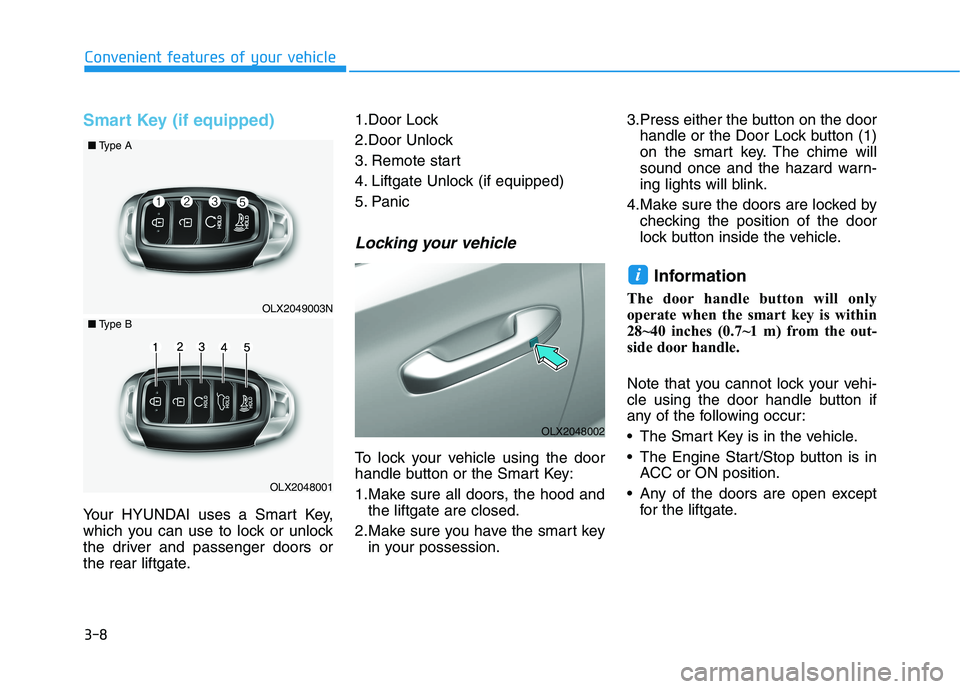
Your HYUNDAI uses a Smart Key,
which you can use to lock or unlock
the driver and passenger doors or
the rear liftgate.1.Door Lock
2.Door Unlock
3. Remote start
4. Liftgate Unlock (if equipped)
5. Panic
Locking your vehicle
To lock your vehicle using the door
handle button or the Smart Key:
1.Make sure all doors, the hood and
the liftgate are closed.
2.Make sure you have the smart key
in your possession.3.Press either the button on the door
handle or the Door Lock button (1)
on the smart key. The chime will
sound once and the hazard warn-
ing lights will blink.
4.Make sure the doors are locked by
checking the position of the door
lock button inside the vehicle.
Information
The door handle button will only
operate when the smart key is within
28~40 inches (0.7~1 m) from the out-
side door handle.
Note that you cannot lock your vehi-
cle using the door handle button if
any of the following occur:
The Smart Key is in the vehicle.
The Engine Start/Stop button is in
ACC or ON position.
Any of the doors are open except
for the liftgate.
i
OLX2049003N
■Type A
■Type B
OLX2048001
OLX2048002
Page 106 of 612
3-10
Convenient features of your vehicle
Information
• The door handle buttons will only
operate when the smart key is with-
in 28-40 inches (0.7~1m) from the
outside door handle.
• Either the driver or front passenger
door can be opened with the door
handle button when the smart key is
within this range.
• If you press the front passenger out-
side door handle with the smart key
in your possession, all the doors will
unlock.
Remote start (if equipped)
You can start the vehicle using the
remote start button (4) of the smart
key.
To start the vehicle remotely :
- Lock the doors by pressing the
door lock button (1) within 32 ft (10
m) distance from the vehicle.
- Press the remote start button for
over 2 seconds within 4 seconds
after locking the doors.Press the remote start button once to
turn off the vehicle.
Air conditioner/heater system main-
tains the status before turning off the
vehicle.
If no further action for operating/driv-
ing the vehicle is taken, the vehicle
will be turned off 10 minutes after
starting the vehicle remotely.
Opening the liftgate
Non-power liftgate
To unlock and open the liftgate:
1.Make sure you have the smart key
in your possession.
2.Press either the liftgate handle
release switch on the vehicle for
more than one second. The hazard
warning lights will blink two times
and the liftgate latch will unlock.
3.Once the liftgate is opened and
then closed, the liftgate will auto-
matically re-lock after 30 seconds.
Information
The liftgate handle switch will only
operate when the smart key is within
28 inches (0.7 m) from the liftgate
handle.
i
i
•Laws in your country may
restrict the use of remote start.
You should check country reg-
ulations before using this
remote starting system.
It is only possible to start the
vehicle remotely when shifted
to P (Park).
If the hood or the liftgate is
opened, you cannot start the
vehicle remotely.
The Remote start function
works the same as Blue Link
remote start. For further cau-
tion information, refer to the
separately supplied "Blue
Link (Infotainment system)
manual".
CAUTION
Page 117 of 612
3-21
Convenient features of your vehicle
3
The Electronic child safety lock sys-
tem can be operated for approxi-
mately 10 minutes after the engine is
turned off.
If your vehicle is equipped with the
Electronic child safety lock system,
the Child-protector rear door locks
which is manually operated is not
provided.
If Electronic child safety lock system
is activated, rear passenger cannot
open or close the rear window also.
For more details, refer to “Windows”
in this chapter.Safe Exit Assist (SEA) System
(if equipped)
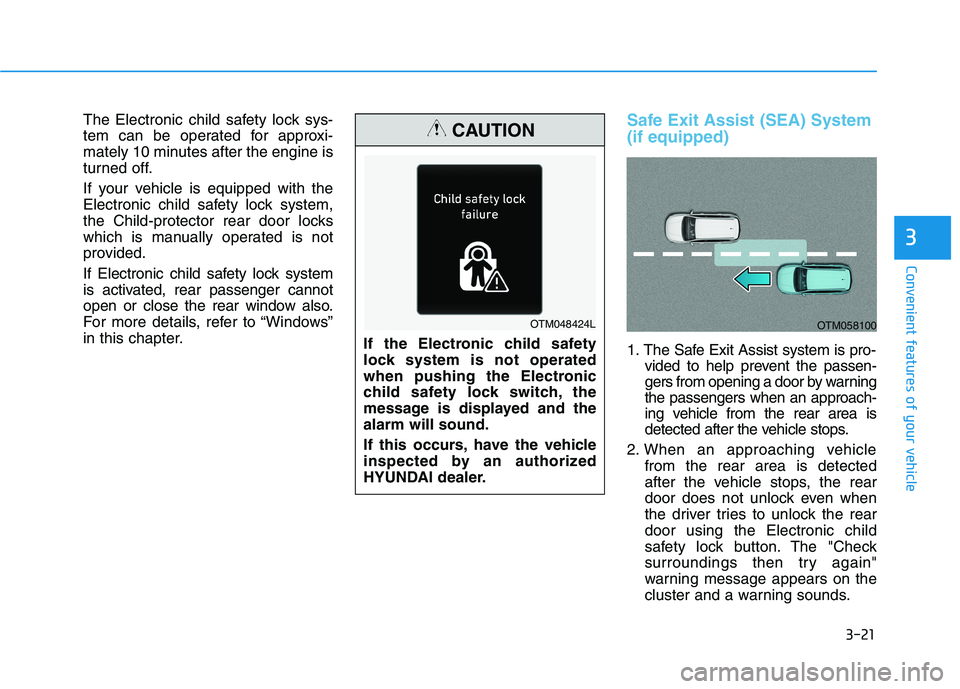
1. The Safe Exit Assist system is pro-
vided to help prevent the passen-
gers from opening a door by warning
the passengers when an approach-
ing vehicle from the rear area is
detected after the vehicle stops.
2. When an approaching vehicle
from the rear area is detected
after the vehicle stops, the rear
door does not unlock even when
the driver tries to unlock the rear
door using the Electronic child
safety lock button. The "Check
surroundings then try again"
warning message appears on the
cluster and a warning sounds. If the Electronic child safety
lock system is not operated
when pushing the Electronic
child safety lock switch, the
message is displayed and the
alarm will sound.
If this occurs, have the vehicle
inspected by an authorized
HYUNDAI dealer.
CAUTION
OTM048424LOTM058100
Page 119 of 612
3-23
Convenient features of your vehicle
3
Rear Occupant Alert (ROA)
System (if equipped)
The Rear Occupant Alert (ROA) sys-
tem is provided to help prevent exit-
ing the vehicle with the rear passen-
ger left in the vehicle.
1st alert
- When you open the front door
after opening and closing the rear
door and turning off the engine,
the "Check rear seats" warning
message appears on the cluster.
You can activate or deactivate the
Rear Occupant Alert (ROA) sys-
tem from the User Settings mode
in the cluster LCD display. The
option can be found under the fol-
lowing menu:
User Settings →Convenience →
Rear Occupant Alert 2nd alert (if equipped)
- After the 1st alert the 2nd alert
operates when any movement is
detected in the vehicle after the
driver's door is closed and all the
doors are locked. The horn will
activate for about 25 seconds. If
the system continues to detect a
movement the alert operates up
to 8 times.
- Unlock the door with the remote
key or smart key to stop the alert.
- The system detects movement in
the vehicle for 24 hours after the
door is locked.
- The 2nd alert is activated only
after the prior activation of the 1st
alert.
The Safe Exit Assist (SEA)
system will not operate if
there is a malfunction with the
Blind-Spot Collision Warning
(BCW) system as follows:
- When the BCW warning
message appears
When the BCW sensor or the
sensor surrounding is pol-
luted or covered
- When the BCW does not
warn or warns wrongly
For more details, refer to cau-
tions and limitations in "Blind-
Spot Collision Warning (BCW)"
in chapter 5.
The system does not detect
every obstacle approaching
the vehicle exit.
The driver and passenger are
responsible for any obstacles
while exiting the vehicle.
Always check the surrounding
before you exit the vehicle.
WARNING
Page 121 of 612
3-25
Convenient features of your vehicle
3
Even if your vehicle is
equipped with the Rear
Occupant Alert (ROA) system,
always make sure you check
the rear seat before you get
off the vehicle.
The alert may not operate if:
- The movement does not
continue for a certain period
of time or the movement is
small.
- The rear passenger is cov-
ered with an obstacle such
as a blanket.
- Also, always be cautious of
the passenger’s safety as
the detection function and
2nd alert may not operate
according to the surround-
ing environment and certain
conditions.
- If a child sits on a vehicle
seat without a child restraint
system.
WARNING