oil change HYUNDAI SANTA CRUZ 2022 Owners Manual
[x] Cancel search | Manufacturer: HYUNDAI, Model Year: 2022, Model line: SANTA CRUZ, Model: HYUNDAI SANTA CRUZ 2022Pages: 598, PDF Size: 9.88 MB
Page 25 of 598
02
2-13
Recommended SAE Viscosity Number
CAUTION
Always be sure to clean the area around any filler plug, drain plug, or dipstick before
checking or draining any lubricant. This is especially important in dusty or sandy
areas and when the vehicle is used on unpaved roads. Cleaning the plug and dipstick
areas will prevent dirt and grit from entering the engine and other mechanisms that
could be damaged.
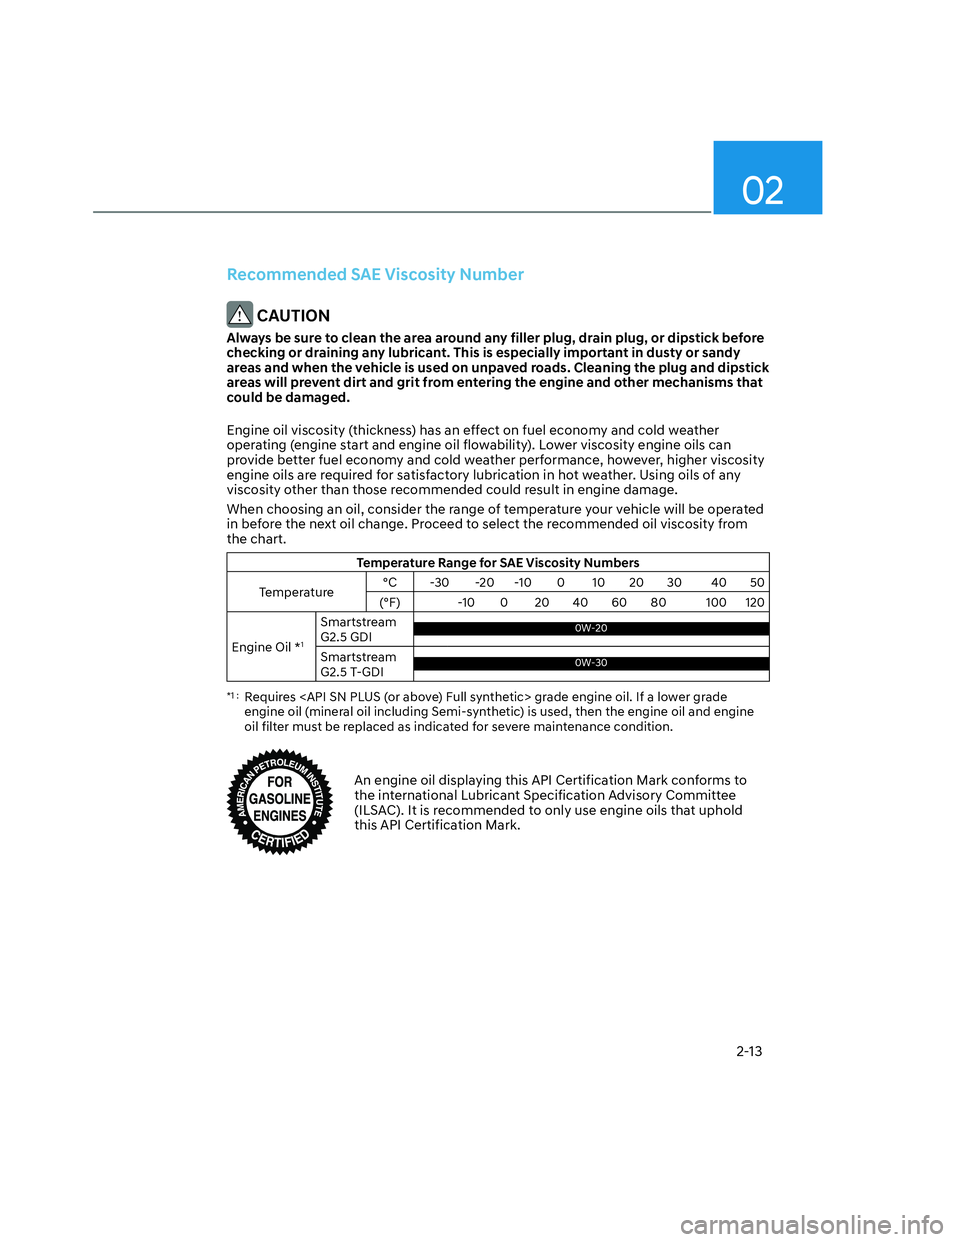
Engine oil viscosity (thickness) has an effect on fuel economy and cold weather
operating (engine start and engine oil flowability). Lower viscosity engine oils can
provide better fuel economy and cold weather performance, however, higher viscosity
engine oils are required for satisfactory lubrication in hot weather. Using oils of any
viscosity other than those recommended could result in engine damage.
When choosing an oil, consider the range of temperature your vehicle will be operated
in before the next oil change. Proceed to select the recommended oil viscosity from
the chart.
Temperature Range for SAE Viscosity Numbers
Temperature°C -30 -20 -10 0 10 20 30 40 50
(°F) -10 0 20 40 60 80 100 120
Engine Oil *
1
Smartstream
G2.5 GDI0W-20
Smartstream
G2.5 T-GDI0W-30
*1 : Requires
engine oil (mineral oil including Semi-synthetic) is used, then the engine oil and engine
oil filter must be replaced as indicated for severe maintenance condition.
An engine oil displaying this API Certification Mark conforms to
the international Lubricant Specification Advisory Committee
(ILSAC). It is recommended to only use engine oils that uphold
this API Certification Mark.
Page 226 of 598
Convenient Features
5-90
System Operation
Ventilation
1. Set the mode to the position.
2. Set the air intake control to the
outside (fresh) air position.
3. Set the temperature control to the
desired position.
4. Set the fan speed control to the
desired speed.
Heating
1. Set the mode to the position.
2. Set the air intake control to the
outside (fresh) air position.
3. Set the temperature control to the
desired position.
4. Set the fan speed control to the
desired speed.
5. If desired, turn the air conditioning ON
with the temperature control knob set
to heat in order to dehumidify the air
before it enters into the cabin.
If the windshield fogs up, set the mode
to the
or position.
Operation Tips
• To help keep dust or unpleasant fumes
from entering the vehicle through the
ventilation system, temporarily set the
air intake control to the recirculated
air position. Be sure to return the
control to the fresh air position when
the irritation has passed to keep fresh
air in the vehicle. This will help keep
the driver alert and comfortable.
• To prevent interior fog on the
windshield, set the air intake control
to the fresh air position and fan speed
to the desired position, turn on the air
conditioning system, and adjust the
temperature control to the desired
temperature.
Air conditioning
HYUNDAI Air Conditioning Systems are
filled with R-1234yf refrigerant.
1. Start the vehicle.
2. Press the air conditioning button.
3. Set the mode to the Face Level
mode.
4. Set the air intake control to
Recirculation mode temporarily to
allow the cabin to cool quickly. When
the desired temperature in the cabin
is reached, change the air intake
control back to Fresh mode.
5. Adjust the fan speed control and
temperature control to maintain
maximum comfort.
When maximum cooling is desired, set
the temperature control to the lowest
position, then set the fan speed control
to the highest setting.
NOTICE
• When using the air conditioning
system, monitor the engine
temperature gauge closely while
driving up hills or in heavy traffic
when outside temperatures are high.
Air conditioning system operation
when climbing a steep grade or in
high outside ambient temperatures
can cause engine overheating.
Continue to use the fan, but turn
the air conditioning system off if the
engine temperature gauge indicates
engine overheating.
• The air conditioning evaporator
(cooling coil) shall never be repaired
or replaced with one removed from
a used or salvaged vehicle and new
replacement MAC evaporators shall
be certified (and labeled) as meeting
SAE Standard J2842.
Page 239 of 598
05
5-103
Operation Tips
• To help keep dust or unpleasant fumes
from entering the vehicle through the
ventilation system, temporarily set the
air intake control to the recirculated
air position. Be sure to return the
control to the fresh air position when
the irritation has passed to keep fresh
air in the vehicle. This will help keep
the driver alert and comfortable.
• To prevent interior fog on the
windshield, set the air intake control
to the fresh air position and fan speed
to the desired position, turn on the air
conditioning system, and adjust the
temperature control to the desired
temperature.
1. Start the vehicle.
2. Press the air conditioning button.
3. Set the mode to the Face Level
mode.
4. Set the air intake control to
Recirculation mode temporarily to
allow the cabin to cool quickly. When
the desired temperature in the cabin
is reached, change the air intake
control back to Fresh mode.
5. Adjust the fan speed control and
temperature control to maintain
maximum comfort.
When maximum cooling is desired, set
the temperature control to the lowest
position, then set the fan speed control
to the highest setting.
NOTICE
• When using the air conditioning
system, monitor the engine
temperature gauge closely while
driving up hills or in heavy traffic
when outside temperatures are high.
Air conditioning system operation
when climbing a steep grade or in
high outside ambient temperatures
can cause engine overheating.
Continue to use the fan, but turn
the air conditioning system off if the
engine temperature gauge indicates
engine overheating.
• The air conditioning evaporator
(cooling coil) shall never be repaired
or replaced with one removed from
a used or salvaged vehicle and new
replacement MAC evaporators shall
be certified (and labeled) as meeting
SAE Standard J2842.
Page 277 of 598
06
6-3
WARNING
Carbon monoxide (CO) gas is toxic. Breathing CO can cause unconsciousness and
death.
Engine exhaust contains carbon monoxide which cannot be seen or smelled.
Do not inhale engine exhaust.
If at any time you smell engine exhaust inside the vehicle, open the windows
immediately. Exposure to CO can cause unconsciousness and death by asphyxiation.
Be sure the exhaust system does not leak.
The exhaust system should be checked whenever the vehicle is raised to change the
oil or for any other purpose. If you hear a change in the sound of the exhaust or if you
drive over something that strikes the underneath side of the vehicle, have the exhaust
system checked as soon as possible by an authorized HYUNDAI dealer.
Do not run the engine in an enclosed area.
Letting the engine idle in your garage, even with the garage door open, is a hazardous
practice. Run the engine only long enough to start the engine and to move the vehicle
out of the garage.
Avoid idling the engine for prolonged periods with people inside the vehicle.
If it is necessary to idle the engine for a prolonged period with people inside the
vehicle, be sure to do so only in an open area with the air intake set at “Fresh” and fan
control set to high so fresh air is drawn into the interior.
Keep the air intakes clear.
To assure proper operation of the ventilation system, keep the ventilation air intakes
located in front of the windshield clear of snow, ice, leaves, or other obstructions.
WARNING
CALIFORNIA PROPOSITION 65 WARNING
Engine exhaust and a wide variety of automobile components including
components found in the interior furnishings in a vehicle, contain or emit harmful
chemicals known to the State of California to cause cancer and birth defects and
reproductive harm. In addition, certain fluids contained in vehicles and certain
products of components contain or emit chemicals known to the State of California
to cause cancer and birth defects or other reproductive harm.
Page 296 of 598
Driving Your Vehicle
6-22
• The advanced wet-clutch dual clutch
transmission in your vehicle can be
thought of as an automatically shifting
manual transmission. It gives the
driving feel of a manual transmission,
yet provides the ease of a fully
automatic transmission.
• When D (Drive) is selected, the
transmission will automatically
shift through the gears similar to a
conventional automatic transmission.
With a wet-type dual clutch
transmission, however, the engine
torque that is transmitted directly
from the engine to the transmission
is transferred by a clutch pack that
is lubricated in oil. The oil's primary
purpose is to cool the clutch, and
because of lubricating properties of
the oil and this cooling effect, gear
shifts are smooth as well as direct.
• The wet-type dual clutch transmission
allows for better acceleration
performance and increased fuel
efficiency while driving. But it differs
from a conventional automatic
transmission because it does not
incorporate a torque converter.
Instead, the transition from one gear
to the next is managed by clutch slip,
especially at lower speeds.
As a result, shifts are sometimes more
noticeable, and a light vibration can
be felt as the transmission shaft speed
is matched with the engine shaft
speed. This is a normal condition of
the dual clutch transmission.
• The wet-type clutch transfers torque
more directly and provides a direct
drive feeling which may feel different
from a conventional automatic
transmission. This may be more
noticeable when launching the vehicle
from a stop or when traveling at low,
stop-and-go vehicle speeds. • When rapidly accelerating from a
lower vehicle speed, the engine
rpm may increase dramatically as a
result of clutch slip as the dual clutch
transmission selects the correct gear.
This is a normal condition.
• When accelerating from a stop on
an incline, press the accelerator
smoothly and gradually to avoid any
shudder feeling or jerkiness.
• When traveling at a lower vehicle
speed, if you release the accelerator
pedal quickly, you may feel engine
braking before the transmission
changes gears. This engine braking
feeling is similar to operating a
manual transmission at low speed.
• When driving downhill, you may
wish to move the gear shift lever to
Manual Shift mode and downshift to
a lower gear in order to control your
speed without using the brake pedal
excessively.
• When you turn the engine on and off,
you may hear clicking sounds as the
system goes through a self-test. This
is a normal sound for the dual clutch
transmission.
• During the first 1000 miles (1,500km),
you may feel that the vehicle may not
be smooth when accelerating at low
speed. During this break-in period, the
shift quality and performance of your
new vehicle is continuously optimized.
Page 324 of 598
Driving Your Vehicle
6-50
Various driving situations, which you may
encounter in SMART mode
• The driving mode automatically
changes to SMART SPORT, when you
abruptly accelerate the vehicle or
repetitively operate the steering
wheel (Your driving is categorized
to be sporty.). In this mode, your
vehicle drives in a lower gear for
abrupt accelerating/decelerating
and increases the engine brake
performance.
• You may still sense the engine
braking performance, even when
you release the accelerator pedal in
SMART SPORT mode. It is because
your vehicle remains in lower gear
over a certain period of time for next
acceleration. Thus, it is a normal
driving situation, not indicating any
malfunction.
• The driving mode automatically
changes to SMART SPORT mode only
in harsh driving situations. In most
of the normal driving situations, the
driving mode sets to be in SMART
NORMAL mode.
Limitation of SMART mode
The SMART mode may be limited in
following situations. (The OFF indicator
illuminates in those situations.)
• The driver manually moves the shift
lever : It deactivates SMART mode.
The vehicle drives, as the driver
manually moves the shift lever.
• The vehicle is driven using the paddle
shifter (manual shift mode) : SMART
mode is deactivated determining that
the driver wants to drive the vehicle
manually
• Cruise Control or Smart Cruise Control
is activated : Cruise Control or Smart
Cruise Control may deactivate the
SMART mode. When a higher system
is set by Cruise Control or Smart
Cruise Control, it starts to control
vehicle speed and deactivates
SMART mode. (SMART mode is not
deactivated just by activing Cruise
Control or Smart Cruise Control.)
• The transmission oil temperature is either
extremely low or extremely high : The
SMART mode can be active in most of
the normal driving situations. However,
an extremely high/ low transmission oil
temperature may temporarily deactivate
the SMART mode, because the
transmission condition is out of normal
operation condition.
Page 336 of 598
Driving Your Vehicle
6-62
Chain Installation
When installing tire chains, follow the
manufacturer’s instructions and mount
them as tightly possible. Drive slowly
(less than 20 mph (30 km/h)) with
chains installed. If you hear the chains
contacting the body or chassis, stop and
tighten them. If they still make contact,
slow down until the noise stops. Remove
the tire chains as soon as you begin
driving on cleared roads.
When mounting snow chains, park the
vehicle on level ground away from traffic.
Turn on the vehicle Hazard Warning
Flasher and place a triangular emergency
warning device behind the vehicle (if
available). Always place the vehicle in P
(Park), apply the parking brake and turn
off the engine before installing snow
chains.
NOTICE
When using tire chains:
• Wrong size chains or improperly
installed chains can damage your
vehicle’s brake lines, suspension,
body and wheels.
• Use SAE “S” class or wire chains.
• If you hear noise caused by chains
contacting the body, retighten the
chain to prevent contact with the
vehicle body.
• To prevent body damage, retighten
the chains after driving 0.3~0.6 miles
(0.5~1.0 km).
• Do not use tire chains on vehicles
equipped with aluminum wheels. If
unavoidable, use a wire type chain.
• Use wire chains less than 0.47 in.
(12mm) thick to prevent damage to
the chain’s connection.
Winter Precautions
Use high quality ethylene glycol coolant
Your vehicle is delivered with high
quality ethylene glycol coolant in the
cooling system. It is the only type of
coolant that should be used because it
helps prevent corrosion in the cooling
system, lubricates the water pump and
prevents freezing. Be sure to replace or
replenish your coolant in accordance
with the maintenance schedule in
chapter 9. Before winter, have your
coolant tested to assure that its freezing
point is sufficient for the temperatures
anticipated during the winter.
Check battery and cables
Winter temperatures affect battery
performance. Inspect the battery and
cables, as specified in chapter 9. The
battery charging level can be checked
by an authorized HYUNDAI dealer or in a
service station.
Change to “winter weight” oil if
necessary
In some regions during winter, it is
recommended to use the “winter
weight” oil with lower viscosity In
addition, replace the engine oil and filter
if it is close to the next maintenance
interval. Fresh engine oil ensures
optimum engine operation during the
winter months. For further information,
refer to chapter 2. When you are not sure
about a type of winter weight oil, consult
an authorized HYUNDAI dealer.
Page 515 of 598
09
9-7
Follow Normal Maintenance Schedule if the vehicle is usually operated where none of
the following conditions apply. If any of the following conditions apply, you must follow
the Maintenance Under Severe Usage Conditions.
• Repeated driving short distance of less than 5 miles (8 km) in normal temperature or
less than 10 miles (16 km) in freezing temperature
• Extensive engine idling or low speed driving for long distances
• Driving on rough, dusty, muddy, unpaved, graveled or salt-spread roads
• Driving in areas using salt or other corrosive materials or in very cold weather
• Driving in heavy dust conditions
• Driving in heavy traffic area
• Driving on uphill, downhill, or mountain road repeatedly
• Towing a trailer or using a camper, or driving with loads on the roof
• Driving as a patrol car, taxi, other commercial use of vehicle towing
• Frequently driving under high speed or rapid acceleration/deceleration
• Frequently driving in stop-and-go condition
• Engine oil usage which is not recommended (Mineral type, Semi-synthetic, Lower
grade spec, etc.)
If your vehicle is operated under the above conditions, you should inspect, replace
or refill more frequently than the following Normal Maintenance Schedule. After the
periods or distance shown in the chart, continue to follow the prescribed maintenance
intervals.
NOTICE
After 10 years or 100,000 miles, we recommend to use severe maintenance
schedule.
Information
• As it is normal for engine oil to be consumed during driving, the engine oil level should
be checked on regular basis.
• The engine oil change interval for normal operating conditions is based on the use of
the recommended engine specification. If the recommended engine oil specification
is not used, then replace the engine oil according to the maintenance schedule under
severe operating conditions.
SCHEDULED MAINTENANCE SERVICES
Page 516 of 598
Maintenance
9-8
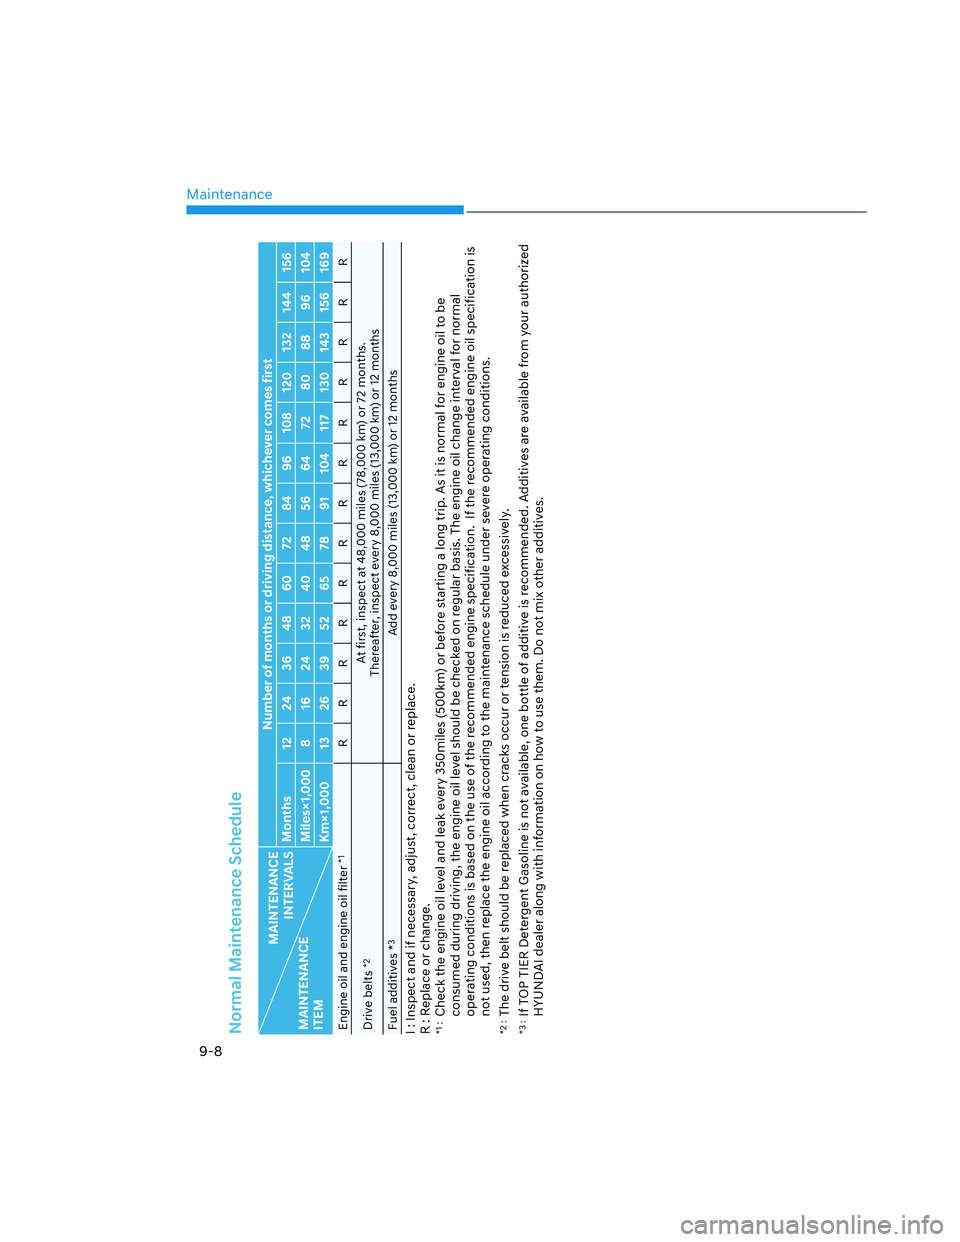
Normal Maintenance Schedule
MAINTENANCE
INTERVALS
MAINTENANCE
ITEMNumber of months or driving distance, whichever comes first
Months 12 24 36 48 60 72 84 96 108 120 132 144 156
Miles×1,000 8 16 24 32 40 48 56 64 72 80 88 96 104
Km×1,000 13 26 39 52 65 78 91 104 117 130 143 156 169
Engine oil and engine oil filter
*1
RRRRRRRRRRRRR
Drive belts
*2
At first, inspect at 48,000 miles (78,000 km) or 72 months.
Thereafter, inspect every 8,000 miles (13,000 km) or 12 months
Fuel additives *
3
Add every 8,000 miles (13,000 km) or 12 months
I : Inspect and if necessary, adjust, correct, clean or replace.
R : Replace or change.*1 :
Check the engine oil level and leak every 350miles (500km) or before starting a long trip. As it is normal for engine oil to be
consumed during driving, the engine oil level should be checked on regular basis. The engine oil change interval for normal
operating conditions is based on the use of the recommended engine specification. If the recommended engine oil specification is
not used, then replace the engine oil according to the maintenance schedule under severe operating conditions.
*2 :
The drive belt should be replaced when cracks occur or tension is reduced excessively.
*3 :
If TOP TIER Detergent Gasoline is not available, one bottle of additive is recommended. Additives are available from your authorized
HYUNDAI dealer along with information on how to use them. Do not mix other additives.
Page 519 of 598
09
9-11
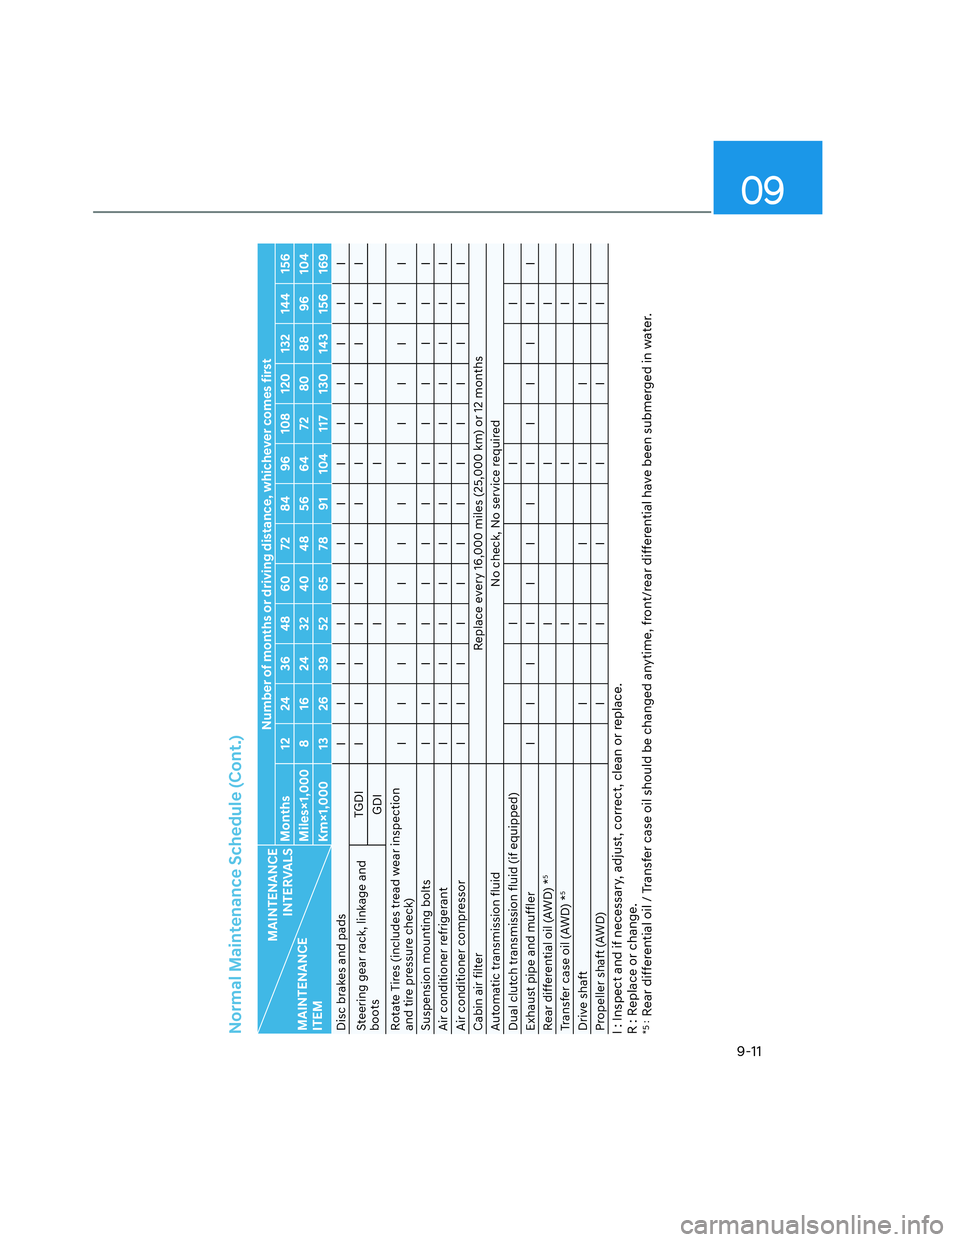
Normal Maintenance Schedule (Cont.)
MAINTENANCE
INTERVALS
MAINTENANCE
ITEMNumber of months or driving distance, whichever comes first
Months 12 24 36 48 60 72 84 96 108 120 132 144 156
Miles×1,000 8 16 24 32 40 48 56 64 72 80 88 96 104
Km×1,000 13 26 39 52 65 78 91 104 117 130 143 156 169
Disc brakes and padsIIIIIIIIIIIII
Steering gear rack, linkage and
bootsTGDI IIIIIIIIIIIII
GDI I I I
Rotate Tires (includes tread wear inspection
and tire pressure check)IIIIIIIIIIIII
Suspension mounting boltsIIIIIIIIIIIII
Air conditioner refrigerantIIIIIIIIIIIII
Air conditioner compressorIIIIIIIIIIIII
Cabin air filter Replace every 16,000 miles (25,000 km) or 12 months
Automatic transmission fluid No check, No service required
Dual clutch transmission fluid (if equipped) I I I
Exhaust pipe and mufflerIIIIIIIIIIIII
Rear differential oil (AWD) *
5
III
Transfer case oil (AWD) *
5
III
Drive shaft IIIIII
Propeller shaft (AWD)IIIIII
I : Inspect and if necessary, adjust, correct, clean or replace.
R : Replace or change.*5 :
Rear differential oil / Transfer case oil should be changed anytime, front/rear differential have been submerged in water.