headlights Hyundai Santa Fe 2009 Owner's Manual - RHD (UK, Australia)
[x] Cancel search | Manufacturer: HYUNDAI, Model Year: 2009, Model line: Santa Fe, Model: Hyundai Santa Fe 2009Pages: 269, PDF Size: 9.78 MB
Page 59 of 269
1FEATURES OF YOUR HYUNDAI
48
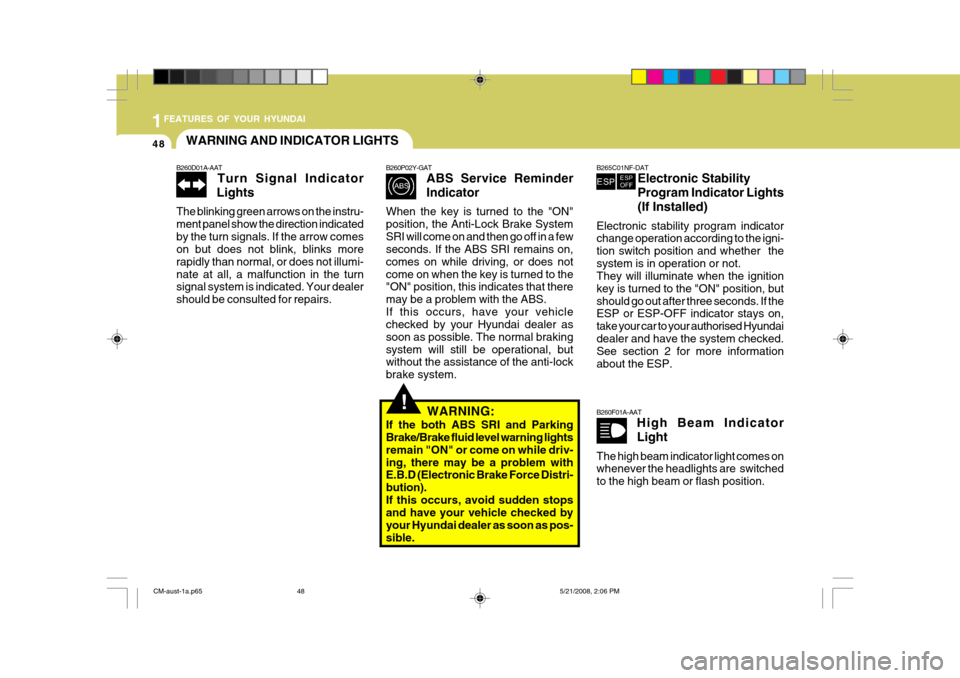
B260D01A-AAT
Turn Signal Indicator
Lights
The blinking green arrows on the instru- ment panel show the direction indicatedby the turn signals. If the arrow comes on but does not blink, blinks more rapidly than normal, or does not illumi-nate at all, a malfunction in the turn signal system is indicated. Your dealer should be consulted for repairs. WARNING AND INDICATOR LIGHTS
B260F01A-AAT
High Beam Indicator Light
The high beam indicator light comes on whenever the headlights are switched to the high beam or flash position.!
B260P02Y-GAT ABS Service Reminder Indicator
When the key is turned to the "ON" position, the Anti-Lock Brake SystemSRI will come on and then go off in a few seconds. If the ABS SRI remains on, comes on while driving, or does notcome on when the key is turned to the "ON" position, this indicates that there may be a problem with the ABS.If this occurs, have your vehicle checked by your Hyundai dealer as soon as possible. The normal brakingsystem will still be operational, but without the assistance of the anti-lock brake system.
WARNING:
If the both ABS SRI and Parking Brake/Brake fluid level warning lights remain "ON" or come on while driv-ing, there may be a problem with E.B.D (Electronic Brake Force Distri- bution).If this occurs, avoid sudden stops and have your vehicle checked by your Hyundai dealer as soon as pos-sible.
B265C01NF-DAT Electronic Stability Program Indicator Lights(If Installed)
Electronic stability program indicator change operation according to the igni- tion switch position and whether thesystem is in operation or not. They will illuminate when the ignition key is turned to the "ON" position, butshould go out after three seconds. If the ESP or ESP-OFF indicator stays on, take your car to your authorised Hyundaidealer and have the system checked. See section 2 for more information about the ESP.
CM-aust-1a.p65 5/21/2008, 2:06 PM
48
Page 72 of 269
1
FEATURES OF YOUR HYUNDAI
61
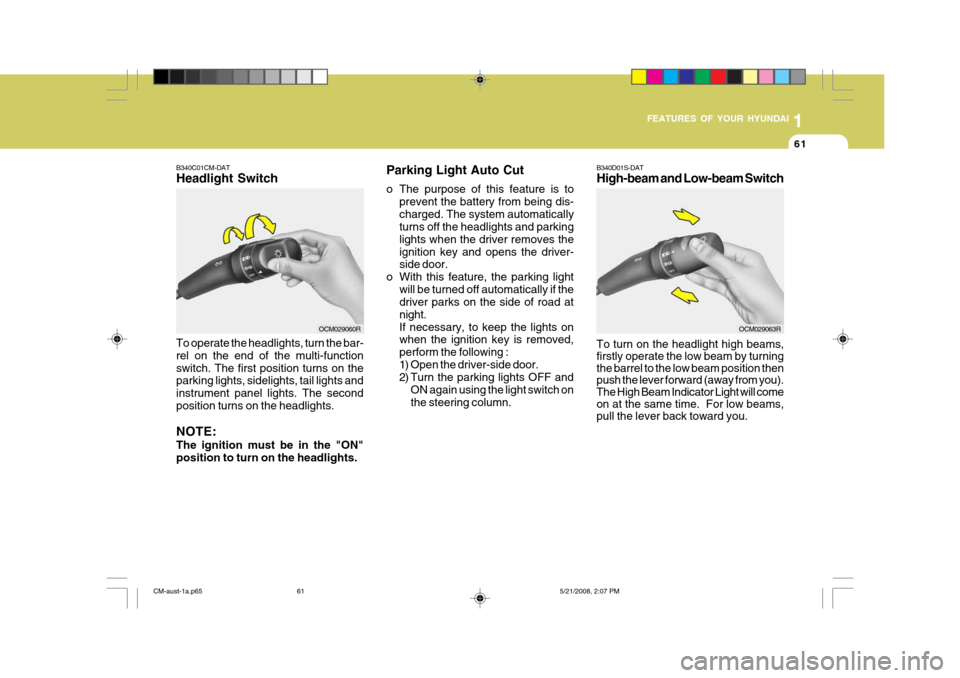
B340C01CM-DAT Headlight Switch To operate the headlights, turn the bar- rel on the end of the multi-functionswitch. The first position turns on the parking lights, sidelights, tail lights and instrument panel lights. The secondposition turns on the headlights. NOTE: The ignition must be in the "ON" position to turn on the headlights. Parking Light Auto Cut
o The purpose of this feature is to
prevent the battery from being dis- charged. The system automatically turns off the headlights and parking lights when the driver removes theignition key and opens the driver- side door.
o With this feature, the parking light will be turned off automatically if thedriver parks on the side of road at night.If necessary, to keep the lights on when the ignition key is removed, perform the following :
1) Open the driver-side door.
2) Turn the parking lights OFF andON again using the light switch on the steering column.
OCM029060R B340D01S-DAT High-beam and Low-beam Switch To turn on the headlight high beams, firstly operate the low beam by turning the barrel to the low beam position then push the lever forward (away from you). The High Beam Indicator Light will come on at the same time. For low beams, pull the lever back toward you.OCM029063R
CM-aust-1a.p65
5/21/2008, 2:07 PM
61
Page 73 of 269
1FEATURES OF YOUR HYUNDAI
62
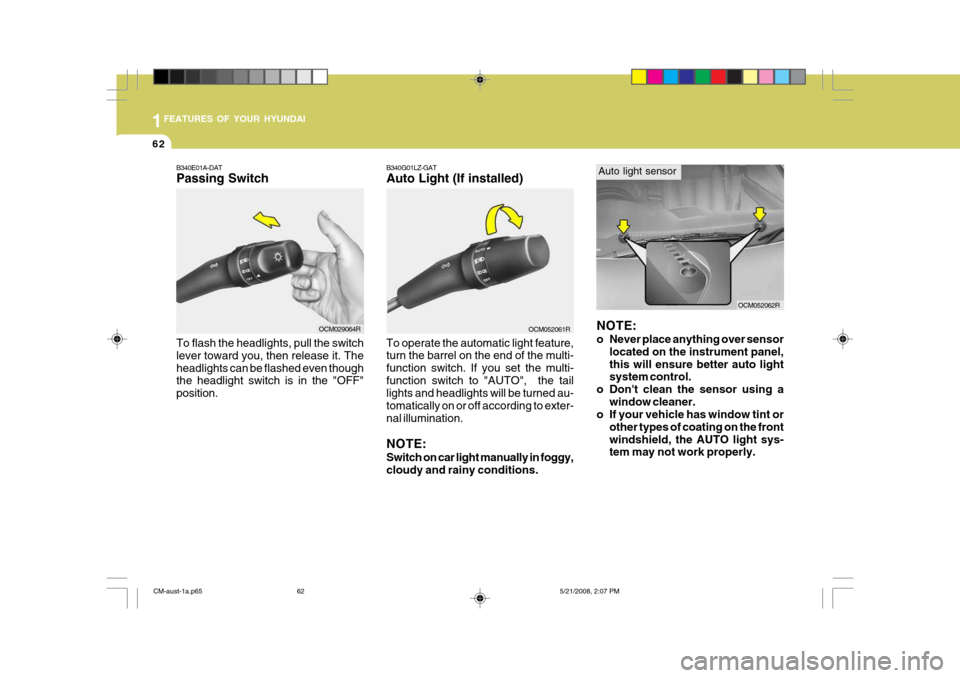
B340E01A-DAT Passing Switch
B340G01LZ-GAT Auto Light (If installed)
OCM052061R
To operate the automatic light feature, turn the barrel on the end of the multi- function switch. If you set the multi-function switch to "AUTO", the tail lights and headlights will be turned au- tomatically on or off according to exter-nal illumination. NOTE: Switch on car light manually in foggy, cloudy and rainy conditions.
NOTE:
o Never place anything over sensor located on the instrument panel, this will ensure better auto light system control.
o Don't clean the sensor using a window cleaner.
o If your vehicle has window tint or
other types of coating on the front windshield, the AUTO light sys- tem may not work properly. OCM052062R
Auto light sensor
To flash the headlights, pull the switch lever toward you, then release it. Theheadlights can be flashed even though the headlight switch is in the "OFF" position.
OCM029064R
CM-aust-1a.p65 5/21/2008, 2:07 PM
62
Page 92 of 269
1
FEATURES OF YOUR HYUNDAI
81
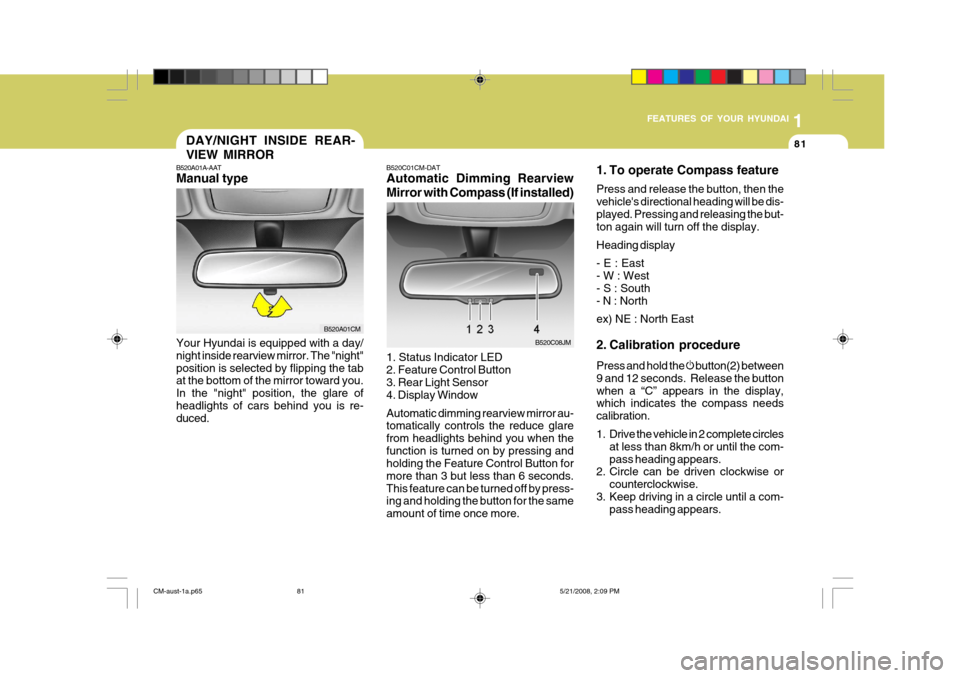
B520C01CM-DAT Automatic Dimming Rearview Mirror with Compass (If installed) 1. Status Indicator LED 2. Feature Control Button3. Rear Light Sensor 4. Display Window Automatic dimming rearview mirror au- tomatically controls the reduce glare from headlights behind you when thefunction is turned on by pressing and holding the Feature Control Button for more than 3 but less than 6 seconds.This feature can be turned off by press- ing and holding the button for the same amount of time once more.
B520C08JM 1. To operate Compass feature Press and release the button, then the vehicle's directional heading will be dis-played. Pressing and releasing the but- ton again will turn off the display. Heading display - E : East - W : West - S : South - N : North ex) NE : North East
2. Calibration procedure Press and hold the
button(2) between
9 and 12 seconds. Release the button when a “C” appears in the display, which indicates the compass needs calibration.
1. Drive the vehicle in 2 complete circles at less than 8km/h or until the com- pass heading appears.
2. Circle can be driven clockwise or
counterclockwise.
3. Keep driving in a circle until a com- pass heading appears.
DAY/NIGHT INSIDE REAR- VIEW MIRROR
B520A01A-AAT Manual type Your Hyundai is equipped with a day/ night inside rearview mirror. The "night"position is selected by flipping the tab at the bottom of the mirror toward you. In the "night" position, the glare ofheadlights of cars behind you is re- duced.
B520A01CM
CM-aust-1a.p65 5/21/2008, 2:09 PM
81
Page 171 of 269
2DRIVING YOUR HYUNDAI
26
!
C190B02S-DAT Trailer Towbar Select the proper towbar and ball com- bination, making sure that it's locationis compatible with that of the trailer or vehicle being towed. We recommend only genuine Hyundai towbars (thetowbars are made and tested in Austra- lia/NZ for local conditions). Use a quality non-equalising towbarwhich distributes the tongue load uni- formly throughout the chassis. Tongue loads can be increased or de- creased by redistributing the load in the trailer. This can be verified by checkingthe total weight of the loaded trailer and then checking the load on the tongue.
WARNING:
Improperly loading your car and trailer can serious affect its steering and braking performance causing a crash in which you may be seriouslyinjured.
TRAILER OR VEHICLE TOWING
C190A01A-DAT If you are considering towing with your vehicle, you should first check with your State Department of Motor Ve- hicles to determine their legal require-ments. Since laws vary from state to state, the requirements for towing trailers, cars,other types of vehicles or apparatus may differ. Ask your Hyundai dealer for further details before towing.
CAUTION:
Do not do any towing with your car during its first 2,000km (1,200 miles) in order to allow the engine to prop-erly bed in. Failure to heed this cau- tion may result in serious engine or transaxle damage.
!
USE OF LIGHTS
C180A01A-AAT Check your lights regularly for correct operation and always keep them clean. When driving during the day in condi- tions of poor visibility, it is helpful todrive with headlights on low beam. This enables you to be seen as well as to see.
CM-aust-2.p65 5/19/2008, 6:35 PM
26
Page 230 of 269
6
DO-IT-YOURSELF MAINTENANCE
23
CAUTION:
A burned-out fuse indicates that there is a problem in the electrical circuit. If you replace a fuse and it blows as soon as the accessory isturned on, the problem is serious and should be referred to a Hyundai dealer for diagnosis and repair.Never replace a fuse with anything except a fuse with the same or a lower amperage rating. A highercapacity fuse could cause damage and create a fire hazard.
!
NOTE: See page 6-38 for the fuse panel
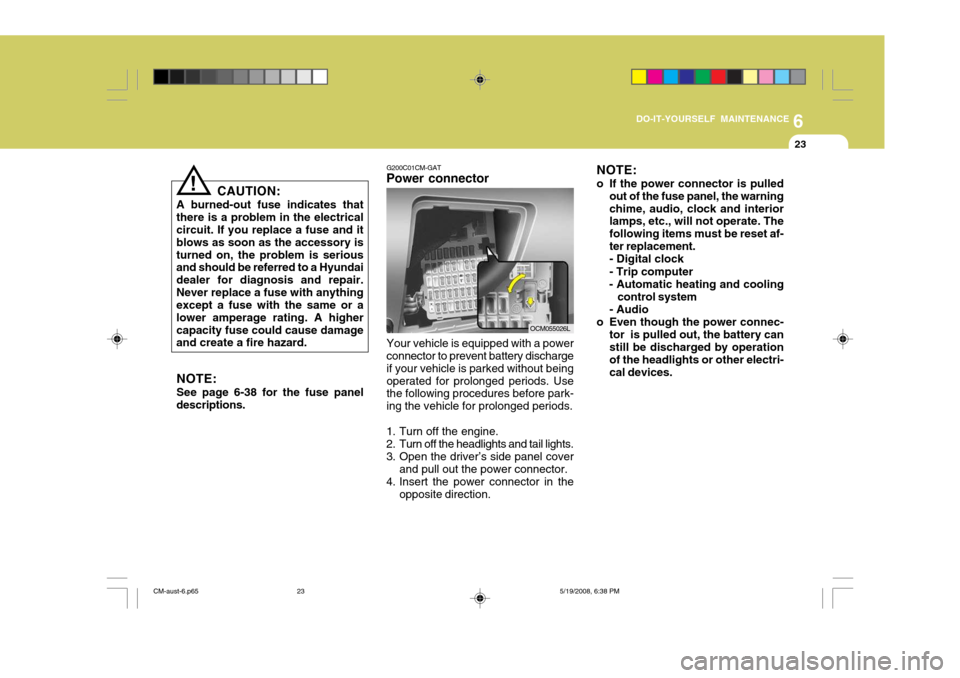
descriptions. G200C01CM-GAT
Power connector NOTE:
o If the power connector is pulled
out of the fuse panel, the warning chime, audio, clock and interior lamps, etc., will not operate. The following items must be reset af-ter replacement.- Digital clock - Trip computer
- Automatic heating and cooling
control system
- Audio
o Even though the power connec- tor is pulled out, the battery can still be discharged by operation of the headlights or other electri-cal devices.
Your vehicle is equipped with a power connector to prevent battery discharge if your vehicle is parked without beingoperated for prolonged periods. Use the following procedures before park- ing the vehicle for prolonged periods.
1. Turn off the engine.
2. Turn off the headlights and tail lights.
3. Open the driver’s side panel cover and pull out the power connector.
4. Insert the power connector in the opposite direction.
OCM055026L
CM-aust-6.p65 5/19/2008, 6:38 PM
23
Page 235 of 269
6DO-IT-YOURSELF MAINTENANCE
28
OCM055007L
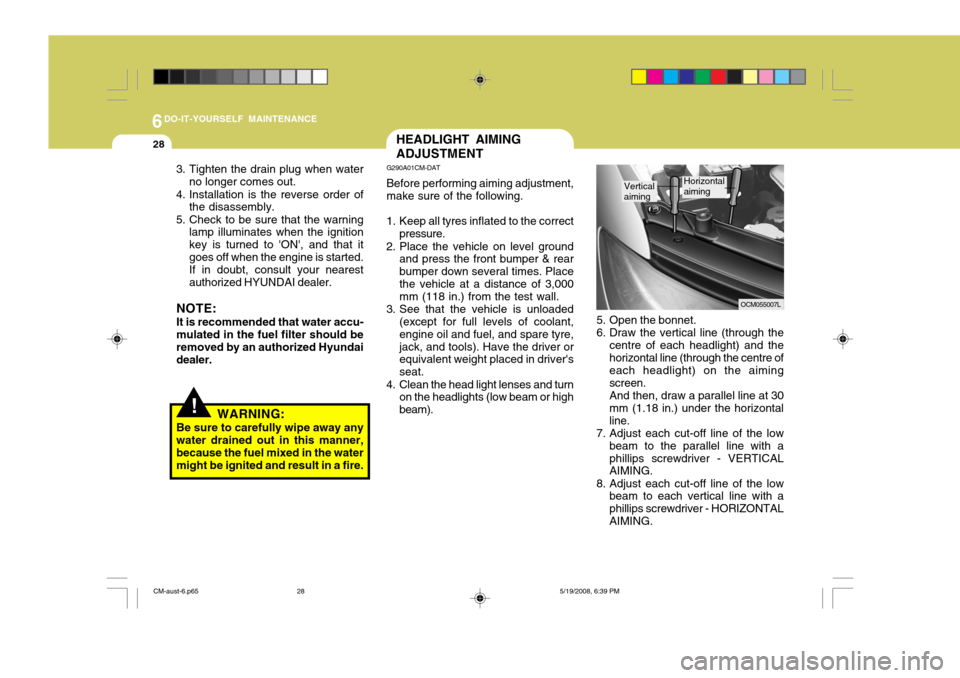
5. Open the bonnet.
6. Draw the vertical line (through the centre of each headlight) and thehorizontal line (through the centre of each headlight) on the aiming screen.And then, draw a parallel line at 30mm (1.18 in.) under the horizontalline.
7. Adjust each cut-off line of the low
beam to the parallel line with aphillips screwdriver - VERTICAL AIMING.
8. Adjust each cut-off line of the low beam to each vertical line with a phillips screwdriver - HORIZONTALAIMING.
Vertical aimingHorizontal aiming
HEADLIGHT AIMING ADJUSTMENT
G290A01CM-DAT Before performing aiming adjustment, make sure of the following.
1. Keep all tyres inflated to the correct pressure.
2. Place the vehicle on level ground and press the front bumper & rear bumper down several times. Placethe vehicle at a distance of 3,000 mm (118 in.) from the test wall.
3. See that the vehicle is unloaded (except for full levels of coolant, engine oil and fuel, and spare tyre,jack, and tools). Have the driver or equivalent weight placed in driver's seat.
4. Clean the head light lenses and turn on the headlights (low beam or highbeam).
!WARNING:
Be sure to carefully wipe away any water drained out in this manner, because the fuel mixed in the watermight be ignited and result in a fire.
3. Tighten the drain plug when water
no longer comes out.
4. Installation is the reverse order of the disassembly.
5. Check to be sure that the warning lamp illuminates when the ignitionkey is turned to 'ON', and that itgoes off when the engine is started.If in doubt, consult your nearestauthorized HYUNDAI dealer.
NOTE: It is recommended that water accu- mulated in the fuel filter should be removed by an authorized Hyundai dealer.
CM-aust-6.p65 5/19/2008, 6:39 PM
28
Page 236 of 269
6
DO-IT-YOURSELF MAINTENANCE
29
G290B01CM-DAT
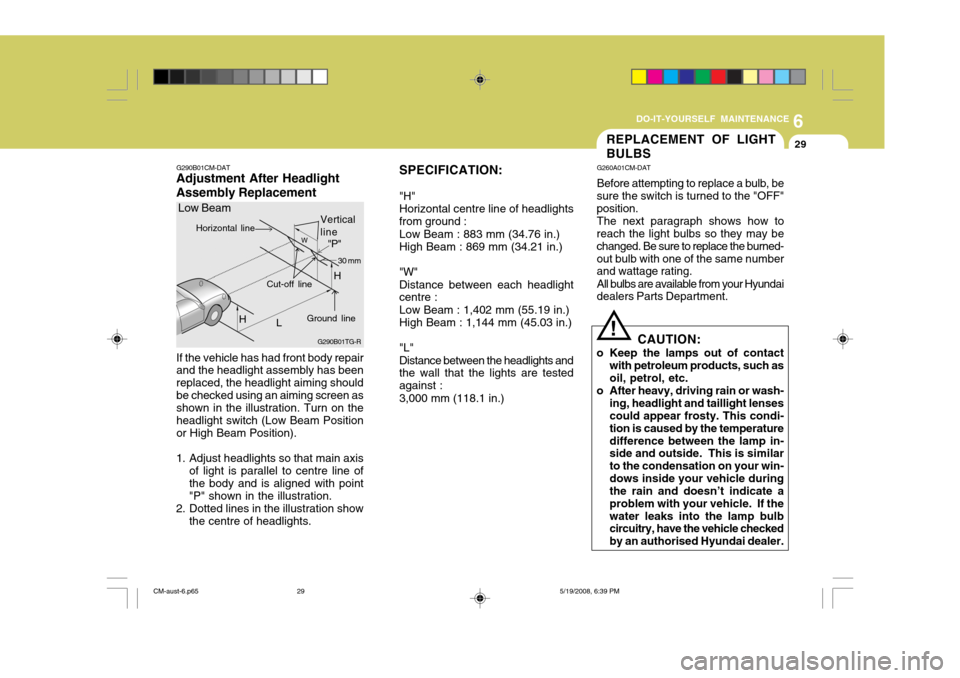
Adjustment After Headlight Assembly Replacement
If the vehicle has had front body repair and the headlight assembly has been replaced, the headlight aiming shouldbe checked using an aiming screen as shown in the illustration. Turn on the headlight switch (Low Beam Positionor High Beam Position).
1. Adjust headlights so that main axis of light is parallel to centre line ofthe body and is aligned with point"P" shown in the illustration.
2. Dotted lines in the illustration show the centre of headlights. SPECIFICATION: "H" Horizontal centre line of headlightsfrom ground : Low Beam : 883 mm (34.76 in.) High Beam : 869 mm (34.21 in.) "W" Distance between each headlight centre : Low Beam : 1,402 mm (55.19 in.) High Beam : 1,144 mm (45.03 in.) "L" Distance between the headlights and the wall that the lights are tested against : 3,000 mm (118.1 in.)
G290B01TG-R
Low Beam
LW
H Cut-off line
"P"
Horizontal line
Ground line 30 mm
Vertical line
H
REPLACEMENT OF LIGHT BULBS
G260A01CM-DAT Before attempting to replace a bulb, be
sure the switch is turned to the "OFF" position.
The next paragraph shows how to
reach the light bulbs so they may bechanged. Be sure to replace the burned-out bulb with one of the same number and wattage rating.
All bulbs are available from your Hyundai
dealers Parts Department.
CAUTION:
o Keep the lamps out of contact with petroleum products, such asoil, petrol, etc.
o After heavy, driving rain or wash- ing, headlight and taillight lensescould appear frosty. This condi- tion is caused by the temperaturedifference between the lamp in- side and outside. This is similar to the condensation on your win-dows inside your vehicle during the rain and doesn’t indicate a problem with your vehicle. If thewater leaks into the lamp bulb circuitry, have the vehicle checked by an authorised Hyundai dealer.
!
CM-aust-6.p65 5/19/2008, 6:39 PM
29