security Hyundai Santa Fe 2010 Owner's Manual
[x] Cancel search | Manufacturer: HYUNDAI, Model Year: 2010, Model line: Santa Fe, Model: Hyundai Santa Fe 2010Pages: 408, PDF Size: 8.63 MB
Page 46 of 408
329
Safety system of your vehicle
C030100AFD
Using a child restraint system
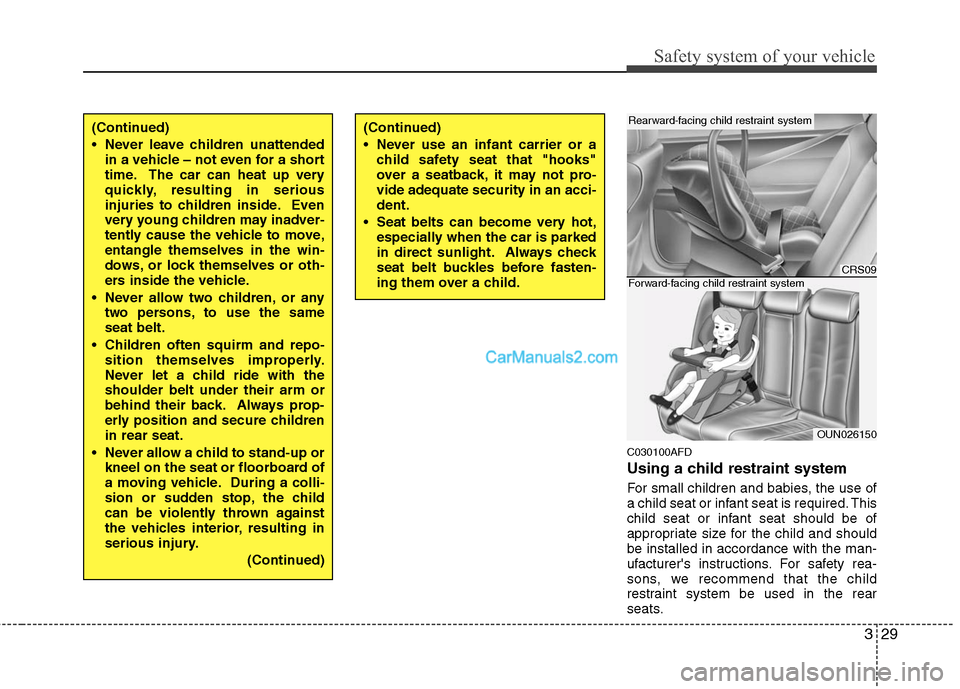
For small children and babies, the use of
a child seat or infant seat is required. This
child seat or infant seat should be of
appropriate size for the child and should
be installed in accordance with the man-
ufacturer's instructions. For safety rea-
sons, we recommend that the child
restraint system be used in the rear
seats.
(Continued)
Never leave children unattendedin a vehicle – not even for a short
time. The car can heat up very
quickly, resulting in serious
injuries to children inside. Even
very young children may inadver-
tently cause the vehicle to move,
entangle themselves in the win-
dows, or lock themselves or oth-
ers inside the vehicle.
Never allow two children, or any two persons, to use the same
seat belt.
Children often squirm and repo- sition themselves improperly.
Never let a child ride with the
shoulder belt under their arm or
behind their back. Always prop-
erly position and secure children
in rear seat.
Never allow a child to stand-up or kneel on the seat or floorboard of
a moving vehicle. During a colli-
sion or sudden stop, the child
can be violently thrown against
the vehicles interior, resulting in
serious injury.
(Continued)(Continued)
Never use an infant carrier or achild safety seat that "hooks"
over a seatback, it may not pro-
vide adequate security in an acci-
dent.
Seat belts can become very hot, especially when the car is parked
in direct sunlight. Always check
seat belt buckles before fasten-
ing them over a child.
CRS09
OUN026150
Rearward-facing child restraint system
Forward-facing child restraint system
Page 113 of 408
Features of your vehicle
34
4
1. Press and hold the button for more
than 6 seconds. When the compass
memory is cleared a "C" will appear in
the display.
2. To calibrate the compass, drive the vehicle in 2 complete circles at less
than 5 mph (8 km/h).
Integrated HomeLink
®Wireless Control
System
The HomeLink® Wireless Control
System provides a convenient way to
replace up to three hand-held radio-fre-
quency (RF) transmitters with a single
built-in device. This innovative feature will
learn the radio frequency codes of most
current transmitters to operate devices
such as gate operators, garage door
openers, entry door locks, security sys-
tems, even home lighting. Both standard
and rolling code-equipped transmitters
can be programmed by following the out-
lined procedures. Additional HomeLink
®
information can be found at: www.home-
link.com or by calling 1-800-355-3515. Retain the original transmitter of the RF
device you are programming for use in
other vehicles as well as for future
HomeLink
®programming. It is also sug-
gested that upon the sale of the vehicle,
the programmed HomeLink
®buttons be
erased for security purposes. Programming HomeLink
®
✽ ✽
NOTICE
• When programming a garage door
opener, it is advised to park the vehi-
cle outside of the garage.
• It is recommended that a new battery be placed in the hand-held transmit-
ter of the device being programmed to
HomeLink
®for quicker training and
accurate transmission of the radio-
frequency signal.
• Some vehicles may require the igni- tion switch to be turned to the second
(or "accessories") position for pro-
gramming and/or operation of
HomeLink.
• In the event that there are still pro- gramming difficulties or questions
after following the programming steps
listed below, contact HomeLink
®at:
www.homelink.com or 1-800-355-
3515.
CAUTION
Before programming HomeLink®to
a garage door opener or gate oper- ator, make sure that people andobjects are out of the way of thedevice to prevent potential harm or damage. Do not use HomeLink
®
with any garage door opener thatlacks the safety stop and reversefeatures required by U.S. federalsafety standards (this includes any garage door opener model manu-factured before April 1, 1982). Agarage door that cannot detect an object - signaling the door to stopand reverse - does not meet currentU.S. federal safety standards. Usinga garage door opener without these features increases the risk of seri-ous injury or death.
Page 115 of 408
Features of your vehicle
36
4
✽
✽
NOTICE
There are 30 seconds in which to initiate
step3.
3. Return to the vehicle and firmly press,
hold for two seconds and then release
the desired HomeLink
®button. Repeat
the "press/hold/release" sequence a
second time to complete the program-
ming. (Some devices may require you
to repeat this sequence a third time to
complete the programming.)
4. Press and hold the just-trained HomeLink
®button and observe the red
Status Indicator LED. If the indicator
light stays on constantly, programming
is complete and your device should
activate.
5. To program the remaining two HomeLink
®buttons, follow either steps
1 through 4 above for other Rolling
Code devices or steps 2 through 5 in
Standard Programming for standard
devices. Gate operator & Canadian program-
ming
During programming, your handheld
transmitter may automatically stop trans-
mitting. Continue to press the Integrated
HomeLink
®Wireless Control System but-
ton (note steps 2 through 4 in the
Standard Programming portion of this
document) while you press and re-press
("cycle") your handheld transmitter every
two seconds until the frequency signal
has been learned. The indicator light will
flash slowly and then rapidly after sever-
al seconds upon successful training.
Operating HomeLink
®
To operate, simply press and release the
programmed HomeLink®button.
Activation will now occur for the trained
device (i.e. garage door opener, gate
operator, security system, entry door
lock, home/office lighting, etc.). For con-
venience, the hand-held transmitter of
the device may also be used at any time. Reprogramming a single HomeLink
®
button
To program a new device to a previously
trained HomeLink
®button, follow these
steps:
1. Press and hold the desired HomeLink
®
button. Do NOT release until step 4
has been completed.
2. When the indicator light begins to flash slowly (after 20 seconds), position the
handheld transmitter 1 to 3 inches
away from the HomeLink
®surface.
3. Press and hold the handheld transmit- ter button. The HomeLink
®indicator
light will flash, first slowly and then rap-
idly.
4. When the indicator light begins to flash rapidly, release both buttons.
5. Press and hold the just-trained HomeLink
®button and observe the red
Status Indicator LED. If the indicator
light stays on constantly, programming
is complete and your new device
should activate.
Page 175 of 408
Features of your vehicle
96
4
CAUTION
To prevent damage to the goods or
the vehicle, care should be takenwhen carrying fragile or bulkyobjects in the luggage compart-ment.
WARNING
To avoid eye injury, DO NOT over-
stretch the luggage net. ALWAYS
keep your face and body out of the
luggage net’s recoil path. DO NOT
use the luggage net when the strap
has visible signs of wear or dam-
age.
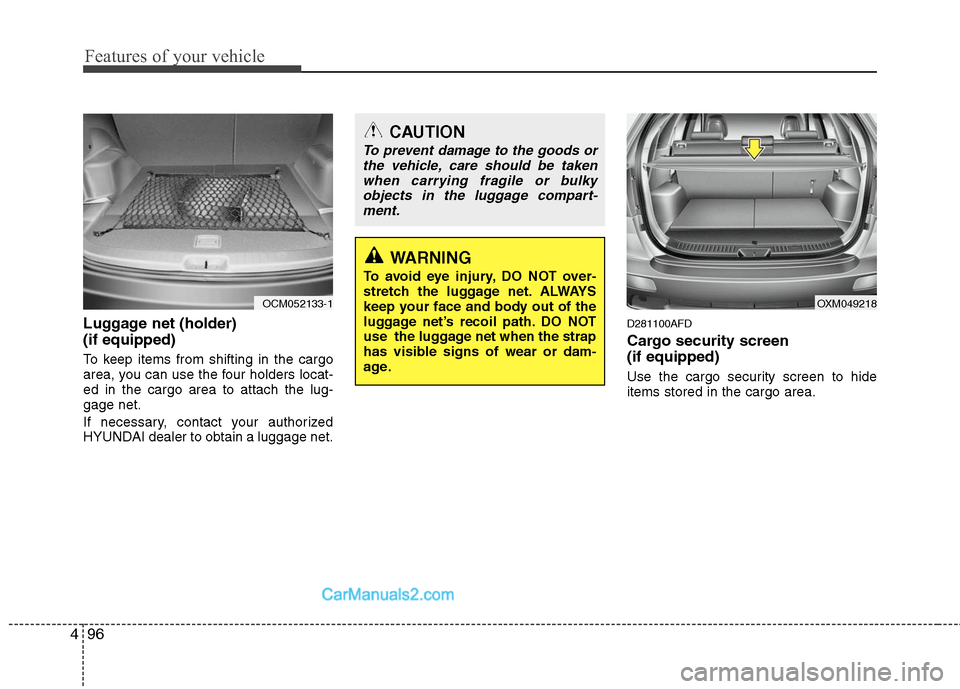
Luggage net (holder)
(if equipped)
To keep items from shifting in the cargo
area, you can use the four holders locat-
ed in the cargo area to attach the lug-
gage net.
If necessary, contact your authorized
HYUNDAI dealer to obtain a luggage net.
D281100AFD
Cargo security screen
(if equipped)
Use the cargo security screen to hide
items stored in the cargo area.
OCM052133-1
OXM049218
Page 176 of 408
497
Features of your vehicle
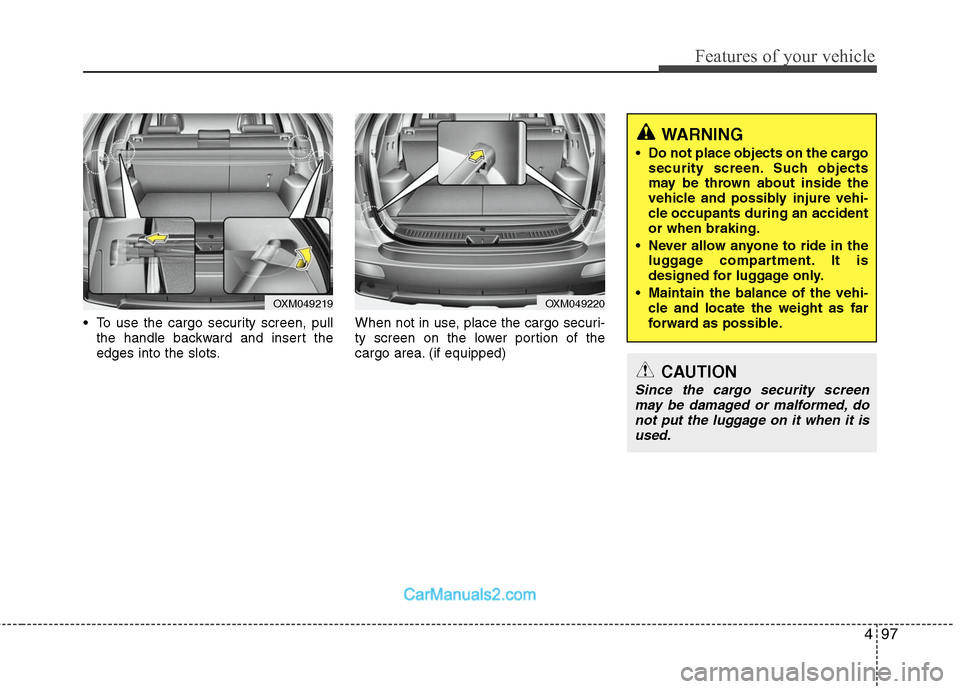
To use the cargo security screen, pullthe handle backward and insert the
edges into the slots. When not in use, place the cargo securi-
ty screen on the lower portion of the
cargo area. (if equipped)
OXM049219
OXM049220
WARNING
Do not place objects on the cargo
security screen. Such objects
may be thrown about inside the
vehicle and possibly injure vehi-
cle occupants during an accident
or when braking.
Never allow anyone to ride in the luggage compartment. It is
designed for luggage only.
Maintain the balance of the vehi- cle and locate the weight as far
forward as possible.
CAUTION
Since the cargo security screenmay be damaged or malformed, donot put the luggage on it when it isused.
Page 370 of 408
751
Maintenance
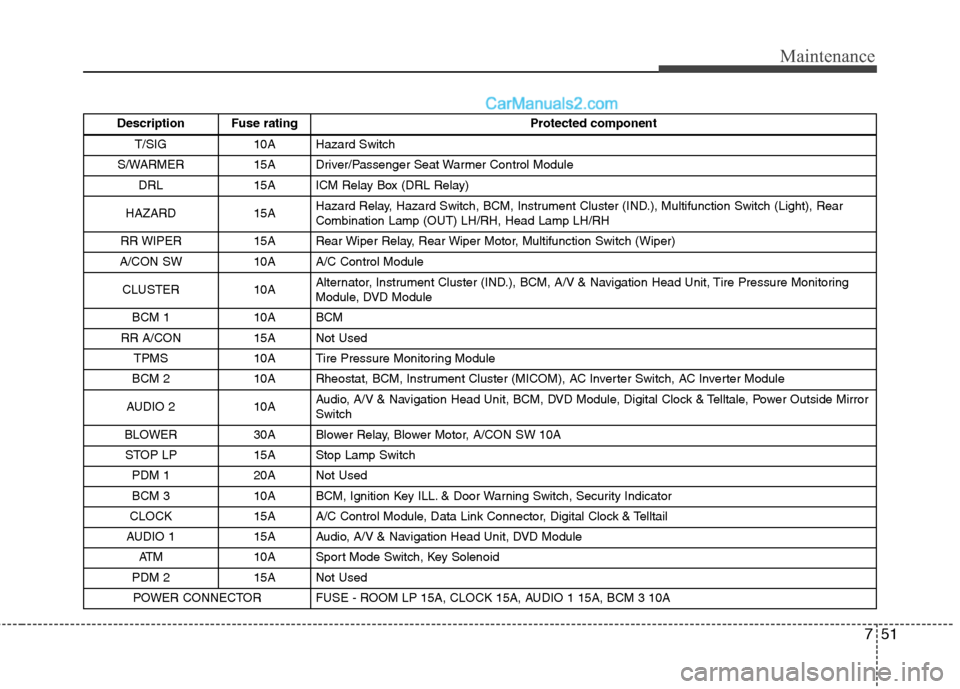
Description Fuse ratingProtected component
T/SIG 10A Hazard Switch
S/WARMER 15A Driver/Passenger Seat Warmer Control Module DRL 15A ICM Relay Box (DRL Relay)
HAZARD 15A Hazard Relay, Hazard Switch, BCM, Instrument Cluster (IND.), Multifunction Switch (Light), Rear
Combination Lamp (OUT) LH/RH, Head Lamp LH/RH
RR WIPER 15A Rear Wiper Relay, Rear Wiper Motor, Multifunction Switch (Wiper)
A/CON SW 10A A/C Control Module
CLUSTER 10A Alternator, Instrument Cluster (IND.), BCM, A/V & Navigation Head Unit, Tire Pressure Monitoring
Module, DVD Module
BCM 1 10A BCM
RR A/CON 15A Not Used TPMS 10A Tire Pressure Monitoring Module
BCM 2 10A Rheostat, BCM, Instrument Cluster (MICOM), AC Inverter Switch, AC Inverter Module
AUDIO 2 10A Audio, A/V & Navigation Head Unit, BCM, DVD Module, Digital Clock & Telltale, Power Outside Mirror
Switch
BLOWER 30A Blower Relay, Blower Motor, A/CON SW 10A STOP LP 15A Stop Lamp Switch PDM 1 20A Not Used
BCM 3 10A BCM, Ignition Key ILL. & Door Warning Switch, Security Indicator
CLOCK 15A A/C Control Module, Data Link Connector, Digital Clock & Telltail
AUDIO 1 15A Audio, A/V & Navigation Head Unit, DVD Module ATM 10A Sport Mode Switch, Key Solenoid
PDM 2 15A Not Used POWER CONNECTOR FUSE - ROOM LP 15A, CLOCK 15A, AUDIO 1 15A, BCM 3 10A
Page 405 of 408
Index
4I
In case of an emergency while driving ··················\
··········6-2
Indicator symbols on the instrument cluster ··················\
·1-6
Instrument cluster ··················\
··················\
··················\
····4-40Engine temperature gauge ··················\
··················\
·······4-42
Fuel gauge ··················\
··················\
··················\
·············4-43
Instrument panel illumination ··················\
··················\
·4-41
Odometer/Tripmeter ··················\
··················\
················4-43
Speedometer ··················\
··················\
··················\
··········4-41
Tachometer ··················\
··················\
··················\
············4-41
Trip computer ··················\
··················\
··················\
········4-45
Warning and indicators ··················\
··················\
············4-48
Instrument panel overview··················\
··················\
···········2-3
Interior features··················\
··················\
··················\
········4-89 AC inverter ··················\
··················\
··················\
············4-93
Ashtray ··················\
··················\
··················\
··················\
4-89
Aux, USB and iPod ··················\
··················\
·················4-95\
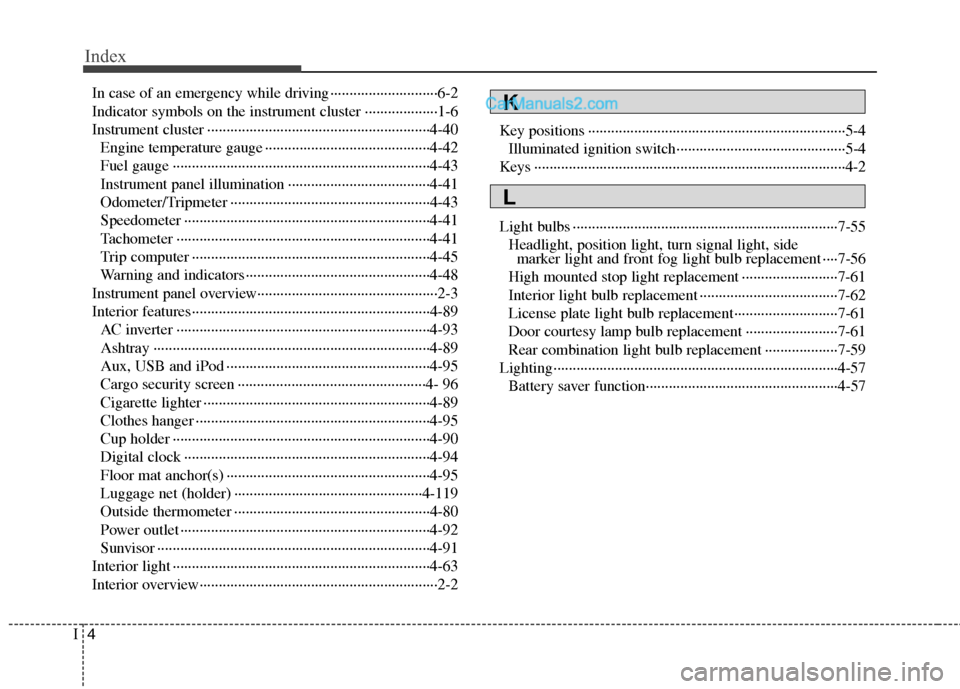
Cargo security screen ··················\
··················\
·············4- 96
Cigarette lighter ··················\
··················\
··················\
·····4-89
Clothes hanger ··················\
··················\
··················\
·······4-95
Cup holder ··················\
··················\
··················\
·············4-90
Digital clock ··················\
··················\
··················\
··········4-94
Floor mat anchor(s) ··················\
··················\
·················4-95\
Luggage net (holder) ··················\
··················\
·············4-119
Outside thermometer ··················\
··················\
···············4-80
Power outlet ··················\
··················\
··················\
···········4-92
Sunvisor ··················\
··················\
··················\
·················4-91\
Interior light ··················\
··················\
··················\
·············4-63
Interior overview··················\
··················\
··················\
········2-2 Key positions ··················\
··················\
··················\
·············5-4
Illuminated ignition switch··················\
··················\
········5-4
Keys ··················\
··················\
··················\
··················\
·········4-2
Light bulbs ··················\
··················\
··················\
···············7-55
Headlight, position light, turn signal light, side marker light and front fog light bulb replacement ····7-56
High mounted stop light replacement ··················\
·······7-61
Interior light bulb replacement ··················\
··················\
7-62
License plate light bulb replacement··················\
·········7-61
Door courtesy lamp bulb replacement ··················\
······7-61
Rear combination light bulb replacement ··················\
·7-59
Lighting··················\
··················\
··················\
··················\
··4-57 Battery saver function··················\
··················\
··············4-57K
L