Hyundai Santa Fe 2011 Owner's Manual - RHD (UK, Australia)
Manufacturer: HYUNDAI, Model Year: 2011, Model line: Santa Fe, Model: Hyundai Santa Fe 2011Pages: 312, PDF Size: 23.92 MB
Page 141 of 312
Features of your vehicle
66
4
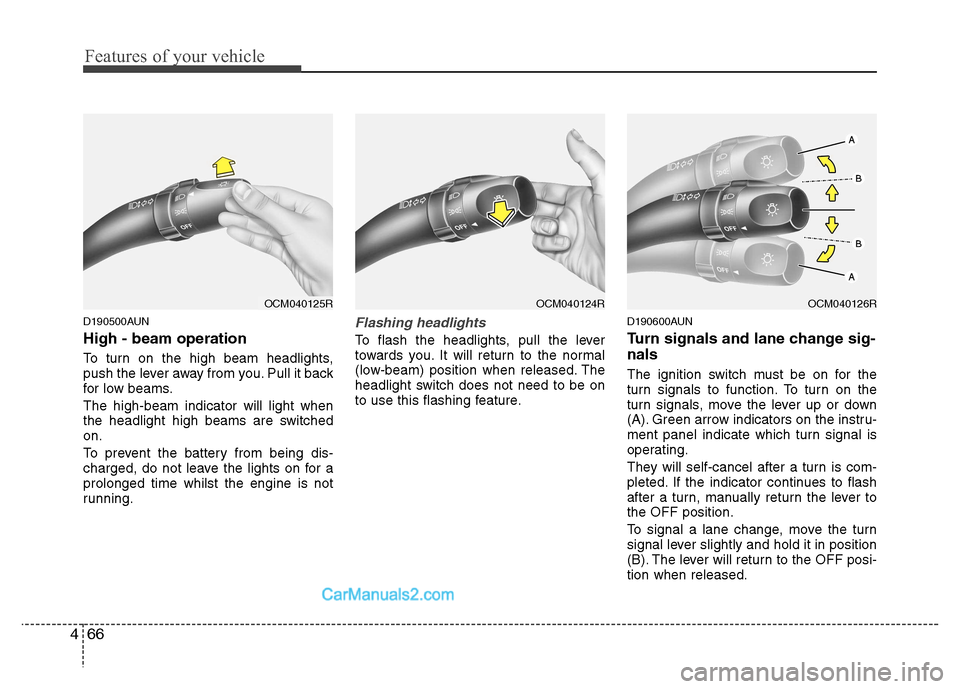
D190500AUN High - beam operation
To turn on the high beam headlights,
push the lever away from you. Pull it back
for low beams. The high-beam indicator will light when
the headlight high beams are switchedon.
To prevent the battery from being dis-
charged, do not leave the lights on for aprolonged time whilst the engine is not
running.Flashing headlights
To flash the headlights, pull the lever
towards you. It will return to the normal
(low-beam) position when released. The
headlight switch does not need to be on
to use this flashing feature. D190600AUN
Turn signals and lane change sig- nals
The ignition switch must be on for the
turn signals to function. To turn on the
turn signals, move the lever up or down
(A). Green arrow indicators on the instru-
ment panel indicate which turn signal is
operating.
They will self-cancel after a turn is com-
pleted. If the indicator continues to flash
after a turn, manually return the lever tothe OFF position.
To signal a lane change, move the turn
signal lever slightly and hold it in position
(B). The lever will return to the OFF posi-tion when released.
OCM040125ROCM040124ROCM040126R
Page 142 of 312
467
Features of your vehicle
If an indicator stays on and does not
flash or if it flashes abnormally, one of the
turn signal bulbs may be burned out andwill require replacement.
✽✽NOTICE
If an indicator flash is abnormally quick
or slow, bulb may be burned out or have
a poor electrical connection in the cir-
cuit.
D190700AFD
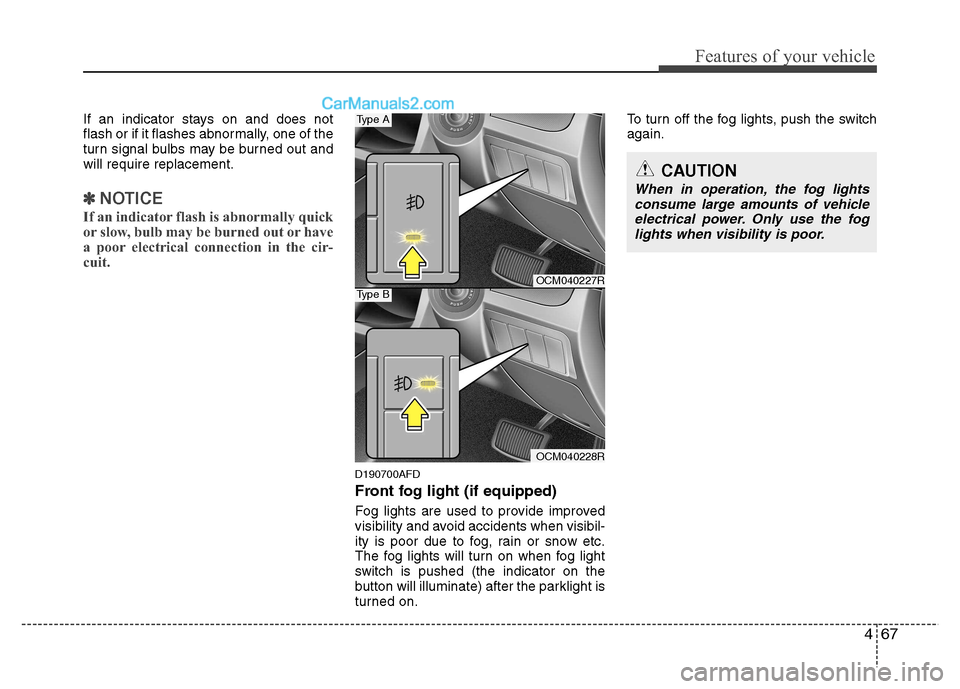
Front fog light (if equipped)
Fog lights are used to provide improved
visibility and avoid accidents when visibil-
ity is poor due to fog, rain or snow etc.
The fog lights will turn on when fog light
switch is pushed (the indicator on the
button will illuminate) after the parklight is
turned on. To turn off the fog lights, push the switchagain.
CAUTION
When in operation, the fog lights
consume large amounts of vehicle electrical power. Only use the fog lights when visibility is poor.
OCM040227R
OCM040228R
Type A
Type B
Page 143 of 312
Features of your vehicle
68
4
D190800AFD
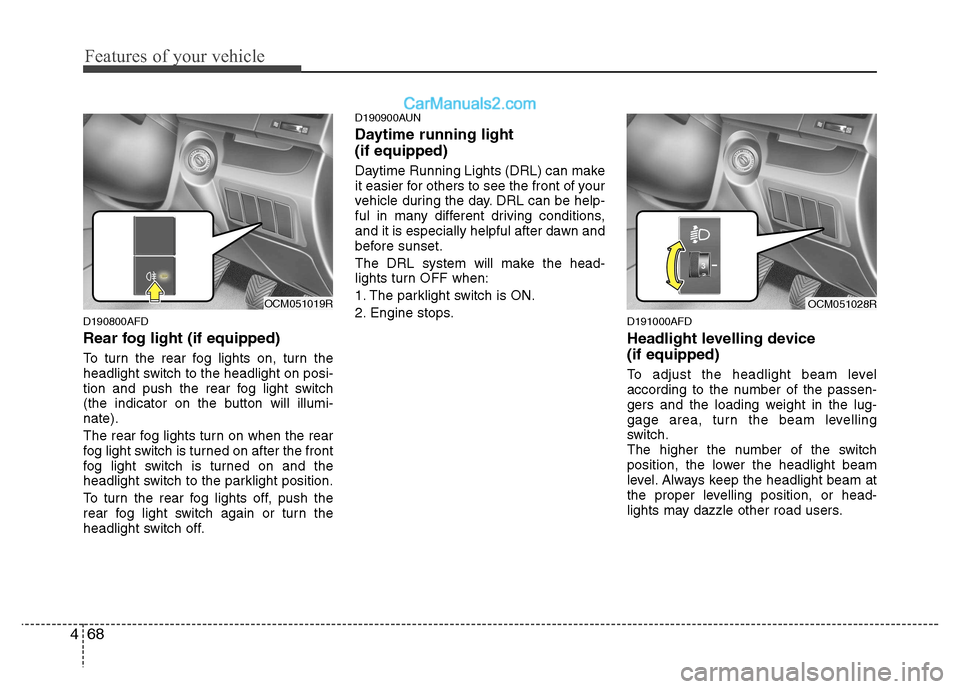
Rear fog light (if equipped)
To turn the rear fog lights on, turn the
headlight switch to the headlight on posi-
tion and push the rear fog light switch
(the indicator on the button will illumi-nate).
The rear fog lights turn on when the rear
fog light switch is turned on after the front
fog light switch is turned on and the
headlight switch to the parklight position.
To turn the rear fog lights off, push the
rear fog light switch again or turn the
headlight switch off. D190900AUN
Daytime running light (if equipped)
Daytime Running Lights (DRL) can make
it easier for others to see the front of your
vehicle during the day. DRL can be help-
ful in many different driving conditions,
and it is especially helpful after dawn and
before sunset.
The DRL system will make the head-
lights turn OFF when:
1. The parklight switch is ON.
2. Engine stops.
D191000AFD
Headlight levelling device (if equipped)
To adjust the headlight beam level
according to the number of the passen-
gers and the loading weight in the lug-
gage area, turn the beam levelling
switch.
The higher the number of the switch
position, the lower the headlight beam
level. Always keep the headlight beam at
the proper levelling position, or head-
lights may dazzle other road users.
OCM051028ROCM051019R
Page 144 of 312
469
Features of your vehicle
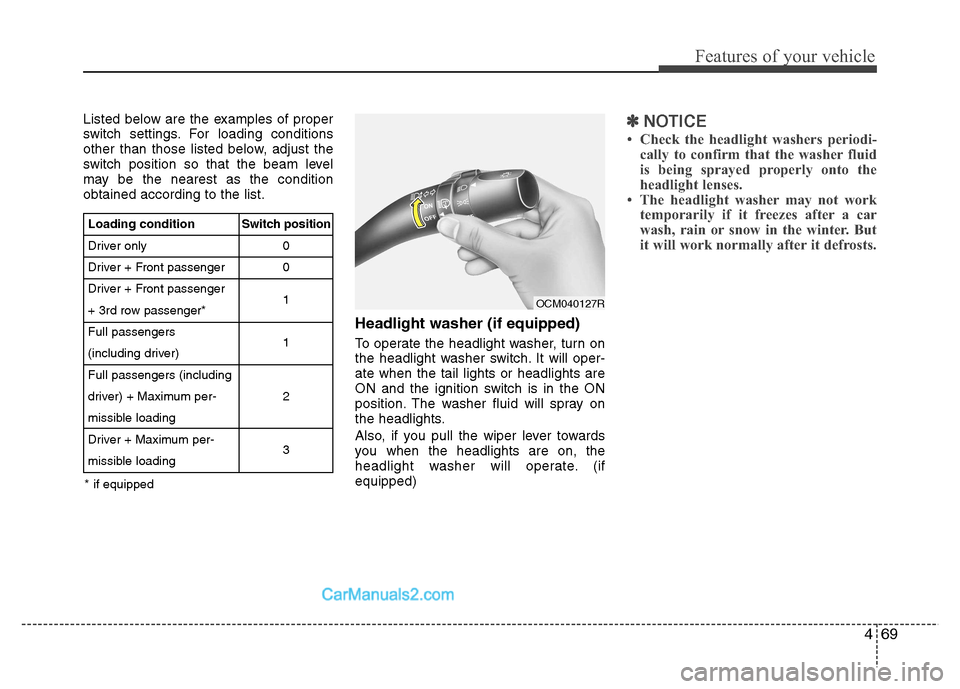
Listed below are the examples of proper
switch settings. For loading conditions
other than those listed below, adjust the
switch position so that the beam level
may be the nearest as the conditionobtained according to the list.Headlight washer (if equipped)
To operate the headlight washer, turn on
the headlight washer switch. It will oper-ate when the tail lights or headlights are
ON and the ignition switch is in the ON
position. The washer fluid will spray on
the headlights.
Also, if you pull the wiper lever towards
you when the headlights are on, the
headlight washer will operate. (ifequipped)✽✽NOTICE
Check the headlight washers periodi- cally to confirm that the washer fluid
is being sprayed properly onto the
headlight lenses.
The headlight washer may not work temporarily if it freezes after a car
wash, rain or snow in the winter. But
it will work normally after it defrosts.
Loading condition
Driver only
Driver + Front passenger
Driver + Front passenger
+ 3rd row passenger*Full passengers
(including driver)Full passengers (including
driver) + Maximum per-
missible loading
Driver + Maximum per-
missible loading Switch position
00 1 1 2 3
* if equipped
OCM040127R
Page 145 of 312
Features of your vehicle
70
4
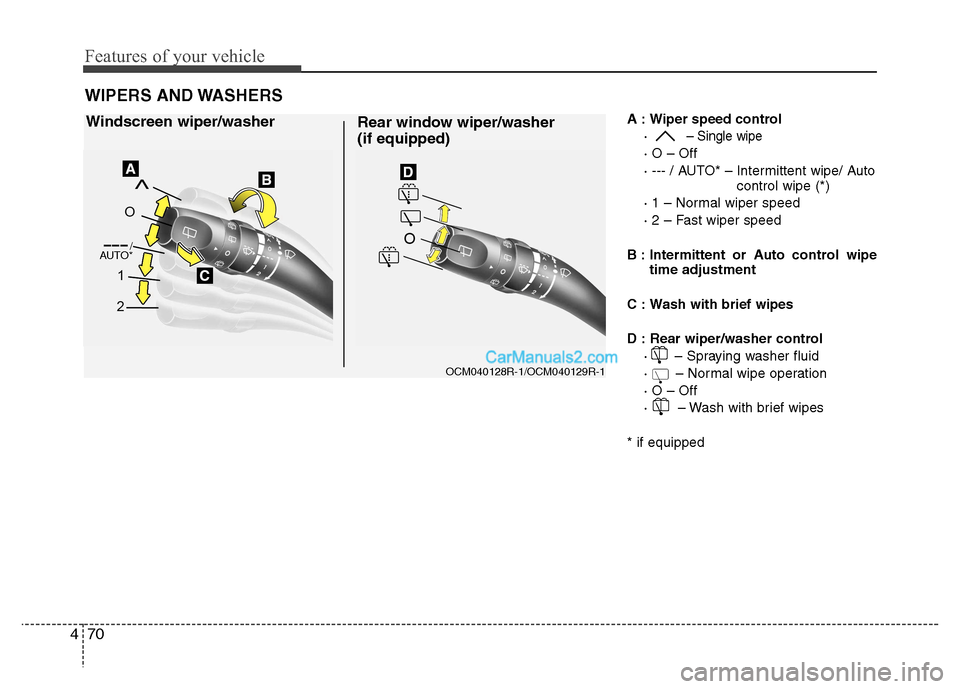
A : Wiper speed control
·
– Single wipe
· O – Off
· --- / AUTO* – Intermittent wipe/ Auto control wipe (*)
· 1 – Normal wiper speed
· 2 – Fast wiper speed
B : Intermittent or Auto control wipe time adjustment
C : Wash with brief wipes D : Rear wiper/washer control · – Spraying washer fluid
· – Normal wipe operation· O – Off
· – Wash with brief wipes
* if equipped
WIPERS AND WASHERS
OCM040128R-1/OCM040129R-1
Windscreen wiper/washerRear window wiper/washer (if equipped)
AUTO* /
Page 146 of 312
471
Features of your vehicle
D200100ACM
Windscreen wipers
Operates as follows when the ignition
switch is turned ON.: For a single wiping cycle, push thelever upward and release it with
the lever in the OFF (O) position.
The wipers will operate continu-
ously if the lever is pushed upwardand held.
O : Wiper is not in operation.
--- : Wiper operates intermittently at the same wiping intervals. Use this mode
in a light rain or mist. To vary the
speed setting, turn the speed control
knob.
1 : Normal wiper speed
2 : Fast wiper speed
✽✽ NOTICE
If there is heavy accumulation of snow
or ice on the windscreen, defrost the
windscreen for about 10 minutes, or
until the snow and/or ice is removed
before using the windscreen wipers to
ensure proper operation.
D200101AFD
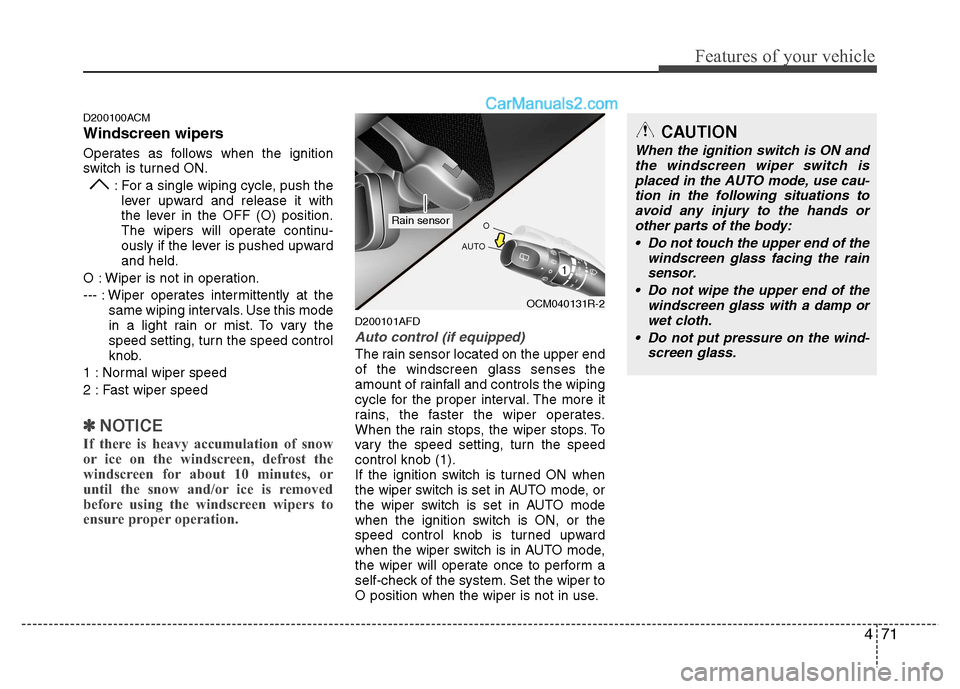
Auto control (if equipped)
The rain sensor located on the upper end of the windscreen glass senses the
amount of rainfall and controls the wiping
cycle for the proper interval. The more it
rains, the faster the wiper operates.
When the rain stops, the wiper stops. To
vary the speed setting, turn the speedcontrol knob (1).
If the ignition switch is turned ON when
the wiper switch is set in AUTO mode, or
the wiper switch is set in AUTO mode
when the ignition switch is ON, or the
speed control knob is turned upward
when the wiper switch is in AUTO mode,
the wiper will operate once to perform a
self-check of the system. Set the wiper to
O position when the wiper is not in use.
CAUTION
When the ignition switch is ON and the windscreen wiper switch is
placed in the AUTO mode, use cau- tion in the following situations toavoid any injury to the hands orother parts of the body:
Do not touch the upper end of the windscreen glass facing the rainsensor.
Do not wipe the upper end of the windscreen glass with a damp or
wet cloth.
Do not put pressure on the wind- screen glass.
OCM040131R-2
Rain sensor
Page 147 of 312
Features of your vehicle
72
4
D200200AFD
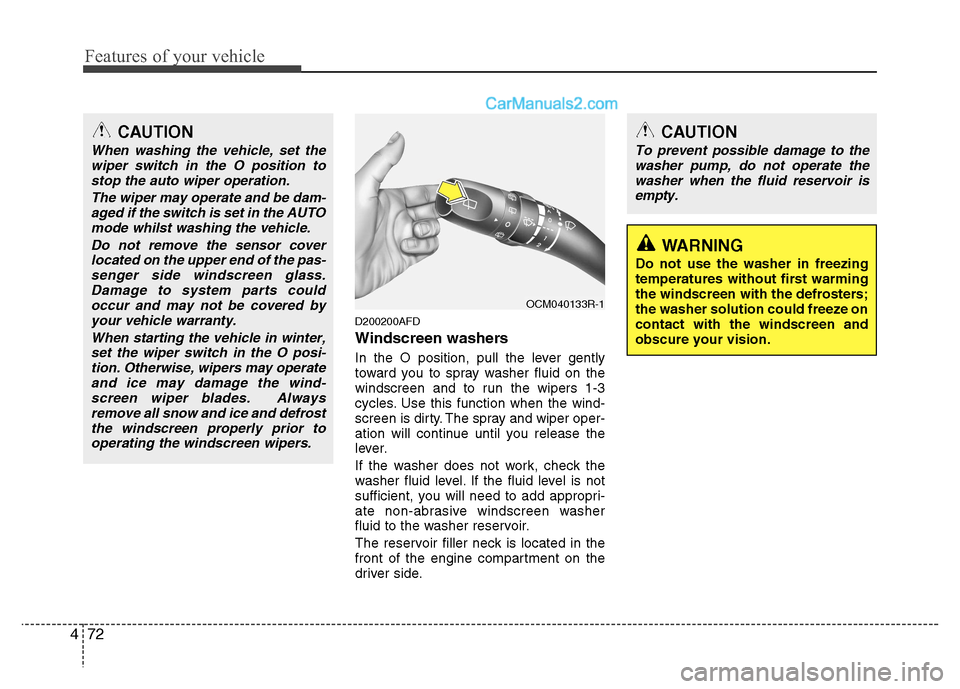
Windscreen washers
In the O position, pull the lever gently
toward you to spray washer fluid on the
windscreen and to run the wipers 1-3
cycles. Use this function when the wind-
screen is dirty. The spray and wiper oper-
ation will continue until you release the
lever.
If the washer does not work, check the
washer fluid level. If the fluid level is not
sufficient, you will need to add appropri-
ate non-abrasive windscreen washer
fluid to the washer reservoir.
The reservoir filler neck is located in the
front of the engine compartment on the
driver side.
CAUTION
When washing the vehicle, set the
wiper switch in the O position to
stop the auto wiper operation.
The wiper may operate and be dam-aged if the switch is set in the AUTO mode whilst washing the vehicle.
Do not remove the sensor coverlocated on the upper end of the pas-senger side windscreen glass.Damage to system parts could occur and may not be covered by
your vehicle warranty.
When starting the vehicle in winter,set the wiper switch in the O posi-tion. Otherwise, wipers may operateand ice may damage the wind-
screen wiper blades. Alwaysremove all snow and ice and defrostthe windscreen properly prior tooperating the windscreen wipers.
OCM040133R-1
CAUTION
To prevent possible damage to the washer pump, do not operate the
washer when the fluid reservoir is empty.
WARNING
Do not use the washer in freezing temperatures without first warmingthe windscreen with the defrosters;the washer solution could freeze oncontact with the windscreen andobscure your vision.
Page 148 of 312
473
Features of your vehicle
D200300AFD
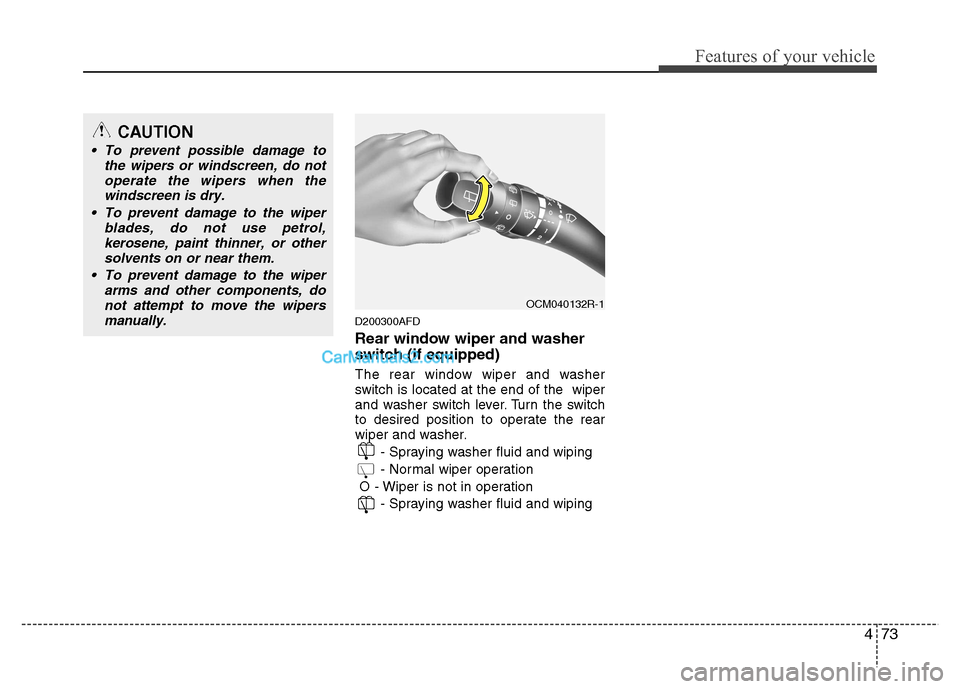
Rear window wiper and washer
switch (if equipped)
The rear window wiper and washer
switch is located at the end of the wiper
and washer switch lever. Turn the switch
to desired position to operate the rear
wiper and washer.- Spraying washer fluid and wiping
- Normal wiper operation
O - Wiper is not in operation - Spraying washer fluid and wiping
CAUTION
To prevent possible damage tothe wipers or windscreen, do not
operate the wipers when thewindscreen is dry.
To prevent damage to the wiper blades, do not use petrol,
kerosene, paint thinner, or other solvents on or near them.
To prevent damage to the wiper arms and other components, donot attempt to move the wipers
manually.
OCM040132R-1
Page 149 of 312
Features of your vehicle
74
4
D210000AUN
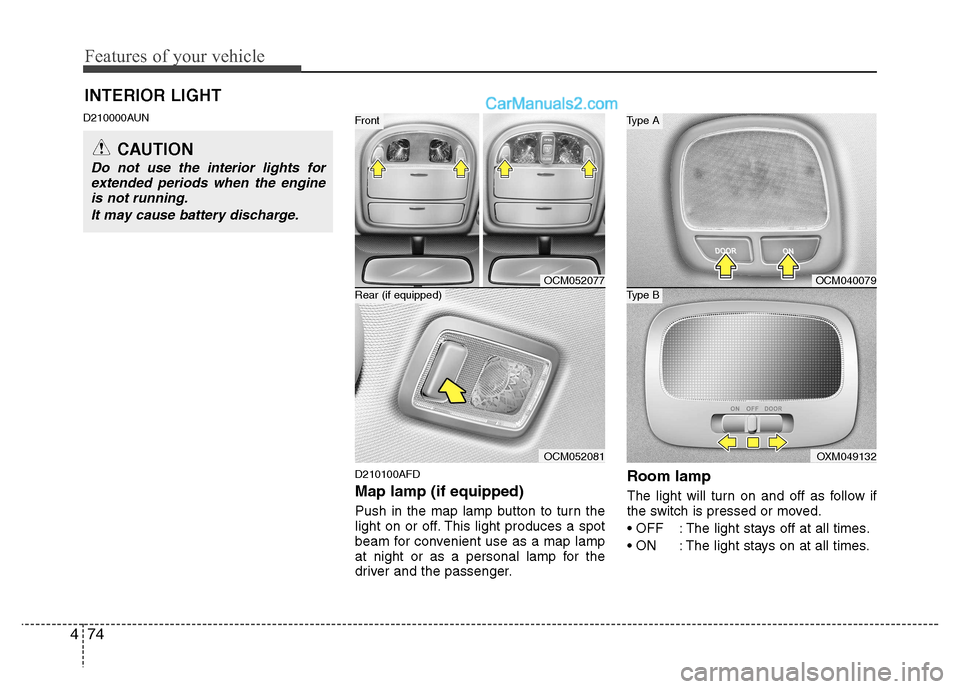
D210100AFD Map lamp (if equipped)
Push in the map lamp button to turn the
light on or off. This light produces a spot
beam for convenient use as a map lamp
at night or as a personal lamp for the
driver and the passenger.Room lamp
The light will turn on and off as follow if
the switch is pressed or moved.
: The light stays off at all times.
: The light stays on at all times.
INTERIOR LIGHT
CAUTION
Do not use the interior lights for
extended periods when the engineis not running.
It may cause battery discharge.
OCM052077
OCM052081
Rear (if equipped)
Front
OCM040079
OXM049132
Type B
Type A
Page 150 of 312
475
Features of your vehicle
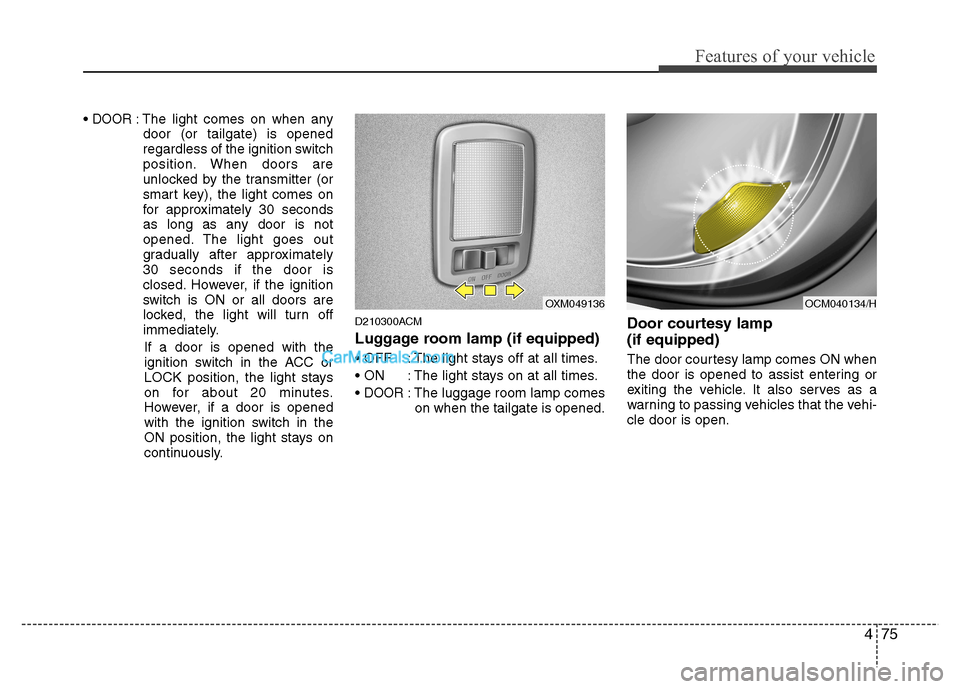
DOOR: The light comes on when anydoor (or tailgate) is opened
regardless of the ignition switch
position. When doors are
unlocked by the transmitter (or
smart key), the light comes on
for approximately 30 seconds
as long as any door is not
opened. The light goes out
gradually after approximately30 seconds if the door is
closed. However, if the ignition
switch is ON or all doors are
locked, the light will turn off
immediately.
If a door is opened with the
ignition switch in the ACC or
LOCK position, the light stays
on for about 20 minutes.
However, if a door is opened
with the ignition switch in the
ON position, the light stays on
continuously. D210300ACM
Luggage room lamp (if equipped)
: The light stays off at all times.
: The light stays on at all times.
DOOR: The luggage room lamp comes
on when the tailgate is opened. Door courtesy lamp (if equipped)
The door courtesy lamp comes ON when
the door is opened to assist entering or
exiting the vehicle. It also serves as a
warning to passing vehicles that the vehi-cle door is open.
OXM049136OCM040134/H