API Hyundai Santa Fe 2011 Owner's Manual - RHD (UK, Australia)
[x] Cancel search | Manufacturer: HYUNDAI, Model Year: 2011, Model line: Santa Fe, Model: Hyundai Santa Fe 2011Pages: 312, PDF Size: 23.92 MB
Page 60 of 312
343
Safety system of your vehicle
(Continued)
Sitting improperly or out of posi-tion can result in serious or fatal
injury in a crash. All occupantsshould sit upright with the seat
back in an upright position, cen-tred on the seat cushion with
their seat belt on, legs comfort-
ably extended and their feet on
the floor until the vehicle is
parked and the ignition key is
removed.
The SRS air bag system must deploy very rapidly to provide
protection in a crash. If an occu-pant is out of position because of
not wearing a seat belt, the air
bag may forcefully contact theoccupant causing serious or fatalinjuries.(Continued)
A child restraint system mustnever be placed in the front seat.
The infant or child could be
severely injured or killed by an air
bag deployment in case of an
accident. NB See section -
Passenger's front air bag ON/OFF
switch (if equipped).
Children age 12 and under must always be properly restrained in
the rear seat. Never allow chil-
dren to ride in the front passen-
ger seat. If a child over 12 must
be seated in the front seat, he or
she must be properly belted and
the seat should be moved as far
back as possible.
For maximum safety protection in all types of crashes, all occu-
pants including the driver should
always wear their seat belts
whether or not an air bag is also
provided at their seating position
to minimise the risk of severe
injury or death in the event of a
crash. Do not sit or lean unneces-
sarily close to the air bag whilst
the vehicle is in motion.
(Continued)
C040501AFD
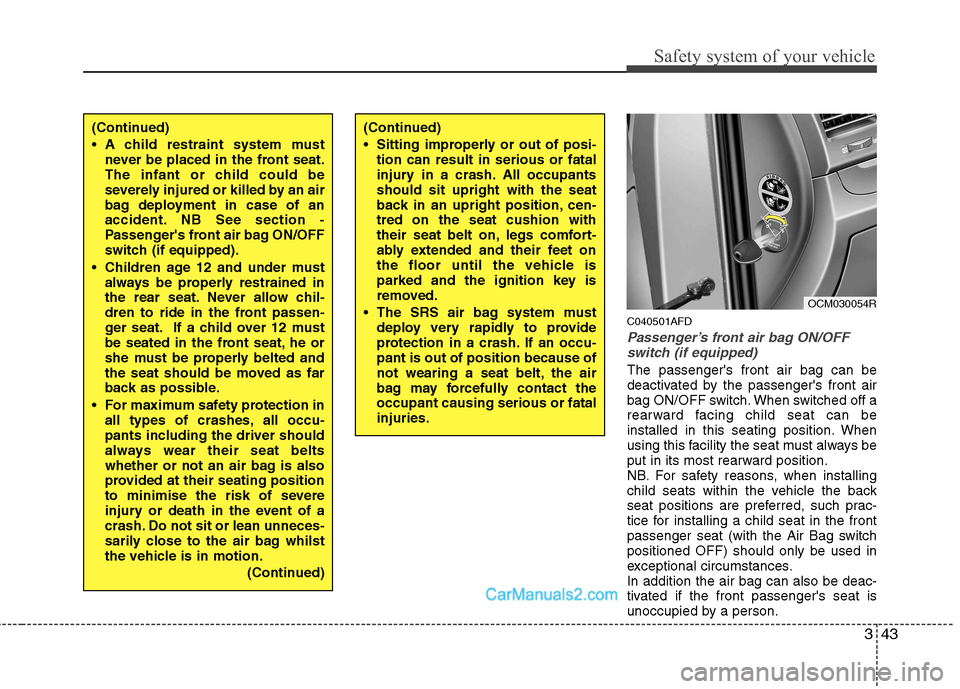
Passenger’s front air bag ON/OFFswitch (if equipped)
The passenger's front air bag can be
deactivated by the passenger's front air
bag ON/OFF switch. When switched off a
rearward facing child seat can be
installed in this seating position. When
using this facility the seat must always be
put in its most rearward position.
NB. For safety reasons, when installing
child seats within the vehicle the back
seat positions are preferred, such prac-
tice for installing a child seat in the front
passenger seat (with the Air Bag switchpositioned OFF) should only be used in
exceptional circumstances.In addition the air bag can also be deac-
tivated if the front passenger's seat is
unoccupied by a person.
OCM030054R
Page 70 of 312
353
Safety system of your vehicle
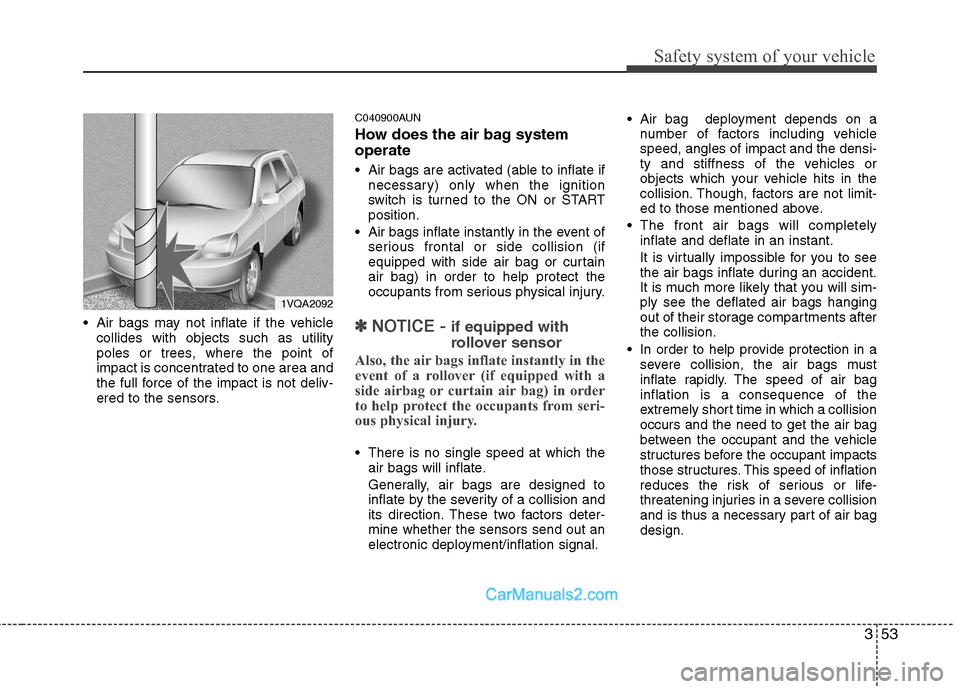
Air bags may not inflate if the vehiclecollides with objects such as utility
poles or trees, where the point of
impact is concentrated to one area and
the full force of the impact is not deliv-
ered to the sensors. C040900AUN
How does the air bag system operate
Air bags are activated (able to inflate if
necessary) only when the ignition
switch is turned to the ON or STARTposition.
Air bags inflate instantly in the event of serious frontal or side collision (if
equipped with side air bag or curtainair bag) in order to help protect the
occupants from serious physical injury.✽✽ NOTICE - if equipped with
rollover sensor
Also, the air bags inflate instantly in the
event of a rollover (if equipped with a
side airbag or curtain air bag) in order
to help protect the occupants from seri-
ous physical injury.
There is no single speed at which the air bags will inflate.
Generally, air bags are designed to
inflate by the severity of a collision and
its direction. These two factors deter-mine whether the sensors send out an
electronic deployment/inflation signal. Air bag deployment depends on a
number of factors including vehiclespeed, angles of impact and the densi-
ty and stiffness of the vehicles or
objects which your vehicle hits in the
collision. Though, factors are not limit-
ed to those mentioned above.
The front air bags will completely inflate and deflate in an instant.
It is virtually impossible for you to see
the air bags inflate during an accident.
It is much more likely that you will sim-ply see the deflated air bags hanging
out of their storage compartments afterthe collision.
In order to help provide protection in a severe collision, the air bags must
inflate rapidly. The speed of air baginflation is a consequence of the
extremely short time in which a collisionoccurs and the need to get the air bag
between the occupant and the vehicle
structures before the occupant impacts
those structures. This speed of inflation
reduces the risk of serious or life-
threatening injuries in a severe collision
and is thus a necessary part of air bagdesign.
1VQA2092
Page 87 of 312
Features of your vehicle
12
4
D050100ACM
Operating door locks from out-
side the vehicle
Turn the key toward rear of vehicle to
unlock and toward front of vehicle to
lock.
If you lock/unlock the door with a key, all vehicle doors will lock/unlock auto-
matically.
Doors can also be locked and unlocked with the transmitter key (ifequipped).
Once the doors are unlocked, they may be opened by pulling the door handle.
When closing the door, push the door by hand. Make sure that doors are
closed securely. ❈
If your vehicle is equipped with the
remote keyless entry system, there is
no key lock on the front passenger's
door.
✽✽
NOTICE
In cold and wet climates, door lock and door mechanisms may not work
properly due to freezing conditions.
If the door is locked/unlocked multi- ple times in rapid succession with
either the vehicle key or door lock
switch, the system may stop operating
temporarily in order to protect the
circuit and prevent damage to system
components.
Always remove the ignition key, engage the parking brake, close all
windows and lock all doors when leav-
ing your vehicle unattended.
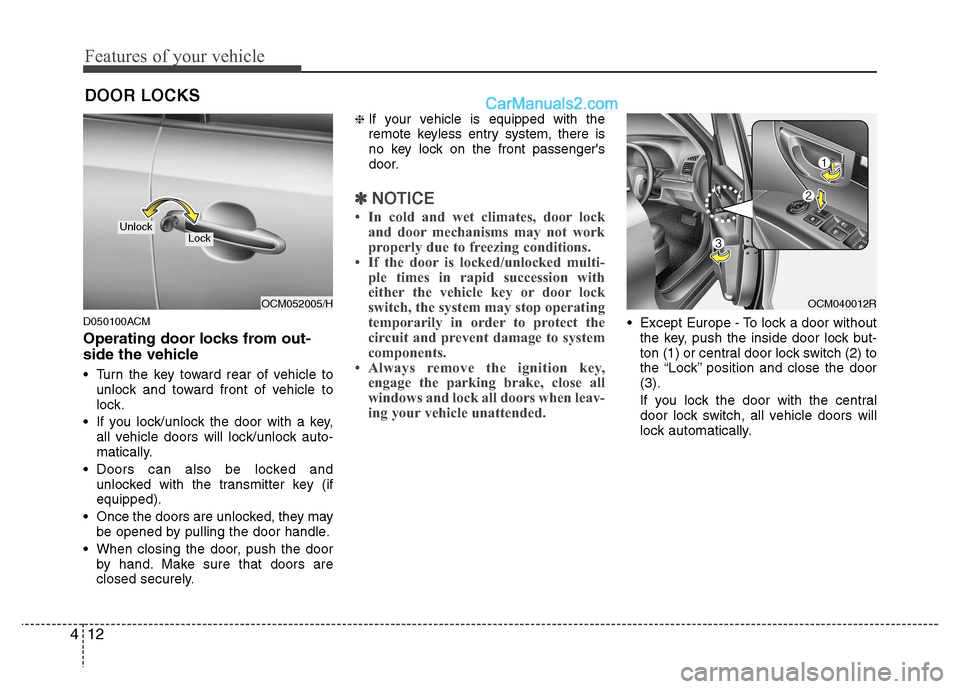
Except Europe - To lock a door withoutthe key, push the inside door lock but-
ton (1) or central door lock switch (2 )to
the “Lock” position and close the door(3).
If you lock the door with the central
door lock switch, all vehicle doors will
lock automatically.
DOOR LOCKS
OCM052005/H
LockUnlock
OCM040012R
Page 100 of 312
425
Features of your vehicle
D100300BFD
WARNING - Refuelling
dangers
Automotive fuels are flammable
materials. When refuelling, please
note the following guidelines care-
fully. Failure to follow these guide-
lines may result in severe personal
injury, severe burns or death by fire
or explosion.
Read and follow all warning at the gas station facility.
Before refuelling note the loca- tion of the Emergency Petrol
Shut-Off, if available, at the gas
station facility.
Before touching the fuel nozzle, you should eliminate potentially
dangerous static electricity dis-
charge by touching another metal
part of the vehicle, a safe dis-
tance away from the fuel filler
neck, nozzle, or other gas source.
(Continued)
WARNING - Refuelling
If pressurized fuel sprays out, it can cover your clothes or skin
and thus subject you to the risk
of fire and burns. Always remove
the fuel cap carefully and slowly.
If the cap is venting fuel or if you
hear a hissing sound, wait until
the condition stops before com-
pletely removing the cap.
Do not "top off" after the nozzle automatically shuts off whenrefuelling.
Always check that the fuel cap is installed securely to prevent fuel
spillage in the event of an acci-dent.
(Continued)
Do not get back into a vehicle
once you have begun refuelling
since you can generate static
electricity by touching, rubbing
or sliding against any item or fab-
ric (polyester, satin, nylon, etc.)
capable of producing static elec-
tricity. Static electricity discharge
can ignite fuel vapours resulting
in rapid burning. If you must re-
enter the vehicle, you should
once again eliminate potentially
dangerous static electricity dis-
charge by touching a metal part
of the vehicle, away from the fuel
filler neck, nozzle or other petrol
source.
When using a portable fuel con- tainer be sure to place the con-
tainer on the ground prior to refu-
elling. Static electricity discharge
from the container can ignite fuel
vapours causing a fire. Once
refuelling has begun, contact
with the vehicle should be main-tained until the filling is com-
plete.
(Continued)
Page 124 of 312
449
Features of your vehicle
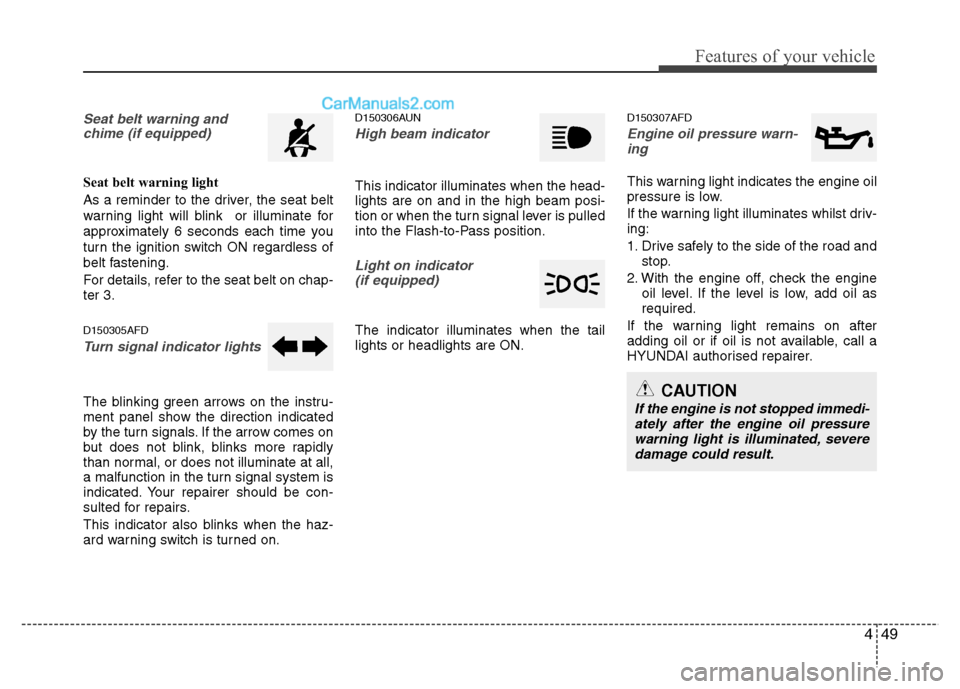
Seat belt warning andchime (if equipped)
Seat belt warning light
As a reminder to the driver, the seat belt
warning light will blink or illuminate for
approximately 6 seconds each time you
turn the ignition switch ON regardless of
belt fastening.
For details, refer to the seat belt on chap- ter 3. D150305AFD
Turn signal indicator lights
The blinking green arrows on the instru-
ment panel show the direction indicated
by the turn signals. If the arrow comes on
but does not blink, blinks more rapidly
than normal, or does not illuminate at all,
a malfunction in the turn signal system is
indicated. Your repairer should be con-
sulted for repairs.
This indicator also blinks when the haz-
ard warning switch is turned on. D150306AUN
High beam indicator
This indicator illuminates when the head- lights are on and in the high beam posi-
tion or when the turn signal lever is pulled
into the Flash-to-Pass position.
Light on indicator
(if equipped)
The indicator illuminates when the tail lights or headlights are ON. D150307AFD
Engine oil pressure warn-
ing
This warning light indicates the engine oil
pressure is low.
If the warning light illuminates whilst driv- ing:
1. Drive safely to the side of the road and stop.
2. With the engine off, check the engine oil level. If the level is low, add oil as required.
If the warning light remains on after
adding oil or if oil is not available, call a
HYUNDAI authorised repairer.
CAUTION
If the engine is not stopped immedi- ately after the engine oil pressurewarning light is illuminated, severe
damage could result.
Page 160 of 312
485
Features of your vehicle
When using the air conditioning sys-tem, you may notice clear water drip-
ping (or even puddling) on the ground
under the passenger side of the vehi-
cle. This is a normal system operation
characteristic.
Operating the air conditioning system in the recirculated air position provides
maximum cooling, however, continual
operation in this mode may cause the
air inside the vehicle to become stale.
During cooling operation, you may occasionally notice a misty air flow
because of rapid cooling and humid air
intake. This is a normal system opera-
tion characteristic. D230300AFD
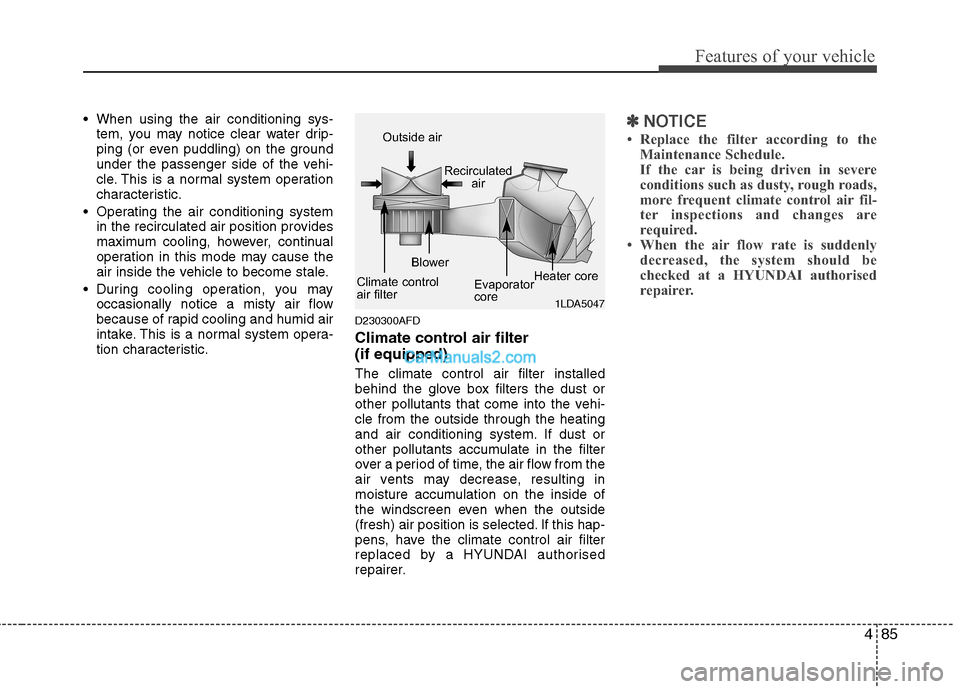
Climate control air filter (if equipped) The climate control air filter installed
behind the glove box filters the dust or
other pollutants that come into the vehi-cle from the outside through the heating
and air conditioning system. If dust or
other pollutants accumulate in the filter
over a period of time, the air flow from the
air vents may decrease, resulting in
moisture accumulation on the inside of
the windscreen even when the outside
(fresh) air position is selected. If this hap-
pens, have the climate control air filter
replaced by a HYUNDAI authorised
repairer.✽✽
NOTICE
Replace the filter according to the Maintenance Schedule.
If the car is being driven in severe
conditions such as dusty, rough roads,
more frequent climate control air fil-
ter inspections and changes are
required.
When the air flow rate is suddenly
decreased, the system should be
checked at a HYUNDAI authorised
repairer.
1LDA5047
Outside air
Recirculatedair
Climate control
air filter Blower
Evaporator
coreHeater core
Page 218 of 312
515
Driving your vehicle
During cold weather, shifting may bedifficult until the transaxle lubricant is
warmed up. This is normal and not
harmful to the transaxle.
If you've come to a complete stop and it's hard to shift into 1st or R(Reverse),
leave the shift lever at N(Neutral) posi-
tion and release the clutch. Press the
clutch pedal back down, and then shift
into 1st or R(Reverse) gear position. E050101AUNUsing the clutch
The clutch should be pressed all the way
to the floor before shifting, then released
slowly. The clutch pedal should always be
fully released whilst driving. Do not rest
your foot on the clutch pedal whilst driv-
ing. This can cause unnecessary wear.
Do not partially engage the clutch to hold
the vehicle on an incline. This causes
unnecessary wear. Use the foot brake or
parking brake to hold the vehicle on an
incline. Do not operate the clutch pedal
rapidly and repeatedly.
E050102AUN
Downshifting
When you must slow down in heavy traf-
fic or whilst driving up steep hills, down-
shift before the engine starts to labour.
Downshifting reduces the chance of
stalling and gives better acceleration
when you again need to increase your
speed. When the vehicle is travelling
down steep hills, downshifting helps
maintain safe speed and prolongs brake
life.
CAUTION
To avoid premature clutch wear
and damage, do not drive with
your foot resting on the clutch pedal. Also, don’t use the clutchto hold the vehicle stopped on anuphill grade, whilst waiting for a
traffic light, etc.
Do not use the shift lever as a handrest during driving, as thiscan result in premature wear of the transaxle shift forks.
WARNING
Before leaving the driver’s seat, always set the parking brake fully
and shut the engine off. Thenmake sure the transaxle is shifted
into 1st gear when the vehicle is
parked on a level or uphill grade,
and shifted into R (Reverse) on a
downhill grade. Unexpected and
sudden vehicle movement canoccur if these precautions are not
followed in the order identified.
If your vehicle has a manual transaxle not equipped with a
ignition lock switch, it may moveand cause a serious accident
when starting the engine without
depressing the clutch pedalwhilst the parking brake is
released and the shift lever not inthe N(Neutral) position.
Page 223 of 312
Driving your vehicle
20
5
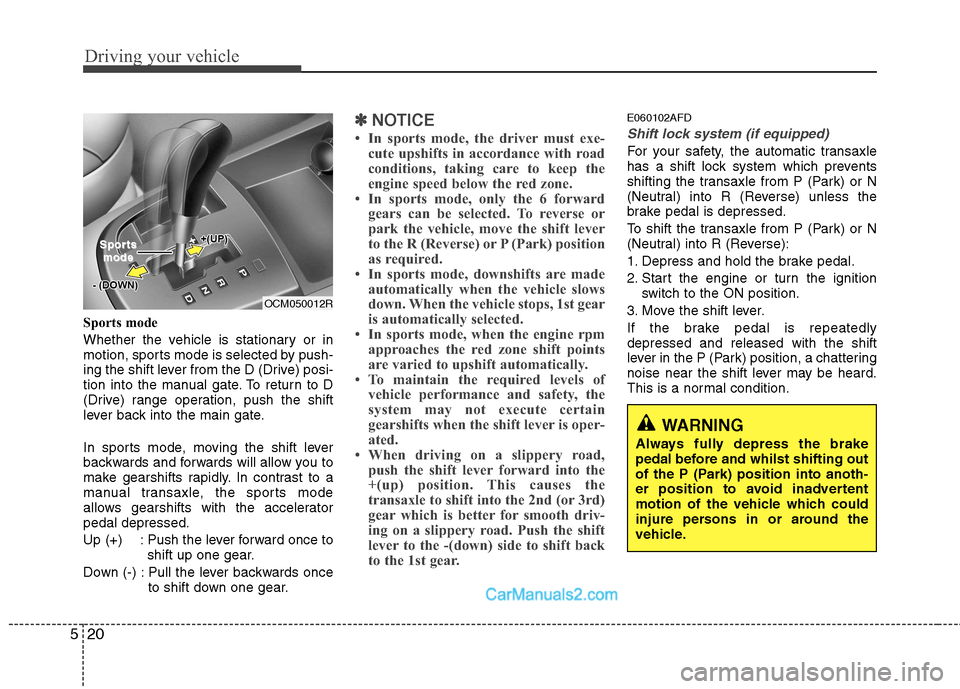
Sports mode
Whether the vehicle is stationary or in
motion, sports mode is selected by push-
ing the shift lever from the D (Drive) posi-
tion into the manual gate. To return to D
(Drive) range operation, push the shift
lever back into the main gate.
In sports mode, moving the shift lever
backwards and forwards will allow you to
make gearshifts rapidly. In contrast to a
manual transaxle, the sports mode
allows gearshifts with the acceleratorpedal depressed.
Up (+) : Push the lever forward once to
shift up one gear.
Down (-) : Pull the lever backwards once to shift down one gear.
✽✽NOTICE
In sports mode, the driver must exe- cute upshifts in accordance with road
conditions, taking care to keep the
engine speed below the red zone.
In sports mode, only the 6 forward
gears can be selected. To reverse or
park the vehicle, move the shift lever
to the R (Reverse) or P (Park) position
as required.
In sports mode, downshifts are made automatically when the vehicle slows
down. When the vehicle stops, 1st gear
is automatically selected.
In sports mode, when the engine rpm approaches the red zone shift points
are varied to upshift automatically.
To maintain the required levels of
vehicle performance and safety, the
system may not execute certain
gearshifts when the shift lever is oper-
ated.
When driving on a slippery road, push the shift lever forward into the
+(up) position. This causes the
transaxle to shift into the 2nd (or 3rd)
gear which is better for smooth driv-
ing on a slippery road. Push the shift
lever to the -(down) side to shift back
to the 1st gear.E060102AFD
Shift lock system (if equipped)
For your safety, the automatic transaxle
has a shift lock system which prevents
shifting the transaxle from P (Park) or N
(Neutral) into R (Reverse) unless the
brake pedal is depressed.
To shift the transaxle from P (Park) or N
(Neutral) into R (Reverse):
1. Depress and hold the brake pedal.
2. Start the engine or turn the ignition switch to the ON position.
3. Move the shift lever.
If the brake pedal is repeatedly depressed and released with the shift
lever in the P (Park) position, a chattering
noise near the shift lever may be heard.
This is a normal condition.
OCM050012R
SporSportstsmodemode
WARNING
Always fully depress the brake
pedal before and whilst shifting out
of the P (Park) position into anoth-
er position to avoid inadvertent
motion of the vehicle which could
injure persons in or around the
vehicle.
Page 255 of 312
Driving your vehicle
52
5
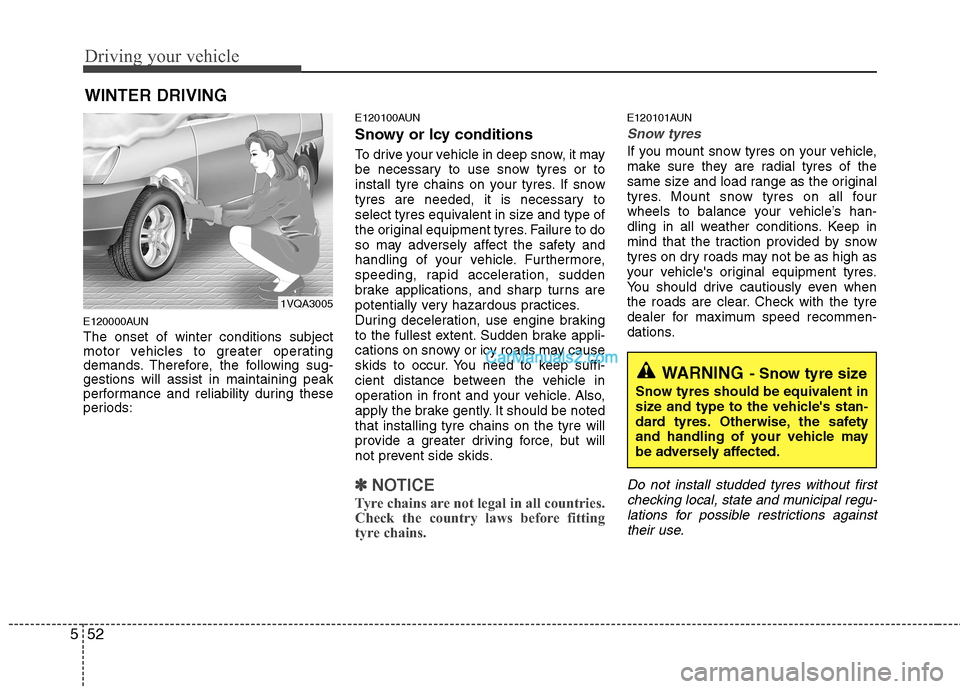
E120000AUN The onset of winter conditions subject
motor vehicles to greater operating
demands. Therefore, the following sug-gestions will assist in maintaining peak
performance and reliability during these
periods: E120100AUN
Snowy or Icy conditions
To drive your vehicle in deep snow, it may
be necessary to use snow tyres or to
install tyre chains on your tyres. If snow
tyres are needed, it is necessary to
select tyres equivalent in size and type of
the original equipment tyres. Failure to do
so may adversely affect the safety and
handling of your vehicle. Furthermore,
speeding, rapid acceleration, sudden
brake applications, and sharp turns are
potentially very hazardous practices.
During deceleration, use engine braking
to the fullest extent. Sudden brake appli-
cations on snowy or icy roads may cause
skids to occur. You need to keep suffi-
cient distance between the vehicle in
operation in front and your vehicle. Also,
apply the brake gently. It should be notedthat installing tyre chains on the tyre will
provide a greater driving force, but will
not prevent side skids.
✽✽
NOTICE
Tyre chains are not legal in all countries.
Check the country laws before fitting
tyre chains.
E120101AUN
Snow tyres
If you mount snow tyres on your vehicle,
make sure they are radial tyres of the
same size and load range as the original
tyres. Mount snow tyres on all four
wheels to balance your vehicle’s han-
dling in all weather conditions. Keep in
mind that the traction provided by snow
tyres on dry roads may not be as high as
your vehicle's original equipment tyres.
You should drive cautiously even when
the roads are clear. Check with the tyre
dealer for maximum speed recommen-
dations.
Do not install studded tyres without first checking local, state and municipal regu-
lations for possible restrictions against their use.
WINTER DRIVING
WARNING - Snow tyre size
Snow tyres should be equivalent in
size and type to the vehicle's stan-
dard tyres. Otherwise, the safety
and handling of your vehicle may
be adversely affected.
1VQA3005
Page 298 of 312
Specifications & Consumer information
4
8
RECOMMENDED LUBRICANTS AND CAPACITIES
I040000CCM
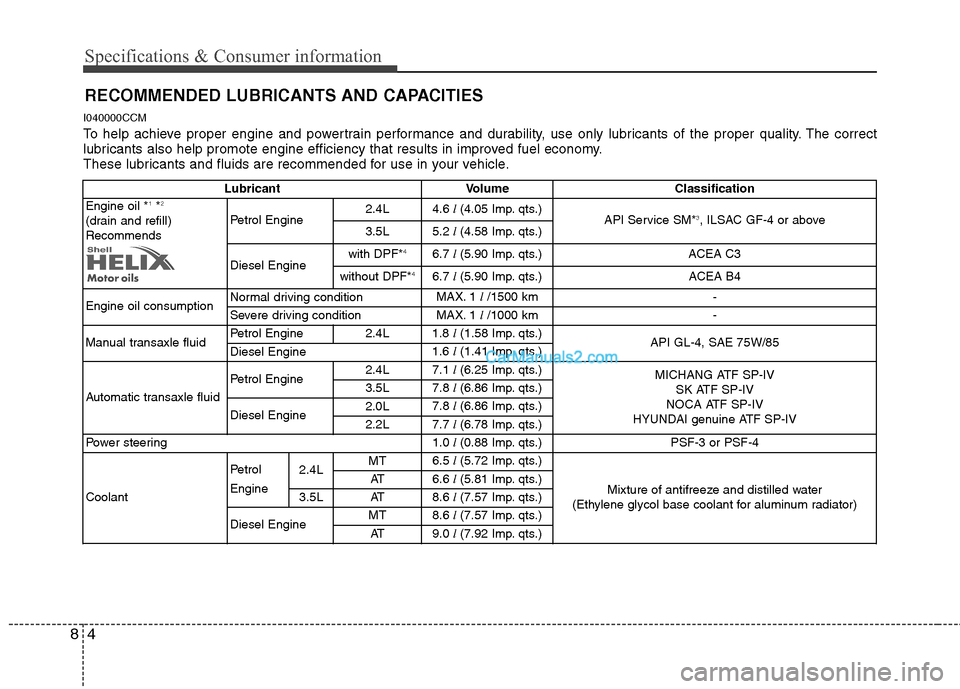
To help achieve proper engine and powertrain performance and durability, use only lubricants of the proper quality. The correct
lubricants also help promote engine efficiency that results in improved fuel economy.
These lubricants and fluids are recommended for use in your vehicle.
Lubricant Volume Classification
Engine oil * 1
*2
(drain and refill) Recommends Petrol Engine
2.4L
4.6
l (4.05 Imp. qts.)
API Service SM*3
, ILSAC GF-4 or above
3.5L 5.2
l (4.58 Imp. qts.)
Diesel Engine with DPF*
4
6.7 l (5.90 Imp. qts.)
ACEA C3
without DPF* 4
6.7 l (5.90 Imp. qts.)
ACEA B4
Engine oil consumption Normal driving condition
MAX. 1
l/1500 km
-
Severe driving condition MAX. 1
l/1000 km
-
Manual transaxle fluid Petrol Engine 2.4L
1.8
l(1.58 Imp. qts.)
API GL-4, SAE 75W/85
Diesel Engine 1.6
l(1.41 Imp. qts.)
Automatic transaxle fluid Petrol Engine
2.4L
7.1
l (6.25 Imp. qts.)
MICHANG ATF SP-IV
SK ATF SP-IV
NOCA ATF SP-IV
HYUNDAI genuine ATF SP-IV
3.5L
7.8
l (6.86 Imp. qts.)
Diesel Engine 2.0L
7.8
l (6.86 Imp. qts.)
2.2L 7.7
l (6.78 Imp. qts.)
Power steering 1.0
l (0.88 Imp. qts.)
PSF-3 or PSF-4
Coolant Petrol Engine
2.4L
MT
6.5
l (5.72 Imp. qts.)
Mixture of antifreeze and distilled water
(Ethylene glycol base coolant for aluminum radiator)
AT
6.6
l (5.81 Imp. qts.)
3.5L AT 8.6
l (7.57 Imp. qts.)
Diesel Engine MT
8.6
l (7.57 Imp. qts.)
AT 9.0
l (7.92 Imp. qts.)