Hyundai Santa Fe 2012 Owner's Manual
Manufacturer: HYUNDAI, Model Year: 2012, Model line: Santa Fe, Model: Hyundai Santa Fe 2012Pages: 419, PDF Size: 5.61 MB
Page 211 of 419
Features of your vehicle
132
4
Before using Bluetooth®wireless tech-
nology features, the phone must be
paired (registered) with the audio sys-
tem. Up to 5 phones can be paired with
the system.
NOTE:
•The pairing procedure of the phone
varies according to each phone
model. Before attempting to pair
phone, please see your phone’s
User’s Guide for instructions.
•Once pairing with the phone is com-
pleted, there is no need to pair with
that phone again unless the phone
is deleted manually from the audio
system (refer “Deleting a Phone”
section) or the vehicle’s information
is removed from the phone.
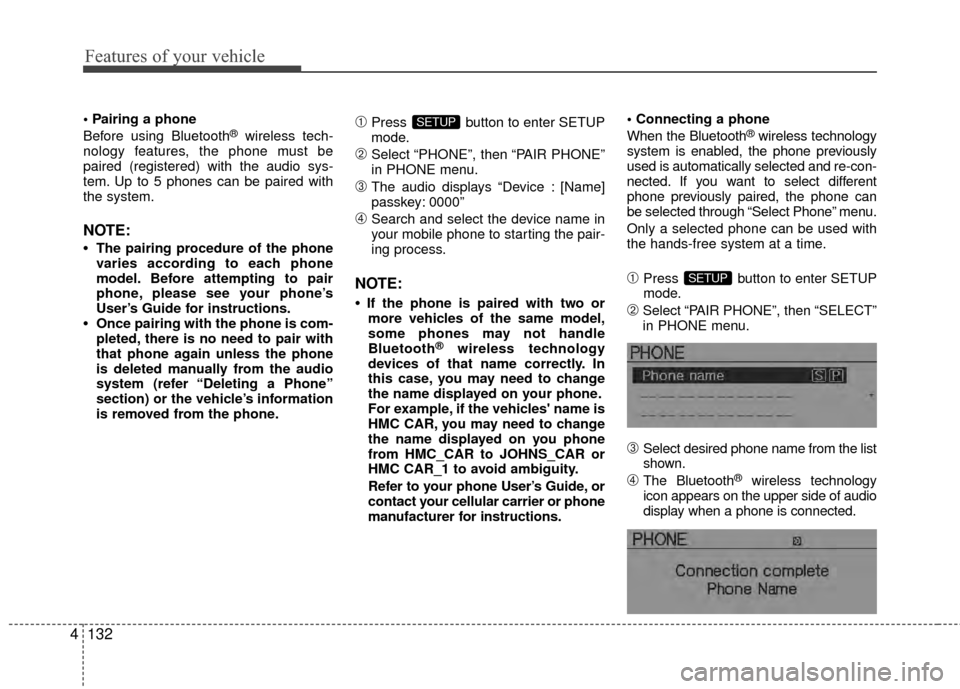
➀Press button to enter SETUP
mode.
➁Select “PHONE”, then “PAIR PHONE”
in PHONE menu.
\bThe audio displays “Device : [Name]
passkey: 0000”
➃Search and select the device name in
your mobile phone to starting the pair-
ing process.
NOTE:
• If the phone is paired with two or more vehicles of the same model,
some phones may not handle
Bluetooth
®wireless technology
devices of that name correctly. In
this case, you may need to change
the name displayed on your phone.
For example, if the vehicles' name is
HMC CAR, you may need to change
the name displayed on you phone
from HMC_CAR to JOHNS_CAR or
HMC CAR_1 to avoid ambiguity.
Refer to your phone User’s Guide, or
contact your cellular carrier or phone
manufacturer for instructions.
When the Bluetooth
®wireless technology
system is enabled, the phone previously
used is automatically selected and re-con-
nected. If you want to select different
phone previously paired, the phone can
be selected through “Select Phone” menu.
Only a selected phone can be used with
the hands-free system at a time.
➀Press button to enter SETUP
mode.
➁Select “PAIR PHONE”, then “SELECT”
in PHONE menu.
\bSelect desired phone name from the list
shown.
➃The Bluetooth®wireless technology
icon appears on the upper side of audio
display when a phone is connected.
SETUP
SETUP
Page 212 of 419
4133
Features of your vehicle
If several phones are paired with the audio
system, the system attempts to connect
following order when the Bluetooth
®wire-
less technology system is enabled:
1) “Priority” checked phone.
2) Previously connected phone
3) Gives up auto connection.
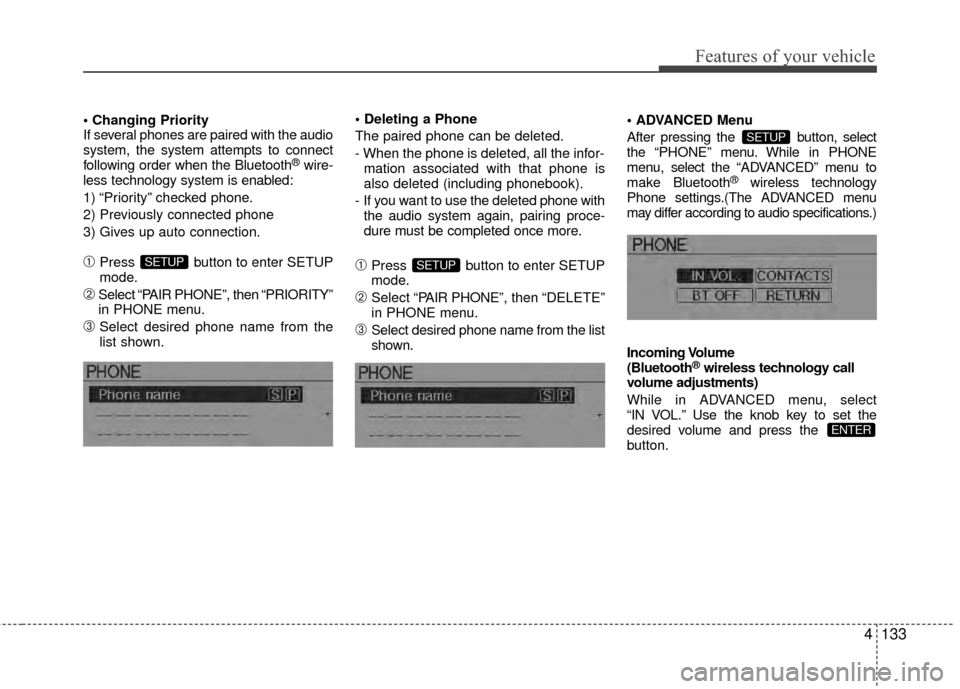
➀Press button to enter SETUP
mode.
➁Select “PAIR PHONE”, then “PRIORITY”
in PHONE menu.
\bSelect desired phone name from the
list shown.
The paired phone can be deleted.
- When the phone is deleted, all the infor-
mation associated with that phone is
also deleted (including phonebook).
- If you want to use the deleted phone with the audio system again, pairing proce-
dure must be completed once more.
➀Press button to enter SETUP
mode.
➁Select “P AIR PHONE”, then “DELETE”
in PHONE menu.
\bSelect desired phone name from the list
shown. Menu
After pressing the button, select
the “PHONE” menu. While in PHONE
menu, select the “ADV
ANCED” menu to
make Bluetooth
®wireless technology
Phone settings.(The ADVANCED menu
may differ according to audio specifications.)
Incoming Volume
(Bluetooth
®wireless technology call
volume adjustments)
While in ADVANCED menu, select
“IN VOL.” Use the knob key to set the
desired volume and press the
button.
ENTER
SETUP
SETUPSETUP
Page 213 of 419
Features of your vehicle
134
4
Contacts Sync
(Automatic Phonebook download setting)
While in ADVANCED menu, select
“CONTACTS” To automatically save the
contacts and call history in your mobile
phone each time you connect a mobile
device, select ON. If you do not wish for
automatic download, select OFF.
It’s not available to make a phone call by
bluetooth audio system while the phone-
book is being downloaded.
Bluetooth
®wireless technology sys-
tem off
While in ADVANCED menu, select
“BT OFF” to turn off the Bluetooth
®wire-
less technology system.
■Voice Recognition Activation
in the Bluetooth®wireless technology
system can be activated in the following
conditions:
- Button Activation
The voice recognition system will be
active when the button is pressed
and after the sound of a Beep.
- Active Listening The voice recognition system will be
active for a period of time when the
Voice Recognition system has asked
for a customer response.
from zero to nine while number greater
than ten will not be recognized.
tion mode in following cases : When
pressing the button and saying
“cancel” following the beep. When not
making a call and pressing the but-
ton. When voice recognition has failed
3 consecutive times.
will announce what commands are
available.
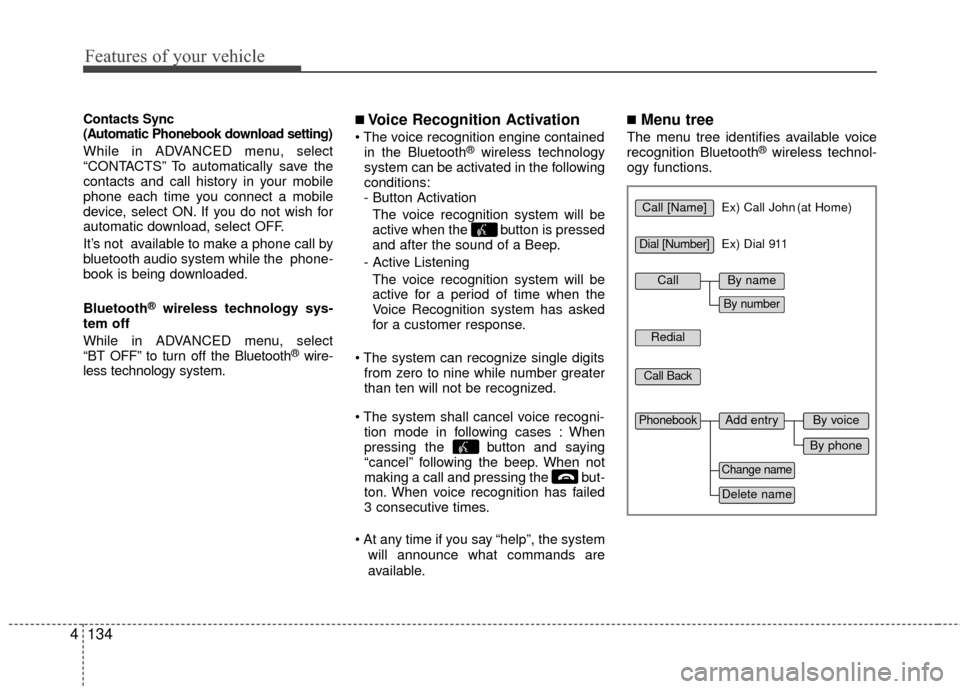
■Menu tree
The menu tree identifies available voice
recognition Bluetooth®wireless technol-
ogy functions.
Call [Name]Ex) Call John (at Home)
Ex) Dial 911
Dial [Number]
Redial
Call Back
Add entryPhonebook
Change name
Delete name
By phone
By voice
CallBy name
By number
Page 214 of 419
4135
Features of your vehicle
✽
✽Tip
■Voice Operation
To get the best performance out of the
Voice Recognition System, observe the
followings:
- Keep the interior of the vehicle as quiet as possible. Close the window
to eliminate surrounding noise
(traffic noise, vibration sounds,
etc), which may disturb recogniz-
ing the voice command correctly.
- Speak a command after a beep sound within 5 seconds. Otherwise
the command will not be received
properly.
- Speak in a natural voice without pausing between words.
- While receiving voice commands, press the button on the steer-
ing wheel remote controller to ter-
minate guidance. Voice command
will convert back to waiting mode
to allow the user to say a new voice
command.
■Making a Phone Call
➀Press button.
➁Say the following command.
- Call
- Call
- Call
- Call
Note:
Calls can be immediately connected
to contacts who name or voice tag are
saved in the phonebook(or contacts).
A phone call can be made by speaking
names registered in the audio system.
➀Press button.
➁Say “Call”.
\bSay “By name” when prompted.
➃Say desired name (in Phonebook or
voice tag).
➄Say desired location (phone number
type). Only stored locations can be
selected.
➅ Say “Yes” to confirm and make a call.
✽ ✽ Tip
A shortcut to each of the following func-
tions is available:
1. Say “Call Name”
Page 215 of 419
Features of your vehicle
136
4
A phone call can be made by dialing the
spoken numbers. The system can recog-
nize single digits from zero to nine.
➀Press button.
➁Say “Call”.
\bSay “By number” when prompted.
➃Say desired phone numbers.
➄Say “Dial” to complete the number and
make a call.
✽ ✽ Tip
A shortcut to each of the following func-
tions is available:
➀Say “Dial Number”
➁Say “Dial
■Phone Book (In-Vehicle)
Phone numbers and voice tags can be
registered. Entries registered in the
phone can also be transferred.
➀Press button.
➁Say "Phonebook".
- The system replies with all available commands.
- To skip the information message, press again and then a beep is
heard.
\bSay “Add Entry”.
➃Say “By Voice” to proceed.
➄Say the name of the entry when
prompted.
➅Say “Yes” to confirm.
\fSay the phone number of that entry
when prompted.
➇Say “Store” if phone number input is
finished.
➈ Say a phone number type. “Home”,
“Work”, “Mobile”, “Other” or “Default” is
available.
➉ Say “Yes” to complete adding entry.
Say “Yes” to store additional location
for this contact, or say “Cancel” to fin-
ish the process.
✽ ✽ NOTICE
- The system can recognize single digits
from zero to nine. Numbers that are
ten or greater cannot be recognized.
- You can enter each digit individually or group digits together in preferred
string lengths.
- To speed up input, it is a good idea to group all digits into a continuous string.
- Recommend to enter the numbers constituted an grouping within all
digit numbers to dial 995 / 734 / 0000
- The display corresponding to each operation appears on the screen as fol-
lows:
Input operation example: 1. Say: “Nine, nine, five”
➟ Display: “995”
2. And say: “Seven, three, four”
➟ Display: “995734”
11
Page 216 of 419
4137
Features of your vehicle
➀Press button.
➁Say "Phonebook".
\bSay "Add Entry" after prompt.
➃Say "By Phone" to proceed.
➄Say “Yes” to confirm.
➅ Your phone will start to transfer
phone/contact list to the audio system.
This process may take over 10 min- utes depending on the phone model
and number of entries
\fWait till the audio displays “Transfer
Complete” message.
Changing Name
The registered names can be modified.
➀Press button.
➁Say “Phonebook”.
\bSay “Change Name” after prompt.
➃Say the name of the entry (voice tag).
➄Say “Yes” to confirm.
➅ Say new desired name.
Deleting Name
The registered names can be deleted.
➀Press button.
➁Say “Phonebook”.
\bSay “Delete Name” after prompt.
➃Say the name of the entry (voice tag).
➄Say “Yes” to confirm.
■Bluetooth®wireless technology
Audio Speaker Adaptation
Speaker adaptation will improve perform-
ance of voice recognition system to a
particular user voice.
This will degrade the performance for
other users.
➀Press button for 10sec.
➁Say “Record profile”.
\bSay “Yes”.
➃Say the word displayed on Radio.
➀Press button for 10sec.
➁Say “Delete profile”.
\bSay “Yes”.
Page 217 of 419
![Hyundai Santa Fe 2012 Owners Manual Features of your vehicle
138
4
■ Key matrix
No.
Class
Paired H/P Empty Disconnected
1 SHORT
LONG
SHORT
SHORT LONG
[10sec]
LONG
[10sec] Normal mode
BT SETUP menuIncoming Call
Outgoing Call
Active Cal Hyundai Santa Fe 2012 Owners Manual Features of your vehicle
138
4
■ Key matrix
No.
Class
Paired H/P Empty Disconnected
1 SHORT
LONG
SHORT
SHORT LONG
[10sec]
LONG
[10sec] Normal mode
BT SETUP menuIncoming Call
Outgoing Call
Active Cal](/img/35/16379/w960_16379-216.png)
Features of your vehicle
138
4
■ Key matrix
No.
Class
Paired H/P Empty Disconnected
1 SHORT
LONG
SHORT
SHORT LONG
[10sec]
LONG
[10sec] Normal mode
BT SETUP menuIncoming Call
Outgoing Call
Active Call2nd Call
Not Paired Not Connecting--Accept Call
Connected
Call name or
number 2nd call
1st Call:waiting 2nd Call:active 2nd Call
2nd Call:waiting 1st Call:active
KEY
---
- -
-
Transfer call:secret call
End Call
VR
MODE Cancel VR
MODE Cancel VR
MODE Cancel VR
MODE Cancel Reject Call End Call End Call
-
Active
Change
language
-
Active Speaker
Adaptation
(Only English)
Change
language Active
Change
language Active
-Speaker
Adaptation
(Only English)
Change
language
- -
- -
- -
- -
-
--
2
3
Page 218 of 419
4139
Features of your vehicle
D320000AEN
Important Safety Information
It is always important to operate your
vehicle in a safe manner and to avoid dis-
traction while driving. This manual pro-
vides information that will help you safely
operate your Rear Seat Entertainment
System (RSE). Please read it completely
before using the system.
This device complies with part 15 of
the FCC rules.
Operation is subject to the following two
conditions:
1. This device may not cause harmfulinterference, and
2. This device must accept any interfer- ence received, including interference
that may cause undesired operation.
Welcome
The Rear Seat Entertainment System is
a compact, built-in, easy-to-use enter-
tainment system designed to provide
family fun while you are on the road.
Enjoy great quality sound from the vehi-
cle speakers, or have a private, quiet lis-
tening with the wireless headphones.
The overhead display unit is mounted to
the ceiling in the rear passenger area of
the vehicle, allowing rear-seat passen-
gers to play DVD movies, video CDs or
music CDs. Users may also plug in a
game platform or VHS player into an aux-
iliary input to show the programs through
the RSE display. The RSE can also
access to the vehicle's front radio pro-
grams.
System Overview
Connections / Setup
Your Rear Seat Entertainment system
will play DVD movies, video CDs, music
CDs or music MP3 discs, and is
designed to make your time on the road
more enjoyable. Please follow these
instructions carefully to get the most out
of your RSE.
REAR SEAT ENTERTAINMENT SYSTEM (RSE) (IF EQUIPPED)
CAUTION
Avoid having food or drinks near, in or on the RSE, the wirelessheadphones or the remote con-troller.
Direct sunlight may interfere with the headphone's operation andperformance.
Normal RSE operation cannot be guaranteed with unofficiallyduplicated discs.
(Continued)
WARNING
Changes or modifications not
expressly approved by the party
responsible for compliance could
void the user's authority to operate
the equipment.
Page 219 of 419
Features of your vehicle
140
4
✽
✽
NOTICE
The RSE requires a few seconds of set
up time after the ignition switch is
turned ON or to ACC mode.
Your RSE system is already set up and
ready for use, and can be turned on by
pushing the POWER/VOLUME knob on
the RSE control panel or the POWER
ON/OFF button on the remote
controll. The vehicle's ignition must be
turned on or in accessory power mode.
The RSE system can also be turned OFF
by the Audio Unit.
Components
Your RSE consists of several compo-
nents:
Monitor (LCD display)
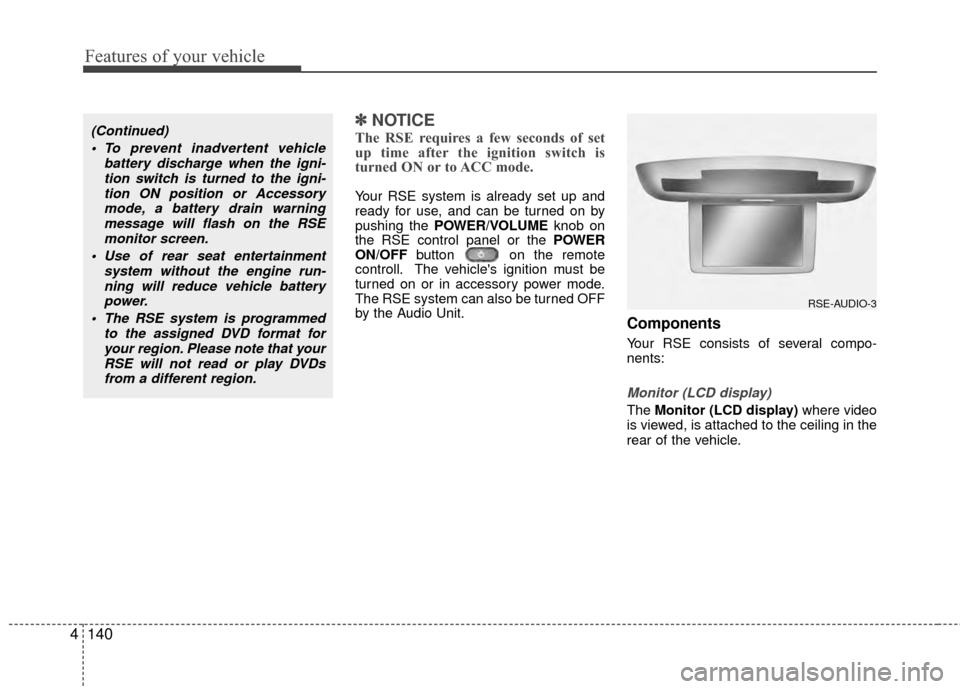
The Monitor (LCD display) where video
is viewed, is attached to the ceiling in the
rear of the vehicle.
(Continued)
To prevent inadvertent vehicle battery discharge when the igni-tion switch is turned to the igni-tion ON position or Accessorymode, a battery drain warningmessage will flash on the RSEmonitor screen.
Use of rear seat entertainment system without the engine run-ning will reduce vehicle battery power.
The RSE system is programmed to the assigned DVD format foryour region. Please note that yourRSE will not read or play DVDsfrom a different region.
RSE-AUDIO-3
Page 220 of 419
4141
Features of your vehicle
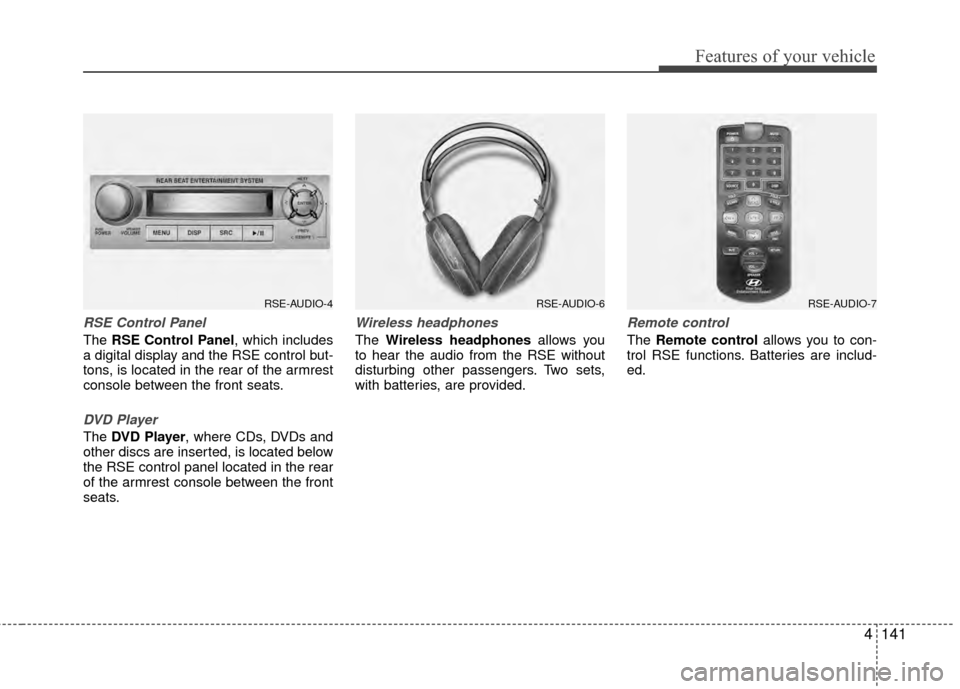
RSE Control Panel
The RSE Control Panel, which includes
a digital display and the RSE control but-
tons, is located in the rear of the armrest
console between the front seats.
DVD Player
The DVD Player, where CDs, DVDs and
other discs are inserted, is located below
the RSE control panel located in the rear
of the armrest console between the front
seats.
Wireless headphones
The Wireless headphones allows you
to hear the audio from the RSE without
disturbing other passengers. Two sets,
with batteries, are provided.
Remote control
The Remote control allows you to con-
trol RSE functions. Batteries are includ-
ed.
RSE-AUDIO-4RSE-AUDIO-6RSE-AUDIO-7