mirror Hyundai Santa Fe 2012 Owner's Manual
[x] Cancel search | Manufacturer: HYUNDAI, Model Year: 2012, Model line: Santa Fe, Model: Hyundai Santa Fe 2012Pages: 419, PDF Size: 5.61 MB
Page 15 of 419
Your vehicle at a glance
22
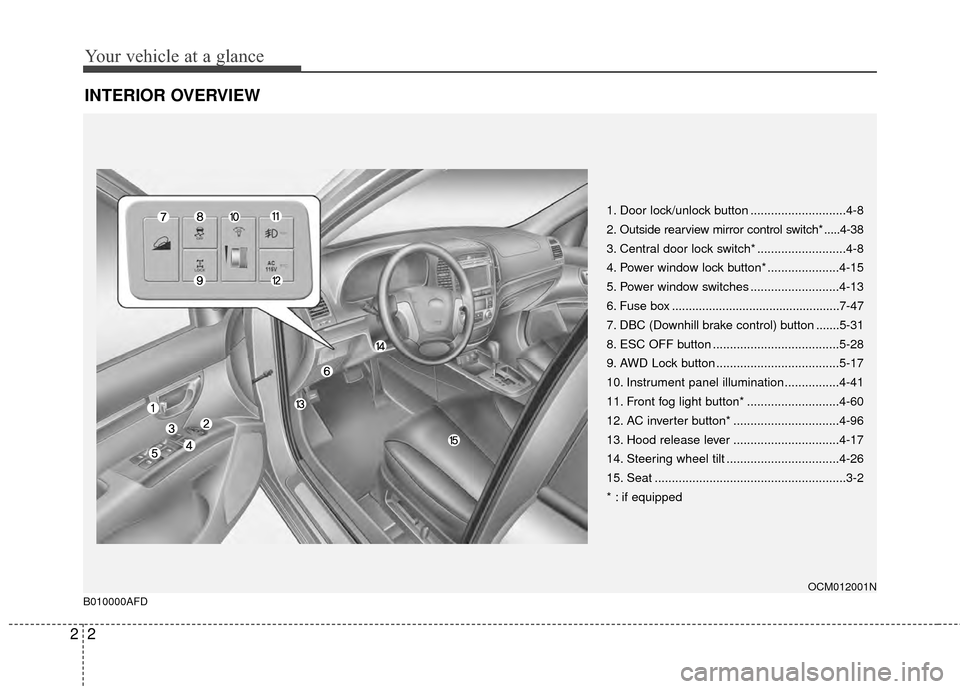
INTERIOR OVERVIEW
1. Door lock/unlock button ............................4-8
2. Outside rearview mirror control switch* .....4-38
3. Central door lock switch* ..........................4-8
4. Power window lock button* .....................4-15
5. Power window switches ..........................4-13
6. Fuse box ..................................................7-47
7. DBC (Downhill brake control) button .......5-31
8. ESC OFF button .....................................5-28
9. AWD Lock button ....................................5-17
10. Instrument panel illumination................4-41
11. Front fog light button* ...........................4-60
12. AC inverter button* ...............................4-96
13. Hood release lever ...............................4-17
14. Steering wheel tilt .................................4-26
15. Seat ........................................................3-2
* : if equipped
OCM012001N
B010000AFD
Page 80 of 419
4
Keys / 4-2
Remote keyless entry / 4-3
Theft-alarm system / 4-5
Door locks / 4-7
Tailgate / 4-11
Windows / 4-13
Hood / 4-17
Fuel filler lid / 4-19
Sunroof / 4-22
Steering wheel / 4-26
Mirrors / 4-28
Instrument cluster / 4-40
Rearview camera / 4-56
Hazard warning flasher / 4-56
Lighting / 4-57
Wipers and washers / 4-61
Interior light / 4-63
Defroster / 4-66
Manual climate control system / 4-67
Automatic climate control system / 4-76
Windshield defrosting and defogging / 4-86
Cluster ionizer / 4-88
Storage compartment / 4-89
Interior features / 4-92
Exterior features / 4-101
Audio system / 4-102
Features of your vehicle
Page 107 of 419
Features of your vehicle
28
4
Inside rearview mirror
Adjust the rearview mirror so that the
center view through the rear window is
seen. Make this adjustment before you
start driving.
D140101AUN
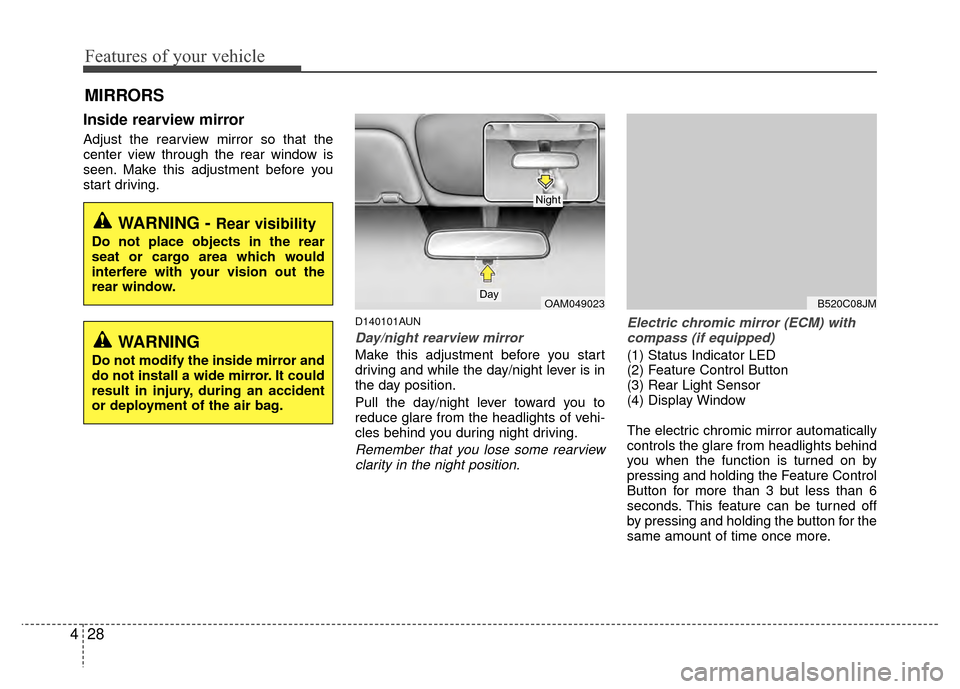
Day/night rearview mirror
Make this adjustment before you start
driving and while the day/night lever is in
the day position.
Pull the day/night lever toward you to
reduce glare from the headlights of vehi-
cles behind you during night driving.
Remember that you lose some rearview
clarity in the night position. Electric chromic mirror (ECM) with
compass (if equipped)
(1) Status Indicator LED
(2) Feature Control Button
(3) Rear Light Sensor
(4) Display Window
The electric chromic mirror automatically
controls the glare from headlights behind
you when the function is turned on by
pressing and holding the Feature Control
Button for more than 3 but less than 6
seconds. This feature can be turned off
by pressing and holding the button for the
same amount of time once more.
MIRRORS
WARNING - Rear visibility
Do not place objects in the rear
seat or cargo area which would
interfere with your vision out the
rear window.
OAM049023Day
Night
B520C08JM
WARNING
Do not modify the inside mirror and
do not install a wide mirror. It could
result in injury, during an accident
or deployment of the air bag.
Page 108 of 419
429
Features of your vehicle
To operate Compass feature
Press and release the button, then the
vehicle's directional heading will be dis-
played. Pressing and releasing the button
again will turn off the display.
Heading display
- E : East
- W : West
- S : South
- N : North
ex) NE : North EastCalibration procedure
The compass may not indicate the cor-
rect compass direction if the electronic
compass has not been calibrated cor-
rectly, if the compass zone number is dif-
ferent from your current location, or when
you are driving in certain areas (tunnel,
parking garage, underground parking lot,
near transformer substation, etc.), and
the following may occur:
- “C” is displayed.
- The compass headings become inac-
curate.
- The compass heading does not change when the vehicle changes
direction.
- Some compass headings are not dis- played.
- The compass headings are inaccurate in long distance driving. If the vehicle’s compass headings
become inaccurate, the compass should
be calibrated as follows:
1. Ensure the vehicle is not located near
large steel structures or under electric
power lines.
2. Turn on the compass by pressing the button.
3. Press and hold the button for more than 6 but less than 9 seconds. The
current zone number will appear in the
display. Release then press the button
until your zone number appears in the
display.
4. Check the mirror angle by pressing and holding the button for more than
12seconds. Release then press the
button to “L”(for steering wheel on the
Left side of the vehicle). (if installed)
5. Press and hold the button between 9 and 12 seconds. Release the button
when a “C” appears in the display.
6. Drive the vehicle in 2 complete circles at less than 5mph(8km/h) or until the
compass heading appears.
CAUTION
Be sure the area is free of traffic,pedestrians, and obstructions.
Page 110 of 419
431
Features of your vehicle
D140105AEN
Electric chromic mirror (ECM) withcompass and HomeLink®system
(if equipped)
Your vehicle may be equipped with a
Gentex Automatic-Dimming Mirror with a
Z-Nav™ Electronic Compass Display
and an Integrated HomeLink
®Wireless
Control System. During nighttime driving,
this feature will automatically detect and
reduce rearview mirror glare while the
compass indicates the direction the vehi-
cle is pointed. The HomeLink
®Universal
Transceiver allows you to activate your
garage door(s), electric gate, home light-
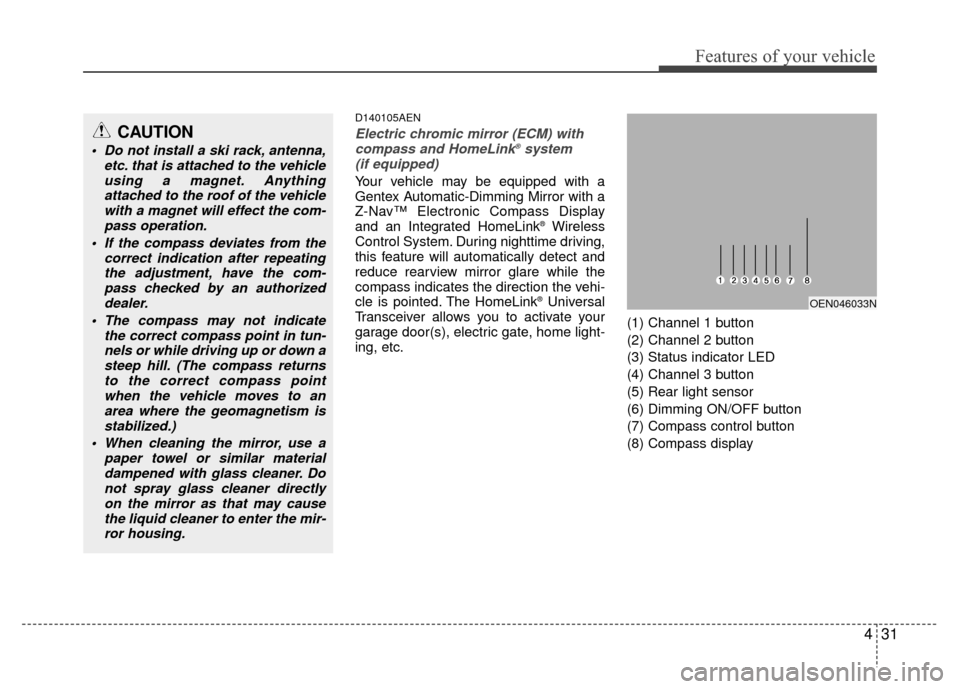
ing, etc. (1) Channel 1 button
(2) Channel 2 button
(3) Status indicator LED
(4) Channel 3 button
(5) Rear light sensor
(6) Dimming ON/OFF button
(7) Compass control button
(8) Compass display OEN046033N
CAUTION
Do not install a ski rack, antenna,
etc. that is attached to the vehicleusing a magnet. Anythingattached to the roof of the vehiclewith a magnet will effect the com- pass operation.
If the compass deviates from the correct indication after repeatingthe adjustment, have the com-pass checked by an authorizeddealer.
The compass may not indicate the correct compass point in tun-nels or while driving up or down asteep hill. (The compass returnsto the correct compass pointwhen the vehicle moves to anarea where the geomagnetism is stabilized.)
When cleaning the mirror, use a paper towel or similar materialdampened with glass cleaner. Donot spray glass cleaner directlyon the mirror as that may causethe liquid cleaner to enter the mir-ror housing.
Page 111 of 419
Features of your vehicle
32
4
Automatic-Dimming Night Vision
Safety™ (NVS®) Mirror
The NVS®Mirror in your vehicle is the
most advanced way to reduce annoying
glare in the rearview mirror during any
driving situation. For more information
regarding NVS
®mirrors and other appli-
cations, please refer to the Gentex web-
site:
www.gentex.com Automatic-dimming function
Your mirror will automatically dim upon
detecting glare from the vehicles travel-
ing behind you. The auto-dimming func-
tion can be controlled by the Dimming
ON/OFF Button:
1. Pressing the button turns the auto-
dimming function OFF which is indicat-
ed by the green Status Indicator LED
turning off.
2. Pressing the button again turns the auto-dimming function ON which is
indicated by the green Status Indicator
LED turning on.
✽ ✽NOTICE
The mirror defaults to the ON position
each time the vehicle is started.
Z-Nav™ Compass Display
The NVS™ Mirror in your vehicle is also
equipped with a Z-Nav™ Compass that
shows the vehicle Compass heading in
the Display Window using the 8 basic
cardinal headings (N, NE, E, SE, etc.).
Compass function
The Compass can be turned ON and
OFF and will remember the last state
when the ignition is cycled. To turn the
display feature ON/OFF:
1. Press and release the button to
turn the display feature OFF.
2. Press and release the button again to turn the display back ON.
Additional options can be set with press
and hold sequences of the button and
are detailed below.
There is a difference between magnetic
north and true north. The compass in the
mirror can compensate for this difference
when it knows the Magnetic Zone in
which it is operating. This is set either by
the dealer or by the user. The operating
Zone Numbers for North America are
shown in the figure on the following sec-
tion.
CAUTION
The NVS®Mirror automatically
reduces glare during driving condi- tions based upon light levels moni-tored in front of the vehicle andfrom the rear of the vehicle. Theselight sensors are visible throughopenings in the front and rear of the mirror case. Any object that wouldobstructs either light sensor willdegrade the automatic dimmingcontrol feature.
Page 117 of 419
Features of your vehicle
38
4
D140200AUN
Outside rearview mirror
Be sure to adjust mirror angles before
driving.
Your vehicle is equipped with both left-
hand and right-hand outside rearview
mirrors. The mirrors can be adjusted
remotely with the remote switch. The mir-
ror heads can be folded back to prevent
damage during an automatic car wash or
when passing in a narrow street.
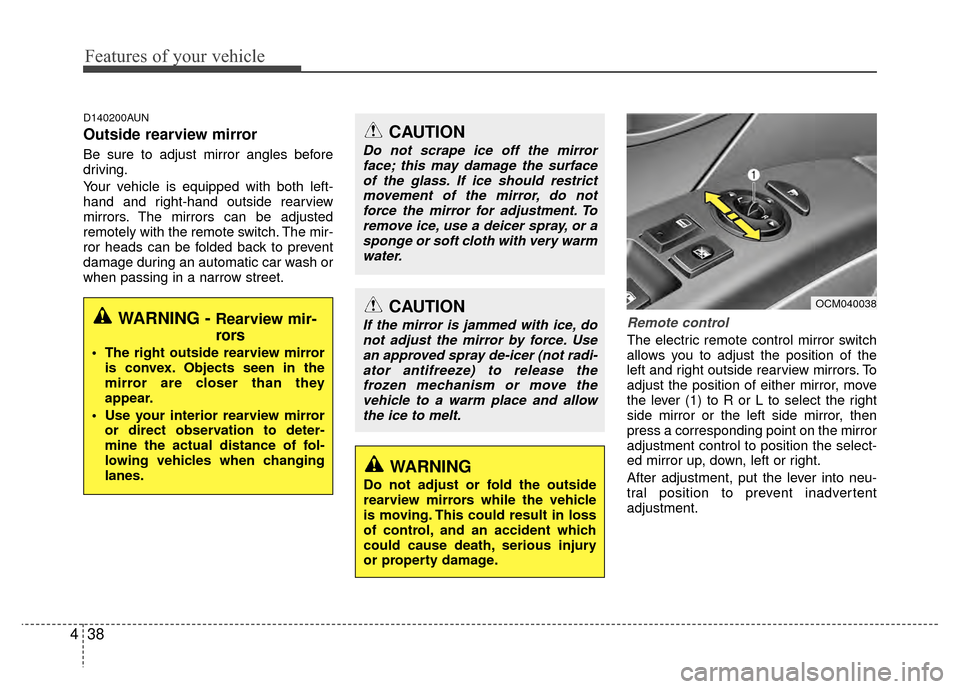
Remote control
The electric remote control mirror switch
allows you to adjust the position of the
left and right outside rearview mirrors. To
adjust the position of either mirror, move
the lever (1) to R or L to select the right
side mirror or the left side mirror, then
press a corresponding point on the mirror
adjustment control to position the select-
ed mirror up, down, left or right.
After adjustment, put the lever into neu-
tral position to prevent inadvertent
adjustment.
CAUTION
If the mirror is jammed with ice, do
not adjust the mirror by force. Use an approved spray de-icer (not radi-ator antifreeze) to release thefrozen mechanism or move thevehicle to a warm place and allowthe ice to melt.
WARNING
Do not adjust or fold the outside
rearview mirrors while the vehicle
is moving. This could result in loss
of control, and an accident which
could cause death, serious injury
or property damage.
OCM040038
CAUTION
Do not scrape ice off the mirrorface; this may damage the surfaceof the glass. If ice should restrictmovement of the mirror, do notforce the mirror for adjustment. To remove ice, use a deicer spray, or asponge or soft cloth with very warmwater.
WARNING - Rearview mir-
rors
The right outside rearview mirror is convex. Objects seen in the
mirror are closer than they
appear.
Use your interior rearview mirror or direct observation to deter-
mine the actual distance of fol-
lowing vehicles when changing
lanes.
Page 118 of 419
439
Features of your vehicle
D140202AFD
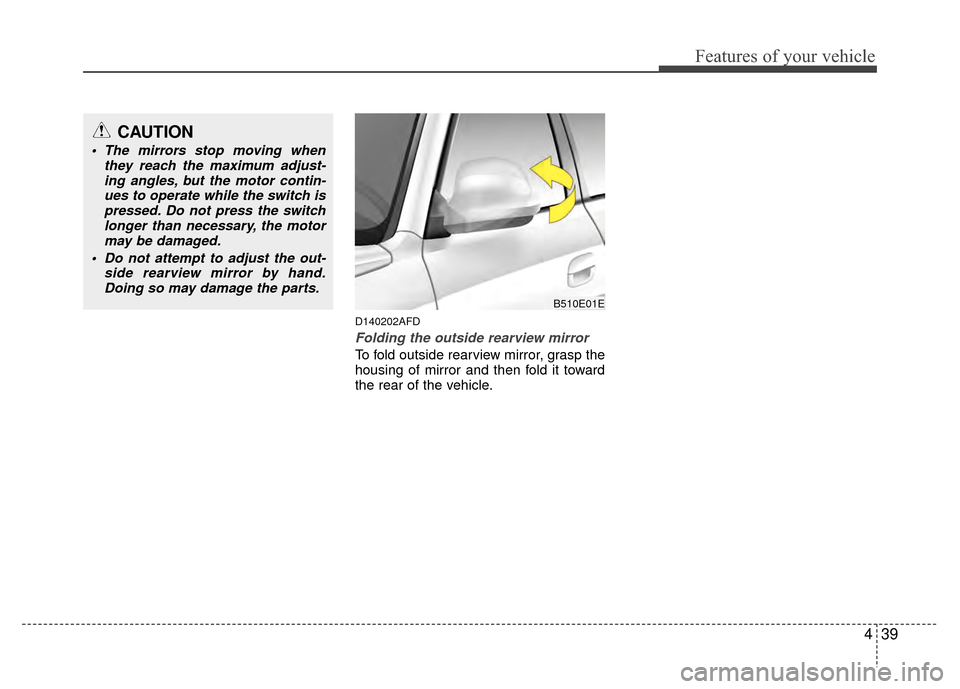
Folding the outside rearview mirror
To fold outside rearview mirror, grasp the
housing of mirror and then fold it toward
the rear of the vehicle.
B510E01E
CAUTION
The mirrors stop moving whenthey reach the maximum adjust-ing angles, but the motor contin-ues to operate while the switch ispressed. Do not press the switch longer than necessary, the motormay be damaged.
Do not attempt to adjust the out- side rearview mirror by hand.Doing so may damage the parts.
Page 135 of 419
Features of your vehicle
56
4
REARVIEW CAMERA (IF EQUIPPED)
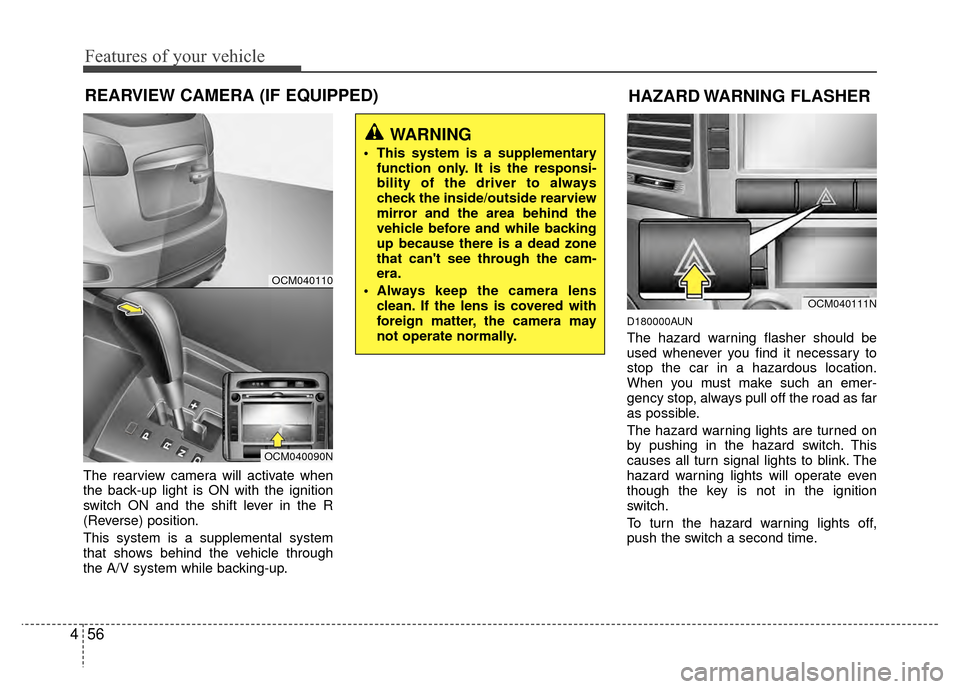
The rearview camera will activate when
the back-up light is ON with the ignition
switch ON and the shift lever in the R
(Reverse) position.
This system is a supplemental system
that shows behind the vehicle through
the A/V system while backing-up.
D180000AUN
The hazard warning flasher should be
used whenever you find it necessary to
stop the car in a hazardous location.
When you must make such an emer-
gency stop, always pull off the road as far
as possible.
The hazard warning lights are turned on
by pushing in the hazard switch. This
causes all turn signal lights to blink. The
hazard warning lights will operate even
though the key is not in the ignition
switch.
To turn the hazard warning lights off,
push the switch a second time.
WARNING
This system is a supplementary
function only. It is the responsi-
bility of the driver to always
check the inside/outside rearview
mirror and the area behind the
vehicle before and while backing
up because there is a dead zone
that can't see through the cam-
era.
Always keep the camera lens clean. If the lens is covered with
foreign matter, the camera may
not operate normally.
OCM040111N
HAZARD WARNING FLASHER
OCM040110
OCM040090N
Page 144 of 419
465
Features of your vehicle
D210500ACM
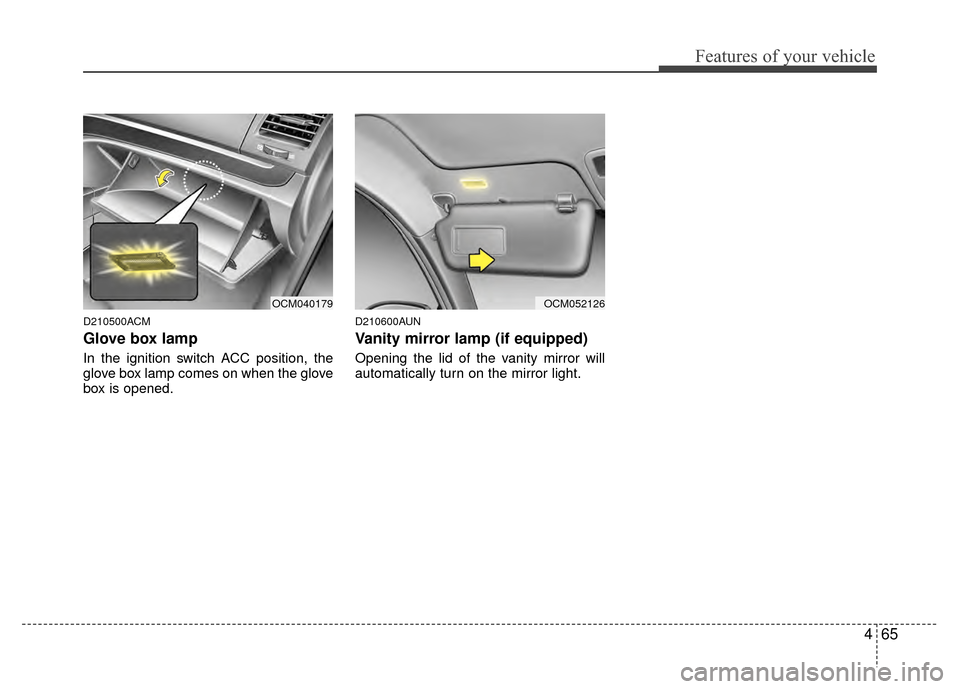
Glove box lamp
In the ignition switch ACC position, the
glove box lamp comes on when the glove
box is opened.
D210600AUN
Vanity mirror lamp (if equipped)
Opening the lid of the vanity mirror will
automatically turn on the mirror light.
OCM052126OCM040179