Hyundai Santa Fe 2014 Owner's Manual
Manufacturer: HYUNDAI, Model Year: 2014, Model line: Santa Fe, Model: Hyundai Santa Fe 2014Pages: 711, PDF Size: 14.72 MB
Page 101 of 711
Safety features of your vehicle
76 3
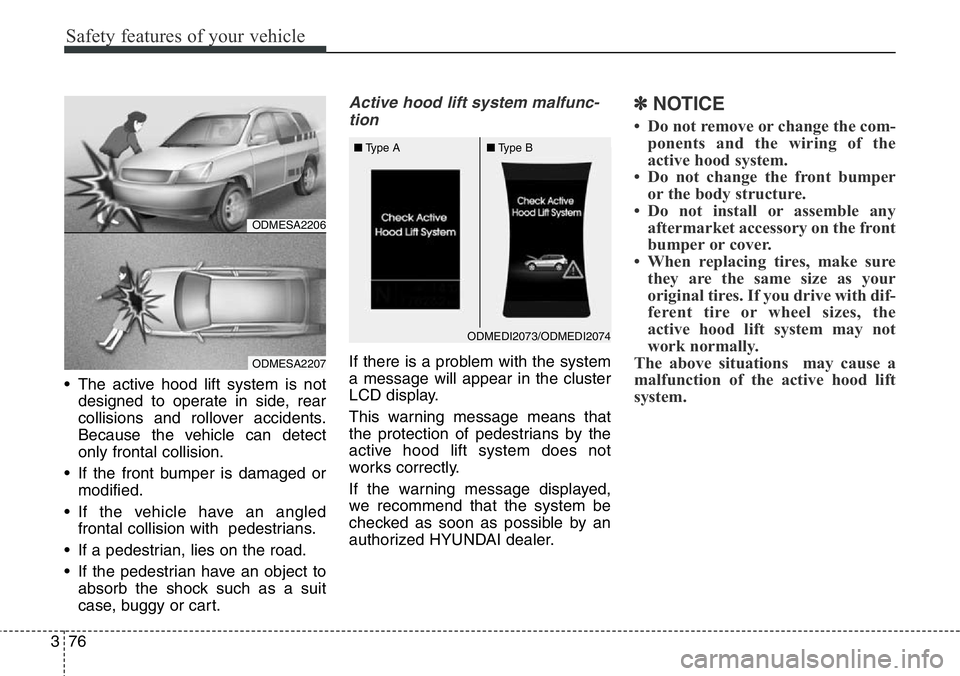
• The active hood lift system is not
designed to operate in side, rear
collisions and rollover accidents.
Because the vehicle can detect
only frontal collision.
• If the front bumper is damaged or
modified.
• If the vehicle have an angled
frontal collision with pedestrians.
• If a pedestrian, lies on the road.
• If the pedestrian have an object to
absorb the shock such as a suit
case, buggy or cart.
Active hood lift system malfunc-
tion
If there is a problem with the system
a message will appear in the cluster
LCD display.
This warning message means that
the protection of pedestrians by the
active hood lift system does not
works correctly.
If the warning message displayed,
we recommend that the system be
checked as soon as possible by an
authorized HYUNDAI dealer.
✽NOTICE
•Do not remove or change the com-
ponents and the wiring of the
active hood system.
•Do not change the front bumper
or the body structure.
•Do not install or assemble any
aftermarket accessory on the front
bumper or cover.
•When replacing tires, make sure
they are the same size as your
original tires. If you drive with dif-
ferent tire or wheel sizes, the
active hood lift system may not
work normally.
The above situations may cause a
malfunction of the active hood lift
system.
ODMEDI2073/ODMEDI2074 ■Type A■Type B
ODMESA2206
ODMESA2207
Page 102 of 711
Features of your vehicle
Keys . . . . . . . . . . . . . . . . . . . . . . . . . . . . . . . . . . . . . . 4-5
• Record your key number . . . . . . . . . . . . . . . . . . . . . . . 4-5
• Key operations . . . . . . . . . . . . . . . . . . . . . . . . . . . . . . . . 4-5
• Immobilizer system . . . . . . . . . . . . . . . . . . . . . . . . . . . . 4-6
Remote keyless entry . . . . . . . . . . . . . . . . . . . . . . . . 4-8
• System operation . . . . . . . . . . . . . . . . . . . . . . . . . . . . . . 4-8
• Transmitter precautions . . . . . . . . . . . . . . . . . . . . . . . 4-10
• Battery replacement . . . . . . . . . . . . . . . . . . . . . . . . . . 4-11
Smart key . . . . . . . . . . . . . . . . . . . . . . . . . . . . . . . . 4-13
• Smart key function . . . . . . . . . . . . . . . . . . . . . . . . . . . 4-13
• Smart key precautions . . . . . . . . . . . . . . . . . . . . . . . . 4-14
• Door lock/unlock in an emergency situation . . . . . . 4-15
Theft-alarm system . . . . . . . . . . . . . . . . . . . . . . . . 4-16
• Armed stage . . . . . . . . . . . . . . . . . . . . . . . . . . . . . . . . . 4-16
• Theft-alarm stage . . . . . . . . . . . . . . . . . . . . . . . . . . . . 4-18
• Disarmed stage. . . . . . . . . . . . . . . . . . . . . . . . . . . . . . . 4-18
Door locks . . . . . . . . . . . . . . . . . . . . . . . . . . . . . . . . 4-19
• From outside . . . . . . . . . . . . . . . . . . . . . . . . . . . . . . . . 4-19
• From inside . . . . . . . . . . . . . . . . . . . . . . . . . . . . . . . . . 4-20
• Deadlocks . . . . . . . . . . . . . . . . . . . . . . . . . . . . . . . . . . . 4-22
• Door lock/unlock features. . . . . . . . . . . . . . . . . . . . . . 4-22
• Child-protector rear door lock . . . . . . . . . . . . . . . . . 4-23
Tailgate . . . . . . . . . . . . . . . . . . . . . . . . . . . . . . . . . . 4-24
• Opening the tailgate . . . . . . . . . . . . . . . . . . . . . . . . . . 4-24
• Closing the tailgate . . . . . . . . . . . . . . . . . . . . . . . . . . . 4-24• Emergency tailgate safety release . . . . . . . . . . . . . . . 4-25
Windows . . . . . . . . . . . . . . . . . . . . . . . . . . . . . . . . . 4-27
• Power windows . . . . . . . . . . . . . . . . . . . . . . . . . . . . . . 4-28
Hood. . . . . . . . . . . . . . . . . . . . . . . . . . . . . . . . . . . . . 4-32
• Opening the hood . . . . . . . . . . . . . . . . . . . . . . . . . . . . 4-32
• Closing the hood . . . . . . . . . . . . . . . . . . . . . . . . . . . . . 4-33
Fuel filler lid . . . . . . . . . . . . . . . . . . . . . . . . . . . . . . 4-34
• Opening the fuel filler lid . . . . . . . . . . . . . . . . . . . . . . 4-34
• Closing the fuel filler lid . . . . . . . . . . . . . . . . . . . . . . . 4-34
• Emergency fuel filler lid release. . . . . . . . . . . . . . . . . 4-36
Panorama sunroof . . . . . . . . . . . . . . . . . . . . . . . . . 4-37
• Sunroof open warning. . . . . . . . . . . . . . . . . . . . . . . . . 4-37
• Sunshade . . . . . . . . . . . . . . . . . . . . . . . . . . . . . . . . . . . 4-38
• Sliding the sunroof . . . . . . . . . . . . . . . . . . . . . . . . . . . 4-39
• Tilting the sunroof . . . . . . . . . . . . . . . . . . . . . . . . . . . . 4-39
• Closing the sunroof . . . . . . . . . . . . . . . . . . . . . . . . . . . 4-40
• Resetting the sunroof . . . . . . . . . . . . . . . . . . . . . . . . . 4-41
Steering wheel . . . . . . . . . . . . . . . . . . . . . . . . . . . . . 4-42
• Electronic power steering . . . . . . . . . . . . . . . . . . . . . . 4-42
• Power steering . . . . . . . . . . . . . . . . . . . . . . . . . . . . . . . 4-43
• Tilt & telescopic steering . . . . . . . . . . . . . . . . . . . . . . 4-43
• Heated steering wheel . . . . . . . . . . . . . . . . . . . . . . . . . 4-44
• Horn . . . . . . . . . . . . . . . . . . . . . . . . . . . . . . . . . . . . . . . 4-45
• Flex steering wheel . . . . . . . . . . . . . . . . . . . . . . . . . . . 4-45
4
Page 103 of 711
Mirrors . . . . . . . . . . . . . . . . . . . . . . . . . . . . . . . . . . 4-48
• Inside rearview mirror . . . . . . . . . . . . . . . . . . . . . . . . 4-48
• Outside rearview mirror . . . . . . . . . . . . . . . . . . . . . . . 4-52
Instrument cluster . . . . . . . . . . . . . . . . . . . . . . . . . 4-56
• Instrument Cluster Control . . . . . . . . . . . . . . . . . . . . 4-58
• LCD Display Control . . . . . . . . . . . . . . . . . . . . . . . . . 4-59
• Gauges . . . . . . . . . . . . . . . . . . . . . . . . . . . . . . . . . . . . . 4-59
• Transaxle Shift Indicator . . . . . . . . . . . . . . . . . . . . . . 4-64
LCD display . . . . . . . . . . . . . . . . . . . . . . . . . . . . . . 4-66
• LCD Modes . . . . . . . . . . . . . . . . . . . . . . . . . . . . . . . . . 4-66
• Service Mode . . . . . . . . . . . . . . . . . . . . . . . . . . . . . . . . 4-67
• User Settings Mode . . . . . . . . . . . . . . . . . . . . . . . . . . . 4-68
• A/V Mode . . . . . . . . . . . . . . . . . . . . . . . . . . . . . . . . . . . 4-71
• Turn By Turn Mode. . . . . . . . . . . . . . . . . . . . . . . . . . . 4-71
• Warning Messages . . . . . . . . . . . . . . . . . . . . . . . . . . . . 4-72
Trip computer . . . . . . . . . . . . . . . . . . . . . . . . . . . . . 4-79
• Overview. . . . . . . . . . . . . . . . . . . . . . . . . . . . . . . . . . . . 4-79
• Trip A/B . . . . . . . . . . . . . . . . . . . . . . . . . . . . . . . . . . . . 4-80
• Fuel Economy . . . . . . . . . . . . . . . . . . . . . . . . . . . . . . . 4-81
Warning and indicator lights . . . . . . . . . . . . . . . . 4-83
• Warning lights . . . . . . . . . . . . . . . . . . . . . . . . . . . . . . . 4-83
• Indicator Lights . . . . . . . . . . . . . . . . . . . . . . . . . . . . . . 4-93
Rear parking assist system . . . . . . . . . . . . . . . . . . 4-98
• Operation . . . . . . . . . . . . . . . . . . . . . . . . . . . . . . . . . . . 4-98
• Non-operational conditions . . . . . . . . . . . . . . . . . . . . 4-99• Self-diagnosis . . . . . . . . . . . . . . . . . . . . . . . . . . . . . . . 4-100
Parking assist system . . . . . . . . . . . . . . . . . . . . . . 4-101
• Operation . . . . . . . . . . . . . . . . . . . . . . . . . . . . . . . . . . 4-101
• Non-operational conditions . . . . . . . . . . . . . . . . . . . 4-103
• Self-diagnosis . . . . . . . . . . . . . . . . . . . . . . . . . . . . . . . 4-105
Smart parking assist system(SPAS) . . . . . . . . . . 4-106
• Operation . . . . . . . . . . . . . . . . . . . . . . . . . . . . . . . . . . 4-107
• Non-operational conditions . . . . . . . . . . . . . . . . . . . 4-107
• How the system works . . . . . . . . . . . . . . . . . . . . . . . 4-110
• Additional instructions . . . . . . . . . . . . . . . . . . . . . . . 4-117
• System malfunction . . . . . . . . . . . . . . . . . . . . . . . . . . 4-118
Rearview camera . . . . . . . . . . . . . . . . . . . . . . . . . 4-119
Hazard warning flasher . . . . . . . . . . . . . . . . . . . . 4-120
Lighting . . . . . . . . . . . . . . . . . . . . . . . . . . . . . . . . . 4-121
• Battery saver function. . . . . . . . . . . . . . . . . . . . . . . . 4-121
• Headlamp escort function. . . . . . . . . . . . . . . . . . . . . 4-121
• Smart cornering light . . . . . . . . . . . . . . . . . . . . . . . . 4-121
• Lighting control . . . . . . . . . . . . . . . . . . . . . . . . . . . . . 4-122
• Traffic change . . . . . . . . . . . . . . . . . . . . . . . . . . . . . . 4-124
• High - beam operation . . . . . . . . . . . . . . . . . . . . . . . 4-125
• Turn signals and lane change signals . . . . . . . . . . . 4-126
• Front fog light . . . . . . . . . . . . . . . . . . . . . . . . . . . . . . 4-127
• Rear fog light . . . . . . . . . . . . . . . . . . . . . . . . . . . . . . . 4-128
• Daytime running light . . . . . . . . . . . . . . . . . . . . . . . . 4-128
• Headlight leveling device . . . . . . . . . . . . . . . . . . . . . 4-129
4
Page 104 of 711
• Adaptive Front Lighting System (AFLS) . . . . . . . . 4-130
Wipers and washers . . . . . . . . . . . . . . . . . . . . . . . 4-131
• Windshield wipers (front) . . . . . . . . . . . . . . . . . . . . . 4-132
• Windshield washers (front) . . . . . . . . . . . . . . . . . . . 4-133
• Rear window wiper and washer switch . . . . . . . . . 4-135
Interior light . . . . . . . . . . . . . . . . . . . . . . . . . . . . . 4-136
• Interior lamp AUTO cut . . . . . . . . . . . . . . . . . . . . . . 4-136
• Map lamp . . . . . . . . . . . . . . . . . . . . . . . . . . . . . . . . . . 4-136
• Room lamp . . . . . . . . . . . . . . . . . . . . . . . . . . . . . . . . . 4-137
• Vanity mirror lamp . . . . . . . . . . . . . . . . . . . . . . . . . . 4-138
• Luggage room lamp . . . . . . . . . . . . . . . . . . . . . . . . . 4-138
• Glove box lamp . . . . . . . . . . . . . . . . . . . . . . . . . . . . . 4-139
• Door courtesy lamp . . . . . . . . . . . . . . . . . . . . . . . . . . 4-139
Welcome system . . . . . . . . . . . . . . . . . . . . . . . . . . 4-140
• Headlamp welcome . . . . . . . . . . . . . . . . . . . . . . . . . . 4-140
• Interior light. . . . . . . . . . . . . . . . . . . . . . . . . . . . . . . . 4-140
• Puddle lamp and pocket lamp . . . . . . . . . . . . . . . . . 4-140
Defroster . . . . . . . . . . . . . . . . . . . . . . . . . . . . . . . . 4-141
• Rear window defroster . . . . . . . . . . . . . . . . . . . . . . . 4-141
Manual climate control system . . . . . . . . . . . . . . 4-143
• Heating and air conditioning . . . . . . . . . . . . . . . . . . 4-144
• 3rd row air conditioning . . . . . . . . . . . . . . . . . . . . . . 4-149
• System operation . . . . . . . . . . . . . . . . . . . . . . . . . . . . 4-150
• Climate control air filter . . . . . . . . . . . . . . . . . . . . . . 4-152
• Air conditioning refrigerant label . . . . . . . . . . . . . . 4-153• Checking the amount of air conditioner refrigerant
and compressor lubricant . . . . . . . . . . . . . . . . . . . 4-154
Automatic climate control system. . . . . . . . . . . . 4-155
• Automatic heating and air conditioning . . . . . . . . . 4-157
• Manual heating and air conditioning . . . . . . . . . . . 4-158
• 3rd row air conditioning . . . . . . . . . . . . . . . . . . . . . . 4-164
• System operation . . . . . . . . . . . . . . . . . . . . . . . . . . . . 4-165
• Climate control air filter . . . . . . . . . . . . . . . . . . . . . . 4-167
• Air conditioning refrigerant label . . . . . . . . . . . . . . 4-168
• Checking the amount of air conditioner
refrigerant and compressor lubricant . . . . . . . . . 4-169
Windshield defrosting and defogging . . . . . . . . . 4-170
• Manual climate control system . . . . . . . . . . . . . . . . 4-170
• Automatic climate control system . . . . . . . . . . . . . . 4-171
Clean air . . . . . . . . . . . . . . . . . . . . . . . . . . . . . . . . 4-173
Storage compartment. . . . . . . . . . . . . . . . . . . . . . 4-174
• Center console storage . . . . . . . . . . . . . . . . . . . . . . . 4-174
• Glove box . . . . . . . . . . . . . . . . . . . . . . . . . . . . . . . . . . 4-174
• Cool box . . . . . . . . . . . . . . . . . . . . . . . . . . . . . . . . . . . 4-175
• Multi box . . . . . . . . . . . . . . . . . . . . . . . . . . . . . . . . . . 4-176
• Sunglass holder . . . . . . . . . . . . . . . . . . . . . . . . . . . . . 4-176
• Luggage tray . . . . . . . . . . . . . . . . . . . . . . . . . . . . . . . 4-177
Interior features . . . . . . . . . . . . . . . . . . . . . . . . . . 4-178
• Cigarette lighter. . . . . . . . . . . . . . . . . . . . . . . . . . . . . 4-178
• Ashtray . . . . . . . . . . . . . . . . . . . . . . . . . . . . . . . . . . . . 4-178
4
Page 105 of 711
• Cup holder . . . . . . . . . . . . . . . . . . . . . . . . . . . . . . . . . 4-179
• Bottle holder. . . . . . . . . . . . . . . . . . . . . . . . . . . . . . . . 4-180
• Sunvisor . . . . . . . . . . . . . . . . . . . . . . . . . . . . . . . . . . . 4-180
• Power outlet . . . . . . . . . . . . . . . . . . . . . . . . . . . . . . . . 4-181
• AC inverter . . . . . . . . . . . . . . . . . . . . . . . . . . . . . . . . . 4-182
• Aux, USB and iPod . . . . . . . . . . . . . . . . . . . . . . . . . . 4-184
• Clothes hanger . . . . . . . . . . . . . . . . . . . . . . . . . . . . . . 4-185
• Floor mat anchor(s). . . . . . . . . . . . . . . . . . . . . . . . . . 4-185
• Luggage net (holder) . . . . . . . . . . . . . . . . . . . . . . . . . 4-186
• Cargo security screen . . . . . . . . . . . . . . . . . . . . . . . . 4-186
• Side curtain . . . . . . . . . . . . . . . . . . . . . . . . . . . . . . . . 4-188
Exterior features. . . . . . . . . . . . . . . . . . . . . . . . . . 4-189
• Roof rack . . . . . . . . . . . . . . . . . . . . . . . . . . . . . . . . . . 4-189
Audio system . . . . . . . . . . . . . . . . . . . . . . . . . . . . . 4-190
• Antenna . . . . . . . . . . . . . . . . . . . . . . . . . . . . . . . . . . . 4-190
• Audio remote control. . . . . . . . . . . . . . . . . . . . . . . . . 4-191
4
Page 106 of 711
45
Features of your vehicle
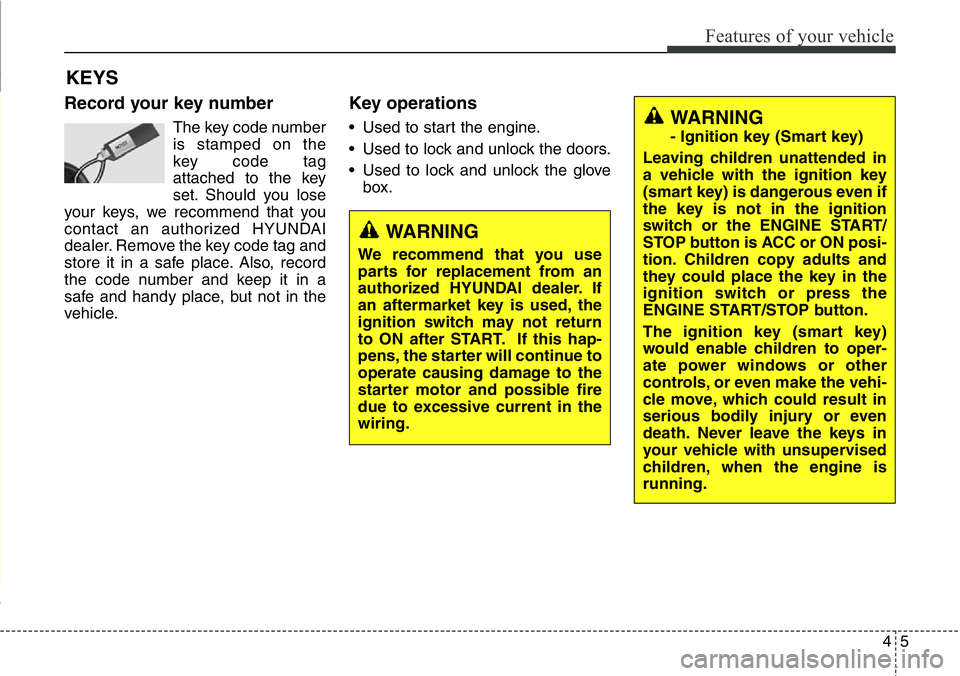
Record your key number
The key code number
is stamped on the
key code tag
attached to the key
set. Should you lose
your keys, we recommend that you
contact an authorized HYUNDAI
dealer. Remove the key code tag and
store it in a safe place. Also, record
the code number and keep it in a
safe and handy place, but not in the
vehicle.
Key operations
• Used to start the engine.
• Used to lock and unlock the doors.
• Used to lock and unlock the glove
box.
KEYS
WARNING
We recommend that you use
parts for replacement from an
authorized HYUNDAI dealer. If
an aftermarket key is used, the
ignition switch may not return
to ON after START. If this hap-
pens, the starter will continue to
operate causing damage to the
starter motor and possible fire
due to excessive current in the
wiring.
WARNING
- Ignition key (Smart key)
Leaving children unattended in
a vehicle with the ignition key
(smart key) is dangerous even if
the key is not in the ignition
switch or the ENGINE START/
STOP button is ACC or ON posi-
tion. Children copy adults and
they could place the key in the
ignition switch or press the
ENGINE START/STOP button.
The ignition key (smart key)
would enable children to oper-
ate power windows or other
controls, or even make the vehi-
cle move, which could result in
serious bodily injury or even
death. Never leave the keys in
your vehicle with unsupervised
children, when the engine is
running.
Page 107 of 711
Features of your vehicle
6 4
Immobilizer system
Your vehicle may be equipped with
an electronic engine immobilizer sys-
tem to reduce the risk of unautho-
rized vehicle use.
Your immobilizer system is com-
prised of a small transponder in the
key and electronic devices inside the
vehicle.
Vehicles without smart key sys-
tem
With the immobilizer system, when-
ever you insert your ignition key into
the ignition switch and turn it to ON,
it checks and determines and verifies
if the ignition key is valid or not.
If the key is valid, the engine will start.
If the key is invalid, the engine will
not start.To deactivate the immobilizer system:
Insert the ignition key into the key
cylinder and turn it to the ON posi-
tion.
To activate the immobilizer system:
Turn the ignition key to the OFF posi-
tion. The immobilizer system acti-
vates automatically. Without a valid
ignition key for your vehicle, the
engine will not start.
Vehicles with smart key system
Whenever the engine start/stop but-
ton is changed to the ON position,
the immobilizer system checks and
verifies if the key is valid or not.
If the key is valid, the engine will start.
If the key is invalid, the engine will
not start.
To deactivate the immobilizer system
Change the engine start/stop button
to the ON position.
To activate the immobilizer system
Change the engine start/stop button
to the OFF position. The immobilizer
system activates automatically.
Without a valid smart key for your
vehicle, the engine will not start.
Page 108 of 711
47
Features of your vehicle
✽NOTICE
When starting the engine, do not use
the key with other immobilizer keys
around. Otherwise the engine may
not start or may stop soon after it
starts. Keep each key separate in
order to avoid a starting malfun-
tioin.
✽NOTICE
If you need additional keys or lose
your keys, we recommend that you
consult with an authorized
HYUNDAI dealer.
CAUTION
The transponder in your ignition
key is an important part of the
immobilizer system. It is
designed to give years of trou-
ble-free service, however you
should avoid exposure to mois-
ture, static electricity and rough
handling. Immobilizer system
malfunction could occur.
CAUTION
Do not change, alter or adjust
the immobilizer system because
it could cause the immobilizer
system to malfunction and we
recommend that the system be
serviced by an authorized
HYUNDAI dealer.
Malfunctions caused by improp-
er alterations, adjustments or
modifications to the immobilizer
system are not covered by your
vehicle manufacturer warranty.
WARNING
In order to prevent theft of your
vehicle, do not leave spare keys
anywhere in your vehicle. Your
immobilizer password is a cus-
tomer unique password and
should be kept confidential. Do
not leave this number anywhere
in your vehicle.
CAUTION
Do not put metal accessories
near the ignition switch.
The engine may not start for the
metal accessories may interrupt
the transponder signal from
normally transmitting.
Page 109 of 711
Features of your vehicle
8 4
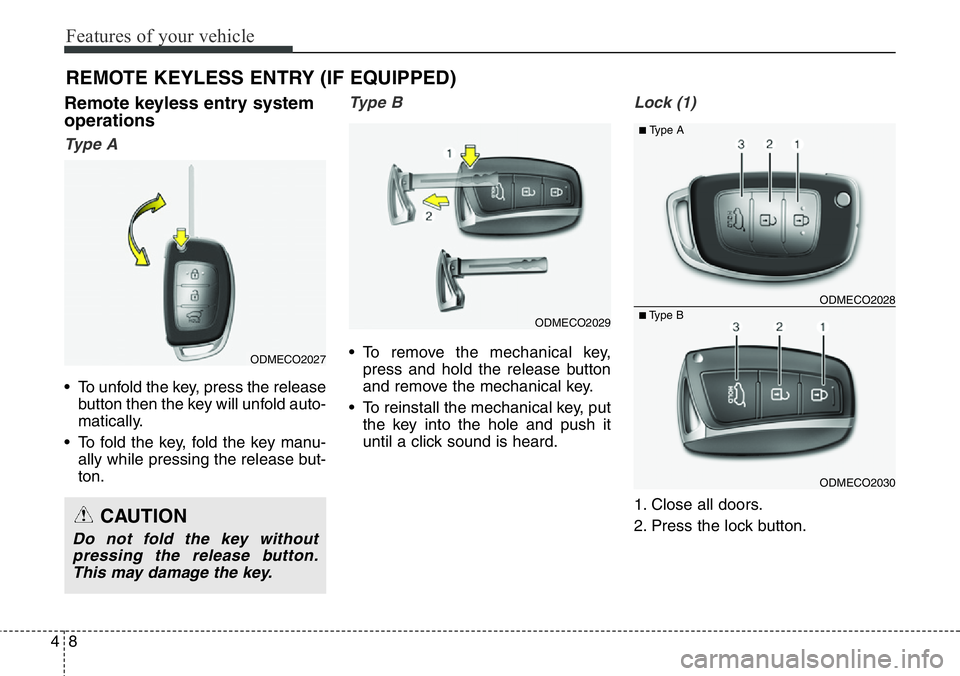
Remote keyless entry system
operations
Ty p e A
• To unfold the key, press the release
button then the key will unfold auto-
matically.
• To fold the key, fold the key manu-
ally while pressing the release but-
ton.
Type B
• To remove the mechanical key,
press and hold the release button
and remove the mechanical key.
• To reinstall the mechanical key, put
the key into the hole and push it
until a click sound is heard.
Lock (1)
1. Close all doors.
2. Press the lock button.
REMOTE KEYLESS ENTRY (IF EQUIPPED)
CAUTION
Do not fold the key without
pressing the release button.
This may damage the key.
ODMECO2030
■Type BODMECO2028
■Type A
ODMECO2027
ODMECO2029
Page 110 of 711
49
Features of your vehicle
3. The hazard warning light will blink
once to indicate that all doors are
locked (the engine hood and tail-
gate must be closed).
Also, the outside rearview mirror
will automatically fold when the
outside rearview mirror folding
switch is in the AUTO position (if
equipped).
✽NOTICE
The doors will not lock if any door is
opened.
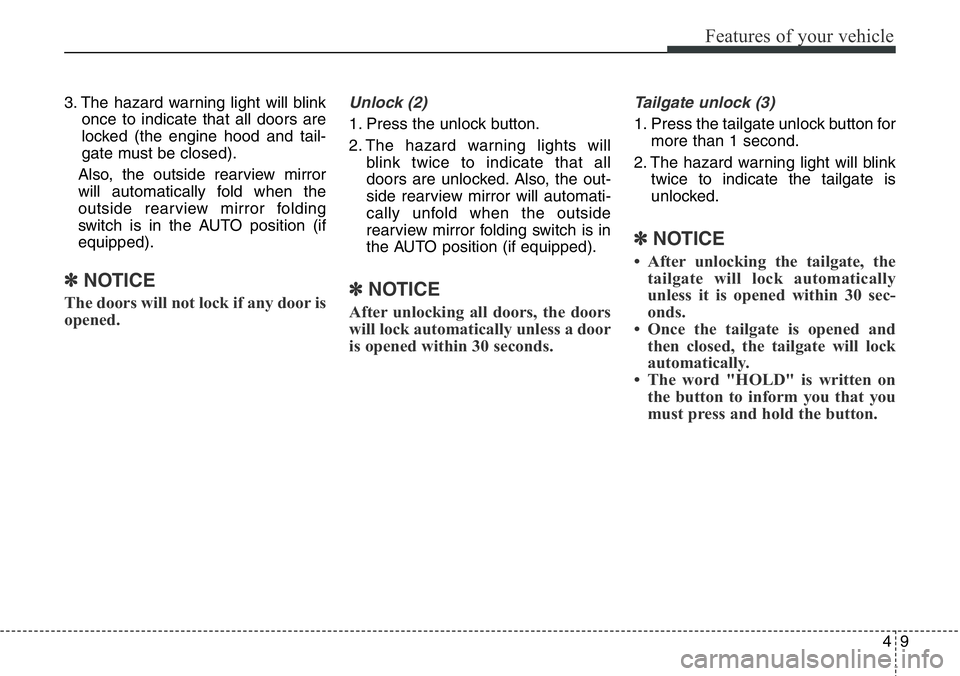
Unlock (2)
1. Press the unlock button.
2. The hazard warning lights will
blink twice to indicate that all
doors are unlocked. Also, the out-
side rearview mirror will automati-
cally unfold when the outside
rearview mirror folding switch is in
the AUTO position (if equipped).
✽NOTICE
After unlocking all doors, the doors
will lock automatically unless a door
is opened within 30 seconds.
Tailgate unlock (3)
1. Press the tailgate unlock button for
more than 1 second.
2. The hazard warning light will blink
twice to indicate the tailgate is
unlocked.
✽NOTICE
• After unlocking the tailgate, the
tailgate will lock automatically
unless it is opened within 30 sec-
onds.
• Once the tailgate is opened and
then closed, the tailgate will lock
automatically.
• The word "HOLD" is written on
the button to inform you that you
must press and hold the button.