set clock Hyundai Santa Fe 2016 - RHD (UK, Australia) User Guide
[x] Cancel search | Manufacturer: HYUNDAI, Model Year: 2016, Model line: Santa Fe, Model: Hyundai Santa Fe 2016Pages: 699, PDF Size: 15.65 MB
Page 445 of 699
![Hyundai Santa Fe 2016 - RHD (UK, Australia) User Guide 4347
Features of your vehicle
Clock Display
Press the key Select
[Clock/Day] Select [Clock Display
(Power off)]
This feature is used to display a clock
on the screen when the audio sys-
tem is turned Hyundai Santa Fe 2016 - RHD (UK, Australia) User Guide 4347
Features of your vehicle
Clock Display
Press the key Select
[Clock/Day] Select [Clock Display
(Power off)]
This feature is used to display a clock
on the screen when the audio sys-
tem is turned](/img/35/16332/w960_16332-444.png)
4347
Features of your vehicle
Clock Display
Press the key Select
[Clock/Day] Select [Clock Display
(Power off)]
This feature is used to display a clock
on the screen when the audio sys-
tem is turned off.
Automatic RDS Time
Press the key Select
[Clock/Day] Select [Automatic RDS
Time]
This feature is used to set time auto-
matically by synchronizing with RDS.SETUP SETUP
Page 450 of 699

Features of your vehicle
352 4
SETUP
(for
Bluetooth®Wireless
Technologyequipped model)
- AM900DMMG, AM910DMMG,
AM911DMMG, AM901DMGG,
AM910DMEE, AM911DMEE,
AM912DMEE, AM913DMEE,
AM910DMGL, AM911DMGL,
AM900DMMN, AM910DMMN
Starting Mode
Press the key to display the
Setup screen.
You can select and control options
related to [Display], [Sound],
[Clock/Calendar], [Phone] and
[System].
Display Settings
Adjusting the Brightness
Press the key Select
[Display] Select [Brightness]
Use the , buttons to adjust the
screen brightness or set the
Brightness on Automatic, Daylight, or
Night mode.
Press the button to reset.
1) Automatic : Adjusts the brightness
automatically
2) Daylight : Always maintains the
brightness on high
3) Night : Always maintains the
brightness on low
Pop-up Mode
Press the key Select
[Display] Select [Mode Pop up]
This feature is used to display the
Pop-up Mode screen when entering
radio and media modes.
When this feature is turned on,
pressing the or key
will display the Pop-up Mode screen.
✽NOTICE
The media Pop-up Mode screen can
be displayed only when two or more
media modes have been connected.
MEDIA RADIO
SETUP
Default
SETUP
SETUP
Page 453 of 699
![Hyundai Santa Fe 2016 - RHD (UK, Australia) User Guide 4355
Features of your vehicle
Clock/Calendar Setting
Clock Setting
Press the key Select
[Clock/Calendar] Select [Clock
Settings]
Use the , buttons to set the
Hour, Minutes and AM/PM setting.
✽NOT Hyundai Santa Fe 2016 - RHD (UK, Australia) User Guide 4355
Features of your vehicle
Clock/Calendar Setting
Clock Setting
Press the key Select
[Clock/Calendar] Select [Clock
Settings]
Use the , buttons to set the
Hour, Minutes and AM/PM setting.
✽NOT](/img/35/16332/w960_16332-452.png)
4355
Features of your vehicle
Clock/Calendar Setting
Clock Setting
Press the key Select
[Clock/Calendar] Select [Clock
Settings]
Use the , buttons to set the
Hour, Minutes and AM/PM setting.
✽NOTICE
Press and hold the key (over
0.8 seconds) to set the Clock/
Calendar screen.
Calendar Setting
Press the key Select
[Clock/Calendar] Select [Calendar
Settings]
Use the , buttons to set the
Day, Month and Year setting.
Clock Display
Press the key Select
[Clock/Calendar] Select [Clock
Display (Power off)]
This feature is used to display a clock
on the screen when the audio sys-
tem is turned off.SETUP SETUP
CLOCK
SETUP
Page 631 of 699

Maintenance
34 7
Battery recharging
Your vehicle has a maintenance-free,
calcium-based battery.
• If the battery becomes discharged
in a short time (because, for exam-
ple, the headlights or interior lights
were left on whilst the vehicle was
not in use), recharge it by slow
charging (trickle) for 10 hours.
• If the battery gradually discharges
because of high electric load whilst
the vehicle is being used, recharge
it at 20-30A for two hours.
Reset items
Items should be reset after the bat-
tery has been discharged or the bat-
tery has been disconnected.
• Auto up/down window
(See section 4)
• Sunroof (See section 4)
• Trip computer (See section 4)
• Climate control system
(See section 4)
• Clock (See section 4)
• Audio (See section 4)
(Continued)
• Watch the battery during
charging, and stop or reduce
the charging rate if the battery
cells begin gassing (boiling)
violently or if the temperature
of the electrolyte of any cell
exceeds 49°C (120°F).
• Wear eye protection when
checking the battery during
charging.
• Disconnect the battery charg-
er in the following order.
1. Turn off the battery charger
main switch.
2. Unhook the negative clamp
from the negative battery
terminal.
3. Unhook the positive clamp
from the positive battery
terminal.
(Continued)
WARNING- Recharging
battery
When recharging the battery,
observe the following precau-
tions:
• The battery must be removed
from the vehicle and placed in
an area with good ventilation.
• Do not allow cigarettes,
sparks, or flame near the bat-
tery.
(Continued)
(Continued)
• Before performing mainte-
nance or recharging the bat-
tery, turn off all accessories
and stop the engine.
• The negative battery cable
must be removed first and
installed last when the battery
is disconnected.
Page 646 of 699

749
Maintenance
If the headlights or other electrical
components do not work and the
fuses are OK, check the fuse block in
the engine compartment. If a fuse is
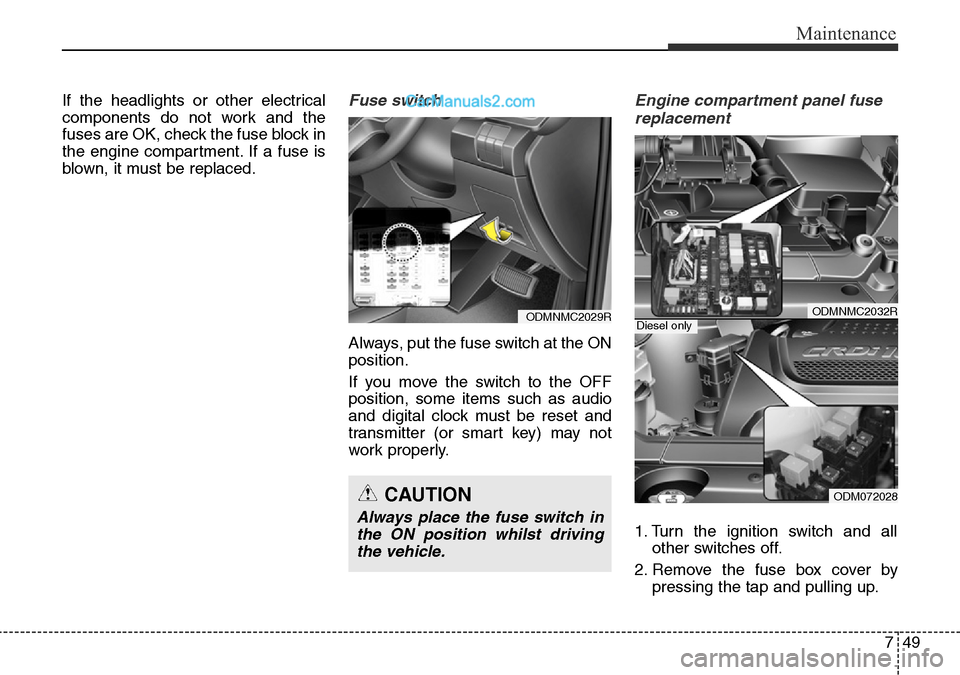
blown, it must be replaced.Fuse switch
Always, put the fuse switch at the ON
position.
If you move the switch to the OFF
position, some items such as audio
and digital clock must be reset and
transmitter (or smart key) may not
work properly.
Engine compartment panel fuse
replacement
1. Turn the ignition switch and all
other switches off.
2. Remove the fuse box cover by
pressing the tap and pulling up.
ODMNMC2029R
CAUTION
Always place the fuse switch in
the ON position whilst driving
the vehicle.
ODMNMC2032R
ODM072028
Diesel only
Page 663 of 699

Maintenance
66 7
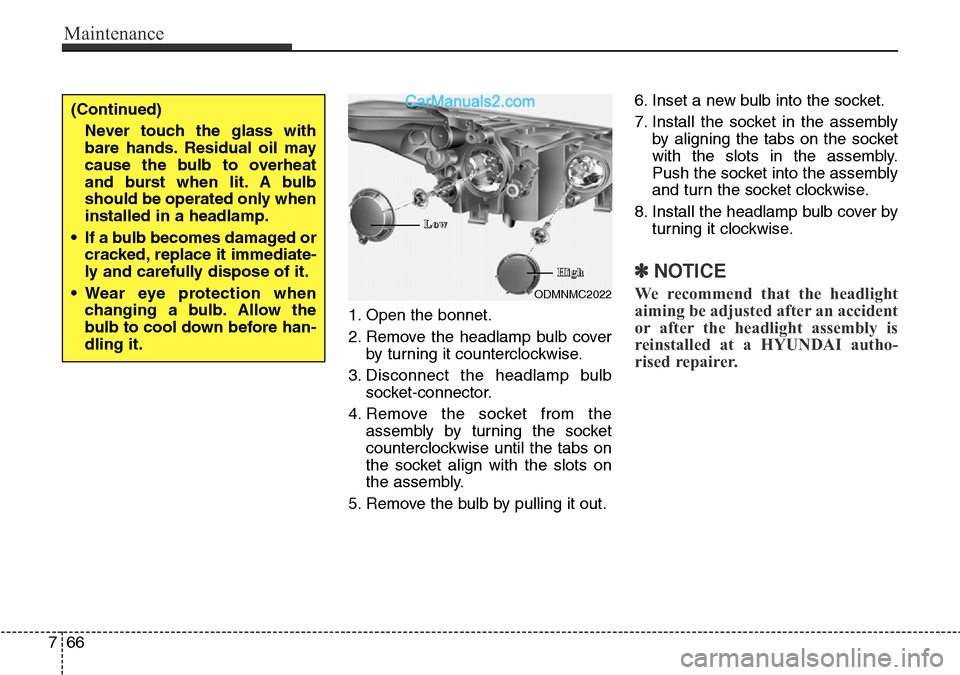
1. Open the bonnet.
2. Remove the headlamp bulb cover
by turning it counterclockwise.
3. Disconnect the headlamp bulb
socket-connector.
4. Remove the socket from the
assembly by turning the socket
counterclockwise until the tabs on
the socket align with the slots on
the assembly.
5. Remove the bulb by pulling it out.6. Inset a new bulb into the socket.
7. Install the socket in the assembly
by aligning the tabs on the socket
with the slots in the assembly.
Push the socket into the assembly
and turn the socket clockwise.
8. Install the headlamp bulb cover by
turning it clockwise.
✽NOTICE
We recommend that the headlight
aiming be adjusted after an accident
or after the headlight assembly is
reinstalled at a HYUNDAI autho-
rised repairer.ODMNMC2022
(Continued)
Never touch the glass with
bare hands. Residual oil may
cause the bulb to overheat
and burst when lit. A bulb
should be operated only when
installed in a headlamp.
• If a bulb becomes damaged or
cracked, replace it immediate-
ly and carefully dispose of it.
• Wear eye protection when
changing a bulb. Allow the
bulb to cool down before han-
dling it.
L L
o o
w w
H H
i i
g g
h h