turn signal Hyundai Santa Fe 2016 - RHD (UK, Australia) User Guide
[x] Cancel search | Manufacturer: HYUNDAI, Model Year: 2016, Model line: Santa Fe, Model: Hyundai Santa Fe 2016Pages: 699, PDF Size: 15.65 MB
Page 300 of 699
Features of your vehicle
202 4
✽NOTICE
• If you install an aftermarket HID
head lamp, your vehicle’s audio
and electronic device may mal-
function.
• Prevent chemicals such as per-
fume, cosmetic oil, sun cream,
hand cleaner and air freshener
from contacting the interior parts
because they may cause damage
or discoloration.
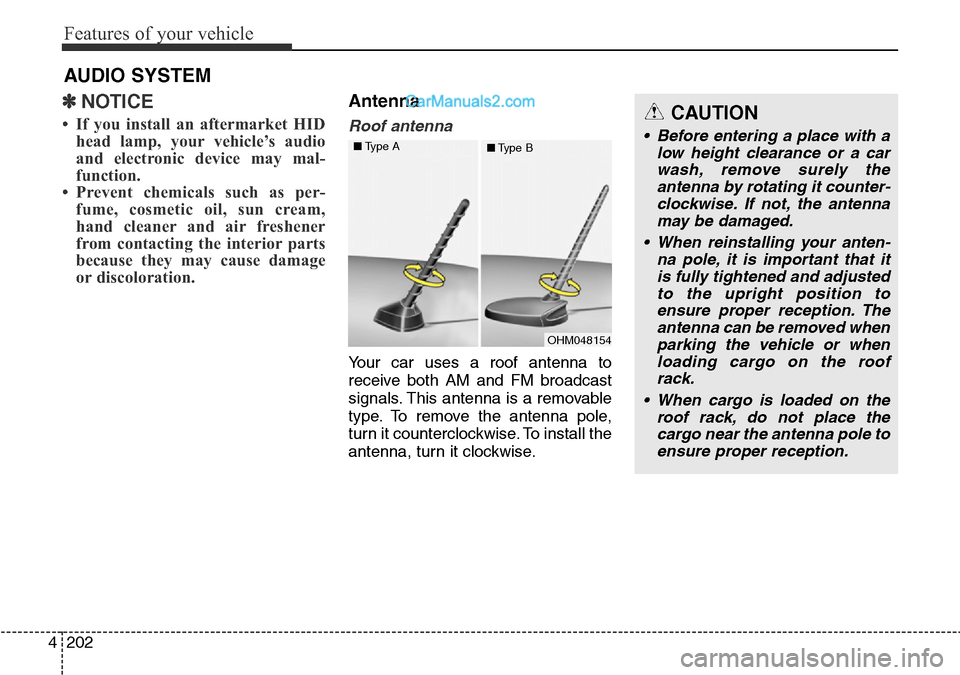
Antenna
Roof antenna
Your car uses a roof antenna to
receive both AM and FM broadcast
signals. This antenna is a removable
type. To remove the antenna pole,
turn it counterclockwise. To install the
antenna, turn it clockwise.
AUDIO SYSTEM
CAUTION
• Before entering a place with a
low height clearance or a car
wash, remove surely the
antenna by rotating it counter-
clockwise. If not, the antenna
may be damaged.
• When reinstalling your anten-
na pole, it is important that it
is fully tightened and adjusted
to the upright position to
ensure proper reception. The
antenna can be removed when
parking the vehicle or when
loading cargo on the roof
rack.
• When cargo is loaded on the
roof rack, do not place the
cargo near the antenna pole to
ensure proper reception.
OHM048154 ■Type A
■Type B
Page 354 of 699

Features of your vehicle
256 4
✽NOTICE - USING THE
Bluetooth®Wireless Technology
CELLULAR PHONE
• Do not use a cellular phone or per-
form Bluetooth®Wireless
Technology settings (e.g. pairing a
phone) while driving.
• Some Bluetooth
®Wireless
Technology -enabled phones may
not be recognized by the system or
fully compatible with the system.
• Before using Bluetooth
®Wireless
Technology related features of the
audio system, refer your phone’s
User’s Manual for phone-side
Bluetooth
®Wireless Technology
operations.
• The phone must be paired to the
audio system to use Bluetooth
®
Wireless Technology related fea-
tures.
• You will not be able to use the
hands-free feature when your
phone (in the car) is outside of the
cellular service area (e.g. in a tun-
nel, in a underground, in a moun-
tainous area, etc.).
(Continued)(Continued)
• If the cellular phone signal is poor
or the vehicles interior noise is too
loud, it may be difficult to hear the
other person’s voice during a call.
• Do not place the phone near or
inside metallic objects, otherwise
communications with Bluetooth
®
Wireless Technology system or cel-
lular service stations can be dis-
turbed.
• While a phone is connected
through Bluetooth
®Wireless
Technology your phone may dis-
charge quicker than usual for
additional Bluetooth
®Wireless
Technology-related operations.
• Some cellular phones or other
devices may cause interference
noise or malfunction to audio sys-
tem. In this case, store the device
in a different location may resolve
the condition.
• Phone contact names should be
saved in English or they may not
be displayed correctly.
(Continued)(Continued)
• If Priority is set upon vehicle igni-
tion(IGN/ACC ON), the
Bluetooth
®Wireless Technology
phone will be automatically con-
nected.
Even if you are outside, the
Bluetooth
®Wireless Technology
phone will be automatically con-
nected once you are in the vicinity
of the vehicle.
If you do not want automatic
Bluetooth
®Wireless Technology
connection, turn the Bluetooth®
Wireless Technology feature off.
• The hands-free call volume and
quality may differ depending on
the mobile phone type.
•Bluetooth
®Wireless Technology
features can be used only when the
mobile phone has been paired and
connected with the device. For
more information on pairing and
connecting Bluetooth
®Wireless
Technology enabled mobile
phones, refer to the “Phone Setup”
section.
(Continued)
Page 515 of 699
557
Driving your vehicle
Hill-start assist control (HAC)
(if equipped)
A vehicle has the tendency to slip
back on a steep hill when it starts to
go after stopping. The Hill-start
Assist Control (HAC) prevents the
vehicle from slipping back by operat-
ing the brakes automatically for
about 2 seconds. The brakes are
released when the accelerator pedal
is depressed or after about 2 sec-
onds.
✽NOTICE
• The HAC does not operate when
the transaxle shift lever is in the P
(Park) or N (Neutral) position.
• The HAC activates even though
the ESC is off but it does not acti-
vate when the ESC has malfunc-
tioned.
Emergency Stop Signal (ESS)
(if equipped)
The Emergency Stop Signal system
alerts the driver behind by blinking
the stop light when the vehicle is
braked rapidly and severely.
The system is activated when:
• The vehicle suddenly stops (vehi-
cle speed is over 35 mph (55 km/h)
and the vehicle deceleration at
greater than 7 m/s
2)
• The ABS is activating
When the vehicle speed is under 25
mph (40 km/h) and the ABS deacti-
vates or the sudden stop situation is
over, the stop light blinking will stop.
Instead, the hazard warning flasher
will turn on automatically.
The hazard warning flasher will turn
off when vehicle speed is over 6 mph
(10 km/h) after the vehicle has
stopped. Also, it will turn off when the
vehicle is driven at low speed for
some time. You can turn it off manu-
ally by pushing the hazard warning
flasher switch.
CAUTION
The Emergency Stop Signal
(ESS) system will not work if the
hazard warning flasher is
already on.
WARNING
The HAC is activated only for
about 2 seconds, so when the
vehicle is starting off always
depress the accelerator pedal.
Page 530 of 699
Driving your vehicle
72 5
2.Auditory warning
If you leave the lane, the warning
sound operates with 0.8 seconds of
interval.Warning indicator
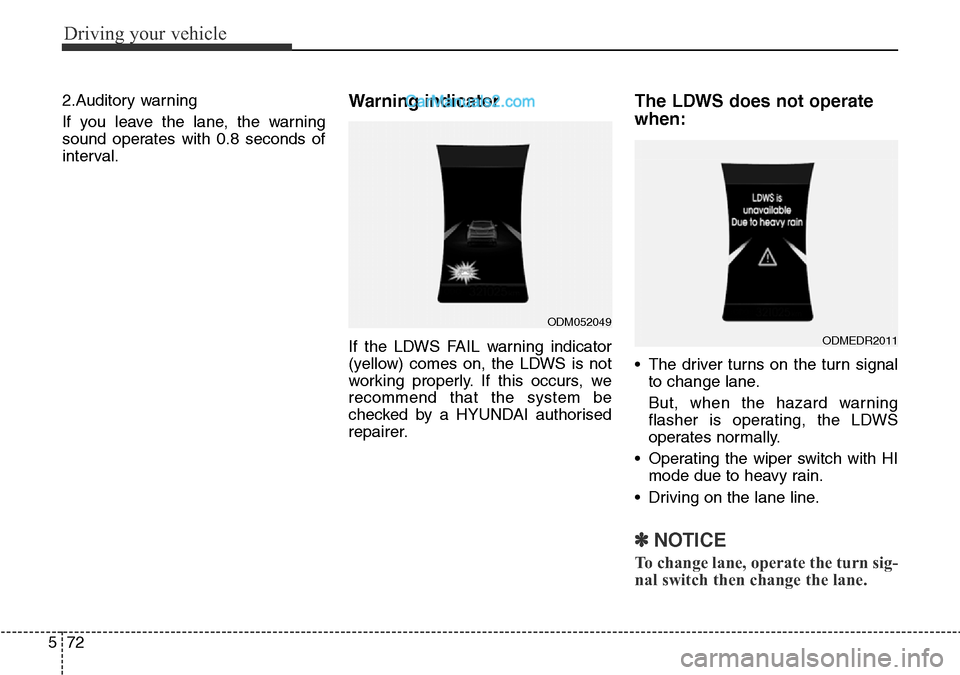
If the LDWS FAIL warning indicator
(yellow) comes on, the LDWS is not
working properly. If this occurs, we
recommend that the system be
checked by a HYUNDAI authorised
repairer.
The LDWS does not operate
when:
• The driver turns on the turn signal
to change lane.
But, when the hazard warning
flasher is operating, the LDWS
operates normally.
• Operating the wiper switch with HI
mode due to heavy rain.
• Driving on the lane line.
✽NOTICE
To change lane, operate the turn sig-
nal switch then change the lane.
ODMEDR2011
ODM052049
Page 549 of 699
591
Driving your vehicle
Driving with a trailer
Towing a trailer requires a certain
amount of experience. Before setting
out for the open road, you must get
to know your trailer. Acquaint your-
self with the feel of handling and
braking with the added weight of the
trailer. And always keep in mind that
the vehicle you are driving is now a
good deal longer and not nearly so
responsive as your vehicle is by
itself.
Before you start, check the trailer
towbar and platform, safety chains,
electrical connector(s), lights, tyres
and mirror adjustment. If the trailer
has electric brakes, start your vehicle
and trailer moving and then apply the
trailer brake controller by hand to be
sure the brakes are working. This lets
you check your electrical connection
at the same time.
During your trip, check occasionally
to be sure that the load is secure,
and that the lights and any trailer
brakes are still working.
Following distance
Stay at least twice as far behind the
vehicle ahead as you would when
driving your vehicle without a trailer.
This can help you avoid situations
that require heavy braking and sud-
den turns.
Passing
You’ll need more passing distance
up ahead when you’re towing a trail-
er. And, because of the increased
vehicle length, you’ll need to go
much farther beyond the passed
vehicle before you can return to your
lane. Due to the added load to the
engine when going uphill the vehicle
may also take longer to pass than it
would on flat ground.
Backing up
Hold the bottom of the steering
wheel with one hand. Then, to move
the trailer to the left, just move your
hand to the left. To move the trailer to
the right, move your hand to the
right. Always back up slowly and, if
possible, have someone guide you.
Making turns
When you’re turning with a trailer,
make wider turns than normal. Do
this so your trailer won’t strike soft
shoulders, kerbs, road signs, trees,
or other objects near the edge of the
road. Avoid jerky or sudden manoeu-
vres. Signal well in advance before
turning or lane changes.
Page 550 of 699
Driving your vehicle
92 5
Turn signals when towing a trailer
When you tow a trailer, your vehicle
has to have a different turn signal
flasher and extra wiring. The green
arrows on your instrument panel will
flash whenever you signal a turn or
lane change. Properly connected,
the trailer lights will also flash to alert
other drivers you’re about to turn,
change lanes, or stop.
When towing a trailer, the green
arrows on your instrument panel will
flash for turns even if the bulbs on
the trailer are burned out. Thus, you
may think drivers behind you are
seeing your signals when, in fact,
they are not. It is important to check
occasionally to be sure the trailer
bulbs are still working. You must also
check the lights every time you dis-
connect and then reconnect the
wires.
Do not connect a trailer lighting sys-
tem directly to your vehicle’s lighting
system. Use only an approved trailer
wiring harness.
A HYUNDAI authorised repairer can
assist you in installing the wiring har-
ness.
Driving on grades
Reduce speed and shift to a lower
gear before you start down a long or
steep downgrade. If you don’t shift
down, you might have to use your
brakes so much that they would get
hot and no longer operate efficiently.
On a long uphill grade, shift down
and reduce your speed to around 45
mph (70 km/h) to reduce the possi-
bility of engine and transaxle over-
heating.
If your trailer weighs more than the
maximum trailer weight without trail-
er brakes and you have an automat-
ic transaxle, you should drive in D
(Drive) when towing a trailer.
Operating your vehicle in D (Drive)
when towing a trailer will minimise
heat build up and extend the life of
your transaxle.WARNING
Failure to use an approved trail-
er wiring harness could result
in damage to the vehicle electri-
cal system and/or personal
injury.
Page 558 of 699
What to do in an emergency
2 6
ROAD WARNING
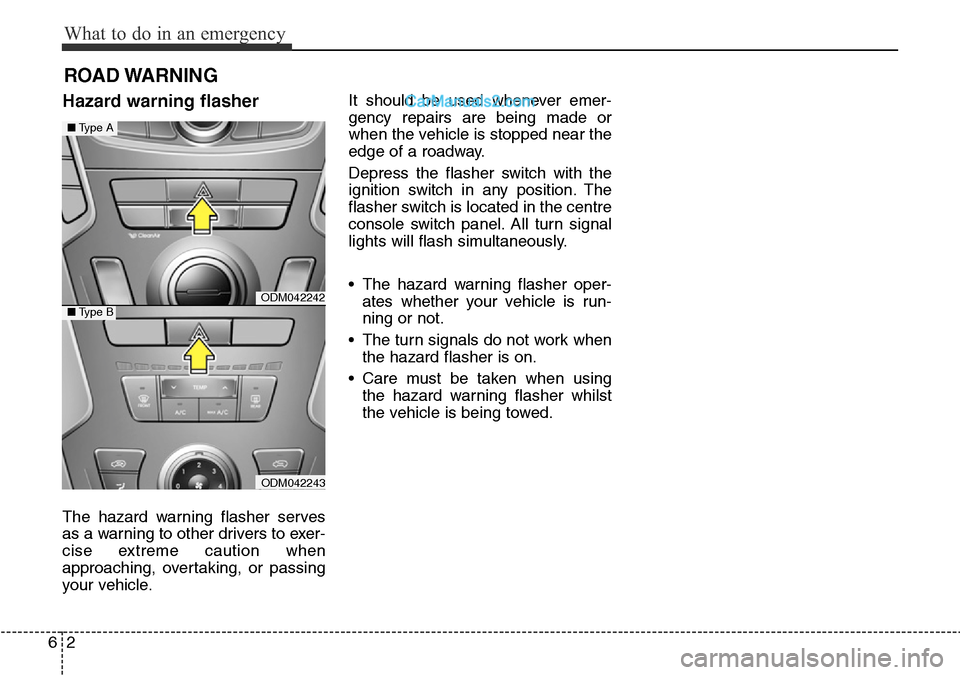
Hazard warning flasher
The hazard warning flasher serves
as a warning to other drivers to exer-
cise extreme caution when
approaching, overtaking, or passing
your vehicle.It should be used whenever emer-
gency repairs are being made or
when the vehicle is stopped near the
edge of a roadway.
Depress the flasher switch with the
ignition switch in any position. The
flasher switch is located in the centre
console switch panel. All turn signal
lights will flash simultaneously.
• The hazard warning flasher oper-
ates whether your vehicle is run-
ning or not.
• The turn signals do not work when
the hazard flasher is on.
• Care must be taken when using
the hazard warning flasher whilst
the vehicle is being towed.
ODM042242
ODM042243
■Type A
■Type B
Page 606 of 699
79
Maintenance
• Check parking brake.
• Check for fluid leaks under your
vehicle (water dripping from the air
conditioning system during or after
use is normal).
At least monthly:
• Check coolant level in the engine
coolant reservoir.
• Check the operation of all exterior
lights, including the stoplights, turn
signals and hazard warning flash-
ers.
• Check the inflation pressures of all
tyres including the spare.
At least twice a year
(i.e., every Spring and Fall) :
• Check radiator, heater and air con-
ditioning hoses for leaks or dam-
age.
• Check windscreen washer spray
and wiper operation. Clean wiper
blades with clean cloth dampened
with washer fluid.
• Check headlight alignment.
• Check muffler, exhaust pipes,
shields and clamps.
• Check the lap/shoulder belts for
wear and function.
• Check for worn tyres and loose
wheel lug nuts.
At least once a year :
• Clean body and door drain holes.
• Lubricate door hinges and checks,
and bonnet hinges.
• Lubricate door and bonnet locks
and latches.
• Lubricate door rubber weather-
strips.
• Check the air conditioning system.
• Check the power steering fluid
level.
• Inspect and lubricate automatic
transaxle linkage and controls.
• Clean battery and terminals.
• Check the brake (and clutch) fluid
level.
Page 662 of 699

765
Maintenance
Headlamp, position lamp,
Front turn signal lamp, front
fog lamp bulb replacement(1) Headlamp (High)
(2) Headlamp (Low)
(3) Position lamp (LED/bulb)
(4) Front turn signal lamp
(5) Front fog lamp (if equipped)
(6) Cornering lamp (if equipped)
(7) Daytime running lamp
(if equipped)Headlamp bulb
OHD076046
WARNING- Halogen
bulbs
• Halogen bulbs contain pres-
surized gas that will produce
flying pieces of glass if bro-
ken.
• Always handle them carefully,
and avoid scratches and abra-
sions. If the bulbs are lit, avoid
contact with liquids.
(Continued)
ODMEMC2017
■Type A
■Type BODM072029
Page 664 of 699
767
Maintenance
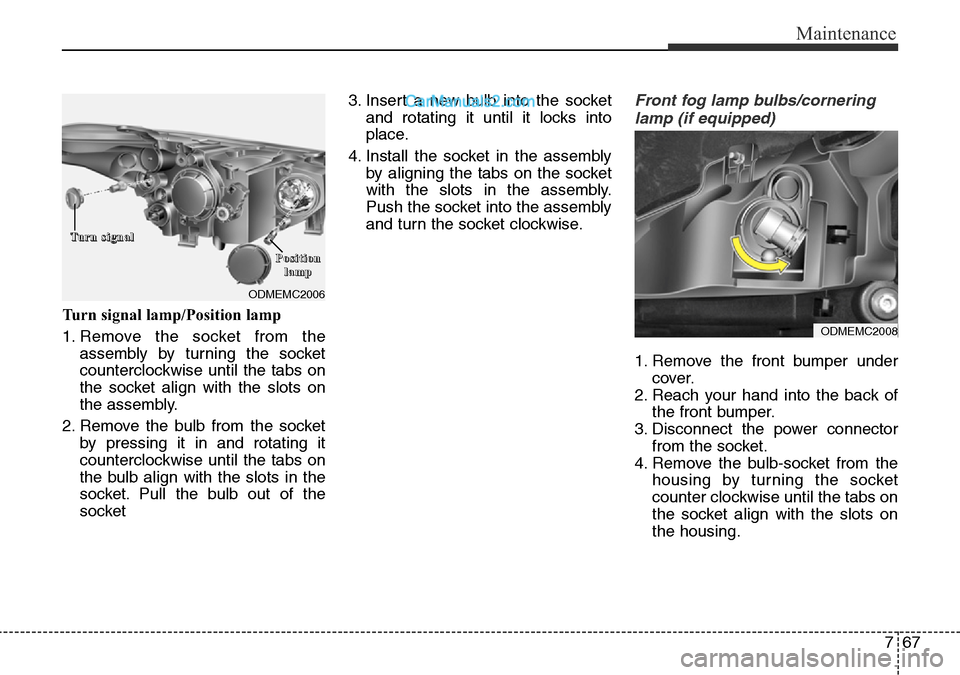
Turn signal lamp/Position lamp
1. Remove the socket from the
assembly by turning the socket
counterclockwise until the tabs on
the socket align with the slots on
the assembly.
2. Remove the bulb from the socket
by pressing it in and rotating it
counterclockwise until the tabs on
the bulb align with the slots in the
socket. Pull the bulb out of the
socket3. Insert a new bulb into the socket
and rotating it until it locks into
place.
4. Install the socket in the assembly
by aligning the tabs on the socket
with the slots in the assembly.
Push the socket into the assembly
and turn the socket clockwise.
Front fog lamp bulbs/cornering
lamp (if equipped)
1. Remove the front bumper under
cover.
2. Reach your hand into the back of
the front bumper.
3. Disconnect the power connector
from the socket.
4. Remove the bulb-socket from the
housing by turning the socket
counter clockwise until the tabs on
the socket align with the slots on
the housing.
ODMEMC2006
T T
u u
r r
n n
s s
i i
g g
n n
a a
l l
P P
o o
s s
i i
t t
i i
o o
n n
l l
a a
m m
p p
ODMEMC2008