security Hyundai Santa Fe 2017 Owner's Manual
[x] Cancel search | Manufacturer: HYUNDAI, Model Year: 2017, Model line: Santa Fe, Model: Hyundai Santa Fe 2017Pages: 569, PDF Size: 16.88 MB
Page 66 of 569
345
Safety features of your vehicle
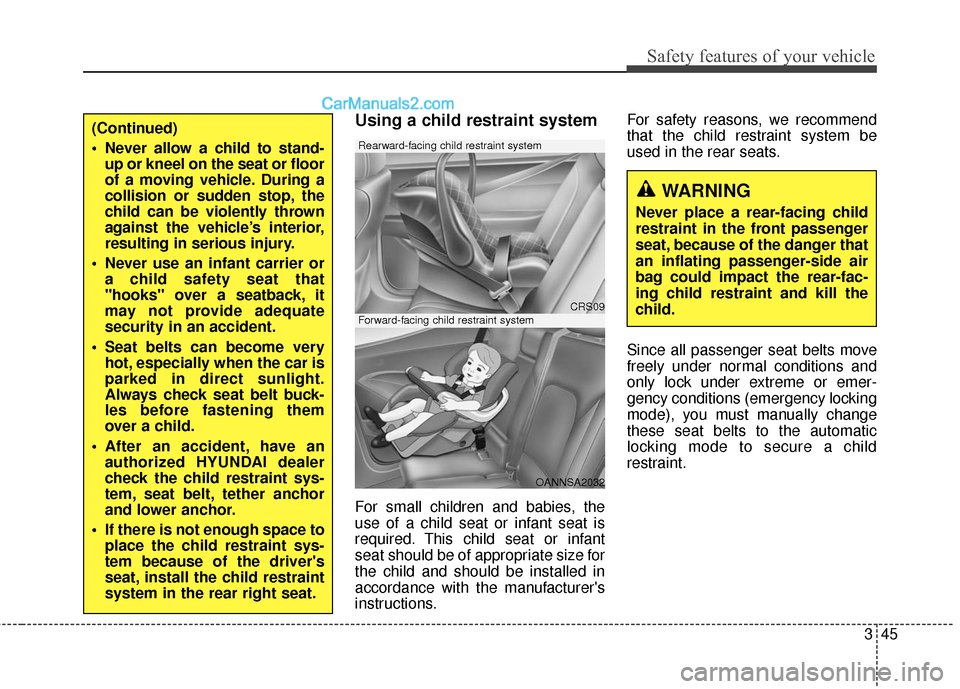
Using a child restraint system
For small children and babies, the
use of a child seat or infant seat is
required. This child seat or infant
seat should be of appropriate size for
the child and should be installed in
accordance with the manufacturer's
instructions.For safety reasons, we recommend
that the child restraint system be
used in the rear seats.
Since all passenger seat belts move
freely under normal conditions and
only lock under extreme or emer-
gency conditions (emergency locking
mode), you must manually change
these seat belts to the automatic
locking mode to secure a child
restraint.
WARNING
Never place a rear-facing child
restraint in the front passenger
seat, because of the danger that
an inflating passenger-side air
bag could impact the rear-fac-
ing child restraint and kill the
child.
CRS09
OANNSA2032
Forward-facing child restraint system
Rearward-facing child restraint system
(Continued)
Never allow a child to stand-
up or kneel on the seat or floor
of a moving vehicle. During a
collision or sudden stop, the
child can be violently thrown
against the vehicle’s interior,
resulting in serious injury.
Never use an infant carrier or a child safety seat that
"hooks" over a seatback, it
may not provide adequate
security in an accident.
Seat belts can become very hot, especially when the car is
parked in direct sunlight.
Always check seat belt buck-
les before fastening them
over a child.
After an accident, have an authorized HYUNDAI dealer
check the child restraint sys-
tem, seat belt, tether anchor
and lower anchor.
If there is not enough space to place the child restraint sys-
tem because of the driver's
seat, install the child restraint
system in the rear right seat.
Page 166 of 569
463
Features of your vehicle
To adjust the Zone setting:
1. Determine the desired ZoneNumber based upon your current
location on the Zone Map.
2. Press and hold the button for 6 seconds, the current Zone
Number will appear on the display.
3. Pressing and holding the button again will cause the numbers to
increment (Note: they will repeat
…13, 14, 15, 1, 2, …). Releasing
the button when the desired Zone
Number appears on the display
will set the new Zone.
4. Within about 5 seconds the com- pass will start displaying a com-
pass heading again.
There are some conditions that can
cause changes to the vehicle mag-
nets, such as installing a ski rack or
a CB antenna. Body repair work on
the vehicle can also cause changes
to the vehicle's magnetic field. In
these situations, the compass will
need to be re-calibrated to quickly
correct for these changes. To re-cali-
brate the compass: 1. Press and hold the button for
more than 9 seconds. When the
compass memory is cleared a "C"
will appear in the display.
2. To calibrate the compass, drive the vehicle in 2 complete circles at
less than 5 mph (8 km/h). Integrated HomeLink®Wireless
Control System
The HomeLink
®Wireless Control
System provides a convenient way to
replace up to three hand-held radio-
frequency (RF) transmitters with a
single built-in device. This innovative
feature will learn the radio frequency
codes of most current transmitters to
operate devices such as gate opera-
tors, garage door openers, entry
door locks, security systems, even
home lighting. Both standard and
rolling code-equipped transmitters
can be programmed by following the
outlined procedures. Additional
HomeLink
®information can be found
at: www.homelink.com or by calling
1-800-355-3515.
Page 167 of 569
Features of your vehicle
64
4
Retain the original transmitter of the
RF device you are programming for
use in other vehicles as well as for
future HomeLink
®programming. It is
also suggested that upon the sale of
the vehicle, the programmed
HomeLink
®buttons be erased for
security purposes. Programming HomeLink
®
✽ ✽
NOTICE
• When programming a garage
door opener, it is advised to park
the vehicle outside of the garage.
• It is recommended that a new bat- tery be placed in the hand-held
transmitter of the device being
programmed to HomeLink
®for
quicker training and accurate
transmission of the radio-frequen-
cy signal.
• Some vehicles may require the ignition switch to be turned to the
second (or "accessories") position
for programming and/or opera-
tion of HomeLink.
• In the event that there are still pro- gramming difficulties or questions
after following the programming
steps listed below, contact
HomeLink
®at: www.homelink.com
or 1-800-355-3515.
WARNING
Before programming
HomeLink®to a garage door
opener or gate operator, make
sure that people and objects are
out of the way of the device to
prevent potential harm or dam-
age. Do not use HomeLink
®with
any garage door opener that
lacks the safety stop and
reverse features required by
U.S. federal safety standards
(this includes any garage door
opener model manufactured
before April 1, 1982). A garage
door that cannot detect an
object - signaling the door to
stop and reverse - does not
meet current U.S. federal safety
standards. Using a garage door
opener without these features
increases the risk of serious
injury or death.
Page 169 of 569
Features of your vehicle
66
4
4. Firmly press, hold for 5 seconds
and release the programmed
HomeLink
®button up to two sepa-
rate times to activate the door. If
the door does not activate, press
and hold the just-trained
HomeLink
®button and observe
the indicator light.
stantly, programming is complete
and your device should activate
when the HomeLink
®button is
pressed and released.
for 2 seconds and then turns to a
constant light, continue with
"Programming" steps 5-7 to
complete the programming of a
rolling code equipped device
(most commonly a garage door
opener).
5. At the garage door opener receiv- er (motor-head unit) in the garage,
locate the "leam" or "smart" but-
ton. This can usually be found
where the hanging antenna wire is
attached to the motor-head unit. 6. Firmly press and release the
"leam" or "smart" button. (The
name and color of the button vary
by manufacturer). There are 30
seconds to initiate step 7.
7. Return to the vehicle and firmly press, hold for 2 seconds and
release the programmed
HomeLink
®button. Repeat the
"press/hold/release" sequence a
second time, and, depending on
the brand of the garage door
opener (or other rolling code
equipped device), repeat this
sequence a third time to complete
the programming process.
HomeLink
®should now activate your
rolling code equipped device. Gate operator & Canadian pro-
gramming
During programming, your handheld
transmitter may automatically stop
transmitting. Continue to press the
Integrated HomeLink
®Wireless
Control System button (note steps 2
through 3 in the Programming por-
tion of this document) while you
press and re-press ("cycle") your
handheld transmitter every two sec-
onds until the frequency signal has
been learned. The indicator light will
flash slowly and then rapidly after
several seconds upon successful
training.
Operating HomeLink
®
To operate, simply press and release
the programmed HomeLink®button.
Activation will now occur for the
trained device (i.e. garage door
opener, gate operator, security sys-
tem, entry door lock, home/office
lighting, etc.). For convenience, the
hand-held transmitter of the device
may also be used at any time.
Page 276 of 569
4173
Features of your vehicle
Luggage net (holder)
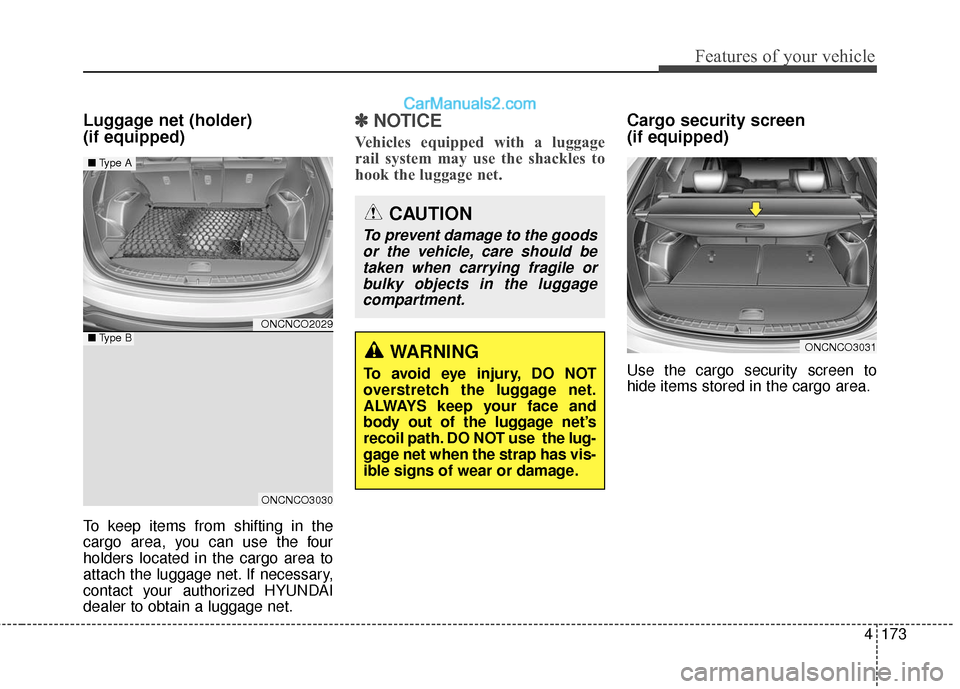
(if equipped)
To keep items from shifting in the
cargo area, you can use the four
holders located in the cargo area to
attach the luggage net. If necessary,
contact your authorized HYUNDAI
dealer to obtain a luggage net.
✽ ✽NOTICE
Vehicles equipped with a luggage
rail system may use the shackles to
hook the luggage net.
Cargo security screen
(if equipped)
Use the cargo security screen to
hide items stored in the cargo area.
WARNING
To avoid eye injury, DO NOT
overstretch the luggage net.
ALWAYS keep your face and
body out of the luggage net’s
recoil path. DO NOT use the lug-
gage net when the strap has vis-
ible signs of wear or damage.
CAUTION
To prevent damage to the goods
or the vehicle, care should betaken when carrying fragile orbulky objects in the luggagecompartment.
ONCNCO3031
ONCNCO2029
ONCNCO3030
■ Type A
■Type B
Page 277 of 569
Features of your vehicle
174
4
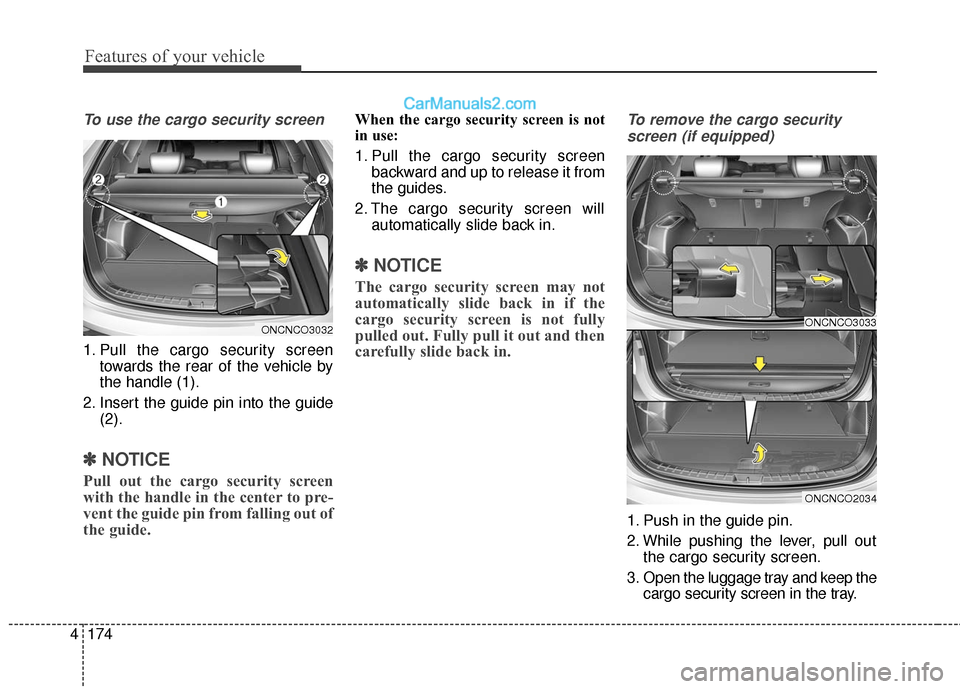
To use the cargo security screen
1. Pull the cargo security screen
towards the rear of the vehicle by
the handle (1).
2. Insert the guide pin into the guide (2).
✽ ✽NOTICE
Pull out the cargo security screen
with the handle in the center to pre-
vent the guide pin from falling out of
the guide.
When the cargo security screen is not
in use:
1. Pull the cargo security screen
backward and up to release it from
the guides.
2. The cargo security screen will automatically slide back in.
✽ ✽NOTICE
The cargo security screen may not
automatically slide back in if the
cargo security screen is not fully
pulled out. Fully pull it out and then
carefully slide back in.
To remove the cargo security
screen (if equipped)
1. Push in the guide pin.
2. While pushing the lever, pull out the cargo security screen.
3. Open the luggage tray and keep the cargo security screen in the tray.
ONCNCO3033
ONCNCO2034
ONCNCO3032
Page 278 of 569
4175
Features of your vehicle
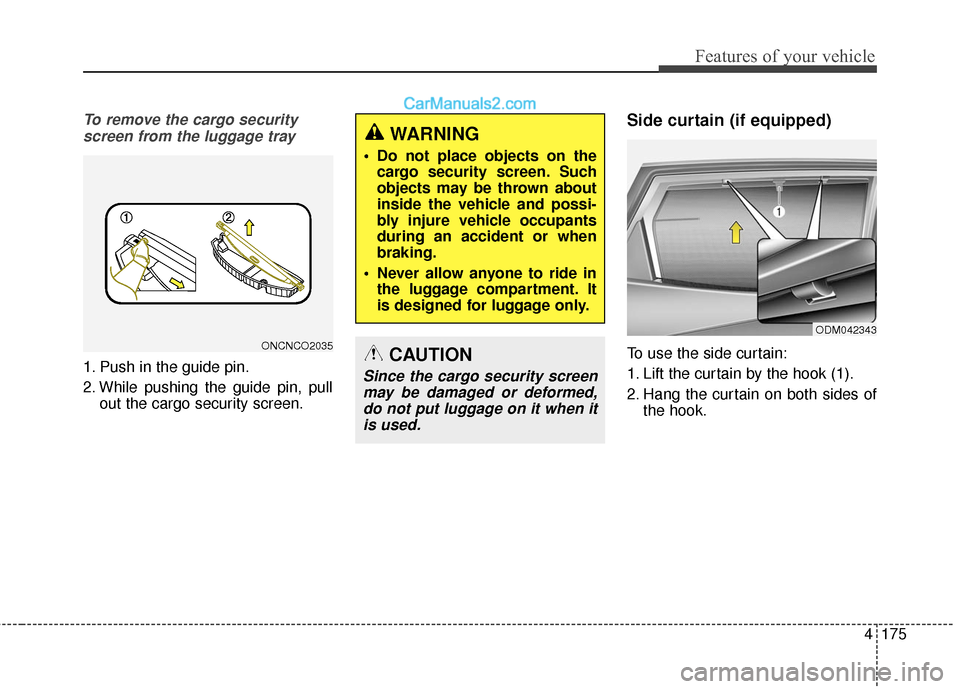
To remove the cargo securityscreen from the luggage tray
1. Push in the guide pin.
2. While pushing the guide pin, pull out the cargo security screen.
Side curtain (if equipped)
To use the side curtain:
1. Lift the curtain by the hook (1).
2. Hang the curtain on both sides ofthe hook.
WARNING
Do not place objects on thecargo security screen. Such
objects may be thrown about
inside the vehicle and possi-
bly injure vehicle occupants
during an accident or when
braking.
Never allow anyone to ride in the luggage compartment. It
is designed for luggage only.
CAUTION
Since the cargo security screenmay be damaged or deformed,do not put luggage on it when itis used.
ODM042343
ONCNCO2035
Page 561 of 569
I3
Index
Hill-start Assist Control (HAC) ................................5-53
In the event of brake failure ......................................5-32
Parking brake ............................................................5-33
Power brakes .............................................................5-15
Vehicle Stability Management (VSM) ......................5-50
Bulb wattage ...................................................................8-3
California perchlorate notice ........................................7-98
Cargo security screen .................................................4-173
Center console storage................................................4-162
Central door lock switch...............................................4-23
Certification label .......................................................5-126
Changing tires ...............................................................6-18
Child restraint system ...................................................3-43 Securing a child restraint seat with child seat lower anchor system ..............................................3-51
Tether Anchor system................................................3-49
Using a child restraint system ...................................3-45
Child-protector rear door lock ......................................4-25
Cigarette lighter ..........................................................4-165
Climate control air filter ...............................................7-40
Clothes hanger ............................................................4-170
Consumer information ..................................................8-11
Cruise control system ...................................................5-67
Cup holder ..................................................................4-165
Curtain air bag ..............................................................3-72 Defroster .....................................................................4-1\
37
Front wiper deicer ...................................................4-138
Rear window defroster ............................................4-137
Dimensions .....................................................................8-2\
Door locks..............................................................\
.......4-21 Child-protector rear door lock ..................................4-25
Impact sensing door unlock system ..........................4-25
Operating door locks from inside the vehicle ...........4-23
Operating door locks from outside the vehicle .........4-21
Downhill Brake Control (DBC) ...................................5-51
Drive mode integrated control system .........................5-29
Driver assist system ....................................................4-113 Multi-view Camera System.....................................4-118
Rear parking assist system ......................................4-113
Rear View Camera ..................................................4-117
Driver position memory system ...................................3-16
Driver's and passenger's front air bag ..........................3-66
Driving conditions ......................................................5-103 Driving at night .......................................................5-106
Driving in flooded areas..........................................5-107
Driving in the rain ...................................................5-106
Driving off-road ......................................................5-107
Hazardous driving conditions .................................5-103
Highway driving......................................................5-107
Reducing the risk of a rollover ...............................5-103
C
D
Page 563 of 569
I5
Index
Gauges ........................................................................\
..4-73
Glove box ...................................................................4-162\
Gross vehicle weight ......................................................8-6
Hazard warning flasher...............................................4-119
Hazardous driving conditions .....................................5-103
Headlamp delay ..........................................................4-120
Heated steering wheel...................................................4-58
Highway driving .........................................................5-107
Hill-start Assist Control (HAC)....................................5-53
Hood ........................................................................\
.....4-44
Horn ........................................................................\
......4-59
How to use this manual ..................................................1-2Immobilizer system ........................................................4-8
Important safety precautions ..........................................3-2
Air Bag Hazards ..........................................................3-2
Always Wear Your Seat Belt .......................................3-2
Control Your Speed .....................................................3-3
Driver Distraction........................................................3-2
Keep Your Vehicle in Safe Condition .........................3-3
Restrain All Children ..................................................3-2
Inside rearview mirror ..................................................4-60
Instrument cluster .........................................................4-72
Instrument cluster control .............................................4-73 Gauges .......................................................................4\
-73
Instrument cluster control .........................................4-73
Transaxle Shift Indicator ...........................................4-76
Instrument panel overview .............................................2-6
Interior care...................................................................7-93
Interior features...........................................................4-165 AC inverter ..............................................................4-169
Aux, USB and iPod
®port .......................................4-172
Cargo security screen ..............................................4-173
Cigarette lighter.......................................................4-165
Clothes hanger.........................................................4-170
Cup holder ...............................................................4-165
Floor mat anchor(s) .................................................4-171
Luggage net (holder) ...............................................4-173
G
H
I