parking brake Hyundai Santa Fe 2019 - RHD (UK, Australia) Manual PDF
[x] Cancel search | Manufacturer: HYUNDAI, Model Year: 2019, Model line: Santa Fe, Model: Hyundai Santa Fe 2019Pages: 682, PDF Size: 16.24 MB
Page 589 of 682

7-14
Maintenance
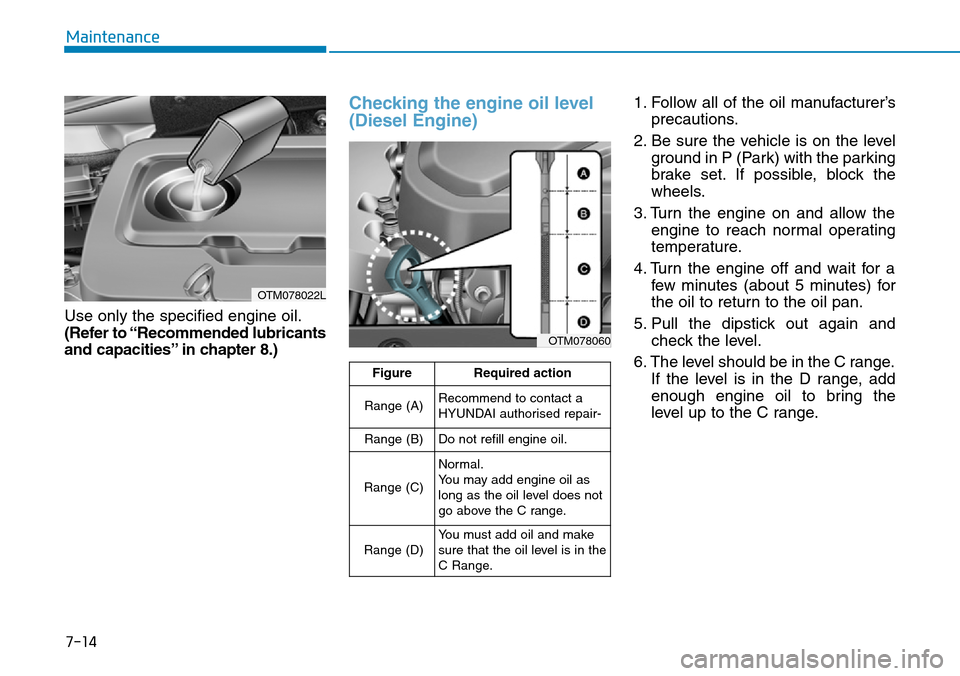
Use only the specified engine oil.
(Refer to “Recommended lubricants
and capacities” in chapter 8.)
Checking the engine oil level
(Diesel Engine)1. Follow all of the oil manufacturer’s
precautions.
2. Be sure the vehicle is on the level
ground in P (Park) with the parking
brake set. If possible, block the
wheels.
3. Turn the engine on and allow the
engine to reach normal operating
temperature.
4. Turn the engine off and wait for a
few minutes (about 5 minutes) for
the oil to return to the oil pan.
5. Pull the dipstick out again and
check the level.
6. The level should be in the C range.
If the level is in the D range, add
enough engine oil to bring the
level up to the C range.
OTM078022L
OTM078060
FigureRequired action
Range (A)Recommend to contact a
HYUNDAI authorised repair-
Range (B)Do not refill engine oil.
Range (C)
Normal.
You may add engine oil as
long as the oil level does not
go above the C range.
Range (D)You must add oil and make
sure that the oil level is in the
C Range.
Page 596 of 682

7-21
7
Maintenance
PARKING BRAKE
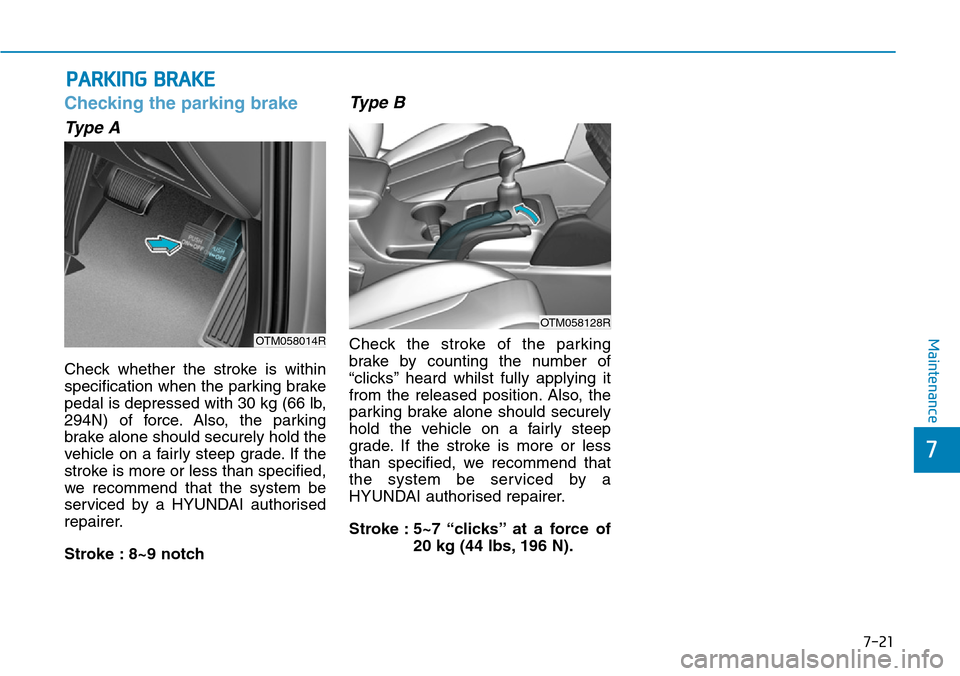
Checking the parking brake
Type A
Check whether the stroke is within
specification when the parking brake
pedal is depressed with 30 kg (66 lb,
294N) of force. Also, the parking
brake alone should securely hold the
vehicle on a fairly steep grade. If the
stroke is more or less than specified,
we recommend that the system be
serviced by a HYUNDAI authorised
repairer.
Stroke : 8~9 notch
Type B
Check the stroke of the parking
brake by counting the number of
“clicks’’ heard whilst fully applying it
from the released position. Also, the
parking brake alone should securely
hold the vehicle on a fairly steep
grade. If the stroke is more or less
than specified, we recommend that
the system be serviced by a
HYUNDAI authorised repairer.
Stroke : 5~7 “clicks’’ at a force of
20 kg (44 lbs, 196 N).
OTM058128R
OTM058014R
Page 634 of 682

7-59
7
Maintenance
LIGHT BULBS
Consult a HYUNDAI authorised
repairer to replace most vehicle light
bulbs. It is difficult to replace vehicle
light bulbs because other parts of the
vehicle must be removed before you
can get to the bulb. This is especially
true for removing the headlamp
assembly to get to the bulb(s).
Removing/installing the headlamp
assembly can result in damage to
the vehicle.Be sure to replace the burned-out
bulb with one of the same wattage
rating. Otherwise, it may cause
damage to the fuse or electrical
wiring system.
Information
After heavy driving rain or washing,
headlamp and tail lamp lenses could
appear frosty. This condition is caused
by the temperature difference between
the lamp inside and outside. This is
similar to the condensation on your
windows inside your vehicle when
raining and doesn’t indicate a problem
with your vehicle. If the water leaks
into the lamp bulb circuitry, we rec-
ommend that the system be checked
by a HYUNDAI authorised repairer.
Information
The headlamp aiming should be adjust-
ed after an accident or after the head-
lamp assembly is reinstalled at a
HYUNDAI authorised repairer.
Information - Traffic Change
The low beam light distribution is
asymmetric. If you go abroad to a coun-
try with opposite traffic direction, this
asymmetric part will dazzle oncoming
car driver. To prevent dazzle, ECE reg-
ulation demand several technical solu-
tions (ex. automatic change system,
adhesive sheet, down aiming). These
headlamps are designed not to dazzle
opposite drivers. So, you need not
change your headlamps in a country
with opposite traffic direction.i
i
i
NOTICE
Prior to working on a light, firmly
apply the parking brake, ensure
that the ignition switch is in the
LOCK/OFF position and turn off
the lights to avoid sudden move-
ment of the vehicle and burning
your fingers or receiving an elec-
tric shock.
WARNING
Page 637 of 682

7-62
Maintenance
7-62
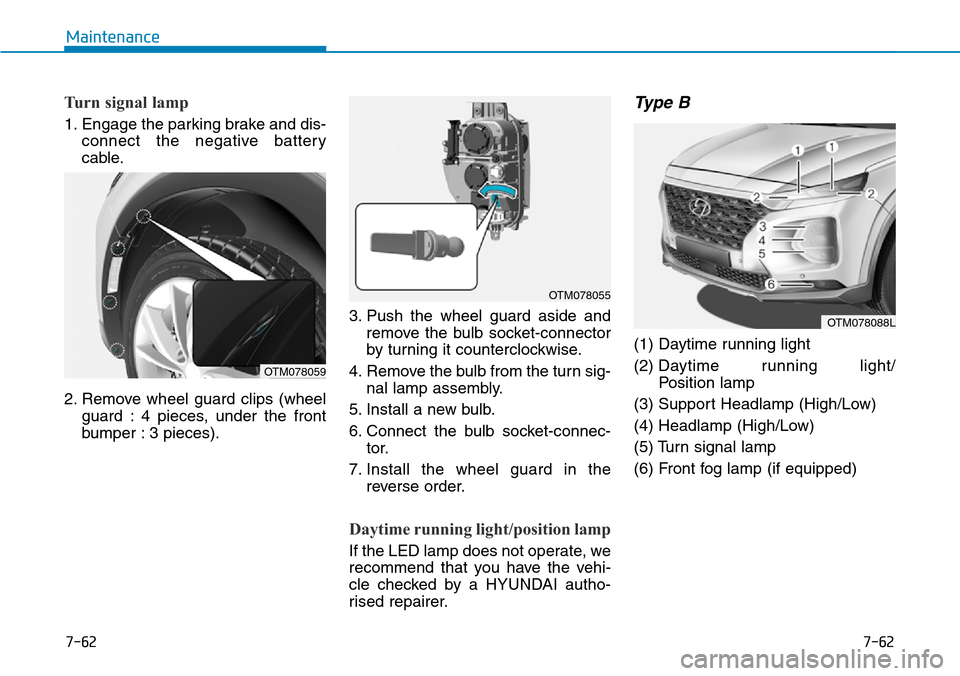
Turn signal lamp
1. Engage the parking brake and dis-
connect the negative battery
cable.
2. Remove wheel guard clips (wheel
guard : 4 pieces, under the front
bumper : 3 pieces).3. Push the wheel guard aside and
remove the bulb socket-connector
by turning it counterclockwise.
4. Remove the bulb from the turn sig-
nal lamp assembly.
5. Install a new bulb.
6. Connect the bulb socket-connec-
tor.
7. Install the wheel guard in the
reverse order.
Daytime running light/position lamp
If the LED lamp does not operate, we
recommend that you have the vehi-
cle checked by a HYUNDAI autho-
rised repairer.
Type B
(1) Daytime running light
(2) Daytime running light/
Position lamp
(3) Support Headlamp (High/Low)
(4) Headlamp (High/Low)
(5) Turn signal lamp
(6) Front fog lamp (if equipped)
OTM078088L
OTM078059
OTM078055