Hyundai Santa Fe 2019 Owner's Manual
Manufacturer: HYUNDAI, Model Year: 2019, Model line: Santa Fe, Model: Hyundai Santa Fe 2019Pages: 557, PDF Size: 14.8 MB
Page 151 of 557
3-62
Convenient features of your vehicle
Information
The Smart Liftgate will NOT operate
when:
• Any door is open, or all doors areclosed but not locked
• The smart key is detected within 15 seconds from when the doors were
closed and locked
• For vehicles equipped with illumi- nated exterior front door handles, if
the smart key is detected within 15
seconds from when the doors were
closed and locked or if the smart
key is within 60 inches (1.5m) from
the front door handles
• The smart key is in the vehicle. 1.Setting
To activate the Smart Liftgate, go to
User Settings mode and select
Smart Liftgate in the cluster LCD dis-
play.
For more details, refer to "LCD
Display" in this chapter.
2.Detect and Alert
The Smart Liftgate detecting area
extends approximately 20-40 in (50-
100 cm) behind the vehicle. If you
are positioned in the detecting area
and are carrying the smart key, the
hazard warning lights will blink and
the chime will sound to alert you that
the smart liftgate will open.
Information
Do not approach the detecting area if
you do not want the liftgate to open. If
you have unintentionally entered the
detecting area and the hazard warn-
ing lights and chime starts to operate,
move away from the area behind the
vehicle with the smart key. The lift-
gate will remain closed.3. Automatic opening
After the hazard warning lights blink
and the chime sounds 6 times, the
power liftgate will open.
i
i
Make certain that you close
the liftgate before driving your
vehicle.
Make sure there are no people
or objects around the liftgate
before opening or closing the
liftgate.
Make sure objects in the rear
cargo area do not come out
when opening the liftgate,
especially if the vehicle is
parked on a grade or incline.
If you keep your vehicle
parked and locked on your
driveway, you may want to
temporarily deactivate the
Smart Liftgate system.
Otherwise, standing at the
rear of the vehicle with the
smart key may cause the lift-
gate to open unintentionally.
WARNING
Page 152 of 557
3-63
Convenient features of your vehicle
3
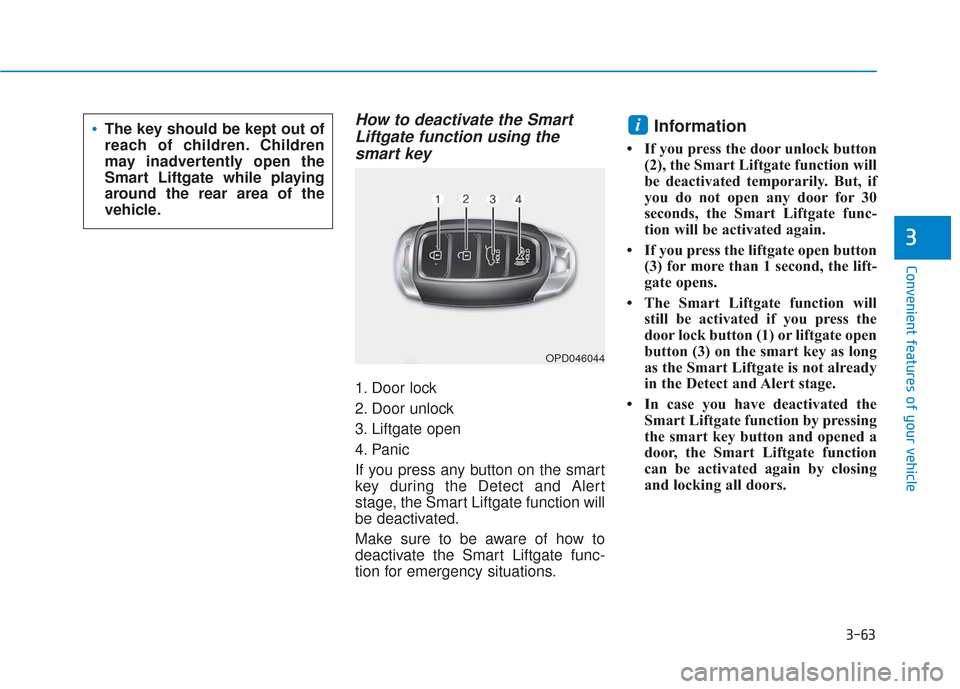
How to deactivate the SmartLiftgate function using thesmart key
1. Door lock
2. Door unlock
3. Liftgate open
4. Panic
If you press any button on the smart
key during the Detect and Alert
stage, the Smart Liftgate function will
be deactivated.
Make sure to be aware of how to
deactivate the Smart Liftgate func-
tion for emergency situations.
Information
• If you press the door unlock button
(2), the Smart Liftgate function will
be deactivated temporarily. But, if
you do not open any door for 30
seconds, the Smart Liftgate func-
tion will be activated again.
• If you press the liftgate open button (3) for more than 1 second, the lift-
gate opens.
• The Smart Liftgate function will still be activated if you press the
door lock button (1) or liftgate open
button (3) on the smart key as long
as the Smart Liftgate is not already
in the Detect and Alert stage.
• In case you have deactivated the Smart Liftgate function by pressing
the smart key button and opened a
door, the Smart Liftgate function
can be activated again by closing
and locking all doors.
iThe key should be kept out of
reach of children. Children
may inadvertently open the
Smart Liftgate while playing
around the rear area of the
vehicle.
OPD046044
Page 153 of 557
3-64
Convenient features of your vehicle
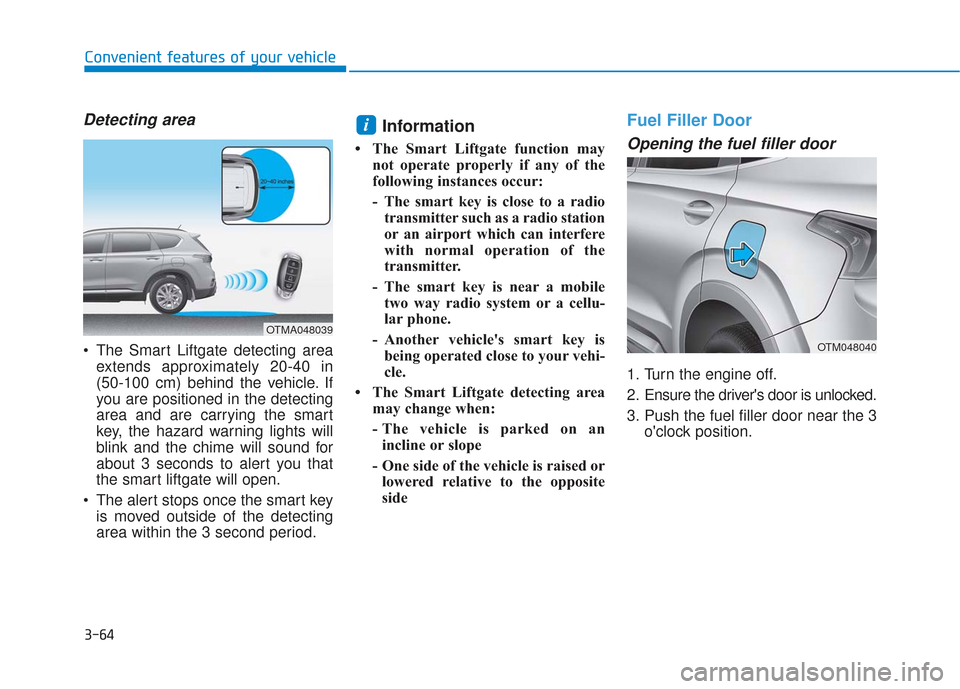
Detecting area
The Smart Liftgate detecting areaextends approximately 20-40 in
(50-100 cm) behind the vehicle. If
you are positioned in the detecting
area and are carrying the smart
key, the hazard warning lights will
blink and the chime will sound for
about 3 seconds to alert you that
the smart liftgate will open.
The alert stops once the smart key is moved outside of the detecting
area within the 3 second period.
Information
• The Smart Liftgate function may not operate properly if any of the
following instances occur:
- The smart key is close to a radiotransmitter such as a radio station
or an airport which can interfere
with normal operation of the
transmitter.
- The smart key is near a mobile two way radio system or a cellu-
lar phone.
- Another vehicle's smart key is being operated close to your vehi-
cle.
• The Smart Liftgate detecting area may change when:
- The vehicle is parked on anincline or slope
- One side of the vehicle is raised or lowered relative to the opposite
side
Fuel Filler Door
Opening the fuel filler door
1. Turn the engine off.
2. Ensure the driver's door is unlocked.
3. Push the fuel filler door near the 3 o'clock position.
i
OTMA048039
OTM048040
Page 154 of 557
3-65
Convenient features of your vehicle
3
Gasoline is highly flammable
and explosive. Failure to follow
these guidelines may result in
SERIOUS INJURY or DEATH:
Read and follow all warnings
posted at the gas station.
Before refueling, note the
location of the Emergency
Gasoline Shut-Off, if available,
at the gas station.
Before touching the fuel noz-
zle, you should eliminate the
potential build-up of static
electricity by touching a metal
part of the vehicle, a safe dis-
tance away from the fuel filler
neck, nozzle, or other gas
source, with your bare hand.
Do not use cellular phones
while refueling. Electric cur-
rent and/or electronic interfer-
ence from cellular phones can
potentially ignite fuel vapors
and cause a fire.
WARNING
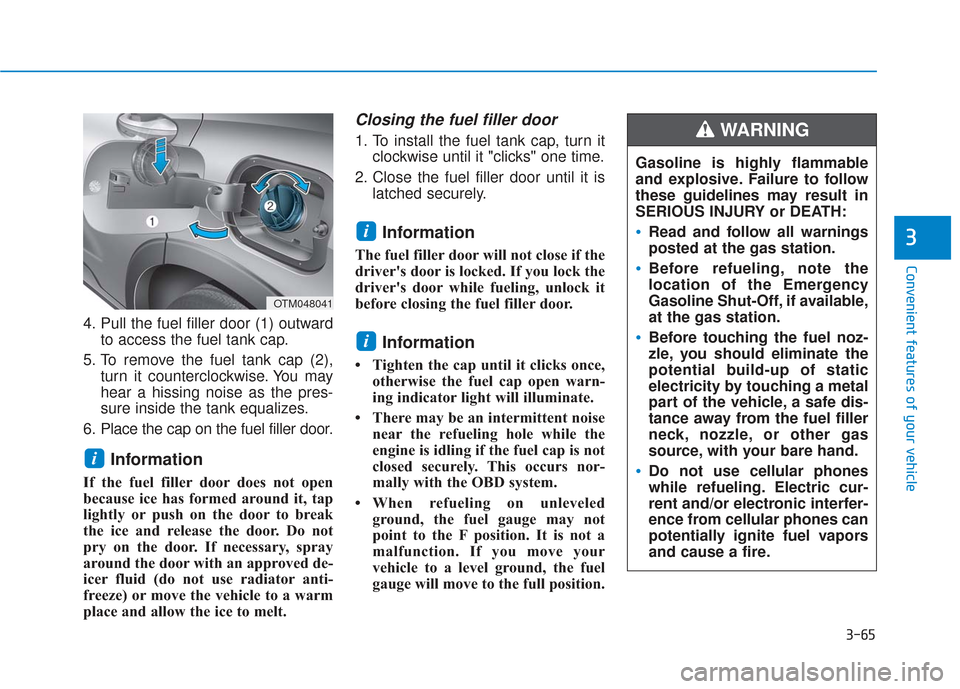
4. Pull the fuel filler door (1) outwardto access the fuel tank cap.
5. To remove the fuel tank cap (2), turn it counterclockwise. You may
hear a hissing noise as the pres-
sure inside the tank equalizes.
6. Place the cap on the fuel filler door.
Information
If the fuel filler door does not open
because ice has formed around it, tap
lightly or push on the door to break
the ice and release the door. Do not
pry on the door. If necessary, spray
around the door with an approved de-
icer fluid (do not use radiator anti-
freeze) or move the vehicle to a warm
place and allow the ice to melt.
Closing the fuel filler door
1. To install the fuel tank cap, turn it clockwise until it "clicks" one time.
2. Close the fuel filler door until it is latched securely.
Information
The fuel filler door will not close if the
driver's door is locked. If you lock the
driver's door while fueling, unlock it
before closing the fuel filler door.
Information
• Tighten the cap until it clicks once,otherwise the fuel cap open warn-
ing indicator light will illuminate.
• There may be an intermittent noise near the refueling hole while the
engine is idling if the fuel cap is not
closed securely. This occurs nor-
mally with the OBD system.
• When refueling on unleveled ground, the fuel gauge may not
point to the F position. It is not a
malfunction. If you move your
vehicle to a level ground, the fuel
gauge will move to the full position.
i
i
i
OTM048041
Page 155 of 557
3-66
Convenient features of your vehicle
Do not get back into a vehicle
once you have begun refuel-
ing. You can generate a build-
up of static electricity by
touching, rubbing or sliding
against any item or fabric
capable of producing static
electricity. Static electricity
discharge can ignite fuel
vapors causing a fire. If you
must re-enter the vehicle, you
should once again eliminate
potentially dangerous static
electricity discharge by touch-
ing a metal part of the vehicle,
away from the fuel filler neck,
nozzle or other gasoline
source, with your bare hand.
When using an approved
portable fuel container, be
sure to place the container on
the ground prior to refueling.
Static electricity discharge
from the container can ignite
fuel vapors causing a fire.
Do not over-fill or top-off your
vehicle tank, which can cause
gasoline spillage.
If a fire breaks out during refu-
eling, leave the vicinity of the
vehicle, and immediately con-
tact the manager of the gas
station and then contact the
local fire department. Follow
any safety instructions they
provide.
If pressurized fuel sprays out,
it can cover your clothes or
skin and thus subject you to
the risk of fire and burns.
Always remove the fuel cap
carefully and slowly. If the cap
is venting fuel or if you hear a
hissing sound, wait until the
condition stops before com-
pletely removing the cap.
Always check that the fuel cap
is installed securely to pre-
vent fuel spillage in the event
of an accident.
Once refueling has begun,
contact between your bare
hand and the vehicle should
be maintained until the filling
is complete.
Use only approved portable
plastic fuel containers designed
to carry and store gasoline.
When refueling, always move
the shift lever to the P (Park)
position (for automatic trans-
mission/dual clutch transmis-
sion), set the parking brake,
and place the ignition switch
to the LOCK/OFF position.
Sparks produced by electrical
components related to the
engine can ignite fuel vapors
causing a fire.
Do not use matches or a
lighter and do not smoke or
leave a lit cigarette in your
vehicle while at a gas station,
especially during refueling.
Page 156 of 557
3-67
Convenient features of your vehicle
3
Information
Make sure to refuel your vehicle
according to the "Fuel Requirements"
suggested in the Introduction chapter.
Do not spill fuel on the exteriorsurfaces of the vehicle. Any type
of fuel spilled on painted sur-
faces may damage the paint.
If the fuel filler cap requires replacement, use only a genuine
HYUNDAI cap or the equivalent
specified for your vehicle. An
incorrect fuel filler cap can
result in a serious malfunction
of the fuel system or emission
control system.
NOTICE
i
Page 157 of 557
3-68
Convenient features of your vehicle
I
IN
N S
ST
T R
R U
U M
M E
EN
N T
T
C
C L
LU
U S
ST
T E
ER
R
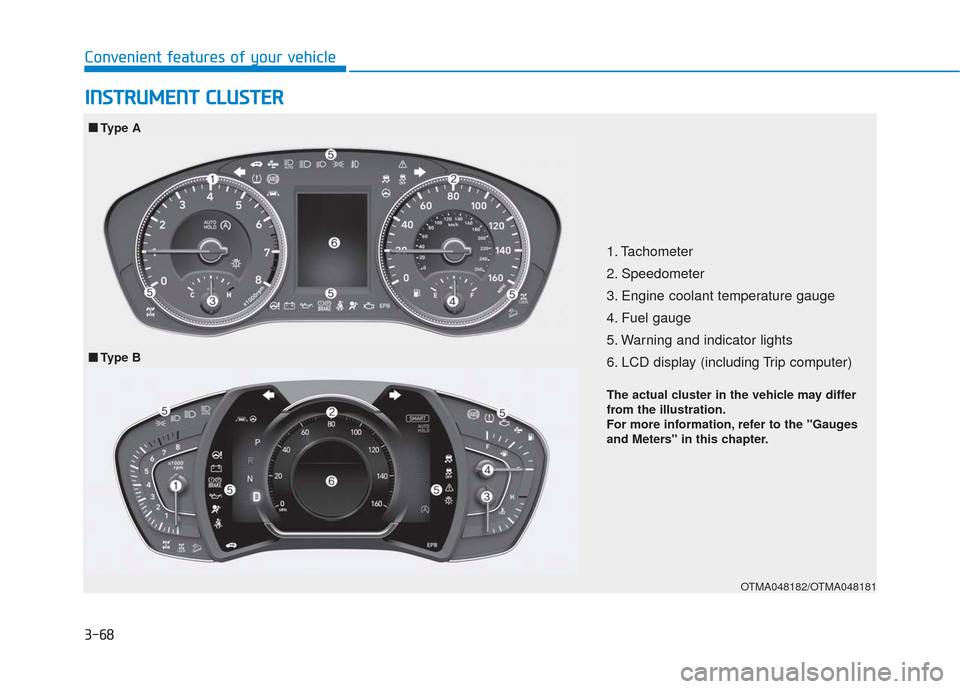
1. Tachometer
2. Speedometer
3. Engine coolant temperature gauge
4. Fuel gauge
5. Warning and indicator lights
6. LCD display (including Trip computer)
OTMA048182/OTMA048181
■ ■
Type A
■
■ Type B
The actual cluster in the vehicle may differ
from the illustration.
For more information, refer to the "Gauges
and Meters" in this chapter.
Page 158 of 557
3-69
Convenient features of your vehicle
3
Instrument Cluster Control
Adjusting instrument clusterillumination
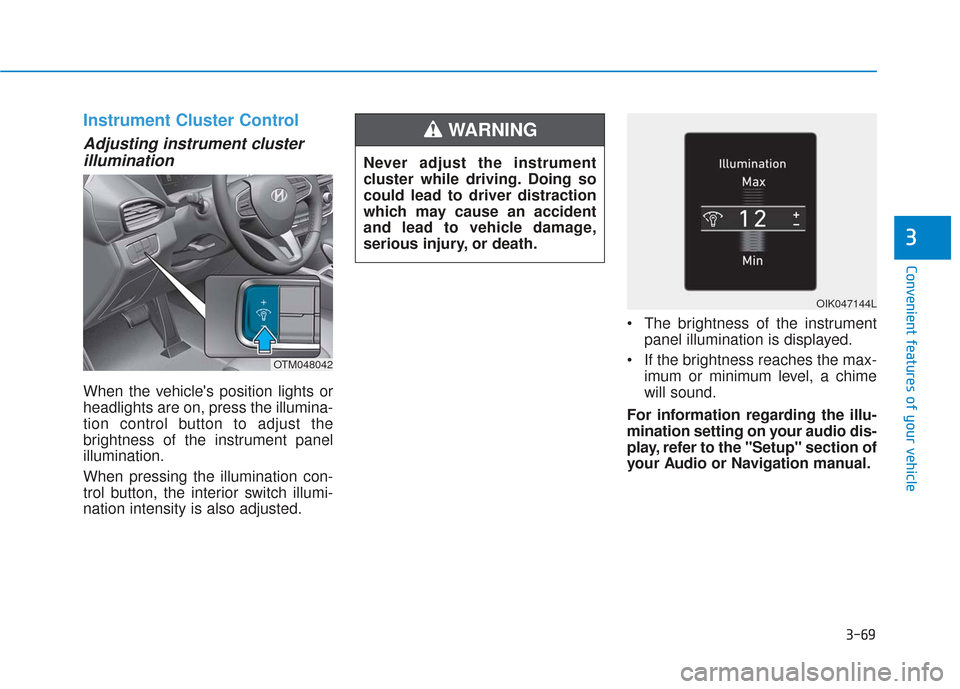
When the vehicle's position lights or
headlights are on, press the illumina-
tion control button to adjust the
brightness of the instrument panel
illumination.
When pressing the illumination con-
trol button, the interior switch illumi-
nation intensity is also adjusted. The brightness of the instrument
panel illumination is displayed.
If the brightness reaches the max- imum or minimum level, a chime
will sound.
For information regarding the illu-
mination setting on your audio dis-
play, refer to the "Setup" section of
your Audio or Navigation manual.
Never adjust the instrument
cluster while driving. Doing so
could lead to driver distraction
which may cause an accident
and lead to vehicle damage,
serious injury, or death.
WARNING
OTM048042
OIK047144L
Page 159 of 557
3-70
Convenient features of your vehicle
Gauges and Meters
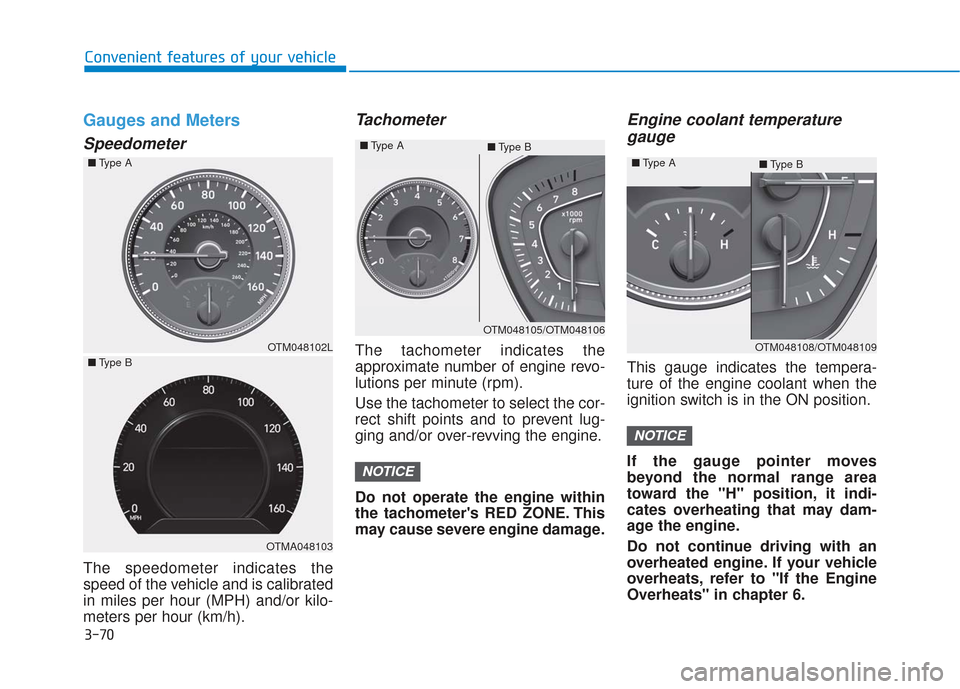
Speedometer
The speedometer indicates the
speed of the vehicle and is calibrated
in miles per hour (MPH) and/or kilo-
meters per hour (km/h).
Tachometer
The tachometer indicates the
approximate number of engine revo-
lutions per minute (rpm).
Use the tachometer to select the cor-
rect shift points and to prevent lug-
ging and/or over-revving the engine.
Do not operate the engine within
the tachometer's RED ZONE. This
may cause severe engine damage.
Engine coolant temperaturegauge
This gauge indicates the tempera-
ture of the engine coolant when the
ignition switch is in the ON position.
If the gauge pointer moves
beyond the normal range area
toward the "H" position, it indi-
cates overheating that may dam-
age the engine.
Do not continue driving with an
overheated engine. If your vehicle
overheats, refer to "If the Engine
Overheats" in chapter 6.
NOTICE
NOTICE
OTM048102L
OTMA048103
OTM048105/OTM048106
■
Type A
■Type B
OTM048108/OTM048109
■
Type A
■Type B
■
Type A
■ Type B
Page 160 of 557
3-71
Convenient features of your vehicle
3
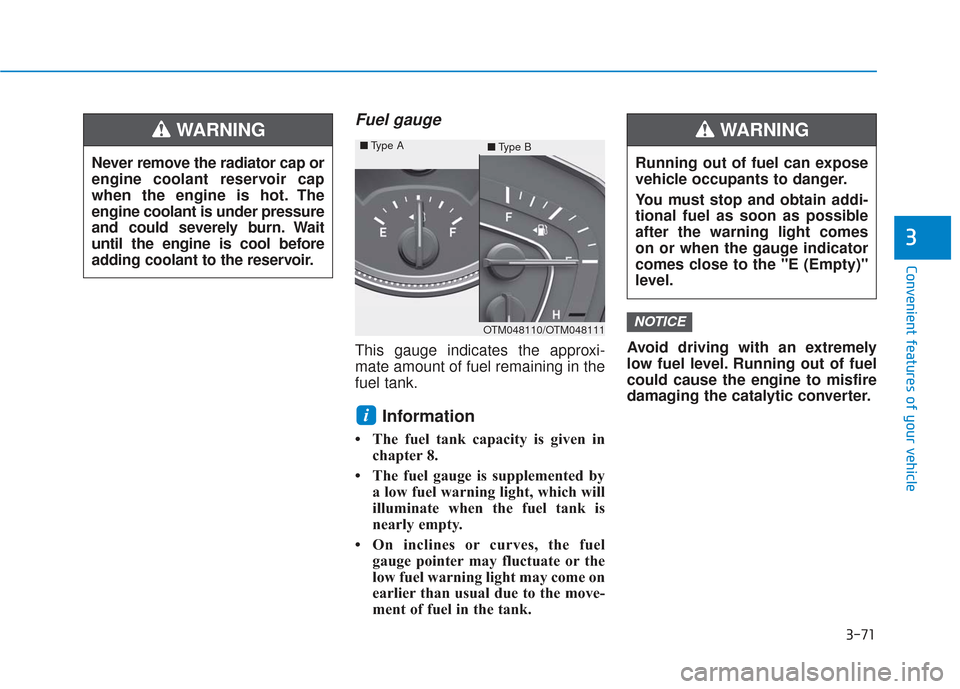
Fuel gauge
This gauge indicates the approxi-
mate amount of fuel remaining in the
fuel tank.
Information
• The fuel tank capacity is given inchapter 8.
• The fuel gauge is supplemented by a low fuel warning light, which will
illuminate when the fuel tank is
nearly empty.
• On inclines or curves, the fuel gauge pointer may fluctuate or the
low fuel warning light may come on
earlier than usual due to the move-
ment of fuel in the tank. Avoid driving with an extremely
low fuel level. Running out of fuel
could cause the engine to misfire
damaging the catalytic converter.
NOTICE
i
Never remove the radiator cap or
engine coolant reservoir cap
when the engine is hot. The
engine coolant is under pressure
and could severely burn. Wait
until the engine is cool before
adding coolant to the reservoir.
WARNING
Running out of fuel can expose
vehicle occupants to danger.
You must stop and obtain addi-
tional fuel as soon as possible
after the warning light comes
on or when the gauge indicator
comes close to the "E (Empty)"
level.
WARNING
OTM048110/OTM048111
■
Type A
■Type B