turn signal Hyundai Santa Fe 2019 Owner's Manual
[x] Cancel search | Manufacturer: HYUNDAI, Model Year: 2019, Model line: Santa Fe, Model: Hyundai Santa Fe 2019Pages: 557, PDF Size: 14.8 MB
Page 17 of 557
1-6
Your vehicle at a glance
I
IN
N S
ST
T R
R U
U M
M E
EN
N T
T
P
P A
A N
N E
EL
L
O
O V
VE
ER
R V
V I
IE
E W
W
(
( I
II
I)
)
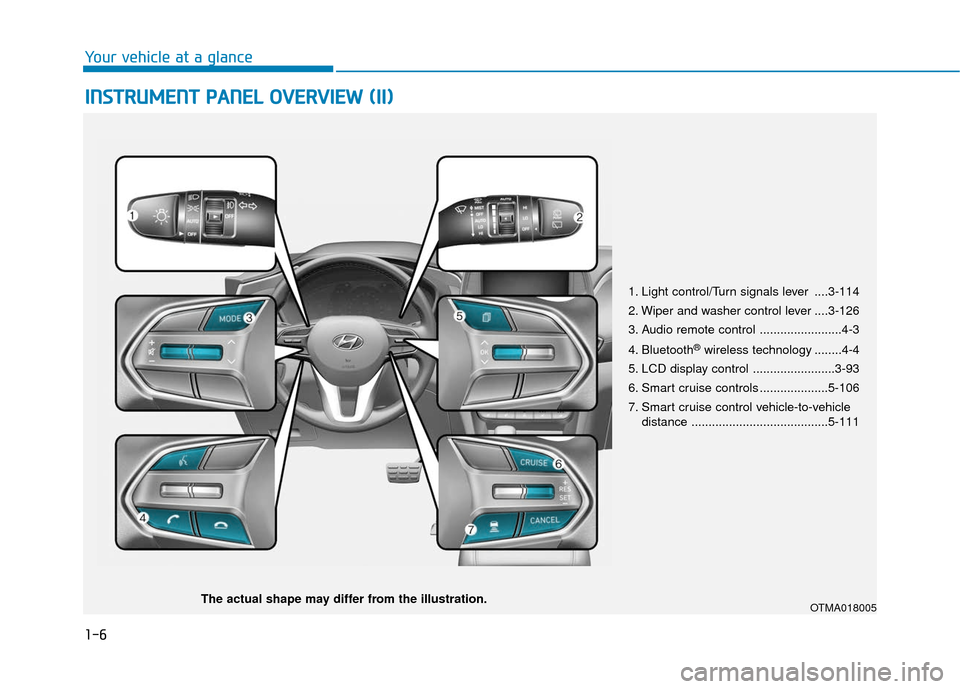
1. Light control/Turn signals lever ....3-114
2. Wiper and washer control lever ....3-126
3. Audio remote control ........................4-3
4. Bluetooth
®wireless technology ........4-4
5. LCD display control ........................3-93
6. Smart cruise controls ....................5-106
7. Smart cruise control vehicle-to-vehicle distance ........................................5-111
OTMA018005The actual shape may differ from the illustration.
Page 95 of 557
3-6
Convenient features of your vehicle
Mechanical key
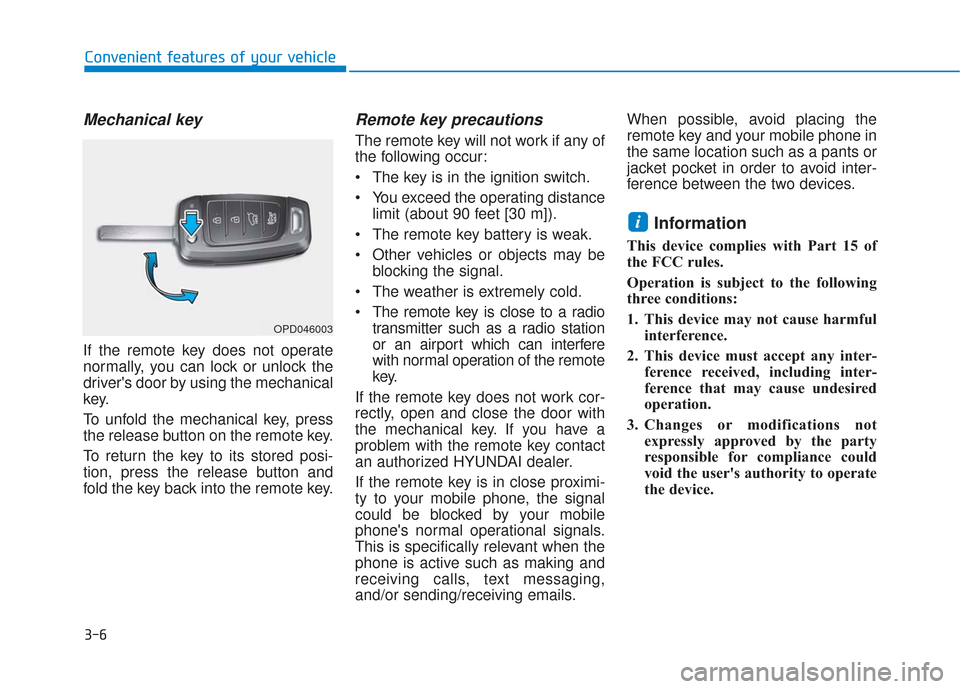
If the remote key does not operate
normally, you can lock or unlock the
driver's door by using the mechanical
key.
To unfold the mechanical key, press
the release button on the remote key.
To return the key to its stored posi-
tion, press the release button and
fold the key back into the remote key.
Remote key precautions
The remote key will not work if any of
the following occur:
• The key is in the ignition switch.
You exceed the operating distancelimit (about 90 feet [30 m]).
The remote key battery is weak.
Other vehicles or objects may be blocking the signal.
The weather is extremely cold.
The remote key is close to a radio transmitter such as a radio station
or an airport which can interfere
with normal operation of the remote
key.
If the remote key does not work cor-
rectly, open and close the door with
the mechanical key. If you have a
problem with the remote key contact
an authorized HYUNDAI dealer.
If the remote key is in close proximi-
ty to your mobile phone, the signal
could be blocked by your mobile
phone's normal operational signals.
This is specifically relevant when the
phone is active such as making and
receiving calls, text messaging,
and/or sending/receiving emails. When possible, avoid placing the
remote key and your mobile phone in
the same location such as a pants or
jacket pocket in order to avoid inter-
ference between the two devices.
Information
This device complies with Part 15 of
the FCC rules.
Operation is subject to the following
three conditions:
1. This device may not cause harmful
interference.
2. This device must accept any inter- ference received, including inter-
ference that may cause undesired
operation.
3. Changes or modifications not expressly approved by the party
responsible for compliance could
void the user's authority to operate
the device.
i
OPD046003
Page 125 of 557
3-36
Convenient features of your vehicle
Programming HomeLink®
Please note the following:
When programming a garage dooropener, it is advised to park the
vehicle outside of the garage.
It is recommended that a new bat- tery be placed in the hand-held
transmitter of the device being pro-
grammed to HomeLink
®for quicker
training and accurate transmission
of the radio-frequency signal.
Some vehicles may require the ignition switch to be placed in the
ACC (or "Accessories") position for
programming and/or operation of
HomeLink
®.
In the event that there are still pro- gramming difficulties or questions
after following the programming
steps listed below, contact
HomeLink
®at: www.homelink.com,
www.youtube.com/HomeLinkGentex
or by calling 1-800-355-3515.
Programming
To program most devices, follow
these instructions:
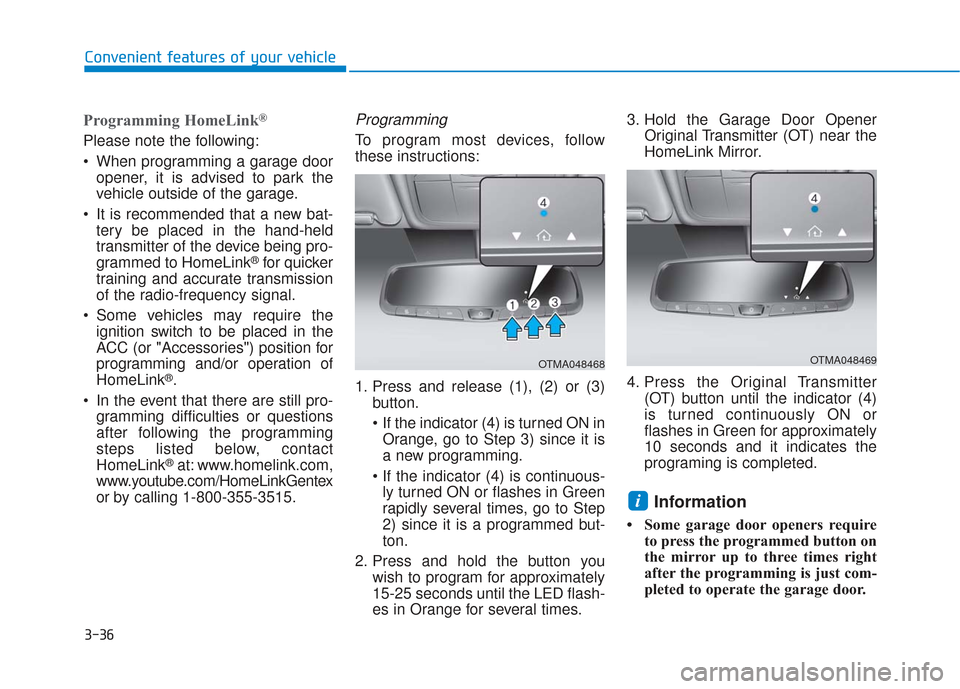
1. Press and release (1), (2) or (3) button.
If the indicator (4) is turned ON inOrange, go to Step 3) since it is
a new programming.
ly turned ON or flashes in Green
rapidly several times, go to Step
2) since it is a programmed but-
ton.
2. Press and hold the button you wish to program for approximately
15-25 seconds until the LED flash-
es in Orange for several times. 3. Hold the Garage Door Opener
Original Transmitter (OT) near the
HomeLink Mirror.
4. Press the Original Transmitter (OT) button until the indicator (4)
is turned continuously ON or
flashes in Green for approximately
10 seconds and it indicates the
programing is completed.
Information
• Some garage door openers requireto press the programmed button on
the mirror up to three times right
after the programming is just com-
pleted to operate the garage door.
i
OTMA048468OTMA048469
Page 126 of 557
3-37
Convenient features of your vehicle
3
• The indicator (4) is turned ON inOrange and flashes for about 60sec-
onds, during the programing mode
and if a programing is not succeed-
ed within the 60 seconds, the pro-
graming mode will be abort.
HomeLink
®should now activate your
rolling code equipped device.
Gate operator & Canadian program- ming
During programming, your handheld
transmitter may automatically stop
transmitting. Continue to press the
Integrated HomeLink
®Wireless
Control System button while you
press and re-press ("cycle") your
handheld transmitter every two sec-
onds until the frequency signal has
been learned. The indicator light will
flash slowly and then rapidly after
several seconds upon successful
training.
Operating HomeLink®
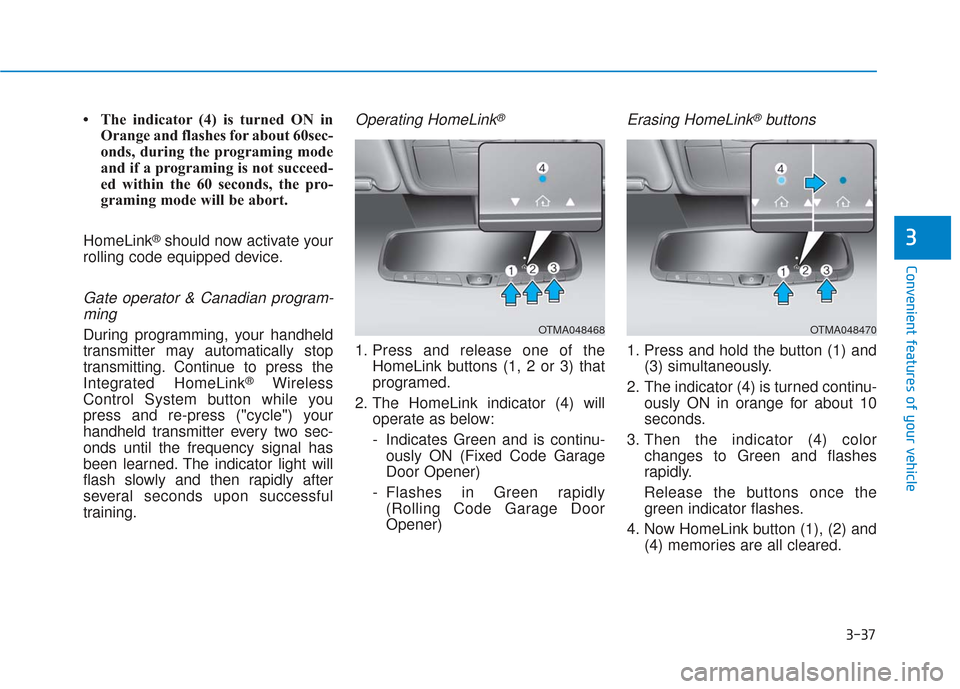
1. Press and release one of the HomeLink buttons (1, 2 or 3) that
programed.
2. The HomeLink indicator (4) will operate as below:
- Indicates Green and is continu-ously ON (Fixed Code Garage
Door Opener)
- Flashes in Green rapidly (Rolling Code Garage Door
Opener)
Erasing HomeLink®buttons
1. Press and hold the button (1) and (3) simultaneously.
2. The indicator (4) is turned continu- ously ON in orange for about 10
seconds.
3. Then the indicator (4) color changes to Green and flashes
rapidly.
Release the buttons once the green indicator flashes.
4. Now HomeLink button (1), (2) and (4) memories are all cleared.
OTMA048468OTMA048470
Page 173 of 557
3-84
Convenient features of your vehicle
This indicator light illuminates for
2 seconds and goes off:
If the smart key is in the vehicleand the Engine Start/Stop button
is ON, but the vehicle cannot
detect the smart key.
If this occurs, have the vehicle
inspected by an authorized
HYUNDAI dealer.
This indicator light blinks:
When there is a malfunction withthe immobilizer system.
If this occurs, have the vehicle
inspected by an authorized
HYUNDAI dealer.
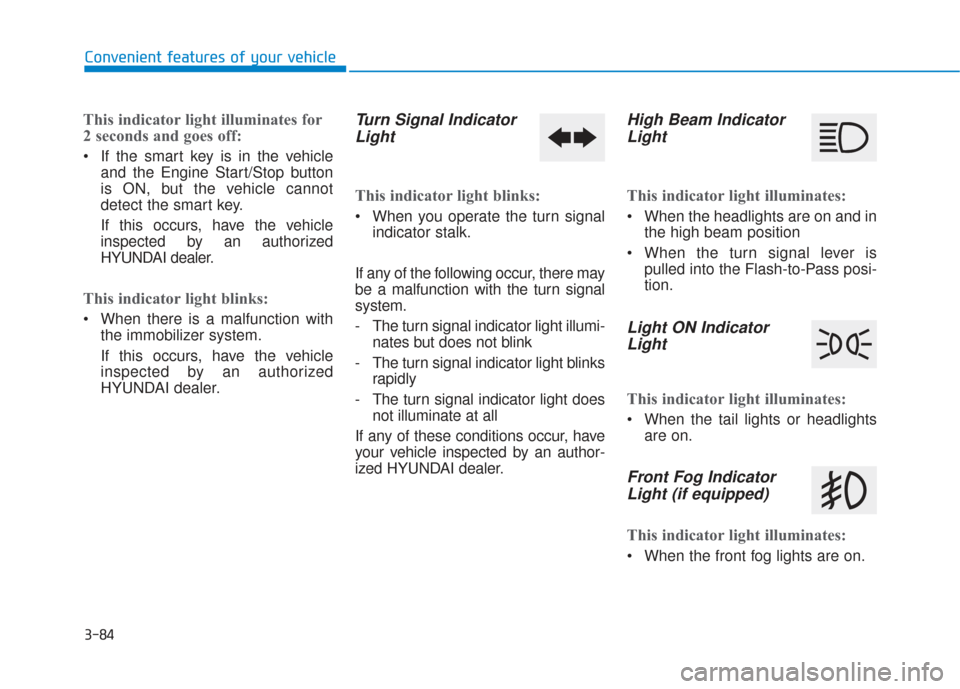
Turn Signal IndicatorLight
This indicator light blinks:
When you operate the turn signal
indicator stalk.
If any of the following occur, there may
be a malfunction with the turn signal
system.
- The turn signal indicator light illumi- nates but does not blink
- The turn signal indicator light blinks rapidly
- The turn signal indicator light does not illuminate at all
If any of these conditions occur, have
your vehicle inspected by an author-
ized HYUNDAI dealer.
High Beam Indicator Light
This indicator light illuminates:
When the headlights are on and in
the high beam position
When the turn signal lever is pulled into the Flash-to-Pass posi-
tion.
Light ON IndicatorLight
This indicator light illuminates:
When the tail lights or headlights
are on.
Front Fog IndicatorLight (if equipped)
This indicator light illuminates:
When the front fog lights are on.
Page 180 of 557
3-91
Convenient features of your vehicle
3
Check headlight (if equipped)
This warning message is displayed if
the headlights are not operating
properly. A headlight bulb may need
to be replaced.
Information
Make sure to replace the burned out
bulb with a new one of the same
wattage rating.
Check turn signal (if equipped)
This warning message is displayed if
the turn signal lamps are not operat-
ing properly. A lamp may need to be
replaced.
Information
Make sure to replace the burned out
bulb with a new one of the same wattage
rating.
Check High Beam Assist (HBA)system (if equipped)
This warning message is displayed if
there is a problem with the High Beam
Assist (HBA) system. Have the vehi-
cle inspected by an authorized
HYUNDAI dealer.
For more details, refer to "High
Beam Assist (HBA) system" in
chapter 3.
Check headlight LED (if equipped)
This warning message is displayed if
there is a problem with the LED
headlight. Have the vehicle inspected
by an authorized HYUNDAI dealer.
Check Forward CollisionAvoidance Assist system(if equipped)
This warning message is displayed if
there is a problem with the Forward
Collision-Avoidance Assist (FCA)
system. Have the vehicle inspected
by an authorized HYUNDAI dealer.
For more details, refer to "Forward
Collision-Avoidance Assist (FCA)
system" in chapter 5.
Check Blind-Spot CollisionWarning (BCW) system (if equipped)
This warning message is displayed if
there is a problem with the Blind-
Spot Collision Warning system. Have
the vehicle inspected by an author-
ized HYUNDAI dealer.
For more details, refer to "Blind-
Spot Collision Warning (BCW)/
Blind-Spot Collision-Avoidance
Assist (BCA)" or "Rear Cross-
Traffic Collision Warning (RCCW)/
Rear Cross-Traffic Collision-
Avoidance Assist (RCCA)"
System in chapter 5.
i
i
Page 193 of 557
3-104
Convenient features of your vehicle
ItemsExplanation
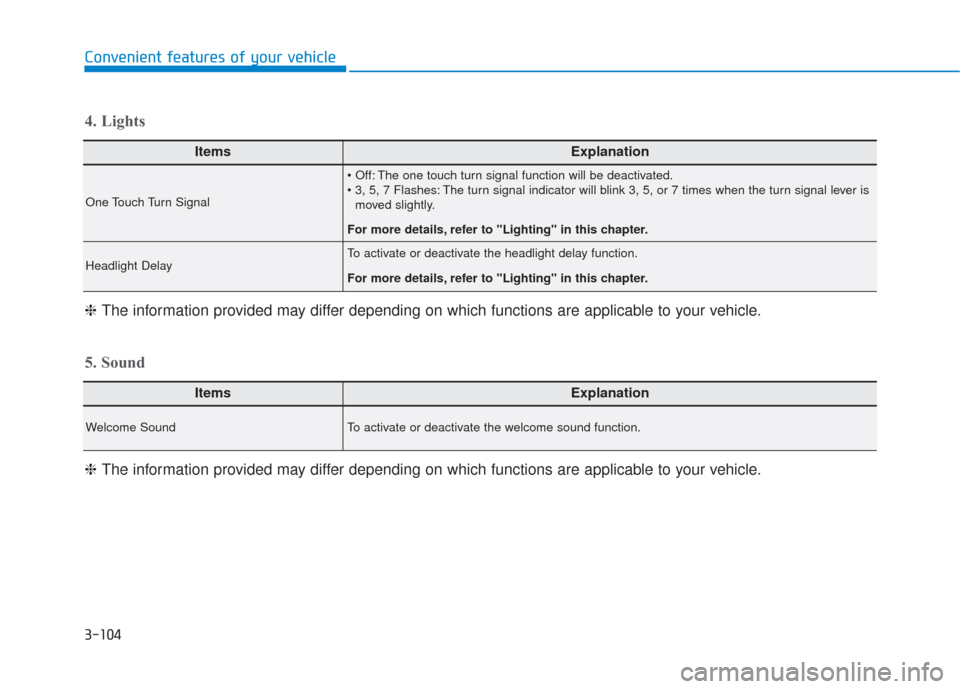
One Touch Turn Signal
The one touch turn signal function will be deactivated.
The turn signal indicator will blink 3, 5, or 7 times when the turn signal lever ismoved slightly.
For more details, refer to "Lighting" in this chapter.
Headlight DelayTo activate or deactivate the headlight delay function.
For more details, refer to "Lighting" in this chapter.
4. Lights
ItemsExplanation
Welcome SoundTo activate or deactivate the welcome sound function.
5. Sound
❈ The information provided may differ depending on which functions are applicable to your vehicle.
❈
The information provided may differ depending on which functions are applicable to your vehicle.
Page 208 of 557
3-119
Convenient features of your vehicle
3
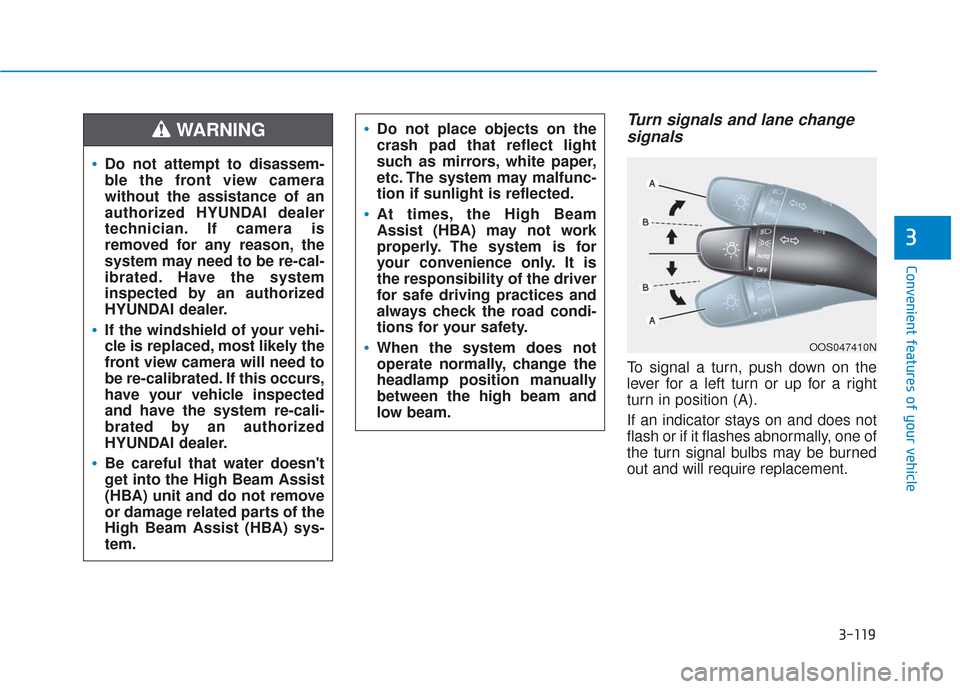
Turn signals and lane changesignals
To signal a turn, push down on the
lever for a left turn or up for a right
turn in position (A).
If an indicator stays on and does not
flash or if it flashes abnormally, one of
the turn signal bulbs may be burned
out and will require replacement.
OOS047410N
Do not attempt to disassem-
ble the front view camera
without the assistance of an
authorized HYUNDAI dealer
technician. If camera is
removed for any reason, the
system may need to be re-cal-
ibrated. Have the system
inspected by an authorized
HYUNDAI dealer.
If the windshield of your vehi-
cle is replaced, most likely the
front view camera will need to
be re-calibrated. If this occurs,
have your vehicle inspected
and have the system re-cali-
brated by an authorized
HYUNDAI dealer.
Be careful that water doesn't
get into the High Beam Assist
(HBA) unit and do not remove
or damage related parts of the
High Beam Assist (HBA) sys-
tem.
Do not place objects on the
crash pad that reflect light
such as mirrors, white paper,
etc. The system may malfunc-
tion if sunlight is reflected.
At times, the High Beam
Assist (HBA) may not work
properly. The system is for
your convenience only. It is
the responsibility of the driver
for safe driving practices and
always check the road condi-
tions for your safety.
When the system does not
operate normally, change the
headlamp position manually
between the high beam and
low beam.
WARNING
Page 209 of 557
3-120
Convenient features of your vehicle
One-touch turn signal function
To activate the One Touch Turn
Signal function, push the turn signal
lever up or down to position (B) and
then release it.
The lane change signals will blink 3,
5 or 7 times.
You can activate or deactivate the
One Touch Turn Signal function or
choose the number of blinks (3, 5, or
7) from the User Settings mode in
the LCD display.
For more details, refer to the "LCD
Display" section in this chapter.
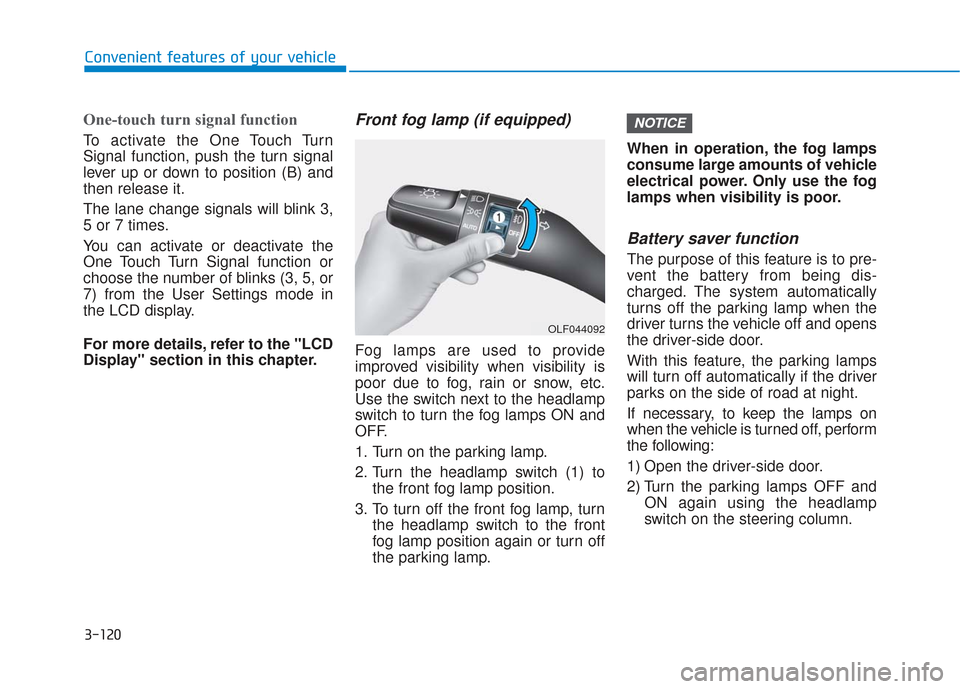
Front fog lamp (if equipped)
Fog lamps are used to provide
improved visibility when visibility is
poor due to fog, rain or snow, etc.
Use the switch next to the headlamp
switch to turn the fog lamps ON and
OFF.
1. Turn on the parking lamp.
2. Turn the headlamp switch (1) tothe front fog lamp position.
3. To turn off the front fog lamp, turn the headlamp switch to the front
fog lamp position again or turn off
the parking lamp. When in operation, the fog lamps
consume large amounts of vehicle
electrical power. Only use the fog
lamps when visibility is poor.
Battery saver function
The purpose of this feature is to pre-
vent the battery from being dis-
charged. The system automatically
turns off the parking lamp when the
driver turns the vehicle off and opens
the driver-side door.
With this feature, the parking lamps
will turn off automatically if the driver
parks on the side of road at night.
If necessary, to keep the lamps on
when the vehicle is turned off, perform
the following:
1) Open the driver-side door.
2) Turn the parking lamps OFF and
ON again using the headlamp
switch on the steering column.
NOTICE
OLF044092
Page 251 of 557
3-162
Convenient features of your vehicle
When the Auto Defogging
System operates, the indi-
cator will illuminate.
If a high amount of humidity is
detected in the vehicle, the Auto
Defogging System will be enabled.
The following steps will be performed
automatically:
Step 1) The A/C button will turn ON.
Step 2) The air intake control will change to Fresh mode.
Step 3) The mode will be changed to defrost to direct airflow to the
windshield.
Step 4) The fan speed will be set to MAX.
If the air conditioning is off or recircu-
lated air position is manually select-
ed while Auto Defogging System is
ON, the Auto Defogging System
Indicator will blink 3 times to signal
that the manual operation has been
canceled.To cancel or reset the
Auto Defogging System
Press the front windshield defroster
button for 3 seconds when the igni-
tion switch is in the ON position.
When the Auto Defogging System is
canceled, the ADS OFF symbol will
blink 3 times and ADS OFF will be
displayed on the climate control
information screen.
When the Auto Defogging System is
reset, the ADS OFF symbol will blink
6 times without a signal.
Information
• When the air conditioning is turned on by Auto defogging system, if you
try to turn off the air conditioning,
the indicator will blink 3 times and
the air conditioning will not be
turned off.
• To maintain the effectiveness and efficiency of the Auto Defogging
System, do not select Recirculation
mode while the system is operating.
• When the Auto Defogging System is operating, the fan speed adjust-
ment button, the temperature
adjustment knob, and the air
intake control button are all dis-
abled.
Do not remove the sensor cover
located on the upper end of the
windshield glass.
Damage to system parts could
occur and may not be covered by
your vehicle warranty.
NOTICE
i