Engine Off Hyundai Santa Fe 2020 Service Manual
[x] Cancel search | Manufacturer: HYUNDAI, Model Year: 2020, Model line: Santa Fe, Model: Hyundai Santa Fe 2020Pages: 557, PDF Size: 19.29 MB
Page 209 of 557
3-120
Convenient features of your vehicle
Interior Lights
Do not use the interior lights for
extended periods when the vehi-
cle is turned off or the battery will
discharge.
Interior lamp AUTO cut
The interior lamps will automatically
go off approximately 20 minutes after
the engine is turned off and the
doors are closed. If a door is opened,
the lamp will go off 40 minutes after
the engine is turned off. If the doors
are locked by the remote key or
smart key and the vehicle enters the
armed stage of the theft alarm sys-
tem, the lamps will go off five sec-
onds later.
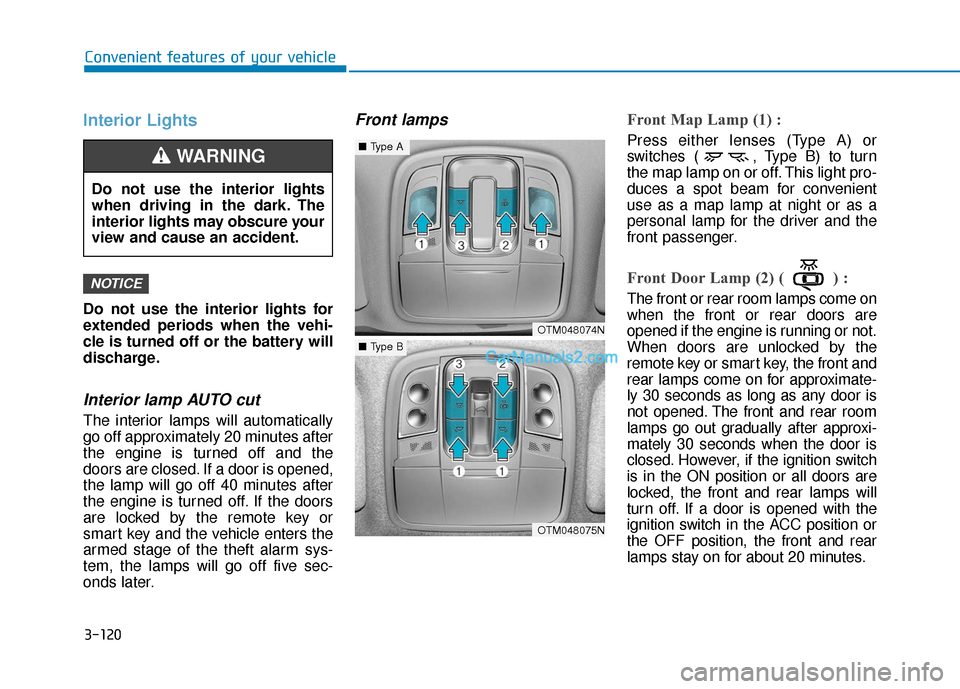
Front lampsFront Map Lamp (1) :
Press either lenses (Type A) or
switches ( , Type B) to turn
the map lamp on or off. This light pro-
duces a spot beam for convenient
use as a map lamp at night or as a
personal lamp for the driver and the
front passenger.
Front Door Lamp (2) ( ) :
The front or rear room lamps come on
when the front or rear doors are
opened if the engine is running or not.
When doors are unlocked by the
remote key or smart key, the front and
rear lamps come on for approximate-
ly 30 seconds as long as any door is
not opened. The front and rear room
lamps go out gradually after approxi-
mately 30 seconds when the door is
closed. However, if the ignition switch
is in the ON position or all doors are
locked, the front and rear lamps will
turn off. If a door is opened with the
ignition switch in the ACC position or
the OFF position, the front and rear
lamps stay on for about 20 minutes.
NOTICE
OTM048074N
OTM048075N
■Type A
■Type B
Do not use the interior lights
when driving in the dark. The
interior lights may obscure your
view and cause an accident.
WARNING
Page 211 of 557
3-122
Convenient features of your vehicle
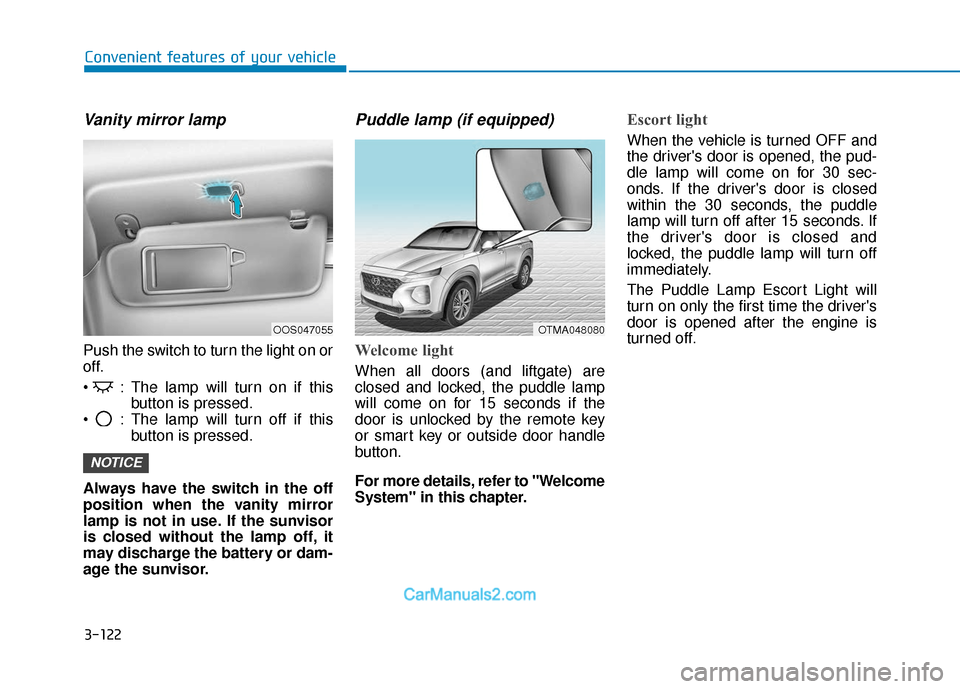
Vanity mirror lamp
Push the switch to turn the light on or
off.
: The lamp will turn on if thisbutton is pressed.
: The lamp will turn off if this button is pressed.
Always have the switch in the off
position when the vanity mirror
lamp is not in use. If the sunvisor
is closed without the lamp off, it
may discharge the battery or dam-
age the sunvisor.
Puddle lamp (if equipped)
Welcome light
When all doors (and liftgate) are
closed and locked, the puddle lamp
will come on for 15 seconds if the
door is unlocked by the remote key
or smart key or outside door handle
button.
For more details, refer to "Welcome
System" in this chapter.
Escort light
When the vehicle is turned OFF and
the driver's door is opened, the pud-
dle lamp will come on for 30 sec-
onds. If the driver's door is closed
within the 30 seconds, the puddle
lamp will turn off after 15 seconds. If
the driver's door is closed and
locked, the puddle lamp will turn off
immediately.
The Puddle Lamp Escort Light will
turn on only the first time the driver's
door is opened after the engine is
turned off.
NOTICE
OOS047055OTMA048080
Page 214 of 557
3-125
Convenient features of your vehicle
3
LO : The wiper runs at a lower speed.
HI : The wiper runs at a higher speed.
Information
If there is heavy accumulation of snow
or ice on the windshield, defrost the
windshield for about 10 minutes, or
until the snow and/or ice is removed
before using the windshield wipers to
ensure proper operation.
If you do not remove the snow and/or
ice before using the wiper and washer,
it may damage the wiper and washer
system.
AUTO (Automatic) control (if equipped)
The rain sensor located on the upper
end of the windshield glass senses
the amount of rainfall and controls
the wiping cycle for the proper inter-
val.
The wiper operation time will be
automatically controlled depends on
rainfall.
When the rain stops, the wiper stops.
To vary the sensitivity setting, turn
the sensitivity control knob (1).
If the wiper switch is set in AUTO
mode when the ignition switch is in
the ON position, the wiper will oper-
ate once to perform a self-check of
the system. Set the wiper to OFF
position when the wiper is not in use.
i
To avoid personal injury from
the windshield wipers, when the
engine is running and the wind-
shield wiper switch is placed in
the AUTO mode:
Do not touch the upper end of
the windshield glass facing
the rain sensor.
Do not wipe the upper end of
the windshield glass with a
damp or wet cloth.
Do not put pressure on the
windshield glass.
WARNING
Page 218 of 557
3-129
Convenient features of your vehicle
3
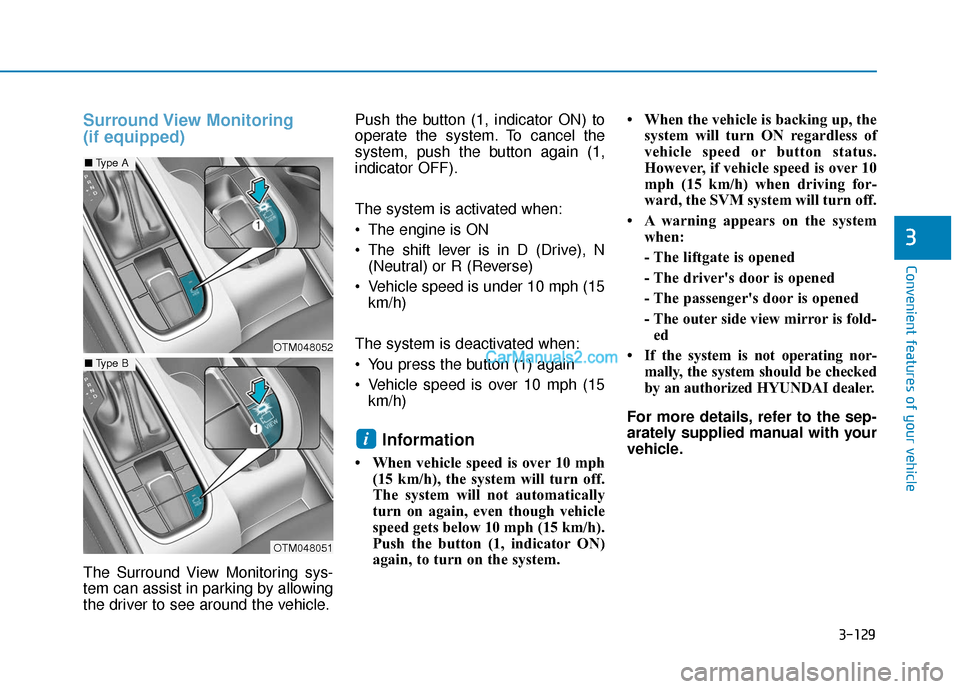
Surround View Monitoring
(if equipped)
The Surround View Monitoring sys-
tem can assist in parking by allowing
the driver to see around the vehicle.Push the button (1, indicator ON) to
operate the system. To cancel the
system, push the button again (1,
indicator OFF).
The system is activated when:
The engine is ON
The shift lever is in D (Drive), N
(Neutral) or R (Reverse)
Vehicle speed is under 10 mph (15 km/h)
The system is deactivated when:
You press the button (1) again
Vehicle speed is over 10 mph (15 km/h)
Information
• When vehicle speed is over 10 mph (15 km/h), the system will turn off.
The system will not automatically
turn on again, even though vehicle
speed gets below 10 mph (15 km/h).
Push the button (1, indicator ON)
again, to turn on the system. • When the vehicle is backing up, the
system will turn ON regardless of
vehicle speed or button status.
However, if vehicle speed is over 10
mph (15 km/h) when driving for-
ward, the SVM system will turn off.
• A warning appears on the system when:
- The liftgate is opened
- The driver's door is opened
- The passenger's door is opened
- The outer side view mirror is fold-ed
• If the system is not operating nor- mally, the system should be checked
by an authorized HYUNDAI dealer.
For more details, refer to the sep-
arately supplied manual with your
vehicle.
i
OTM048052
OTM048051
■ Type A
■Type B
Page 219 of 557
3-130
Convenient features of your vehicle
Always keep the camera lens
clean. The camera may not work
normally if the lens is covered
with foreign material.
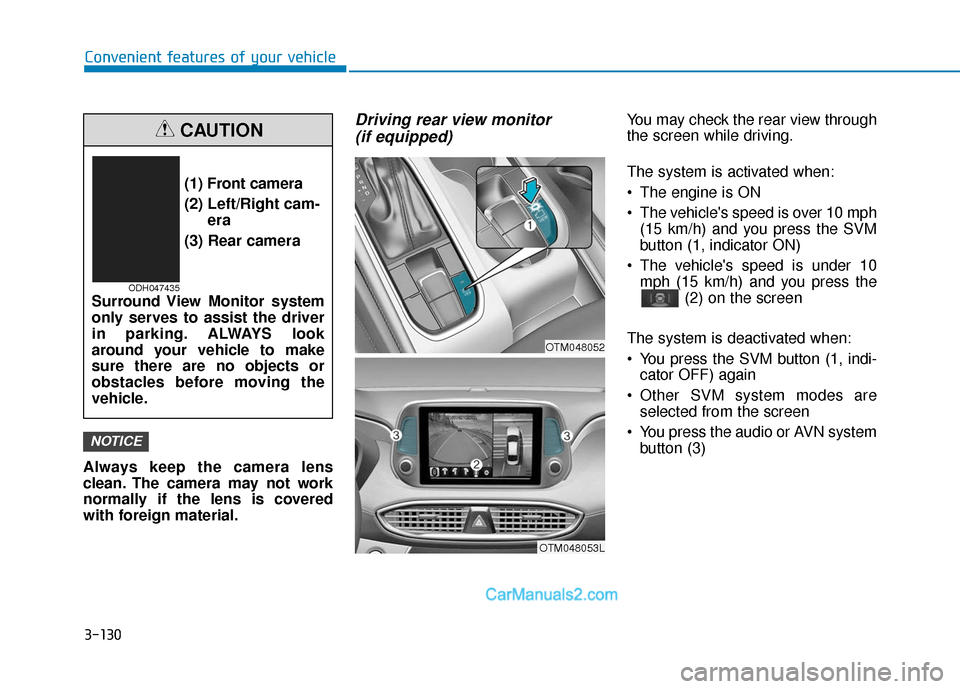
Driving rear view monitor (if equipped)You may check the rear view through
the screen while driving.
The system is activated when:
The engine is ON
The vehicle's speed is over 10 mph
(15 km/h) and you press the SVM
button (1, indicator ON)
The vehicle's speed is under 10 mph (15 km/h) and you press the (2) on the screen
The system is deactivated when:
You press the SVM button (1, indi- cator OFF) again
Other SVM system modes are selected from the screen
You press the audio or AVN system button (3)
NOTICE
(1) Front camera
(2) Left/Right cam- era
(3) Rear camera
Surround View Monitor system
only serves to assist the driver
in parking. ALWAYS look
around your vehicle to make
sure there are no objects or
obstacles before moving the
vehicle.
CAUTION
ODH047435
OTM048053L
OTM048052
Page 221 of 557
3-132
BVM (Blind-spot View Monitor) sys-
tem displays the driver-side or pas-
senger-side rear areas in the cluster
when the system is activated.
To turn on BVM system: Under condi-
tion BVM system is enabled in the
settings
1. The ignition switch is turned tothe ON position.
2. The turn signal is activated
To turn off BVM system
1. The ignition switch is turned to the OFF position.
2. The turn signal is deactivated
3. The hazard warning flasher is on
4. A warning screen pops up and takes priority over the Blind-Spot
View Monitor system.System setting
With the engine ON, the Blind-spot
View Monitor system turns on and
gets ready to be activated when the
'User Settings →Driver Assistance
→ Blind-spot safety →Blind-spot
view' is selected on the cluster. The
system stops operation when the set-
ting is deactivated.
Convenient features of your vehicle
Like all assistance systems,
BVM system has limitations.
Over-reliance on the system
may result in a collision.
Always look around your vehi-
cle to make sure there are no
objects or obstacles before
moving the vehicle in any
direction to prevent a colli-
sion.
Objects are closer than they
appear. Failure to visually
confirm that is safe to change
the lane before doing so may
result in crash and serious
injury or death.
Always keep the camera lens
clean. The camera may not
work normally if the lens is
covered with foreign material.
CAUTION
Page 231 of 557
3-142
Convenient features of your vehicle
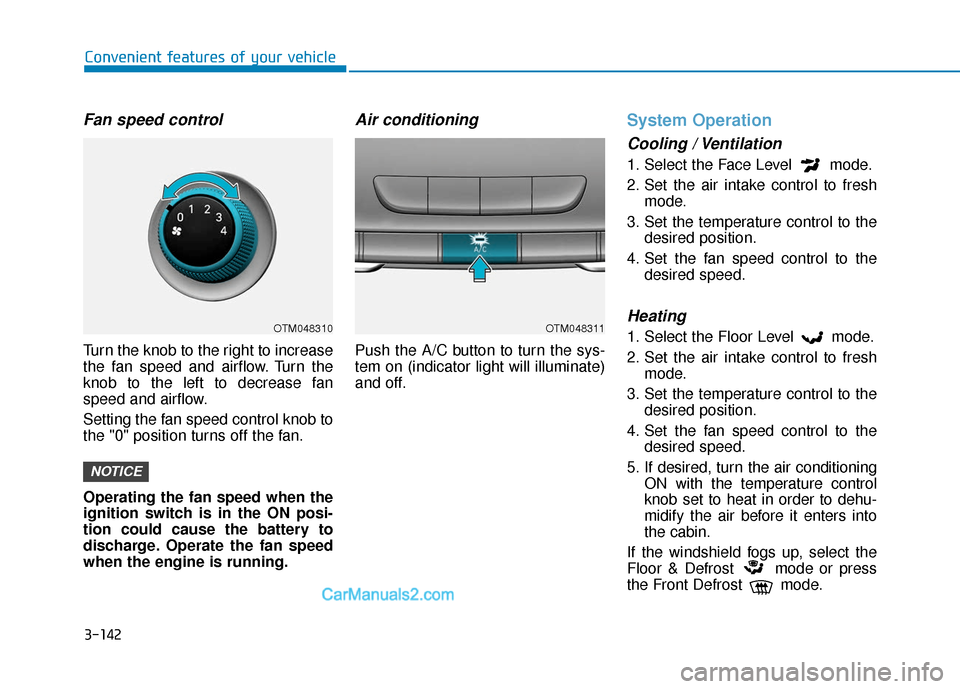
Fan speed control
Turn the knob to the right to increase
the fan speed and airflow. Turn the
knob to the left to decrease fan
speed and airflow.
Setting the fan speed control knob to
the "0" position turns off the fan.
Operating the fan speed when the
ignition switch is in the ON posi-
tion could cause the battery to
discharge. Operate the fan speed
when the engine is running.
Air conditioning
Push the A/C button to turn the sys-
tem on (indicator light will illuminate)
and off.
System Operation
Cooling / Ventilation
1. Select the Face Level mode.
2. Set the air intake control to freshmode.
3. Set the temperature control to the desired position.
4. Set the fan speed control to the desired speed.
Heating
1. Select the Floor Level mode.
2. Set the air intake control to freshmode.
3. Set the temperature control to the desired position.
4. Set the fan speed control to the desired speed.
5. If desired, turn the air conditioning ON with the temperature control
knob set to heat in order to dehu-
midify the air before it enters into
the cabin.
If the windshield fogs up, select the
Floor & Defrost mode or press
the Front Defrost mode.
NOTICE
OTM048310OTM048311
Page 232 of 557
3-143
Convenient features of your vehicle
3
Operation Tips
To keep dust or unpleasant fumesfrom entering the vehicle through
the ventilation system, temporarily
set the air intake control to recir-
culation mode. Return the control
to fresh mode when the unpleas-
ant air outside has diminished.
This will help keep the driver alert
and comfortable.
To help prevent the inside of the windshield from fogging, set the air
intake control to fresh mode and
fan speed to the desired position,
turn on the air conditioning sys-
tem, and adjust the temperature
control to the desired temperature.
Air conditioning
Your HYUNDAI vehicle air condition-
ing system is filled with R-1234yf
refrigerant.
1. Start the engine.
2. Press the air conditioning button.
3. Select the Face Level mode.
4. Set the air intake control toRecirculation mode temporarily to
allow the cabin to cool quickly.
When the desired temperature in
the cabin is reached, change the
air intake control back to Fresh
mode.
5. Adjust the fan speed control and temperature control to maintain
maximum comfort.
When maximum cooling is desired,
set the temperature control to the
MAX A/C position, then set the fan
speed control to the highest setting. When using the air conditioning
system, monitor the engine tem-
perature gauge closely while driv-
ing up hills or in heavy traffic when
outside temperatures are high. Air
conditioning system operation
when climbing a steep grade or in
high outside ambient tempera-
tures can cause engine overheat-
ing.
Continue to use the fan, but turn
the air conditioning system off if
the engine temperature gauge
indicates engine overheating.
NOTICE
Page 237 of 557
3-148
Convenient features of your vehicle
To turn the automatic operation off,
select any button of the following:
- Mode selection button
- Front windshield defroster button (Press the button one more time
to deselect the front windshield
defroster function. The 'AUTO'
sign will illuminate on the informa-
tion display once again.)
- Fan speed control button
The selected function will be con-
trolled manually while other functions
operate automatically.
For your convenience and to improve
the efficiency of the climate control,
use the AUTO button and set the
temperature to 72°F (22°C).
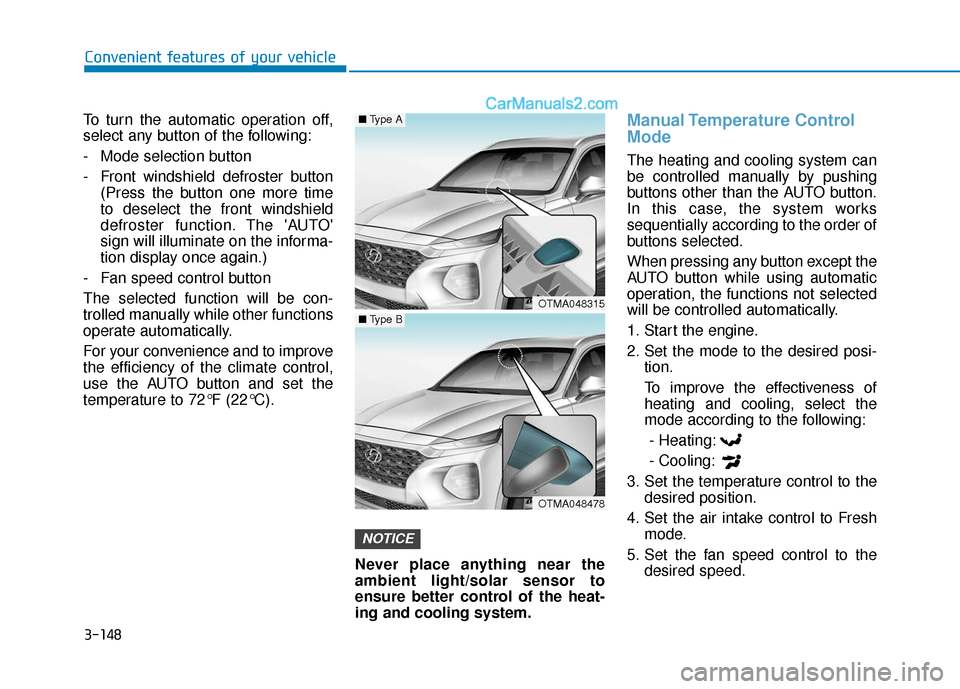
Never place anything near the
ambient light/solar sensor to
ensure better control of the heat-
ing and cooling system.
Manual Temperature Control
Mode
The heating and cooling system can
be controlled manually by pushing
buttons other than the AUTO button.
In this case, the system works
sequentially according to the order of
buttons selected.
When pressing any button except the
AUTO button while using automatic
operation, the functions not selected
will be controlled automatically.
1. Start the engine.
2. Set the mode to the desired posi-tion.
To improve the effectiveness of heating and cooling, select the
mode according to the following:
- Heating:
- Cooling:
3. Set the temperature control to the desired position.
4. Set the air intake control to Fresh mode.
5. Set the fan speed control to the desired speed.
NOTICE
OTMA048315
OTMA048478
■Type A
■Type B
Page 243 of 557
3-154
Convenient features of your vehicle
Operating the fan when the igni-
tion switch is in the ON position
could cause the battery to dis-
charge. Operate the fan when the
engine is running.
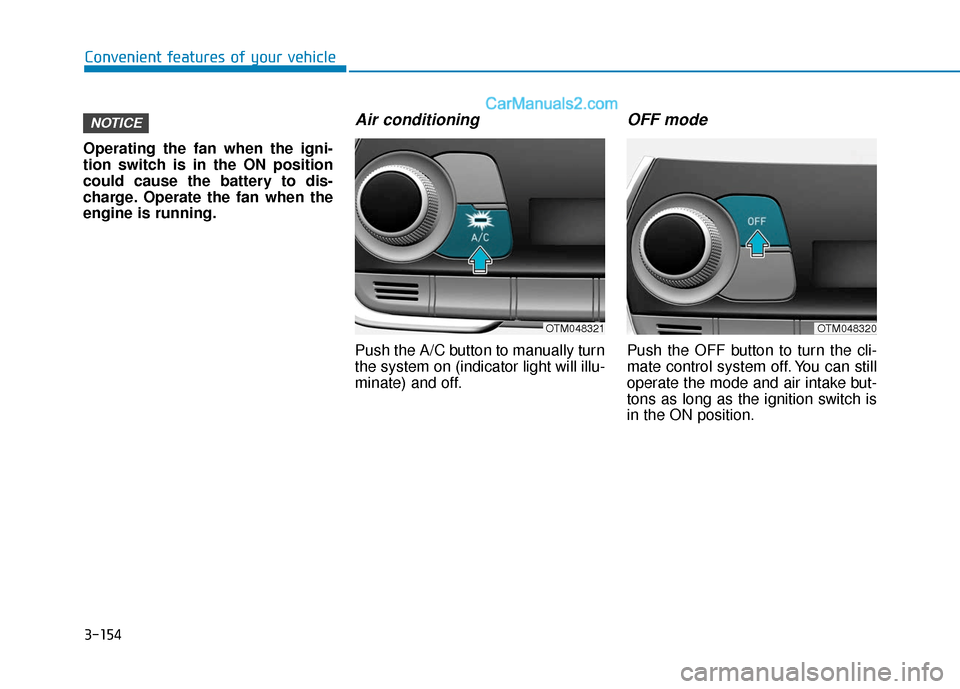
Air conditioning
Push the A/C button to manually turn
the system on (indicator light will illu-
minate) and off.
OFF mode
Push the OFF button to turn the cli-
mate control system off. You can still
operate the mode and air intake but-
tons as long as the ignition switch is
in the ON position.
NOTICE
OTM048321OTM048320