Engine compartment Hyundai Santa Fe 2020 Owner's Manual
[x] Cancel search | Manufacturer: HYUNDAI, Model Year: 2020, Model line: Santa Fe, Model: Hyundai Santa Fe 2020Pages: 557, PDF Size: 19.29 MB
Page 12 of 557
Your vehicle at a glance
1
Your vehicle at a glance
Exterior Overview ..................................................1-2
Interior Overview ...................................................1-4
Instrument Panel Overview ..................................1-5
Engine Compartment .............................................1-71
Page 18 of 557
1-7
Your vehicle at a glance
1
E
EN
N G
GI
IN
N E
E
C
C O
O M
M P
PA
A R
RT
TM
M E
EN
N T
T
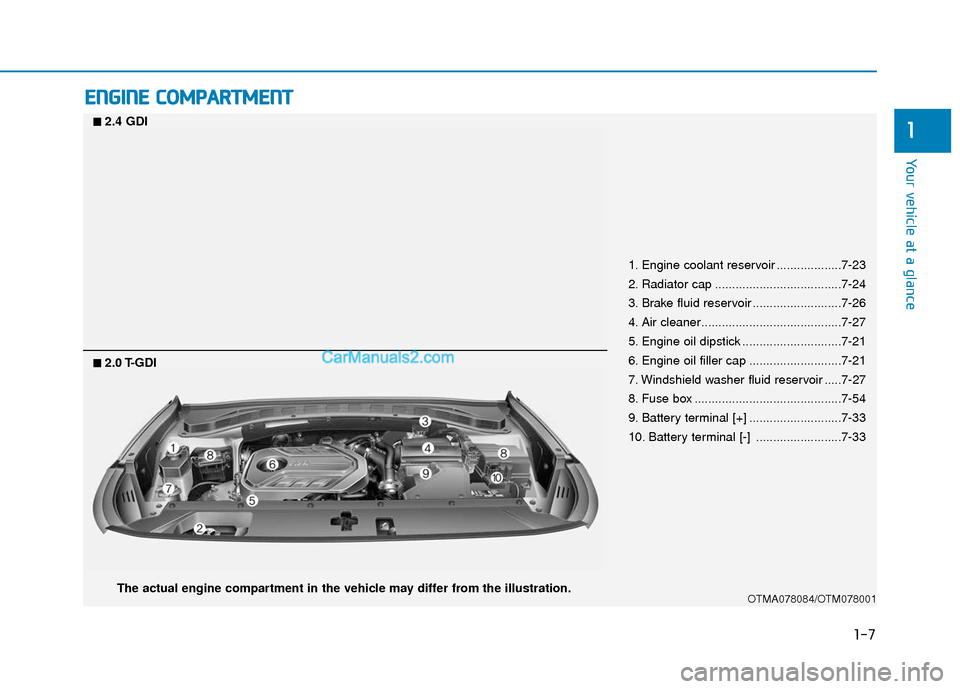
1. Engine coolant reservoir ...................7-23
2. Radiator cap .....................................7-24
3. Brake fluid reservoir ..........................7-26
4. Air cleaner.........................................7-27
5. Engine oil dipstick .............................7-21
6. Engine oil filler cap ...........................7-21
7. Windshield washer fluid reservoir .....7-27
8. Fuse box ...........................................7-54
9. Battery terminal [+] ...........................7-33
10. Battery terminal [-] .........................7-33
OTMA078084/OTM078001
■
■2.4 GDI
The actual engine compartment in the vehicle may differ from the illustration.
■
■2.0 T-GDI
Page 138 of 557
3-49
Convenient features of your vehicle
3
Hood
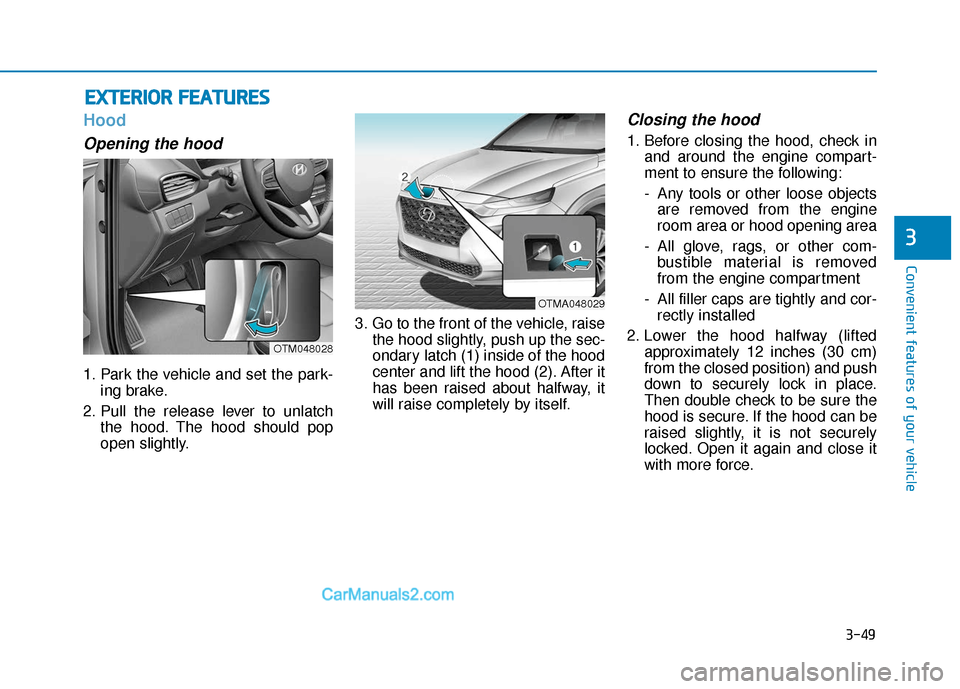
Opening the hood
1. Park the vehicle and set the park-ing brake.
2. Pull the release lever to unlatch the hood. The hood should pop
open slightly. 3. Go to the front of the vehicle, raise
the hood slightly, push up the sec-
ondary latch (1) inside of the hood
center and lift the hood (2). After it
has been raised about halfway, it
will raise completely by itself.
Closing the hood
1. Before closing the hood, check inand around the engine compart-
ment to ensure the following:
- Any tools or other loose objectsare removed from the engine
room area or hood opening area
- All glove, rags, or other com- bustible material is removed
from the engine compartment
- All filler caps are tightly and cor- rectly installed
2. Lower the hood halfway (lifted approximately 12 inches (30 cm)
from the closed position) and push
down to securely lock in place.
Then double check to be sure the
hood is secure. If the hood can be
raised slightly, it is not securely
locked. Open it again and close it
with more force.
E EX
X T
TE
ER
R I
IO
O R
R
F
F E
E A
A T
TU
U R
RE
ES
S
OTM048028
OTMA048029
Page 252 of 557
3-163
Convenient features of your vehicle
3
C
CL
LI
IM
M A
AT
TE
E
C
C O
O N
NT
TR
R O
O L
L
A
A D
DD
DI
IT
T I
IO
O N
NA
AL
L
F
F E
E A
A T
TU
U R
RE
ES
S
Cluster ionizer (if equipped)
When the ignition switch is in the ON
position, the clean air function turns
on automatically.
Also, the clean air function turns off
automatically, when the ignition
switch is in the OFF position.
Air recirculation of passenger
compartment while spraying
the washer fluid
While spraying the washer fluid on
the windshield, the air recirculation
mode and the air conditioning sys-
tem are automatically operated
according to the outside temperature
in order to prevent the outside air
intake. If you control the recirculation
mode manually during operation, it
will be controlled but will change
back after a while. (It may not work
under certain circumstances: in case
of the cold weather or the ignition
switch is in the OFF position.) To set up the air recirculation
1. Start the engine.
2. Set the air flow outlet direction to
the Floor Level Mode by
pressing the mode selection but-
ton.
3. While pressing the air condition- ing button, push the recirculation
mode button over 4 times within 2
seconds.
4. If the function is set, the recircula- tion button indicator will blink 6
times.
To release the air recirculation
1. Start the engine.
2. Set the air flow outlet direction to the Floor Level Mode by
pressing the mode selection but-
ton.
3. While pressing the air condition- ing button, push the recirculation
mode button indicator over 4
times within 2 seconds.
4. If the function is released, the recirculation button indicator will
blink 3 times.
Automatic Ventilation
(if equipped)
When the ignition switch is in the ON
position or when the engine is run-
ning and temperature is below 59°F
(15°C) with the recirculation mode
selected more than three to five min-
utes, the air intake position will auto-
matically change to fresh mode.
To cancel or reset the Automatic
Ventilation
When the air conditioning system is
on, select Face Level mode and
press the recirculation mode button
five times within three seconds while
pressing A/C button.
When the Automatic Ventilation fea-
ture is enabled, the recirculation but-
ton LED indicator will blink 6 times.
When the Automatic Ventilation fea-
ture is disabled, the recirculation but-
ton LED indicator will blink 3 times.
Page 399 of 557
5-125
Driving your vehicle
5
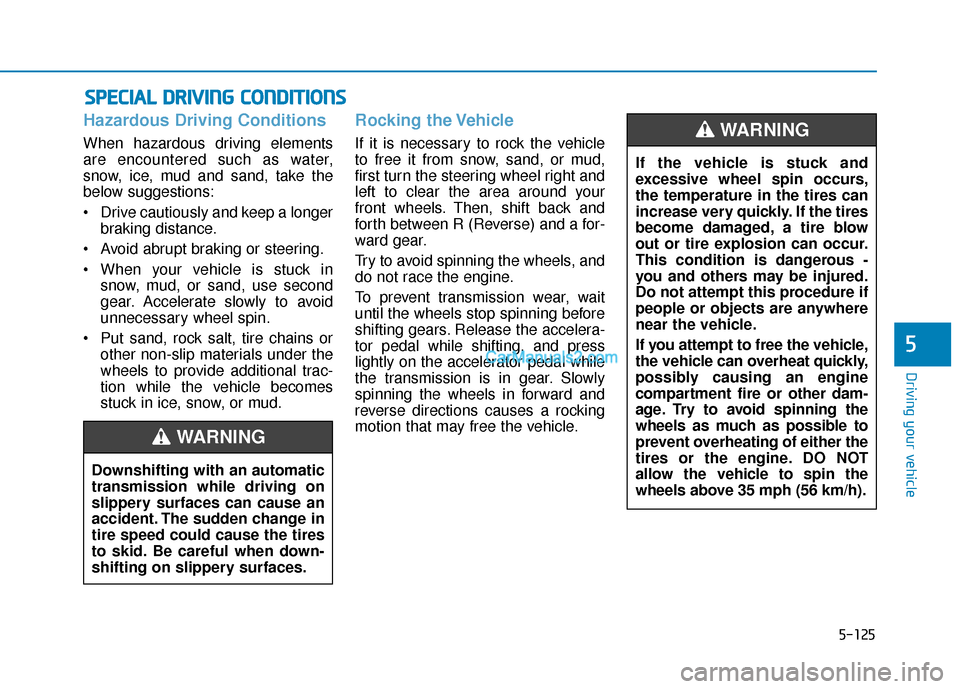
Hazardous Driving Conditions
When hazardous driving elements
are encountered such as water,
snow, ice, mud and sand, take the
below suggestions:
Drive cautiously and keep a longerbraking distance.
Avoid abrupt braking or steering.
When your vehicle is stuck in snow, mud, or sand, use second
gear. Accelerate slowly to avoid
unnecessary wheel spin.
Put sand, rock salt, tire chains or other non-slip materials under the
wheels to provide additional trac-
tion while the vehicle becomes
stuck in ice, snow, or mud.
Rocking the Vehicle
If it is necessary to rock the vehicle
to free it from snow, sand, or mud,
first turn the steering wheel right and
left to clear the area around your
front wheels. Then, shift back and
forth between R (Reverse) and a for-
ward gear.
Try to avoid spinning the wheels, and
do not race the engine.
To prevent transmission wear, wait
until the wheels stop spinning before
shifting gears. Release the accelera-
tor pedal while shifting, and press
lightly on the accelerator pedal while
the transmission is in gear. Slowly
spinning the wheels in forward and
reverse directions causes a rocking
motion that may free the vehicle.
S SP
P E
EC
CI
IA
A L
L
D
D R
RI
IV
V I
IN
N G
G
C
C O
O N
ND
DI
IT
T I
IO
O N
NS
S
Downshifting with an automatic
transmission while driving on
slippery surfaces can cause an
accident. The sudden change in
tire speed could cause the tires
to skid. Be careful when down-
shifting on slippery surfaces.
WARNING
If the vehicle is stuck and
excessive wheel spin occurs,
the temperature in the tires can
increase very quickly. If the tires
become damaged, a tire blow
out or tire explosion can occur.
This condition is dangerous -
you and others may be injured.
Do not attempt this procedure if
people or objects are anywhere
near the vehicle.
If you attempt to free the vehicle,
the vehicle can overheat quickly,
possibly causing an engine
compartment fire or other dam-
age. Try to avoid spinning the
wheels as much as possible to
prevent overheating of either the
tires or the engine. DO NOT
allow the vehicle to spin the
wheels above 35 mph (56 km/h).
WARNING
Page 406 of 557
5-132
Driving your vehicle
Check spark plugs and ignitionsystem
Inspect your spark plugs as
described in chapter 7 and replace
them if necessary. Also check all
ignition wiring and components to be
sure they are not cracked, worn or
damaged in any way.
Use approved window washeranti-freeze in system
To keep the water in the window
washer system from freezing, add an
approved window washer anti-freeze
solution in accordance with instruc-
tions on the container. Window wash-
er anti-freeze is available from an
authorized HYUNDAI dealer and
most auto parts outlets. Do not use
engine coolant or other types of anti-
freeze as these may damage the
paint finish.
Do not let your parking brakefreeze
Under some conditions your parking
brake can freeze in the engaged
position. This is most likely to happen
when there is an accumulation of
snow or ice around or near the rear
brakes or if the brakes are wet. If
there is a risk the parking brake may
freeze, apply it only temporarily while
you put the gear selector lever in P
and block the rear wheels so the car
cannot roll. Then release the parking
brake.
Do not let ice and snow accu-mulate underneath
Under some conditions, snow and
ice can build up under the fenders
and interfere with the steering. When
driving in severe winter conditions
where this may happen, you should
periodically check underneath the
car to be sure the movement of the
front wheels and the steering com-
ponents is not obstructed.
Don't place foreign objects ormaterials in the engine com-partment
Placement of foreign object or mate-
rials which prevent cooling of the
engine, in the engine compartment,
may cause a failure or combustion.
The manufacturer is not responsible
for the damage caused by such
placement.
To keep locks from freezing
To keep the locks from freezing,
squirt an approved de-icer fluid or
glycerine into the key opening. If a
lock is covered with ice, squirt it with
an approved de-icing fluid to remove
the ice. If the lock is frozen internally,
you may be able to thaw it out by
using a heated key. Handle the heat-
ed key with care to avoid injury.
Page 425 of 557
6-5
What to do in an emergency
6
Information
An inappropriately disposedbattery can be harmful to the
environment and human
health. Dispose of the battery
according to your local law(s)
or regulations.
To prevent damage to your vehicle:
Only use a 12-volt power supply (battery or jumper system) to
jump start your vehicle.
Do not attempt to jump start your vehicle by push-starting.
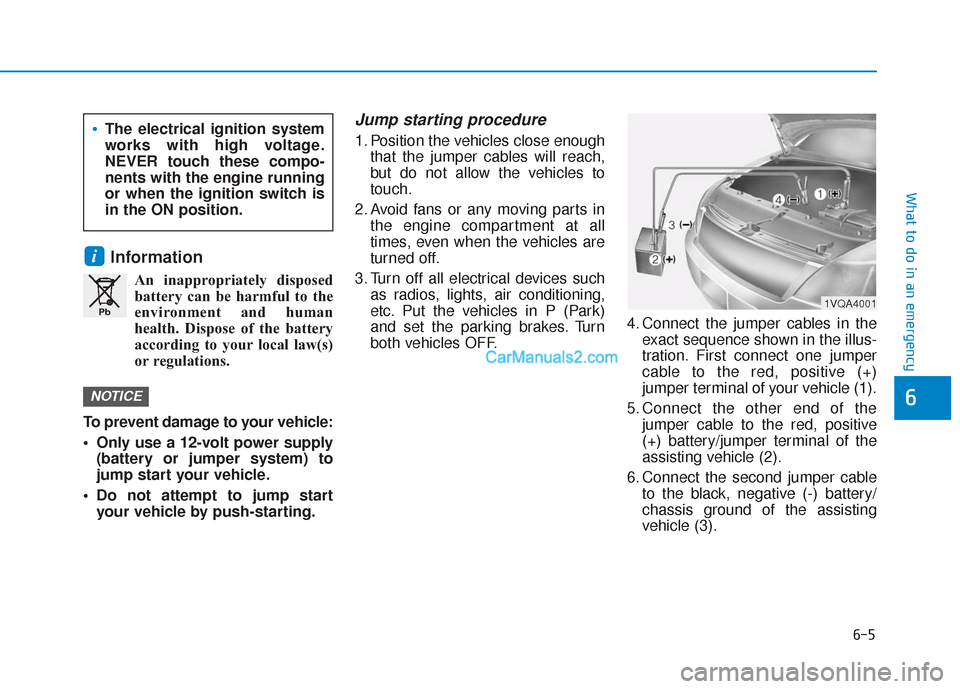
Jump starting procedure
1. Position the vehicles close enough that the jumper cables will reach,
but do not allow the vehicles to
touch.
2. Avoid fans or any moving parts in the engine compartment at all
times, even when the vehicles are
turned off.
3. Turn off all electrical devices such as radios, lights, air conditioning,
etc. Put the vehicles in P (Park)
and set the parking brakes. Turn
both vehicles OFF. 4. Connect the jumper cables in the
exact sequence shown in the illus-
tration. First connect one jumper
cable to the red, positive (+)
jumper terminal of your vehicle (1).
5. Connect the other end of the jumper cable to the red, positive
(+) battery/jumper terminal of the
assisting vehicle (2).
6. Connect the second jumper cable to the black, negative (-) battery/
chassis ground of the assisting
vehicle (3).
NOTICE
i
Pb
The electrical ignition system
works with high voltage.
NEVER touch these compo-
nents with the engine running
or when the ignition switch is
in the ON position.
1VQA4001
Page 443 of 557
7
Maintenance
Engine Compartment .............................................7-3
Maintenance Services ...........................................7-4
Owner's Responsibility .....................................................7-4
Owner Maintenance Precautions..................................7-4
Owner Maintenance ..............................................7-5
Owner Maintenance Schedule .......................................7-6
Scheduled maintenance services.........................7-7
Normal Maintenance Schedule (2.4 GDI) ....................7-8
Maintenance Under Severe Usage Conditions (2.4 GDI) ........................................................7-11
Normal Maintenance Schedule (2.0 T-GDI) ..............7-13
Maintenance Under Severe Usage
Conditions (2.0 T-GDI)....................................................7-16
Explanation of Scheduled
Maintenance Items ...............................................7-18
Engine Oil ..............................................................7-21
Checking the Engine Oil Level .....................................7-21
Checking the Engine Oil and Filter .............................7-22
Engine Coolant .....................................................7-23
Checking the Engine Coolant Level ............................7-23
Changing Engine Coolant .............................................7-25
Brake Fluid ............................................................7-26
Checking the Brake Fluid Level ...................................7-26
Washer Fluid .........................................................7-27
Checking the Washer Fluid Level................................7-27
Air Cleaner ............................................................7-27
Filter Replacement ..........................................................7-27
Climate Control Air Filter ....................................7-29
Filter Inspection ...............................................................7-29
Wiper blades .........................................................7-31
Blade Inspection ..............................................................7-31
Blade Replacement .........................................................7-31
Battery...................................................................7-33
For Best Battery Service .............................................7-34
Battery Recharging ........................................................7-35
Reset Features.................................................................7-36
7
Maintenance
7
Page 444 of 557
7
Tires and Wheels .................................................7-37
Tire Care ........................................................................\
....7-37
Recommended Cold Tire Inflation Pressures ..........7-38
Check Tire Inflation Pressure ......................................7-39
Tire Rotation...................................................................\
..7-39
Wheel Alignment and Tire Balance ............................7-40
Tire Replacement ...........................................................7-41
Wheel Replacement ........................................................7-42
Tire Traction ....................................................................7-42\
Tire Maintenance ............................................................7-43
Tire Sidewall Labeling ....................................................7-43
Tire Terminology and Definitions ..............................7-47
All Season Tires ...............................................................7-50
Snow Tires ........................................................................\
7-50
Radial-Ply Tires ...............................................................7-50
Fuses ......................................................................7-\
52
Instrument Panel Fuse Replacement..........................7-53
Engine Compartment Panel Fuse Replacement.......7-54
Fuse/Relay Panel Description ......................................7-55
Light Bulbs ............................................................7-65
Headlamp, Parking lamp, Daytime Running Light,
Turn signal lamp and Side marker ..............................7-65
Front Fog Lamp Replacement......................................7-69
Side Repeater Lamp Replacement ..............................7-69
Rear Combination Light Bulb Replacement ..............7-70
High Mounted Stop Lamp Bulb Replacement ..........7-73
License Plate Light Bulb Replacement .....................7-73
Interior Light Bulb Replacement .................................7-74
Appearance Care..................................................7-76
Exterior Care ....................................................................7-76\
Interior Care .....................................................................7-8\
1
Emission Control System ....................................7-84
Crankcase Emission Control System ..........................7-84
Evaporative Emission Control System Including
Onboard Refueling Vapor Recovery (ORVR)............7-84Exhaust Emission Control System .............................7-85
California Perchlorate Notice.............................7-88
Page 445 of 557
E
EN
N G
GI
IN
N E
E
C
C O
O M
M P
PA
A R
RT
TM
M E
EN
N T
T
OTMA078084/OTM078001
■
■2.4 GDI
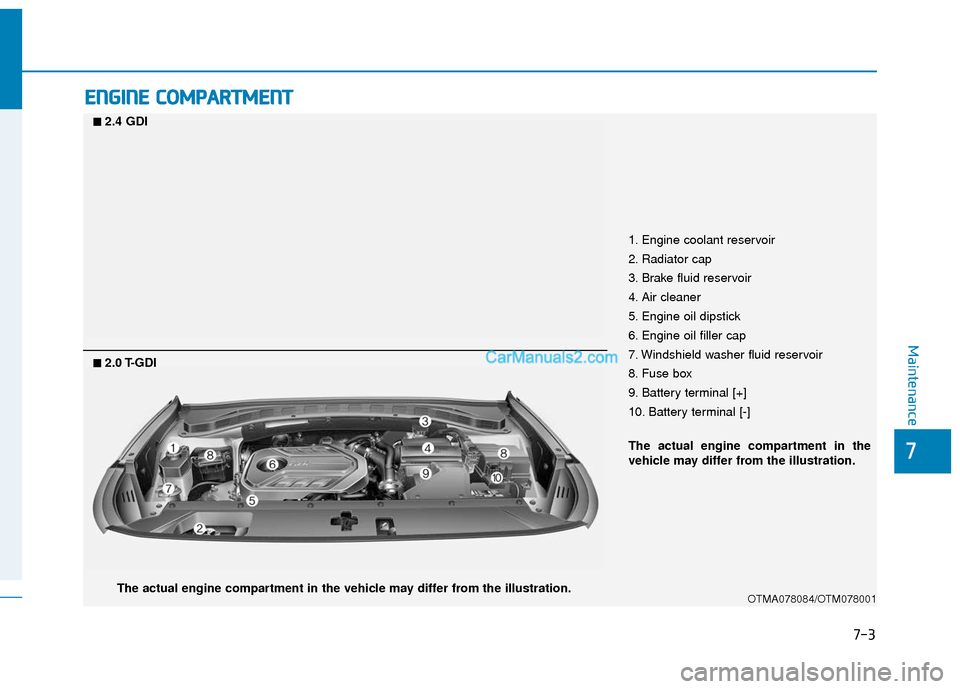
1. Engine coolant reservoir
2. Radiator cap
3. Brake fluid reservoir
4. Air cleaner
5. Engine oil dipstick
6. Engine oil filler cap
7. Windshield washer fluid reservoir
8. Fuse box
9. Battery terminal [+]
10. Battery terminal [-]
The actual engine compartment in the
vehicle may differ from the illustration.
The actual engine compartment in the vehicle may differ from the illustration.
■
■2.0 T-GDI
Maintenance
7
7-3