change time HYUNDAI SANTA FE 2021 Owners Manual
[x] Cancel search | Manufacturer: HYUNDAI, Model Year: 2021, Model line: SANTA FE, Model: HYUNDAI SANTA FE 2021Pages: 636, PDF Size: 81.2 MB
Page 3 of 636
All information in this Owner’s Manual is current at the time
of publication. However, HYUNDAI reserves the right to make
changes at any time so that our policy of continual product
improvement may be carried out.
This manual applies to all models of this vehicle and includes
descriptions and explanations of optional as well as standard
equipment.
As a result, you may find material in this manual that does not
apply to your specific vehicle.
OWNER’S MANUAL
Operation
Maintenance
Specifications
Introduction
1
Page 39 of 636
03
3 -7
Seat belts must be snug against your
hips and chest to work properly. When
the seatback is reclined, the shoulder
belt cannot do its job because it will not
be snug against your chest. Instead,
it will be in front of you. During an
accident, you could be thrown into the
seat belt, causing neck or other injuries.
The more the seatback is reclined,
the greater chance the passenger’s
hips will slide under the lap belt or the
passenger’s neck will strike the shoulder
belt.
OTM030040
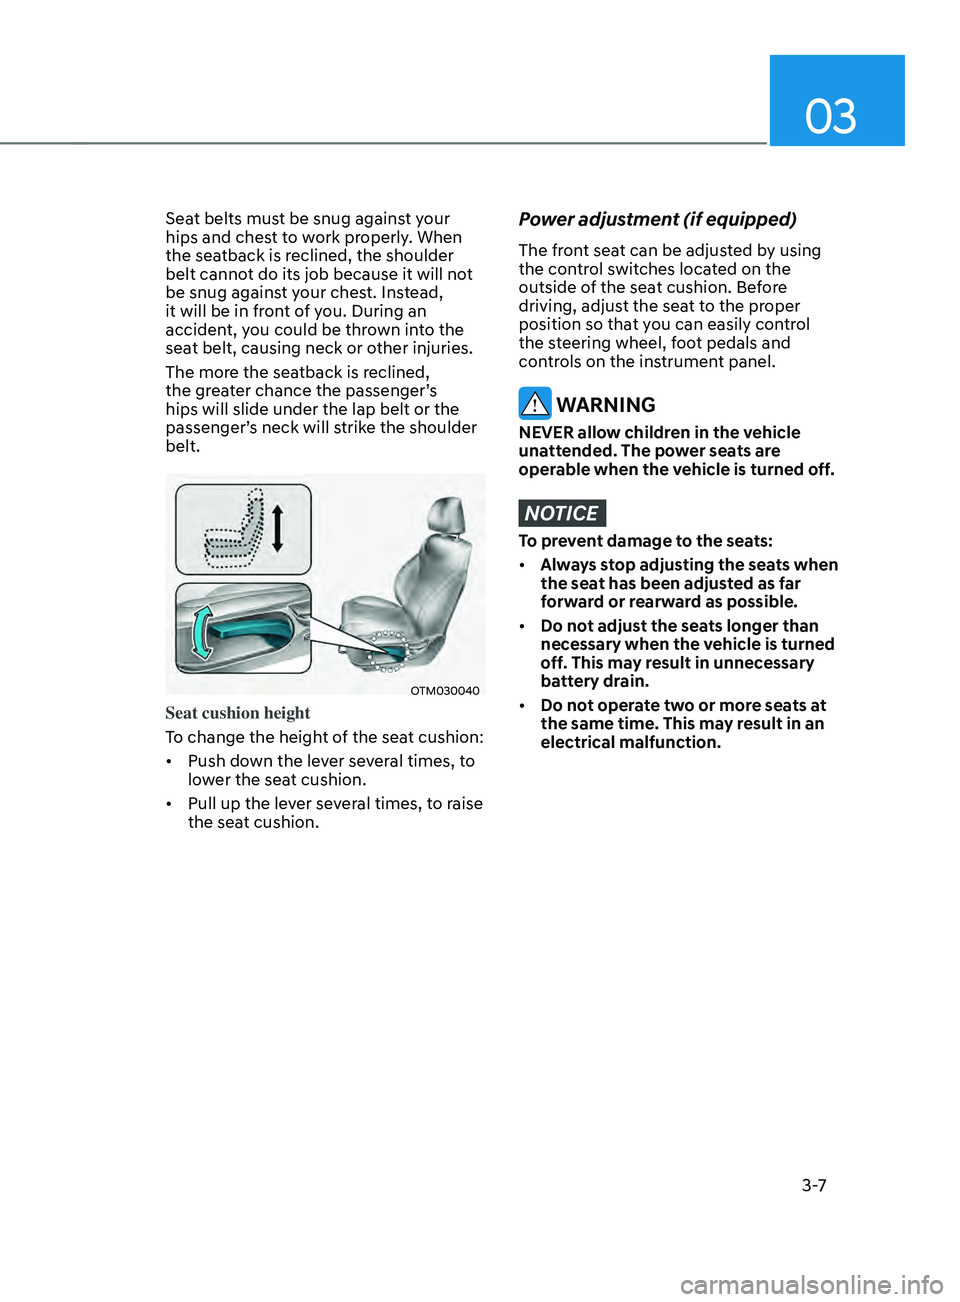
Seat cushion height
To change the height of the seat cushion:
• Push down the lever several times, to
lower the seat cushion.
• Pull up the lever several times, to raise
the seat cushion.
Power adjustment (if equipped)
The front seat can be adjusted by using
the control switches located on the
outside of the seat cushion. Before
driving, adjust the seat to the proper
position so that you can easily control
the steering wheel, foot pedals and
controls on the instrument panel.
WARNING
NEVER allow children in the vehicle
unattended. The power seats are
operable when the vehicle is turned off.
NOTICE
To prevent damage to the seats:
• Always stop adjusting the seats when
the seat has been adjusted as far
forward or rearward as possible.
• Do not adjust the seats longer than
necessary when the vehicle is turned
off. This may result in unnecessary
battery drain.
• Do not operate two or more seats at
the same time. This may result in an
electrical malfunction.
Page 50 of 636
Seats & Safety System
3-18
OTM030071
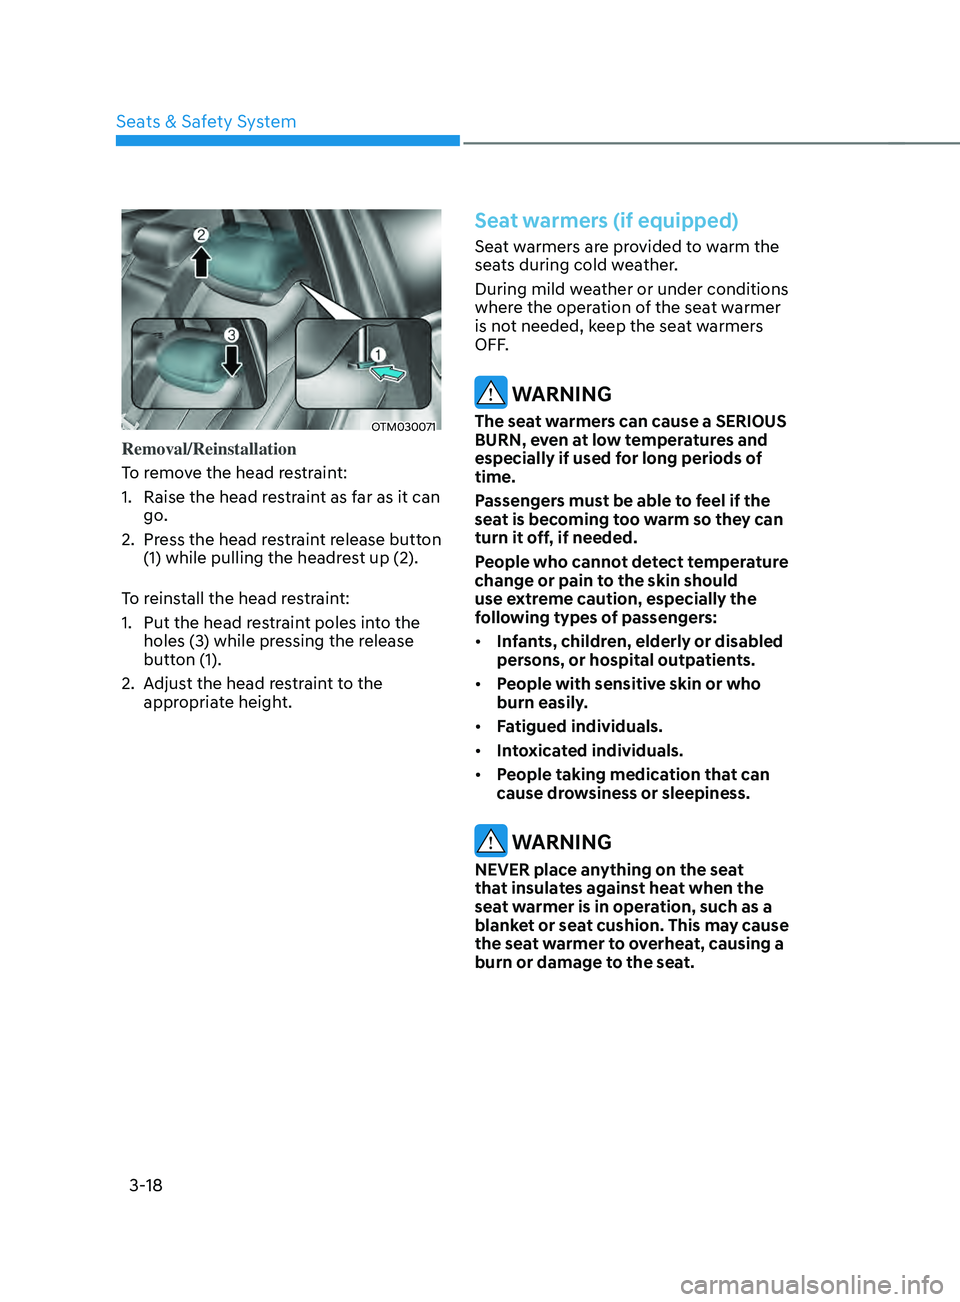
Removal/Reinstallation
To remove the head restraint:
1.
Raise the head res
traint as far as it can
go.
2.
Press the head r
estraint release button
(1) while pulling the headrest up (2).
To reinstall the head restraint:
1.
Put the head res
traint poles into the
holes (3) while pressing the release
button (1).
2.
Adjus
t the head restraint to the
appropriate height.
Seat warmers (if equipped)
Seat warmers are provided to warm the
seats during cold weather.
During mild weather or under conditions
where the operation of the seat warmer
is not needed, keep the seat warmers
OFF.
WARNING
The seat warmers can cause a SERIOUS
BURN, even at low temperatures and
especially if used for long periods of
time.
Passengers must be able to feel if the
seat is becoming too warm so they can
turn it off, if needed.
People who cannot detect temperature
change or pain to the skin should
use extreme caution, especially the
following types of passengers:
• Infants, children, elderly or disabled
persons, or hospital outpatients.
• People with sensitive skin or who
burn easily.
• Fatigued individuals.
• Intoxicated individuals.
• People taking medication that can
cause drowsiness or sleepiness.
WARNING
NEVER place anything on the seat
that insulates against heat when the
seat warmer is in operation, such as a
blanket or seat cushion. This may cause
the seat warmer to overheat, causing a
burn or damage to the seat.
Page 51 of 636
03
3-19
NOTICE
To prevent damage to the seat warmers
and seats:
• Never use a solvent such as paint
thinner, benzene, alcohol or gasoline
to clean the seats.
• Do not place heavy or sharp objects
on seats equipped with seat
warmers.
• Do not change the seat cover. It may
damage the seat warmer.
„„Front seat
OTM030002
„„Rear seat
OTM030078
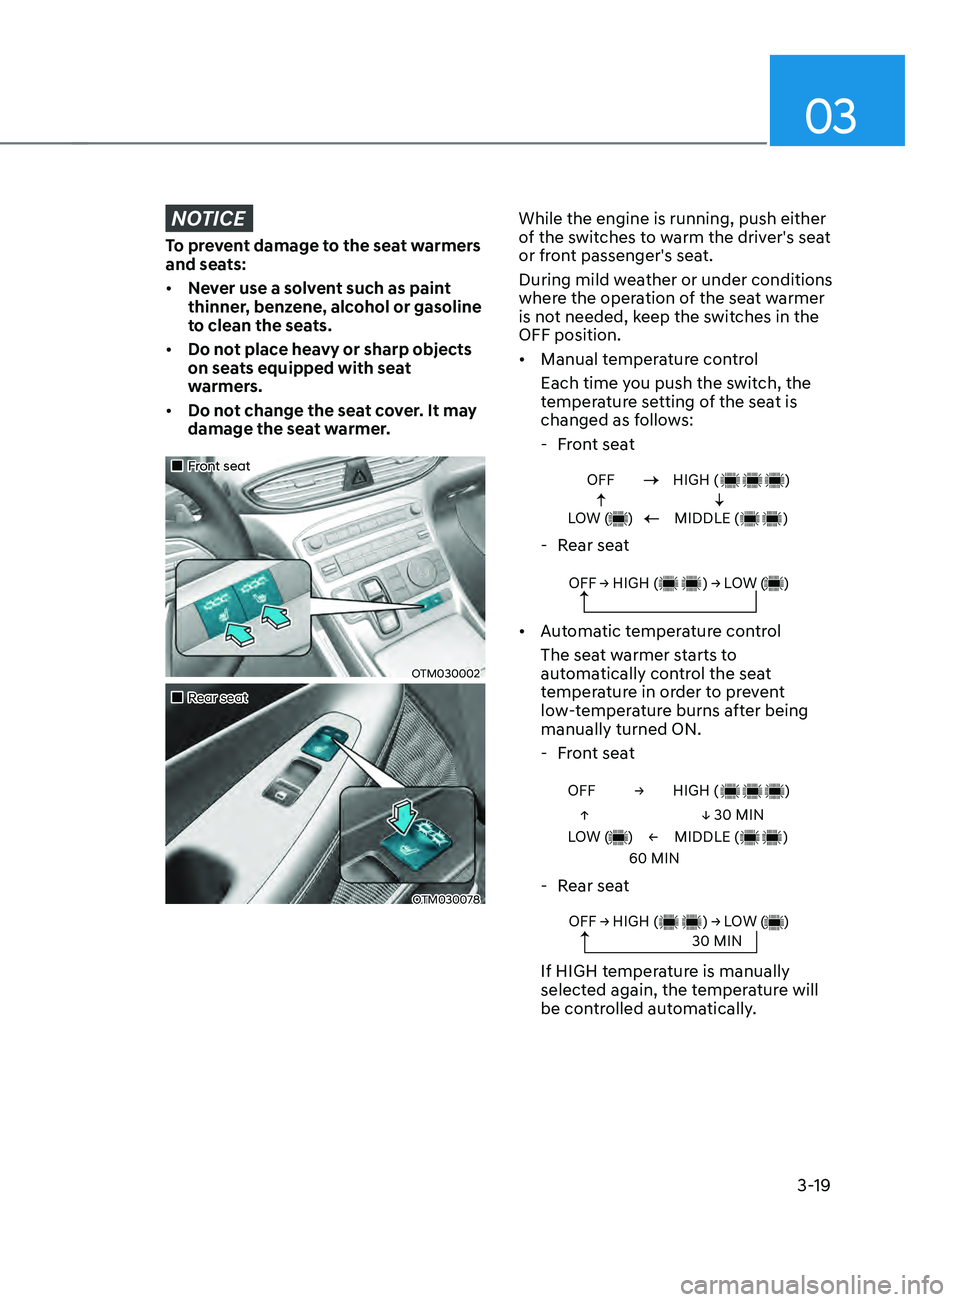
While the engine is running, push either
of the switches to warm the driver's seat
or front passenger's seat.
During mild weather or under conditions
where the operation of the seat warmer
is not needed, keep the switches in the
OFF position.
• Manual temperature control
Each time you push the switch, the
temperature setting of the seat is
changed as follows:
- Fr
ont seat
OFF
LOW ( )HIGH ( )
MIDDLE ( )
- Rear seat
OFF → HIGH ( ) → LOW ( )
• Automatic temperature control
The seat warmer starts to
automatically control the seat
temperature in order to prevent
low-temperature burns after being
manually turned ON.
- Fr
ont seat
OFF →
←
↑
↓ 30 MIN
60 MIN
LOW ( )
HIGH ( )
MIDDLE ( )
- Rear seat
OFF → HIGH ( ) → LOW ( )30 MIN
If HIGH temperature is manually
selected again, the temperature will
be controlled automatically.
Page 53 of 636
03
3-21
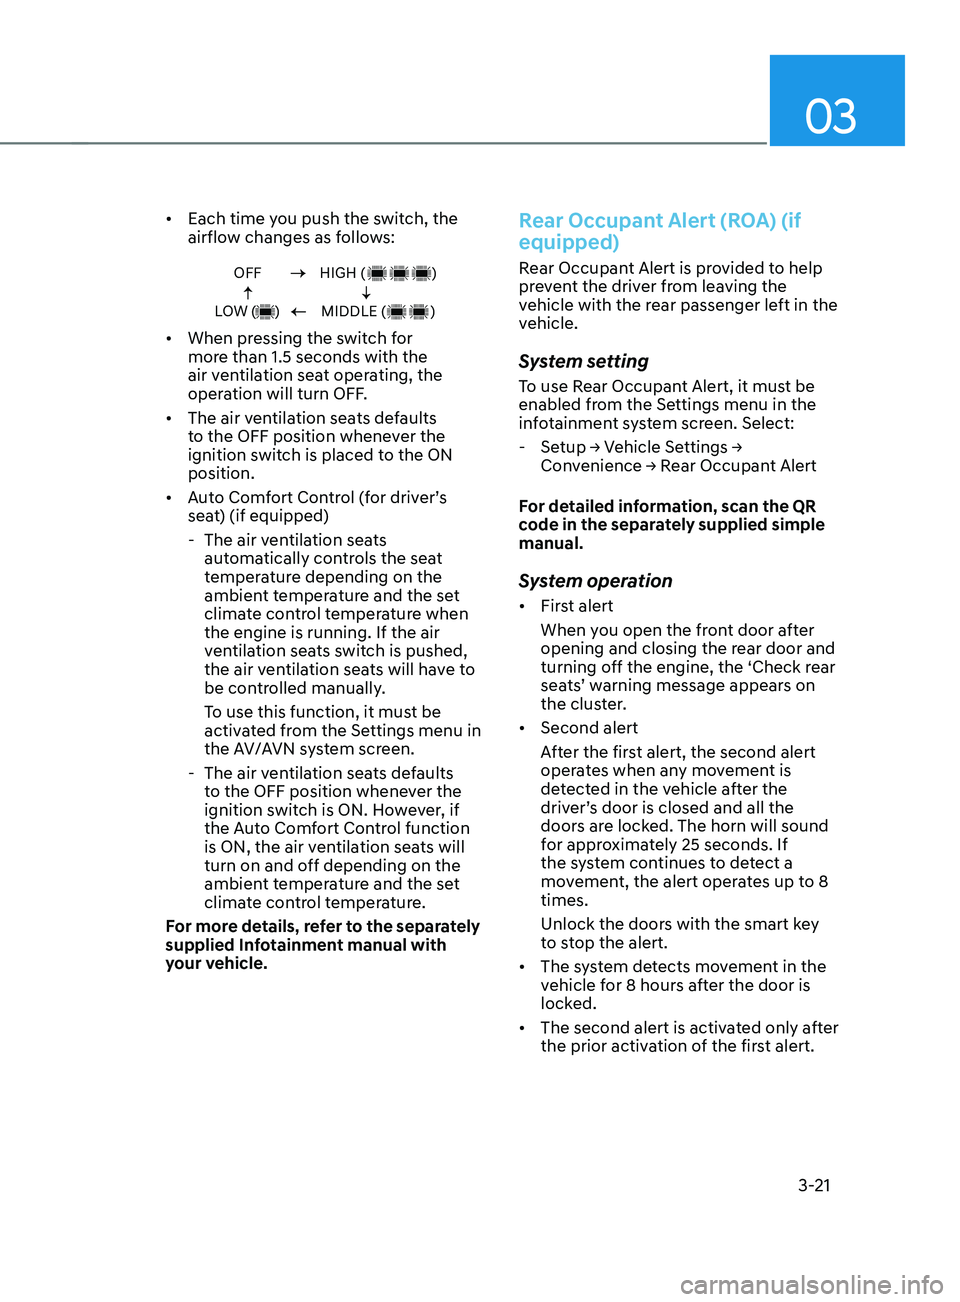
• Each time you push the switch, the
airflow changes as follows:
OFF
LOW ( )HIGH ( )
MIDDLE ( )
• When pressing the switch for
more than 1.5 seconds with the
air ventilation seat operating, the
operation will turn OFF.
• The air ventilation seats defaults
to the OFF position whenever the
ignition switch is placed to the ON
position.
• Auto Comfort Control (for driver’s
seat) (if equipped)
- The air ven
tilation seats
automatically controls the seat
temperature depending on the
ambient temperature and the set
climate control temperature when
the engine is running. If the air
ventilation seats switch is pushed,
the air ventilation seats will have to
be controlled manually.
To use this function, it must be
activated from the Settings menu in
the AV/AVN system screen.
- The air ven
tilation seats defaults
to the OFF position whenever the
ignition switch is ON. However, if
the Auto Comfort Control function
is ON, the air ventilation seats will
turn on and off depending on the
ambient temperature and the set
climate control temperature.
For more details, refer to the separately
supplied Infotainment manual with
your vehicle.
Rear Occupant Alert (ROA) (if
equipped)
Rear Occupant Alert is provided to help
prevent the driver from leaving the
vehicle with the rear passenger left in the
vehicle.
System setting
To use Rear Occupant Alert, it must be
enabled from the Settings menu in the
infotainment system screen. Select:
- Setup → V
ehicle
Se
ttings
→ Conv
enience
→ R
ear
Occupan
t
Alert
F
or detailed information, scan the QR
code in the separately supplied simple
manual.
System operation
• First alert
When you open the front door after
opening and closing the rear door and
turning off the engine, the ‘Check rear
seats’ warning message appears on
the cluster.
• Second alert
After the first alert, the second alert
operates when any movement is
detected in the vehicle after the
driver’s door is closed and all the
doors are locked. The horn will sound
for approximately 25 seconds. If
the system continues to detect a
movement, the alert operates up to 8
times.
Unlock the doors with the smart key
to stop the alert.
• The system detects movement in the
vehicle for 8 hours after the door is
locked.
• The second alert is activated only after
the prior activation of the first alert.
Page 121 of 636
04
4-23
LCD display messages
Shift to P (for smart key system)
This message is displayed if you try to
turn off the vehicle without the gear in
the P (Park) position.
If this occurs, the Engine Start/Stop
button turns to the ACC position.
Low key battery (for smart key
system)
This message is displayed if the battery
of the smart key is discharged while
changing the Engine Start/Stop button to
the OFF position.
Press START button while turning
wheel (for smart key system)
This message is displayed if the steering
wheel does not unlock normally when
the Engine Start/Stop button is pressed.
You should press the Engine Start/Stop
button while turning the steering wheel
right and left.
Check steering wheel lock system
(for smart key system)
This message is displayed if the steering
wheel does not lock normally while the
Engine Start/Stop button is pressed to
the OFF position.
Press brake pedal to start engine (for
smart key system)
This message is displayed if the Engine
Start/Stop button changes to the ACC
position twice by pressing the button
repeatedly without depressing the brake
pedal.
You can start the vehicle by depressing
the brake pedal and then pressing the
Engine Start/Stop button.
Key not in vehicle (for smart key
system)
This message is displayed if the smart
key is not in the vehicle when you leave
the vehicle with the Engine Start/Stop
button in the ON or Start position.
Always turn off the engine before leaving
your vehicle.
Key not detected (for smart key
system)
This message is displayed if the smart
key is not detected when you press the
Engine Start/Stop button.
Press START button again (for smart
key system)
This message is displayed if you were
unable to start the vehicle when the
Engine Start/Stop button was pressed.
If this occurs, attempt to start the engine
by pressing the Engine Start/ Stop button
again.
If the warning message appears each
time you press the Engine Start/Stop
button, we recommend that you have
the vehicle inspected by an authorized
HYUNDAI dealer.
Page 141 of 636
04
4-43
Trip computer (Type B)
The trip computer is a microcomputer-
controlled driver information system that
displays information related to driving.
Information
Some driving information stored in the
trip computer (for example Average
Vehicle Speed) resets if the battery is
disconnected.
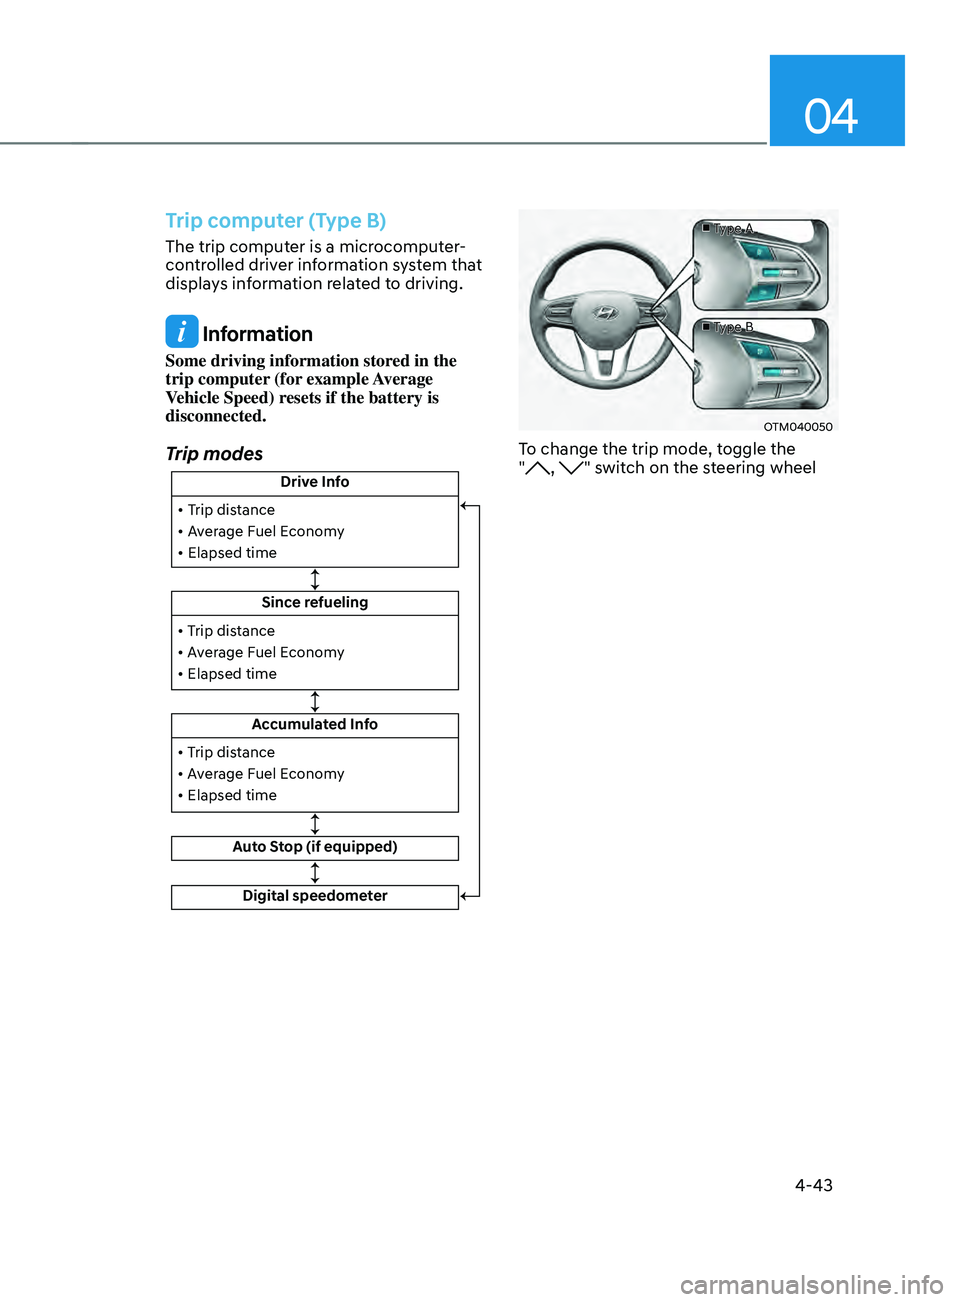
Trip modes
Drive Info
Since refueling
Accumulated Info
Auto Stop (if equipped)
• Trip distance
• Average Fuel Economy
• Elapsed time
• Trip distance
• Average Fuel Economy
• Elapsed time
Digital speedometer
• Trip distance
• Average Fuel Economy
• Elapsed time
■
Type A
■ Type B
OTM040050
To change the trip mode, toggle the
", " switch on the steering wheel
Page 165 of 636
05
5-21
Remote Start with Digital Key
• When the shift button of your vehicle
is in P (Park) and all of the doors
including trunk and hood is locked
and the vehicle is off, press the Door
Lock button in the Hyundai Digital
Key app then press the Remote Start
button within 4 seconds.
You can confirm the engine is on if the
hazard warning lights blinks two times
and the chime sounds.
• If you want to turn off the engine,
press Remote Engine Stop. Air
Conditioner / Heating system
maintains the same status as when
you last used the vehicle.
• Unless you put the registered digital
key(smartphone) on the interior
authentication pad (wireless charger)
when the remote start function is on,
the engine will turn off.
• If you do not get on the vehicle within
10 minutes after the engine turns on,
the vehicle will turn off.
For more information, refer to the Engine
Start/Stop button in chapter 6.
Vehicle information Display
The digital key application displays
the vehicle information such as
driving or door conditions through the
communication with the vehicle.
• How to check : Select the vehicle
what you want to check and touch
the vehicle image, then vehicle
information display page will be
shown.
• Contents : accumulated odometer,
latest fuel economy, driving range,
fuel remaining, tire pressure, doors
lock/unlock status and last data
updated time.
ÃDisplay
ed vehicle date could be
differed from the current vehicle
condition.
à For mor
e information, please refer to
the ‘Tutorial’ on your Digital key app. Smartphone change/App deletion
If you change your smartphone or delete
the Hyundai Digital Key App, please refer
to the following to set up your Digital
Key:
Smartphone Change/ Reset
If you change or reset the smartphone,
the registered digital key in your previous
smartphone may not be used. Please
refer to following procedure to use the
digital key.
1.
Install the digital k
ey application and
log in.
2.
If you ar
e the owner, retry the Digital
key save process.
3.
If you ar
e the sharer, need to re-share
the key from owner.
App delete & reinstall/ Delete App data
You can re-download the digital key
from server in these cases as follow
procedure.
1.
Reins
tall the application and log in.
2.
Input the PIN number for user
v
erification.
3.
If PIN is correct, digital k
ey data
will be re-downloaded to your
smartphone and you can use it
without any further registration or
sharing.
Smartphone operability with Digital Key
The digital key application may not
be available to old type smartphones.
Please check the available smartphone
models with your dealer. NFC antenna
position on the smartphone can be
confirmed on each smartphone’s manual
or contact to customer service center of
the smartphone manufacture.
Page 192 of 636
Convenient features
5-48
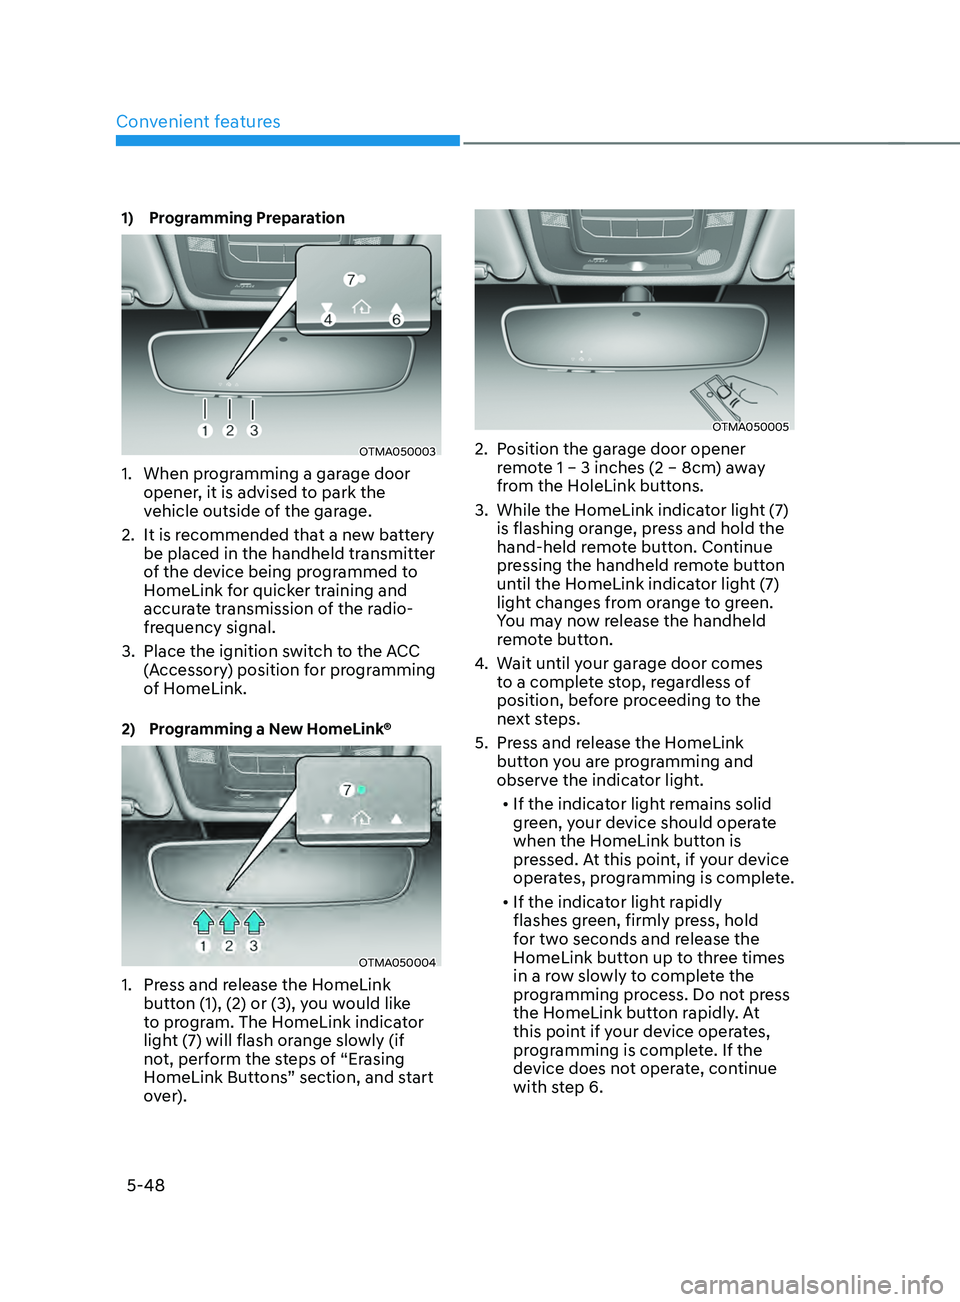
1) Programming Preparation
OTMA050003
1. When programming a garage door
opener, it is advised to park the
vehicle outside of the garage.
2.
It is recommended tha
t a new battery
be placed in the handheld transmitter
of the device being programmed to
HomeLink for quicker training and
accurate transmission of the radio-
frequency signal.
3.
Place the ignition swit
ch to the ACC
(Accessory) position for programming
of HomeLink.
2) Programming a New HomeLink®
OTMA050004
1. Press and release the HomeLink
butt on (1), (2) or (3), you would like
to program. The HomeLink indicator
light (7) will flash orange slowly (if
not, perform the steps of “Erasing
HomeLink Buttons” section, and start
over).
OTMA050005
2. Position the garage door opener
r emote 1 – 3 inches (2 – 8cm) away
from the HoleLink buttons.
3.
While the HomeLink indica
tor light (7)
is flashing orange, press and hold the
hand-held remote button. Continue
pressing the handheld remote button
until the HomeLink indicator light (7)
light changes from orange to green.
You may now release the handheld
remote button.
4.
Wait un
til your garage door comes
to a complete stop, regardless of
position, before proceeding to the
next steps.
5.
Press and r
elease the HomeLink
button you are programming and
observe the indicator light.
• If the indicator light remains solid
green, your device should operate
when the HomeLink button is
pressed. At this point, if your device
operates, programming is complete.
• If the indicator light rapidly
flashes green, firmly press, hold
for two seconds and release the
HomeLink button up to three times
in a row slowly to complete the
programming process. Do not press
the HomeLink button rapidly. At
this point if your device operates,
programming is complete. If the
device does not operate, continue
with step 6.
Page 194 of 636
Convenient features
5-50
2. On your garage door opener in your
garage, locate the “Learn” button
(usually near where the hanging
antenna wire is attached to the garage
door opener). If there is difficulty
locating this button, reference the
device’s owner’s manual.
3.
Press and r
elease the “Learn” button.
4.
A light on y
our garage door opener
may flash, and your Two-Way
Communication indicators (4), (6) in
your vehicle may flash, confirming
completion of the process.
5.
Re
turn to the vehicle and firmly
press and release the programmed
HomeLink button to activate
your garage door. The Two-Way
Communication indicators (4), (6)
flash in orange when the door is
moving. Do not make any additional
button presses until AFTER the garage
door has come to a complete stop.
6.
Your T
wo-Way Communication
programming is now complete.
Information
If your garage door opener has Two-
Way Communication functionality,
it is possible for HomeLink to stop
functioning the garage door shortly
after initial programming, IF the Two-
Way Communication Programming
wasn’t properly completed. This
usually happens after the first 10 times
a programmed HomeLink button is
pressed. If you experience this, completing
the “Programming a New HomeLink
Button” and “Two-Way Communication
Programming” will restore door
operation.
4) Canadian Pr ogramming
Canadian radio-frequency laws require
transmitter remote signals to “time-
out” (or quit) after a couple seconds of
transmission, which may not be long
enough for HomeLink to pick up the signal
during programming.
If you live in Canada or you are having
difficulties programming a gate operator
or garage door opener by using the
programming procedures, replace
“Programming a New HomeLink Button”
step 3 with the following:
While the HomeLink indicator light (7) is
flashing orange, press and release (“cycle”)
your device’s handheld remote every two
seconds until the HomeLink indicator light
(7) changes from orange to green. You may
now release the hand-held remote button.
Then proceed with “Programming a New
HomeLink Button” step 4.