clock Hyundai Santa Fe Sport 2015 Owner's Guide
[x] Cancel search | Manufacturer: HYUNDAI, Model Year: 2015, Model line: Santa Fe Sport, Model: Hyundai Santa Fe Sport 2015Pages: 785, PDF Size: 13.38 MB
Page 671 of 785

What to do in an emergency
20 6
When towing your vehicle in an
emergency without wheel dollies :
1. Set the ignition switch in the ACC
position.
2. Place the shift lever in N (Neutral).
3. Release the parking brake.Removable towing hook
(if equipped)
1. Open the talegate, and remove the
towing hook from the tool case.
2. Remove the hole cover pressing
the lower part of the cover on the
bumper.
3. Install the towing hook by turning it
clockwise into the hole until it is
fully secured.
4. Remove the towing hook and
install the cover after use.
Emergency towing (if equipped)
If towing is necessary, we recom-
mend you to have it done by an
authorized HYUNDAI dealer or a
commercial tow truck service.
CAUTION
Failure to place the transaxle
shift lever in N (Neutral) may
cause internal damage to the
transaxle.
ODM062013
■Rear
ODM062015
■Rear
Page 712 of 785

737
Maintenance
ENGINE COOLANT
The high-pressure cooling system
has a reservoir filled with year-round
antifreeze coolant. The reservoir is
filled at the factory.
Check the antifreeze protection and
coolant concentration level at least
once a year, at the beginning of the
winter season, and before traveling
to a colder climate.
Checking the coolant level
(Continued)
• Turn the engine off and wait
until it cools down. Use
extreme care when removing
the radiator cap. Wrap a thick
towel around it, and turn it
counterclockwise slowly to
the first stop. Step back while
the pressure is released from
the cooling system.
When you are sure all the
pressure has been released,
press down on the cap, using
a thick towel, and continue
turning counterclockwise to
remove it.
• Even if the engine is not oper-
ating, do not remove the radi-
ator cap or the drain plug
while the engine and radiator
are hot. Hot coolant and
steam may still blow out
under pressure, causing seri-
ous injury.WARNING
The electric motor
(cooling fan) is con-
trolled by engine
coolant temperature,
refrigerant pressure
and vehicle speed. It may some-
times operate even when the
engine is not running. Use
extreme caution when working
near the blades of the cooling
fan so that you are not injured
by a rotating fan blades. As the
engine coolant temperature
decreases, the electric motor
will automatically shut off. This
is a normal condition.
If your vehicle is if equipped
with GDI, the electric motor
(cooling fan) may operate until
you disconnect the negative
battery cable.
WARNING
Removing radiator
cap
• Never attempt to remove the
radiator cap while the engine
is operating or hot. Doing so
might lead to cooling system
and engine damage and could
result in serious personal
injury from escaping hot
coolant or steam.
(Continued)
Page 727 of 785
Maintenance
52 7
Reset items
Items should be reset after the bat-
tery has been discharged or the bat-
tery has been disconnected.
• Auto up/down window
(See section 4)
• Sunroof (See section 4)
• Trip computer (See section 4)
• Climate control system
(See section 4)
• Clock (See section 4)
• Audio (See section 4)(Continued)
1. Turn off the battery charger
main switch.
2. Unhook the negative clamp
from the negative battery
terminal.
3. Unhook the positive clamp
from the positive battery
terminal.
• Before performing mainte-
nance or recharging the bat-
tery, turn off all accessories
and stop the engine.
• The negative battery cable
must be removed first and
installed last when the battery
is disconnected.WARNING- Recharging
battery
When recharging the battery,
observe the following precau-
tions:
• The battery must be removed
from the vehicle and placed in
an area with good ventilation.
• Do not allow cigarettes, sparks,
or flame near the battery.
• Watch the battery during
charging, and stop or reduce
the charging rate if the battery
cells begin gassing (boiling)
violently or if the temperature
of the electrolyte of any cell
exceeds 49°C (120°F).
• Wear eye protection when
checking the battery during
charging.
• Disconnect the battery charg-
er in the following order.
(Continued)
Page 745 of 785

Maintenance
70 7
If the headlights or other electrical
components do not work and the
fuses are OK, check the fuse block in
the engine compartment. If a fuse is
blown, it must be replaced.Fuse switch
Always, put the mode switch at the
ON position.
If you move the switch to the OFF
position, some items such as audio
and digital clock must be reset and
transmitter (or smart key) may not
work properly.
Engine compartment panel fuse
replacement
1. Turn the ignition switch and all
other switches off.
2. Remove the fuse box cover by
pressing the tab and pulling up.
ODM072019
CAUTION
Always place the fuse switch in
the ON position while driving
the vehicle.
OANNMC2032
Page 757 of 785
Maintenance
82 7
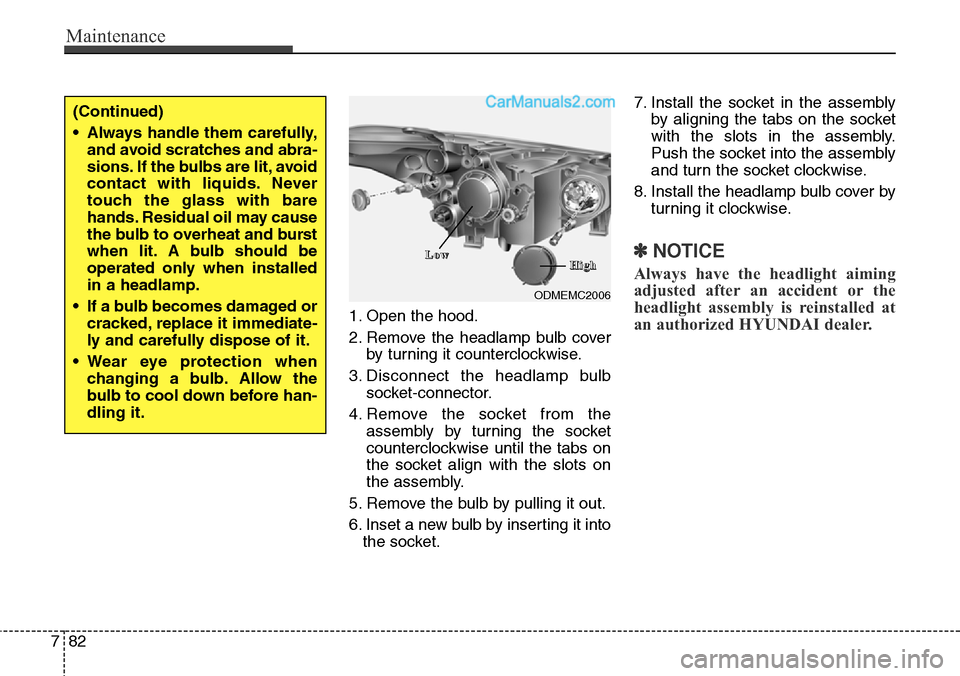
1. Open the hood.
2. Remove the headlamp bulb cover
by turning it counterclockwise.
3. Disconnect the headlamp bulb
socket-connector.
4. Remove the socket from the
assembly by turning the socket
counterclockwise until the tabs on
the socket align with the slots on
the assembly.
5. Remove the bulb by pulling it out.
6. Inset a new bulb by inserting it into
the socket.7. Install the socket in the assembly
by aligning the tabs on the socket
with the slots in the assembly.
Push the socket into the assembly
and turn the socket clockwise.
8. Install the headlamp bulb cover by
turning it clockwise.
✽NOTICE
Always have the headlight aiming
adjusted after an accident or the
headlight assembly is reinstalled at
an authorized HYUNDAI dealer.
(Continued)
• Always handle them carefully,
and avoid scratches and abra-
sions. If the bulbs are lit, avoid
contact with liquids. Never
touch the glass with bare
hands. Residual oil may cause
the bulb to overheat and burst
when lit. A bulb should be
operated only when installed
in a headlamp.
• If a bulb becomes damaged or
cracked, replace it immediate-
ly and carefully dispose of it.
• Wear eye protection when
changing a bulb. Allow the
bulb to cool down before han-
dling it.
ODMEMC2006
L L
o o
w wH H
i i
g g
h h
Page 758 of 785
783
Maintenance
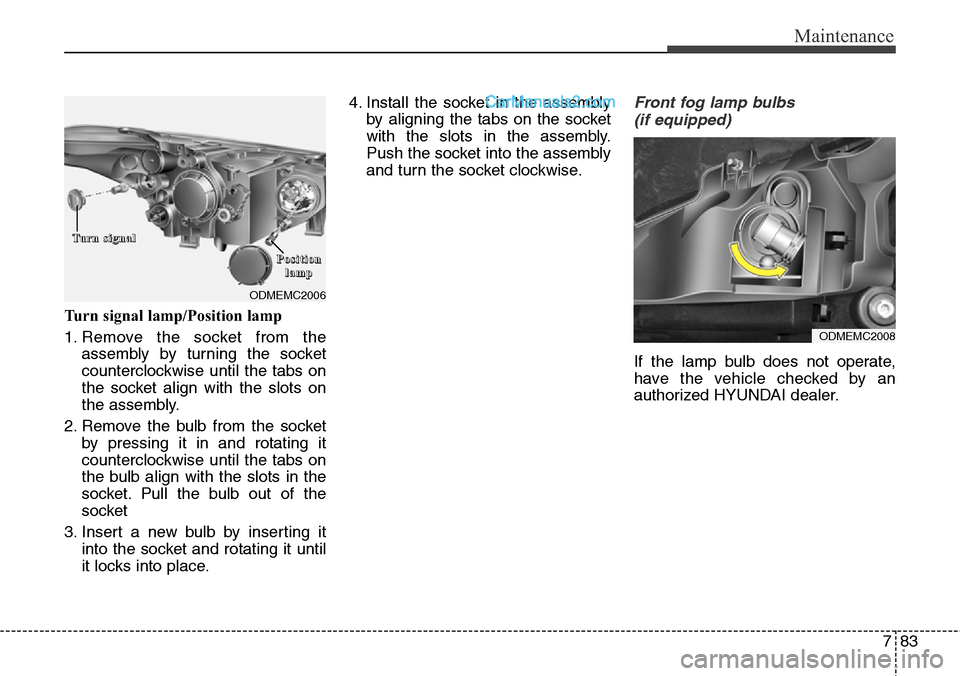
Turn signal lamp/Position lamp
1. Remove the socket from the
assembly by turning the socket
counterclockwise until the tabs on
the socket align with the slots on
the assembly.
2. Remove the bulb from the socket
by pressing it in and rotating it
counterclockwise until the tabs on
the bulb align with the slots in the
socket. Pull the bulb out of the
socket
3. Insert a new bulb by inserting it
into the socket and rotating it until
it locks into place.4. Install the socket in the assembly
by aligning the tabs on the socket
with the slots in the assembly.
Push the socket into the assembly
and turn the socket clockwise.
Front fog lamp bulbs
(if equipped)
If the lamp bulb does not operate,
have the vehicle checked by an
authorized HYUNDAI dealer.
ODMEMC2006
T T
u u
r r
n n
s s
i i
g g
n n
a a
l l
P P
o o
s s
i i
t t
i i
o o
n n
l l
a a
m m
p p
ODMEMC2008
Page 760 of 785

785
Maintenance
Rear combination lamp bulb
replacement
(1) Rear stop and tail lamp
(2) Rear tail lamp
(3) Rear turn signal lamp
(4) Back-up lamp
(5) Rear side marker
Outside lamp
1. Open the tailgate.
2. Remove the service cover using a
flat-blade screwdriver.
3. Loosen the lamp assembly retain-
ing please verify.
4. Remove the rear combination
lamp assembly from the body of
the vehicle.
5. Remove the socket from the
assembly by turning the socket
counterclockwise until the tabs on
the socket align with the slots on
the assembly.
ODM072033
ODMEMC2007
■Type A
■Type BODM072034
ODM072035
ODMEMC2010 ■Type A
■Type B
Page 761 of 785

Maintenance
86 7
6. Remove the bulb from the socket by
pressing it in and rotating it counter-
clockwise until the tabs on the bulb
align with the slots in the socket.
Pull the bulb out of the socket. (Side
marker : Remove the bulb from the
socket by pulling it out)
7. Insert a new bulb by inserting it
into the socket and rotating it until
it locks into place.
8. Install the socket in the assembly
by aligning the tabs on the socket
with the slots in the assembly.
Push the socket into the assembly
and turn the socket clockwise.
9. Reinstall the lamp assembly to the
body of the vehicle.Inside lamp
1. Open the tailgate.
2. Remove the service cover using a
flat-blade screwdriver.
3. Remove the socket from the
assembly by turning the socket
counterclockwise until the tabs on
the socket align with the slots on
the assembly.
OANNMC2036
ODM072037
ODMEMC2011
■Type A
■Type B
B B
a a
c c
k k
- -
u u
p p
l l
a a
m m
p p
S S
t t
o o
p p
/ /
t t
a a
i i
l l
l l
a a
m m
p p
Page 762 of 785

787
Maintenance
4. Remove the bulb from the socket
by pressing it in and rotating it
counterclockwise until the tabs on
the bulb align with the slots in the
socket. Pull the bulb out of the
socket. (Back-up lamp : Remove
the bulb from the socket by pulling
it out)
5. Insert a new bulb by inserting it
into the socket and rotating it until
it locks into place.
6. Install the socket in the assembly
by aligning the tabs on the socket
with the slots in the assembly.
Push the socket into the assembly
and turn the socket clockwise.
7. Install the service cover by putting
it into the service hole.High mounted stop lamp
replacement (if equipped)
1.Open the tailgate.
2.Gently remove the center cover of
the rear tailgate trim.
3.Disconnect the electrical connector.4.Loosen the retaining nuts and
remove the spoiler.
ODMEMC2018
ODMEMC2019
ODMEMC2022