bulbs Hyundai Santa Fe Sport 2015 Owner's Manual
[x] Cancel search | Manufacturer: HYUNDAI, Model Year: 2015, Model line: Santa Fe Sport, Model: Hyundai Santa Fe Sport 2015Pages: 785, PDF Size: 13.38 MB
Page 221 of 785
Features of your vehicle
128 4
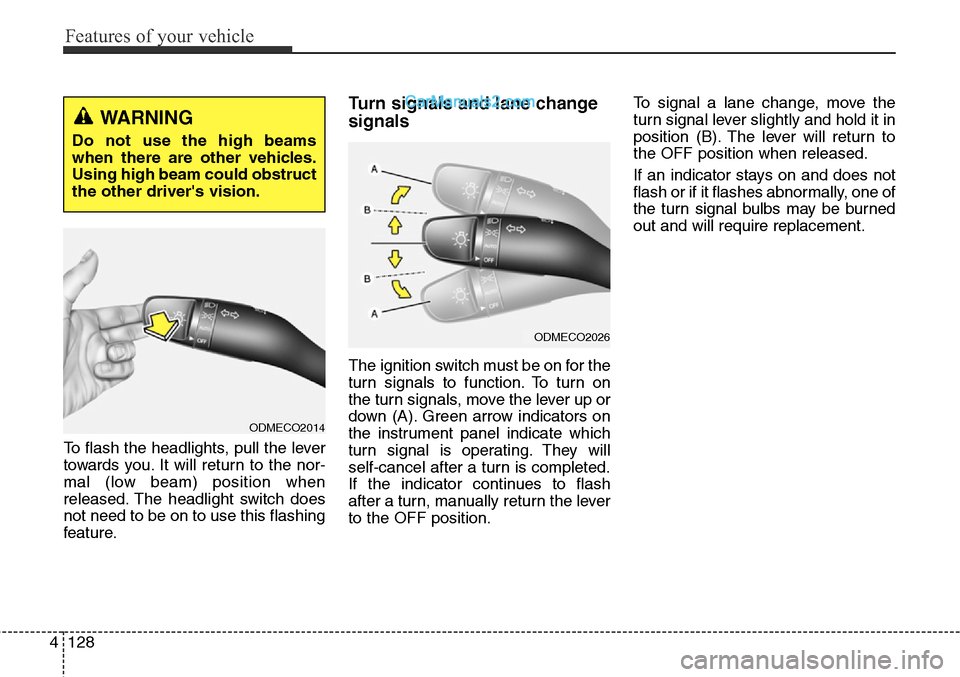
To flash the headlights, pull the lever
towards you. It will return to the nor-
mal (low beam) position when
released. The headlight switch does
not need to be on to use this flashing
feature.
Turn signals and lane change
signals
The ignition switch must be on for the
turn signals to function. To turn on
the turn signals, move the lever up or
down (A). Green arrow indicators on
the instrument panel indicate which
turn signal is operating. They will
self-cancel after a turn is completed.
If the indicator continues to flash
after a turn, manually return the lever
to the OFF position.To signal a lane change, move the
turn signal lever slightly and hold it in
position (B). The lever will return to
the OFF position when released.
If an indicator stays on and does not
flash or if it flashes abnormally, one of
the turn signal bulbs may be burned
out and will require replacement.
WARNING
Do not use the high beams
when there are other vehicles.
Using high beam could obstruct
the other driver's vision.
ODMECO2014
ODMECO2026
Page 640 of 785
571
Driving your vehicle
Turn signals when towing a trailer
When you tow a trailer, your vehicle
has to have a different turn signal
flasher and extra wiring. The green
arrows on your instrument panel will
flash whenever you signal a turn or
lane change. Properly connected,
the trailer lights will also flash to alert
other drivers you’re about to turn,
change lanes, or stop.
When towing a trailer, the green
arrows on your instrument panel will
flash for turns even if the bulbs on the
trailer are burned out. Thus, you may
think drivers behind you are seeing
your signals when, in fact, they are
not. It’s important to check occasion-
ally to be sure the trailer bulbs are still
working. You must also check the
lights every time you disconnect and
then reconnect the wires.
Do not connect a trailer lighting sys-
tem directly to your vehicle’s lighting
system. Use only an approved trailer
wiring harness.
An authorized HYUNDAI dealer can
assist you in installing the wiring har-
ness.
Driving on grades
Reduce speed and shift to a lower
gear before you start down a long or
steep downgrade. If you don’t shift
down, you might have to use your
brakes so much that they would get
hot and no longer operate efficiently.
On a long uphill grade, shift down
and reduce your speed to around 70
km/h (45 mph) to reduce the possi-
bility of engine and transaxle over-
heating.
If your trailer weighs more than the
maximum trailer weight without trail-
er brakes and you have an automat-
ic transaxle, you should drive in D
(Drive) when towing a trailer.
Operating your vehicle in D (Drive)
when towing a trailer will minimize
heat build up and extend the life of
your transaxle.WARNING
Failure to use an approved trail-
er wiring harness could result
in damage to the vehicle electri-
cal system and/or personal
injury.
Page 675 of 785
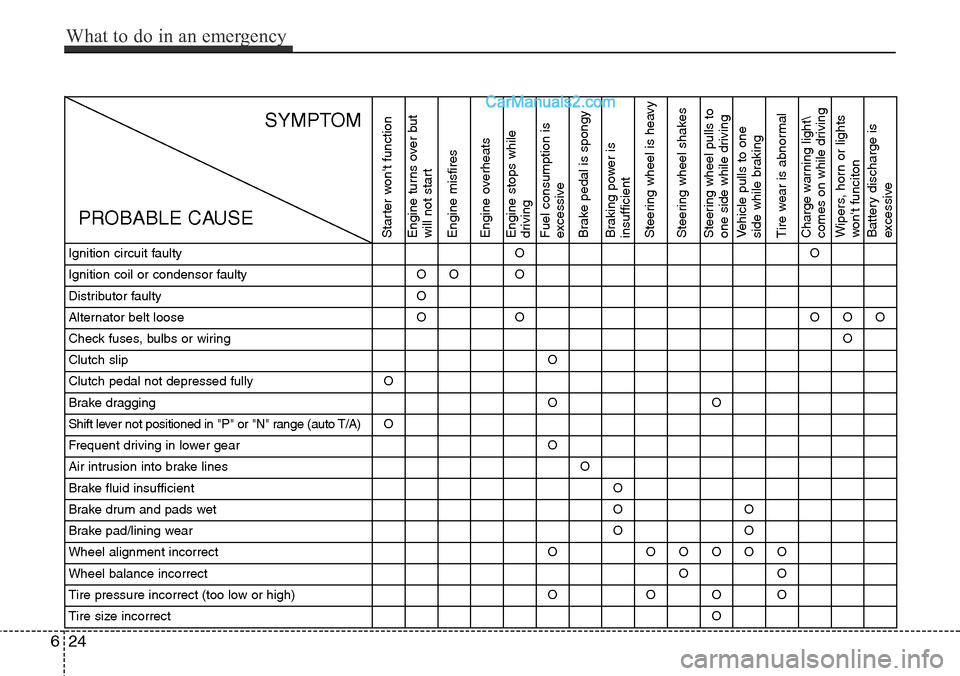
Ignition circuit faultyOO
Ignition coil or condensor faultyOOO
Distributor faultyO
Alternator belt looseOOOOO
Check fuses, bulbs or wiringO
Clutch slipO
Clutch pedal not depressed fullyO
Brake draggingOO
Shift lever not positioned in "P" or "N" range (auto T/A)O
Frequent driving in lower gearO
Air intrusion into brake linesO
Brake fluid insufficientO
Brake drum and pads wetOO
Brake pad/lining wearOO
Wheel alignment incorrectOOOOOO
Wheel balance incorrectOO
Tire pressure incorrect (too low or high)OOOO
Tire size incorrectO
Starter won't function
Engine turns over but
will not start
Engine misfires
Engine overheats
Engine stops while
driving
Fuel consumption is
excessive
Brake pedal is spongy
Braking power is
insufficient
Steering wheel is heavy
Steering wheel shakesSteering wheel pulls to
one side while drivingVehicle pulls to one
side while braking
Tire wear is abnormalCharge warning light\
comes on while drivingWipers, horn or lights
won't funciton
Battery discharge is
excessive
SYMPTOM
PROBABLE CAUSE
624
What to do in an emergency
Page 676 of 785
Maintenance
Engine compartment . . . . . . . . . . . . . . . . . . . . . . . . 7-3
Maintenance services . . . . . . . . . . . . . . . . . . . . . . . . 7-4
• Owner’s responsibility . . . . . . . . . . . . . . . . . . . . . . . . . 7-4
• Owner maintenance precautions . . . . . . . . . . . . . . . . . 7-5
Owner maintenance . . . . . . . . . . . . . . . . . . . . . . . . . 7-6
• Owner maintenance schedule. . . . . . . . . . . . . . . . . . . . 7-6
Scheduled maintenance service. . . . . . . . . . . . . . . . 7-8
Explanation of scheduled maintenance items . . . 7-32
Engine oil. . . . . . . . . . . . . . . . . . . . . . . . . . . . . . . . . 7-35
• Checking the engine oil level . . . . . . . . . . . . . . . . . . . 7-35
• Changing the engine oil and filter . . . . . . . . . . . . . . . 7-36
Engine coolant . . . . . . . . . . . . . . . . . . . . . . . . . . . . 7-37
• Checking the coolant level . . . . . . . . . . . . . . . . . . . . . 7-37
• Changing the coolant . . . . . . . . . . . . . . . . . . . . . . . . . 7-39
Brake fluid . . . . . . . . . . . . . . . . . . . . . . . . . . . . . . . 7-40
• Checking the brake fluid level . . . . . . . . . . . . . . . . . . 7-40
Washer fluid . . . . . . . . . . . . . . . . . . . . . . . . . . . . . . 7-42
• Checking the washer fluid level . . . . . . . . . . . . . . . . . 7-42
Parking brake . . . . . . . . . . . . . . . . . . . . . . . . . . . . . 7-42
• Checking the parking brake. . . . . . . . . . . . . . . . . . . . 7-42
Air cleaner. . . . . . . . . . . . . . . . . . . . . . . . . . . . . . . . 7-43
• Filter replacement . . . . . . . . . . . . . . . . . . . . . . . . . . . . 7-43
Climate control air filter . . . . . . . . . . . . . . . . . . . . 7-45
• Filter inspection . . . . . . . . . . . . . . . . . . . . . . . . . . . . . . 7-45
• Filter replacement . . . . . . . . . . . . . . . . . . . . . . . . . . . . 7-45
Wiper blades . . . . . . . . . . . . . . . . . . . . . . . . . . . . . . 7-47
• Blade inspection . . . . . . . . . . . . . . . . . . . . . . . . . . . . . . 7-47
• Blade replacement . . . . . . . . . . . . . . . . . . . . . . . . . . . . 7-47
Battery . . . . . . . . . . . . . . . . . . . . . . . . . . . . . . . . . . . 7-50
• For best battery service . . . . . . . . . . . . . . . . . . . . . . . 7-50
• Battery recharging . . . . . . . . . . . . . . . . . . . . . . . . . . . 7-51
• Reset items . . . . . . . . . . . . . . . . . . . . . . . . . . . . . . . . . . 7-52
Tires and wheels . . . . . . . . . . . . . . . . . . . . . . . . . . . 7-53
• Tire care . . . . . . . . . . . . . . . . . . . . . . . . . . . . . . . . . . . . 7-53
• Recommended cold tire inflation pressures . . . . . . . 7-53
• Checking tire inflation pressure. . . . . . . . . . . . . . . . . 7-54
• Tire rotation . . . . . . . . . . . . . . . . . . . . . . . . . . . . . . . . . 7-55
• Wheel alignment and tire balance . . . . . . . . . . . . . . . 7-56
• Tire replacement . . . . . . . . . . . . . . . . . . . . . . . . . . . . . 7-57
• Wheel replacement . . . . . . . . . . . . . . . . . . . . . . . . . . . 7-58
• Tire traction . . . . . . . . . . . . . . . . . . . . . . . . . . . . . . . . . 7-58
• Tire maintenance . . . . . . . . . . . . . . . . . . . . . . . . . . . . . 7-59
• Tire sidewall labeling . . . . . . . . . . . . . . . . . . . . . . . . . 7-59
• Low aspect ratio tire . . . . . . . . . . . . . . . . . . . . . . . . . . 7-63
Fuses . . . . . . . . . . . . . . . . . . . . . . . . . . . . . . . . . . . . 7-68
• Fuse/relay panel description. . . . . . . . . . . . . . . . . . . . 7-72
Light bulbs . . . . . . . . . . . . . . . . . . . . . . . . . . . . . . . 7-80
• Front light replacement . . . . . . . . . . . . . . . . . . . . . . . 7-81
• Side repeater light bulb replacement . . . . . . . . . . . . 7-84
• Rear combination light bulb replacement . . . . . . . . 7-85
7
Page 755 of 785
Maintenance
80 7
LIGHT BULBS
Use only the bulbs of the specified
wattage.
✽NOTICE
After heavy, driving rain or wash-
ing, headlamp and taillamp lenses
could appear frosty. This condition
is caused by the temperature differ-
ence between the lamp inside and
outside. This is similar to the con-
densation on your windows inside
your vehicle during the rain and
doesn’t indicate a problem with
your vehicle. If the water leaks into
the lamp bulb circuitry, have the
vehicle checked by an authorized
HYUNDAI dealer.WARNING - Working on
the lights
Prior to working on the light,
firmly apply the parking brake,
ensure that the ignition switch
is turned to the “LOCK” position
and turn off the lights to avoid
sudden movement of the vehi-
cle and burning your fingers or
receiving an electric shock.
CAUTION
Be sure to replace the burned-
out bulb with one of the same
wattage rating. Otherwise, it
may cause damage to the fuse
or electric wiring system.
CAUTION
If you don’t have necessary
tools, the correct bulbs and the
expertise, consult an authorized
HYUNDAI dealer. In many cases,
it is difficult to replace vehicle
light bulbs because other parts
of the vehicle must be removed
before you can get to the bulb.
This is especially true if you
have to remove the headlight
assembly to get to the bulb(s).
Removing/installing the head-
light assembly can result in
damage to the vehicle.
Page 756 of 785
781
Maintenance
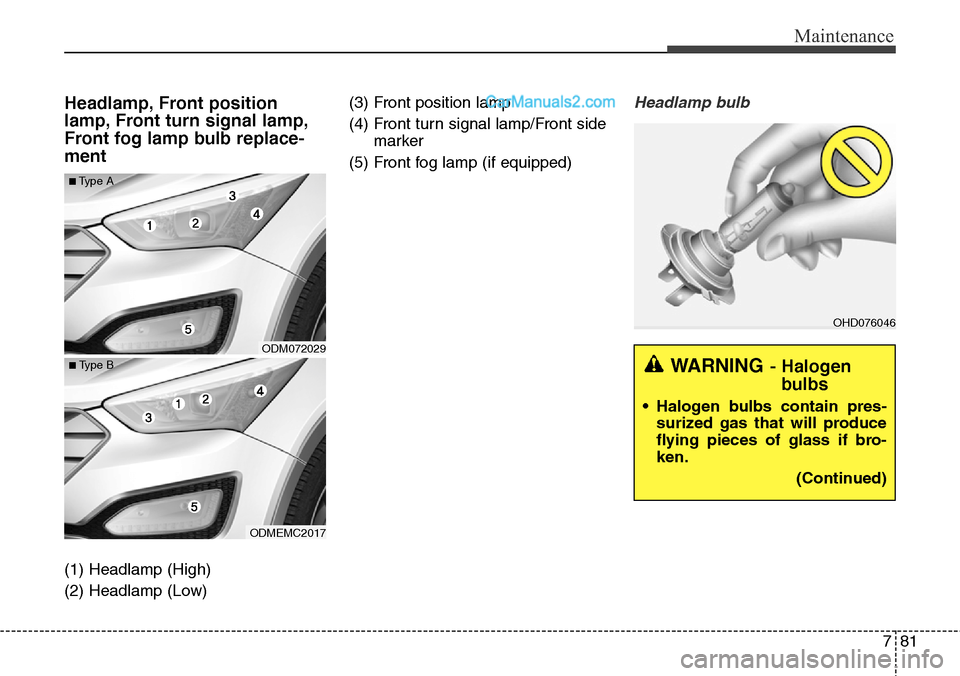
Headlamp, Front position
lamp, Front turn signal lamp,
Front fog lamp bulb replace-
ment
(1) Headlamp (High)
(2) Headlamp (Low)(3) Front position lamp
(4) Front turn signal lamp/Front side
marker
(5) Front fog lamp (if equipped)
Headlamp bulb
ODM072029
ODMEMC2017
■Type A
■ Type B
OHD076046
WARNING- Halogen
bulbs
• Halogen bulbs contain pres-
surized gas that will produce
flying pieces of glass if bro-
ken.
(Continued)
Page 757 of 785
Maintenance
82 7
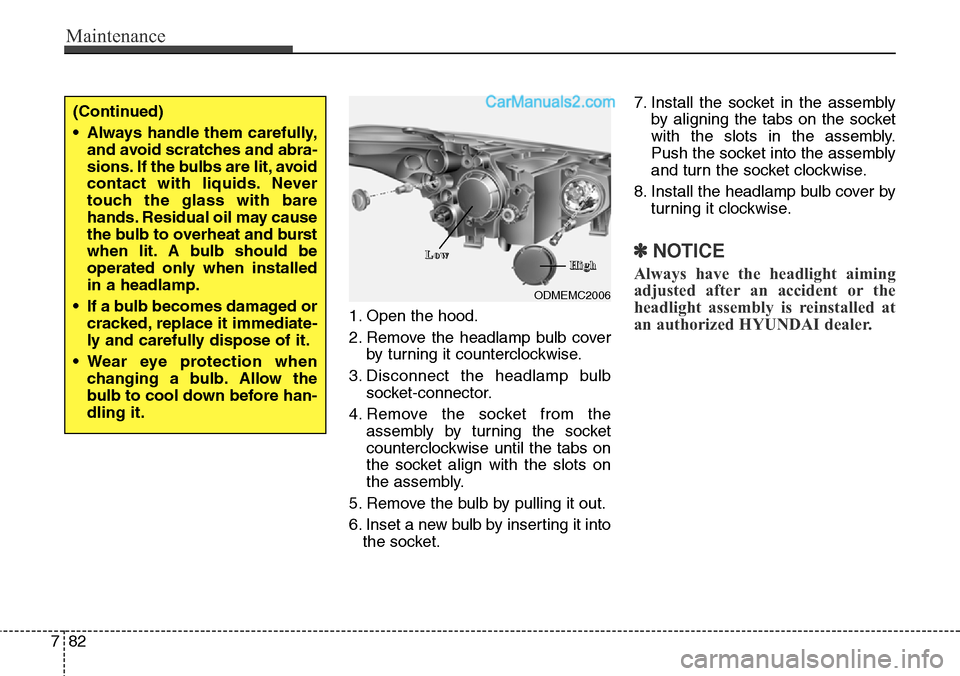
1. Open the hood.
2. Remove the headlamp bulb cover
by turning it counterclockwise.
3. Disconnect the headlamp bulb
socket-connector.
4. Remove the socket from the
assembly by turning the socket
counterclockwise until the tabs on
the socket align with the slots on
the assembly.
5. Remove the bulb by pulling it out.
6. Inset a new bulb by inserting it into
the socket.7. Install the socket in the assembly
by aligning the tabs on the socket
with the slots in the assembly.
Push the socket into the assembly
and turn the socket clockwise.
8. Install the headlamp bulb cover by
turning it clockwise.
✽NOTICE
Always have the headlight aiming
adjusted after an accident or the
headlight assembly is reinstalled at
an authorized HYUNDAI dealer.
(Continued)
• Always handle them carefully,
and avoid scratches and abra-
sions. If the bulbs are lit, avoid
contact with liquids. Never
touch the glass with bare
hands. Residual oil may cause
the bulb to overheat and burst
when lit. A bulb should be
operated only when installed
in a headlamp.
• If a bulb becomes damaged or
cracked, replace it immediate-
ly and carefully dispose of it.
• Wear eye protection when
changing a bulb. Allow the
bulb to cool down before han-
dling it.
ODMEMC2006
L L
o o
w wH H
i i
g g
h h
Page 758 of 785
783
Maintenance
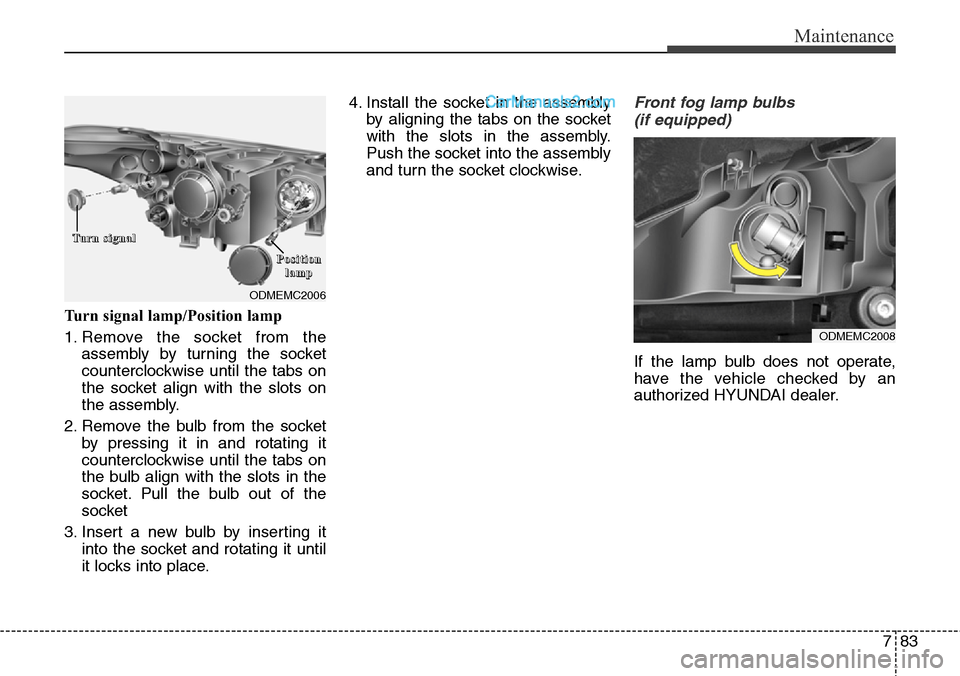
Turn signal lamp/Position lamp
1. Remove the socket from the
assembly by turning the socket
counterclockwise until the tabs on
the socket align with the slots on
the assembly.
2. Remove the bulb from the socket
by pressing it in and rotating it
counterclockwise until the tabs on
the bulb align with the slots in the
socket. Pull the bulb out of the
socket
3. Insert a new bulb by inserting it
into the socket and rotating it until
it locks into place.4. Install the socket in the assembly
by aligning the tabs on the socket
with the slots in the assembly.
Push the socket into the assembly
and turn the socket clockwise.
Front fog lamp bulbs
(if equipped)
If the lamp bulb does not operate,
have the vehicle checked by an
authorized HYUNDAI dealer.
ODMEMC2006
T T
u u
r r
n n
s s
i i
g g
n n
a a
l l
P P
o o
s s
i i
t t
i i
o o
n n
l l
a a
m m
p p
ODMEMC2008
Page 759 of 785
Maintenance
84 7
Headlamp (HID type), position
(LED), turn signal, and front fog
lamp bulb replacement
If the lamp bulb does not operate,
have the vehicle checked by an
authorized HYUNDAI dealer.
✽NOTICE
A skilled technician should check or
repair the LED light. Otherwise, it
may damage related parts.
✽NOTICE
HID lamps have superior perform-
ance vs. halogen bulbs. HID lamps
are estimated by the manufacturer to
last twice as long or longer than halo-
gen bulbs depending on their fre-
quency of use. They will probably
require replacement at some point in
the life of the vehicle. Cycling the
headlamps on and off more than typ-
ical use will shorten HID lamps life.
HID lamps do not fail in the same
manner as halogen incandescent
lamps. If a headlamp goes out after a
period of operation but will immedi-
ately relight when the headlamp
switch is cycled it is likely the HID
lamp needs to be replaced. HID light-
ing components are more complex
than conventional halogen bulbs thus
have higher replacement cost.
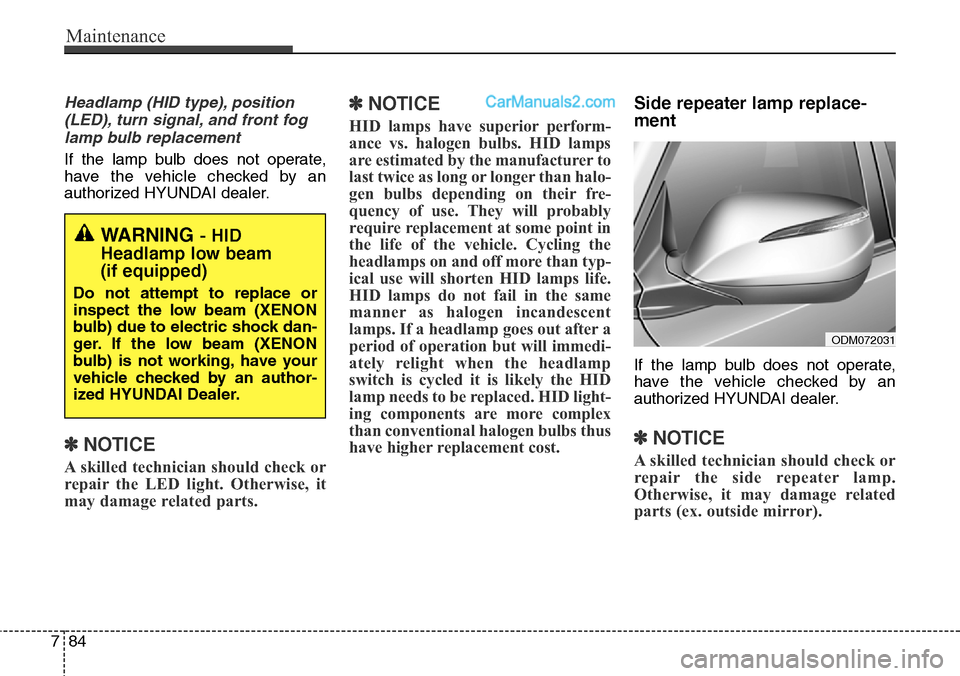
Side repeater lamp replace-
ment
If the lamp bulb does not operate,
have the vehicle checked by an
authorized HYUNDAI dealer.
✽NOTICE
A skilled technician should check or
repair the side repeater lamp.
Otherwise, it may damage related
parts (ex. outside mirror).
WARNING - HID
Headlamp low beam
(if equipped)
Do not attempt to replace or
inspect the low beam (XENON
bulb) due to electric shock dan-
ger. If the low beam (XENON
bulb) is not working, have your
vehicle checked by an author-
ized HYUNDAI Dealer.
ODM072031