child lock Hyundai Santa Fe Sport 2015 Owner's Manual
[x] Cancel search | Manufacturer: HYUNDAI, Model Year: 2015, Model line: Santa Fe Sport, Model: Hyundai Santa Fe Sport 2015Pages: 785, PDF Size: 13.38 MB
Page 48 of 785
327
Safety features of your vehicle
Seat belts - Front passenger and
rear seat 3-point system with
combination locking retractor
To fasten your seat belt:
Combination retractor type seat belts
are installed in the rear seat positions
to help accommodate the installation
of child restraint systems. Although a
combination retractor is also installed
in the front passenger seat position, it
is strongly recommended that children
always be seated in the rear seat.
NEVER place any infant restraint sys-
tem in the front seat of the vehicle.
This type of seat belt combines the
features of both an emergency lock-
ing retractor seat belt and an auto-
matic locking retractor seat belt. To
fasten your seat belt, pull it out of the
retractor and insert the metal tab into
the buckle. There will be an audible
"click" when the tab locks into the
buckle. When not securing a child
restraint, the seat belt operates in the
same way as the driver's seat belt
(Emergency Locking Retractor Type).
It automatically adjusts to the proper
length only after the lap belt portion of
the seat belt is adjusted manually so
that it fits snugly around your hips.When the seat belt is fully extended
from the retractor to allow the instal-
lation of a child restraint system, the
seat belt operation changes to allow
the belt to retract, but not to extend
(Automatic Locking Retractor Type).
Refer to “Using a child restraint sys-
tem” in this section.
To convert from the automatic lock-
ing feature to the emergency locking
operation mode, allow the unbuckled
seat belt to fully retract.
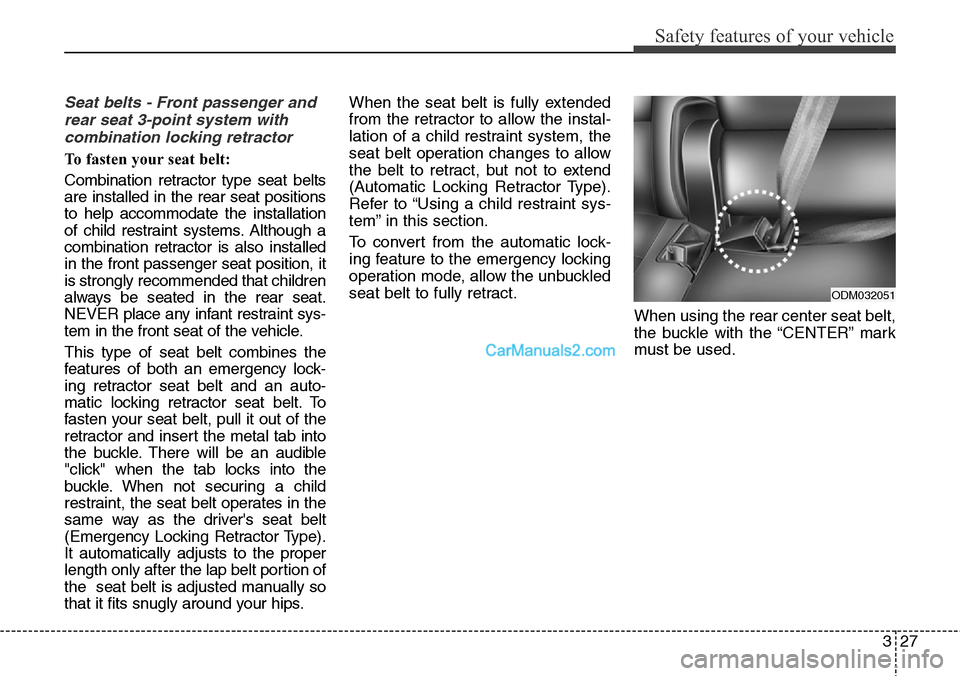
When using the rear center seat belt,
the buckle with the “CENTER” mark
must be used.
ODM032051
Page 57 of 785
Safety features of your vehicle
36 3
WARNING
To reduce the chance of serious
or fatal injuries:
• Children of all ages are safer
when restrained in the rear
seat. A child riding in the front
passenger seat can be force-
fully struck by an inflating air
bag resulting in serious or
fatal injuries.
• Always follow the child
restraint system manufactur-
er’s instructions for installation
and use of the child restraint.
• Always make sure the child
seat is secured properly in the
car and your child is securely
restrained in the child seat.
• Never hold a child in your
arms or lap when riding in a
vehicle. The violent forces cre-
ated during a crash will tear
the child from your arms and
throw the child against the
car’s interior.
(Continued)
(Continued)
• Never put a seat belt over
yourself and a child. During a
crash, the belt could press
deep into the child causing
serious internal injuries.
• Never leave children unat-
tended in a vehicle – not even
for a short time. The car can
heat up very quickly, resulting
in serious injuries to children
inside. Even very young chil-
dren may inadvertently cause
the vehicle to move, entangle
themselves in the windows, or
lock themselves or others
inside the vehicle.
• Never allow two children, or
any two persons, to use the
same seat belt.
• Children often squirm and
reposition themselves improp-
erly. Never let a child ride with
the shoulder belt under their
arm or behind their back.
Always properly position and
secure children in the rear seat.
(Continued)(Continued)
• Never allow a child to stand-
up or kneel on the seat or floor
of a moving vehicle. During a
collision or sudden stop, the
child can be violently thrown
against the vehicle’s interior,
resulting in serious injury.
• Never use an infant carrier or
a child safety seat that
"hooks" over a seatback, it
may not provide adequate
security in an accident.
• Seat belts can become very
hot, especially when the car is
parked in direct sunlight.
Always check seat belt buck-
les before fastening them
over a child.
• After an accident, have an
authorized HYUNDAI dealer
check the child restraint sys-
tem, seat belt, tether anchor
and lower anchor.
• If there is not enough space to
place the child restraint sys-
tem because of the driver's
seat, install the child restraint
system in the rear right seat.
Page 58 of 785
337
Safety features of your vehicle
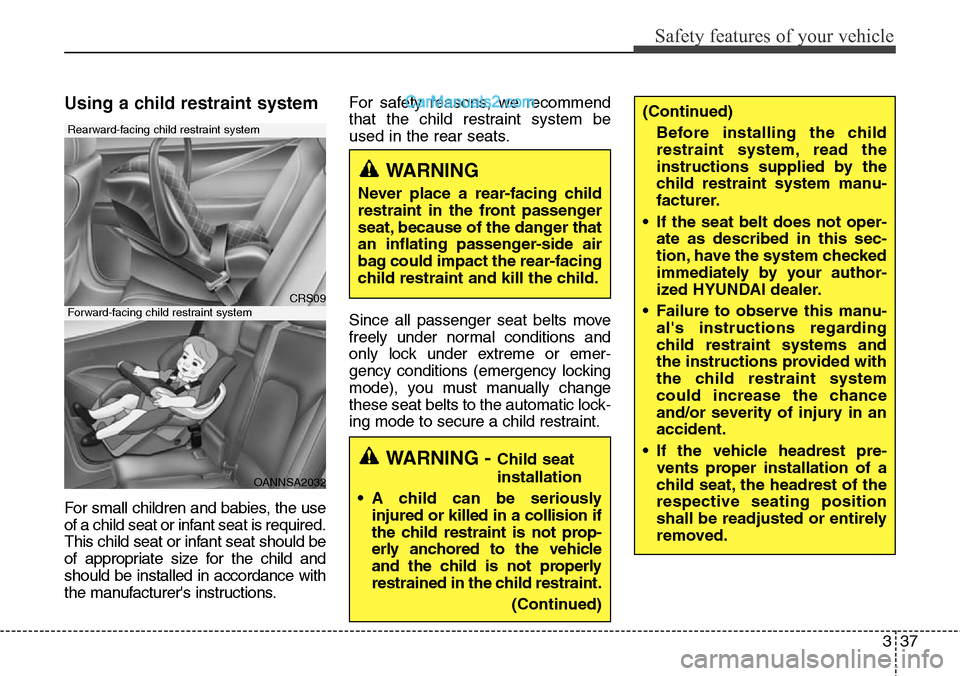
Using a child restraint system
For small children and babies, the use
of a child seat or infant seat is required.
This child seat or infant seat should be
of appropriate size for the child and
should be installed in accordance with
the manufacturer's instructions.For safety reasons, we recommend
that the child restraint system be
used in the rear seats.
Since all passenger seat belts move
freely under normal conditions and
only lock under extreme or emer-
gency conditions (emergency locking
mode), you must manually change
these seat belts to the automatic lock-
ing mode to secure a child restraint.
WARNING - Child seat
installation
• A child can be seriously
injured or killed in a collision if
the child restraint is not prop-
erly anchored to the vehicle
and the child is not properly
restrained in the child restraint.
(Continued)
(Continued)
Before installing the child
restraint system, read the
instructions supplied by the
child restraint system manu-
facturer.
• If the seat belt does not oper-
ate as described in this sec-
tion, have the system checked
immediately by your author-
ized HYUNDAI dealer.
• Failure to observe this manu-
al's instructions regarding
child restraint systems and
the instructions provided with
the child restraint system
could increase the chance
and/or severity of injury in an
accident.
• If the vehicle headrest pre-
vents proper installation of a
child seat, the headrest of the
respective seating position
shall be readjusted or entirely
removed.
WARNING
Never place a rear-facing child
restraint in the front passenger
seat, because of the danger that
an inflating passenger-side air
bag could impact the rear-facing
child restraint and kill the child.
CRS09
OANNSA2032
Forward-facing child restraint system
Rearward-facing child restraint system
Page 59 of 785
Safety features of your vehicle
38 3
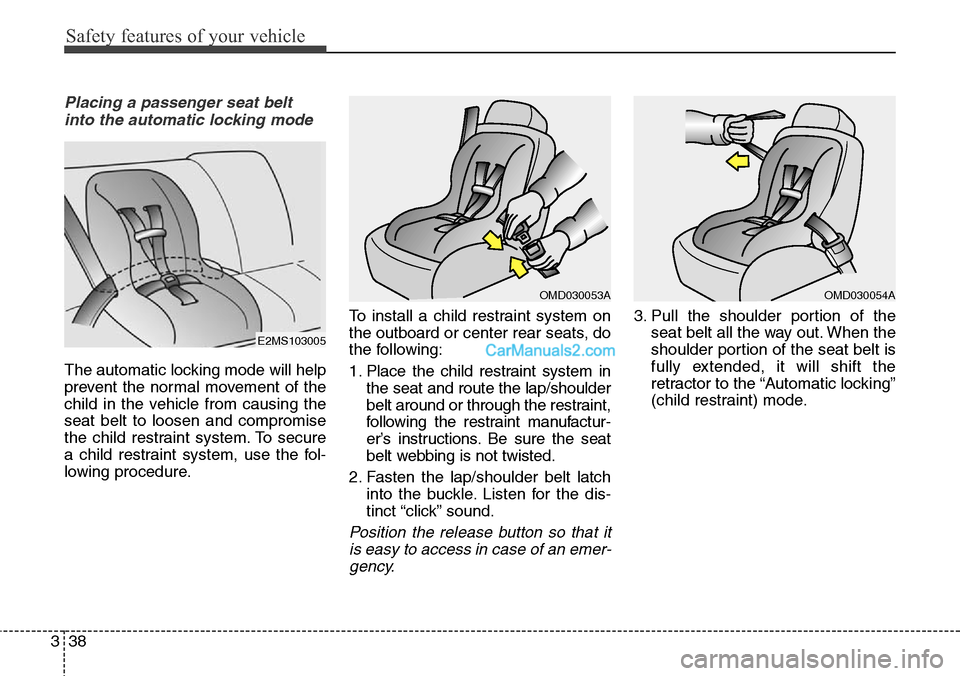
Placing a passenger seat belt
into the automatic locking mode
The automatic locking mode will help
prevent the normal movement of the
child in the vehicle from causing the
seat belt to loosen and compromise
the child restraint system. To secure
a child restraint system, use the fol-
lowing procedure.To install a child restraint system on
the outboard or center rear seats, do
the following:
1. Place the child restraint system in
the seat and route the lap/shoulder
belt around or through the restraint,
following the restraint manufactur-
er’s instructions. Be sure the seat
belt webbing is not twisted.
2. Fasten the lap/shoulder belt latch
into the buckle. Listen for the dis-
tinct “click” sound.
Position the release button so that it
is easy to access in case of an emer-
gency.
3. Pull the shoulder portion of the
seat belt all the way out. When the
shoulder portion of the seat belt is
fully extended, it will shift the
retractor to the “Automatic locking”
(child restraint) mode.
OMD030054AOMD030053A
E2MS103005
Page 60 of 785
339
Safety features of your vehicle
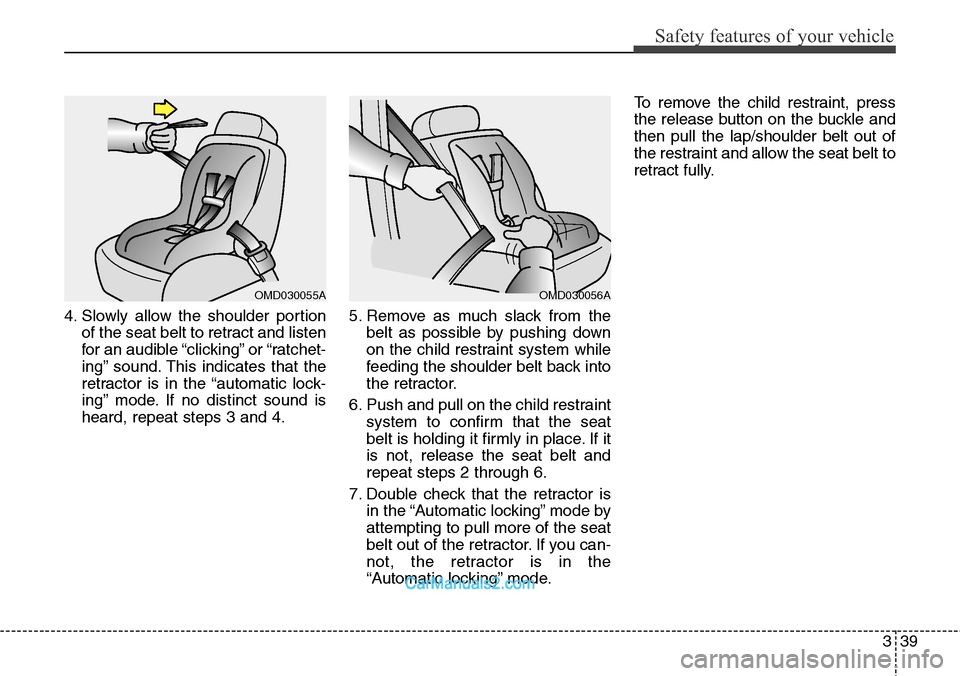
4. Slowly allow the shoulder portion
of the seat belt to retract and listen
for an audible “clicking” or “ratchet-
ing” sound. This indicates that the
retractor is in the “automatic lock-
ing” mode. If no distinct sound is
heard, repeat steps 3 and 4.5. Remove as much slack from the
belt as possible by pushing down
on the child restraint system while
feeding the shoulder belt back into
the retractor.
6. Push and pull on the child restraint
system to confirm that the seat
belt is holding it firmly in place. If it
is not, release the seat belt and
repeat steps 2 through 6.
7. Double check that the retractor is
in the “Automatic locking” mode by
attempting to pull more of the seat
belt out of the retractor. If you can-
not, the retractor is in the
“Automatic locking” mode.To remove the child restraint, press
the release button on the buckle and
then pull the lap/shoulder belt out of
the restraint and allow the seat belt to
retract fully.
OMD030056AOMD030055A
Page 61 of 785
Safety features of your vehicle
40 3
When the seat belt is allowed to
retract to its fully stowed position,
the retractor will automatically
switch from the “Automatic lock-
ing” mode to the emergency lock
mode for normal adult usage.
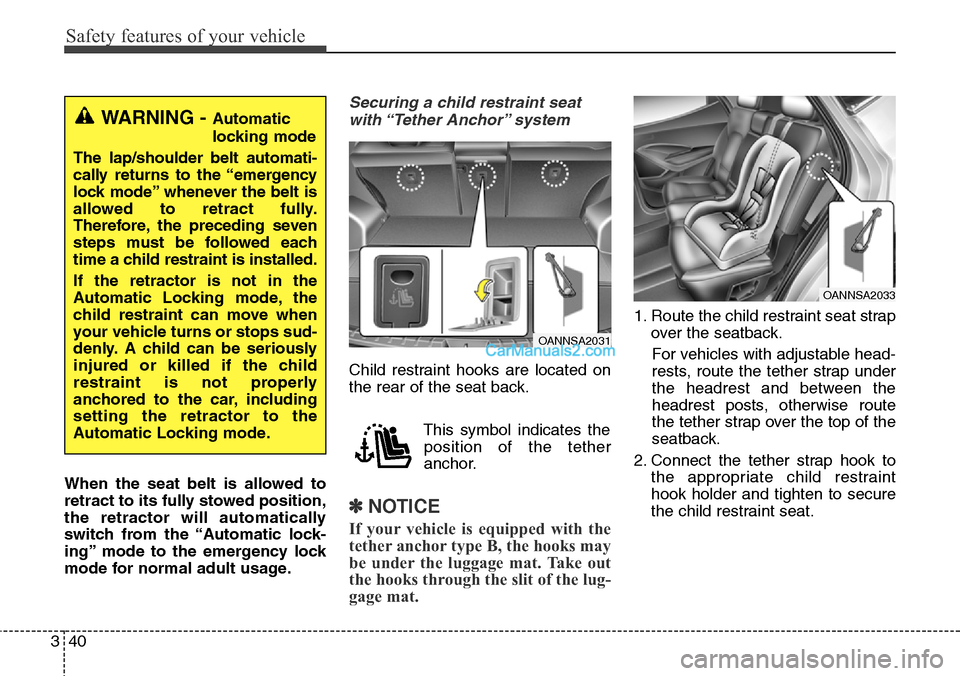
Securing a child restraint seat
with “Tether Anchor” system
Child restraint hooks are located on
the rear of the seat back.
This symbol indicates the
position of the tether
anchor.
✽NOTICE
If your vehicle is equipped with the
tether anchor type B, the hooks may
be under the luggage mat. Take out
the hooks through the slit of the lug-
gage mat.
1. Route the child restraint seat strap
over the seatback.
For vehicles with adjustable head-
rests, route the tether strap under
the headrest and between the
headrest posts, otherwise route
the tether strap over the top of the
seatback.
2. Connect the tether strap hook to
the appropriate child restraint
hook holder and tighten to secure
the child restraint seat.
WARNING - Automatic
locking mode
The lap/shoulder belt automati-
cally returns to the “emergency
lock mode” whenever the belt is
allowed to retract fully.
Therefore, the preceding seven
steps must be followed each
time a child restraint is installed.
If the retractor is not in the
Automatic Locking mode, the
child restraint can move when
your vehicle turns or stops sud-
denly. A child can be seriously
injured or killed if the child
restraint is not properly
anchored to the car, including
setting the retractor to the
Automatic Locking mode.
OANNSA2031
OANNSA2033
Page 85 of 785
Safety features of your vehicle
64 3
They are designed to help protect
occupants in certain side impacts
and to help prevent them from eject-
ing out of the vehicle as a result of a
rollover, especially when the seat-
belts are also in use.
• The curtain air bags are designed
to deploy during certain side
impact collisions, depending on the
crash severity, angle, speed and
point of impact.
However, when side deployment
threshold is satisfied at frontim-
pact, curtain air bags may deploy.
• The curtain air bags do not only
deploy on the side of the impact
but also on the opposite side.
• Also, the curtain air bags on both
sides of the vehicle will deploy in
certain rollover situations.
• The curtain air bags are not
designed to deploy in all side
impact or rollover situations.(Continued)
• Do not allow the passengers
to lean their heads or bodies
onto doors, put their arms on
the doors, stretch their arms
out of the window, or place
objects between the doors
and passengers when they are
seated on seats equipped with
side and/or curtain air bags.
• Never try to open or repair any
components of the side cur-
tain air bag system. This
should only be done by an
authorized HYUNDAI dealer.
Failure to follow the above
instructions can result in injury
or death to the vehicle occu-
pants in an accident.WARNING
• In order for side and curtain
air bags to provide the best
protection, front seat occu-
pants and outboard rear occu-
pants should sit in an upright
position with the seat belts
properly fastened.
Importantly, children should
sit in a proper child restraint
system in the rear seat.
• When children are seated in
the rear outboard seats, they
must be seated in the proper
child restraint system. Make
sure to put the child restraint
system as far away from the
door side as possible, and
secure the child restraint sys-
tem in a locked position.
(Continued)
Page 94 of 785
Features of your vehicle
Folding key . . . . . . . . . . . . . . . . . . . . . . . . . . . . . . . . 4-4
• Record your key number . . . . . . . . . . . . . . . . . . . . . . . 4-4
• Key operations . . . . . . . . . . . . . . . . . . . . . . . . . . . . . . . . 4-4
• Precautions . . . . . . . . . . . . . . . . . . . . . . . . . . . . . . . . . . . 4-6
• Battery replacement . . . . . . . . . . . . . . . . . . . . . . . . . . . 4-7
• Immobilizer system . . . . . . . . . . . . . . . . . . . . . . . . . . . . 4-8
Smart key . . . . . . . . . . . . . . . . . . . . . . . . . . . . . . . . 4-11
• Record your key number . . . . . . . . . . . . . . . . . . . . . . 4-11
• Smart key function . . . . . . . . . . . . . . . . . . . . . . . . . . . 4-11
• Loss of the smart key . . . . . . . . . . . . . . . . . . . . . . . . . 4-14
• Precautions . . . . . . . . . . . . . . . . . . . . . . . . . . . . . . . . . . 4-15
• Smart key immobilizer system . . . . . . . . . . . . . . . . . . 4-15
• Battery replacement . . . . . . . . . . . . . . . . . . . . . . . . . . 4-17
Theft-alarm system . . . . . . . . . . . . . . . . . . . . . . . . 4-19
• Armed stage . . . . . . . . . . . . . . . . . . . . . . . . . . . . . . . . . 4-19
• Theft-alarm stage . . . . . . . . . . . . . . . . . . . . . . . . . . . . 4-21
• Disarmed stage. . . . . . . . . . . . . . . . . . . . . . . . . . . . . . . 4-21
Door locks . . . . . . . . . . . . . . . . . . . . . . . . . . . . . . . . 4-23
• From outside . . . . . . . . . . . . . . . . . . . . . . . . . . . . . . . . 4-23
• From inside . . . . . . . . . . . . . . . . . . . . . . . . . . . . . . . . . 4-25
• Impact sensing door unlock system . . . . . . . . . . . . . . 4-27
• Child-protector rear door lock. . . . . . . . . . . . . . . . . . 4-27
Tailgate . . . . . . . . . . . . . . . . . . . . . . . . . . . . . . . . . . 4-28
• Non-powered tailgate . . . . . . . . . . . . . . . . . . . . . . . . . 4-28
• Power tailgate . . . . . . . . . . . . . . . . . . . . . . . . . . . . . . . 4-30• Smart Tailgate . . . . . . . . . . . . . . . . . . . . . . . . . . . . . . . 4-35
• Emergency tailgate safety release . . . . . . . . . . . . . . . 4-38
Windows . . . . . . . . . . . . . . . . . . . . . . . . . . . . . . . . . 4-39
• Power windows . . . . . . . . . . . . . . . . . . . . . . . . . . . . . . 4-40
Hood. . . . . . . . . . . . . . . . . . . . . . . . . . . . . . . . . . . . . 4-44
• Opening the hood . . . . . . . . . . . . . . . . . . . . . . . . . . . . 4-44
• Closing the hood . . . . . . . . . . . . . . . . . . . . . . . . . . . . . 4-45
Fuel filler lid . . . . . . . . . . . . . . . . . . . . . . . . . . . . . . 4-46
• Opening the fuel filler lid . . . . . . . . . . . . . . . . . . . . . . 4-46
• Closing the fuel filler lid . . . . . . . . . . . . . . . . . . . . . . . 4-46
• Emergency fuel filler lid release . . . . . . . . . . . . . . . . 4-49
Panoramic sunroof . . . . . . . . . . . . . . . . . . . . . . . . . 4-50
• Sunroof open warning. . . . . . . . . . . . . . . . . . . . . . . . . 4-51
• Sunshade . . . . . . . . . . . . . . . . . . . . . . . . . . . . . . . . . . . 4-52
• Sliding the sunroof . . . . . . . . . . . . . . . . . . . . . . . . . . . 4-52
• Tilting the sunroof . . . . . . . . . . . . . . . . . . . . . . . . . . . . 4-53
• Closing the sunroof . . . . . . . . . . . . . . . . . . . . . . . . . . . 4-53
• Resetting the sunroof . . . . . . . . . . . . . . . . . . . . . . . . . 4-55
Steering wheel . . . . . . . . . . . . . . . . . . . . . . . . . . . . . 4-56
• Electronic power steering . . . . . . . . . . . . . . . . . . . . . . 4-56
• Tilt & telescopic steering . . . . . . . . . . . . . . . . . . . . . . 4-57
• Heated steering wheel . . . . . . . . . . . . . . . . . . . . . . . . . 4-58
• Horn . . . . . . . . . . . . . . . . . . . . . . . . . . . . . . . . . . . . . . . 4-58
• Driver selectable steering mode . . . . . . . . . . . . . . . . . 4-59
4
Page 98 of 785
45
Features of your vehicle
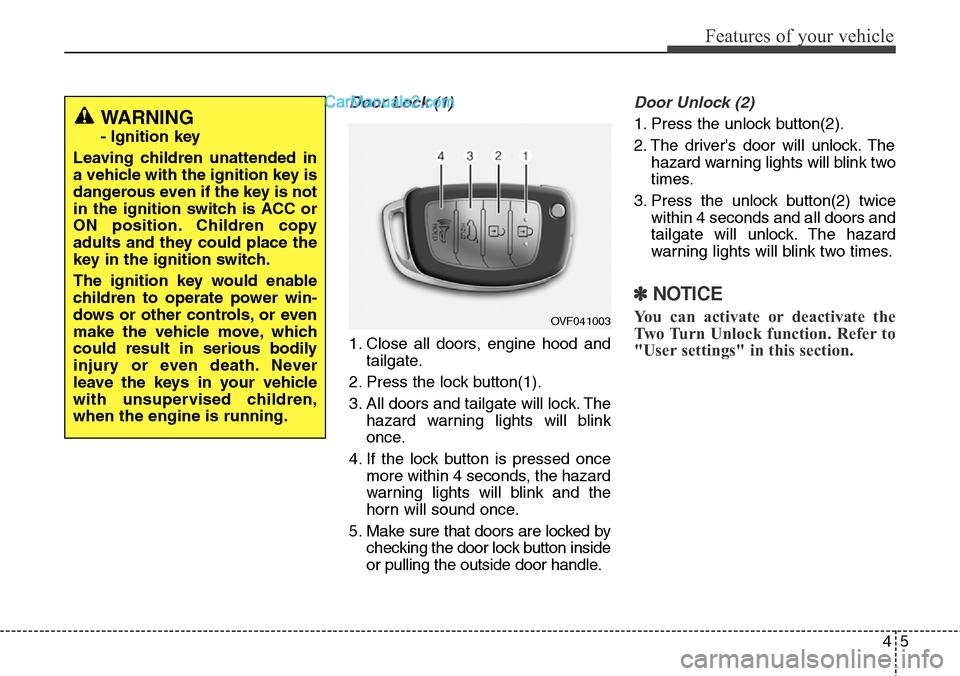
Door Lock (1)
1. Close all doors, engine hood and
tailgate.
2. Press the lock button(1).
3. All doors and tailgate will lock. The
hazard warning lights will blink
once.
4. If the lock button is pressed once
more within 4 seconds, the hazard
warning lights will blink and the
horn will sound once.
5. Make sure that doors are locked by
checking the door lock button inside
or pulling the outside door handle.
Door Unlock (2)
1. Press the unlock button(2).
2. The driver's door will unlock. The
hazard warning lights will blink two
times.
3. Press the unlock button(2) twice
within 4 seconds and all doors and
tailgate will unlock. The hazard
warning lights will blink two times.
✽NOTICE
You can activate or deactivate the
Two Turn Unlock function. Refer to
"User settings" in this section.
WARNING
- Ignition key
Leaving children unattended in
a vehicle with the ignition key is
dangerous even if the key is not
in the ignition switch is ACC or
ON position. Children copy
adults and they could place the
key in the ignition switch.
The ignition key would enable
children to operate power win-
dows or other controls, or even
make the vehicle move, which
could result in serious bodily
injury or even death. Never
leave the keys in your vehicle
with unsupervised children,
when the engine is running.
OVF041003
Page 104 of 785
411
Features of your vehicle
Record your key number
The key code num-
ber is stamped or
printed on the key
code tag attached to
the key set. Should
you lose your keys,
this number will enable an author-
ized HYUNDAI dealer to duplicate
the keys easily. Remove the key
code tag and store it in a safe place.
Also, record the code number and
keep it in a safe and handy place, but
not in the vehicle.
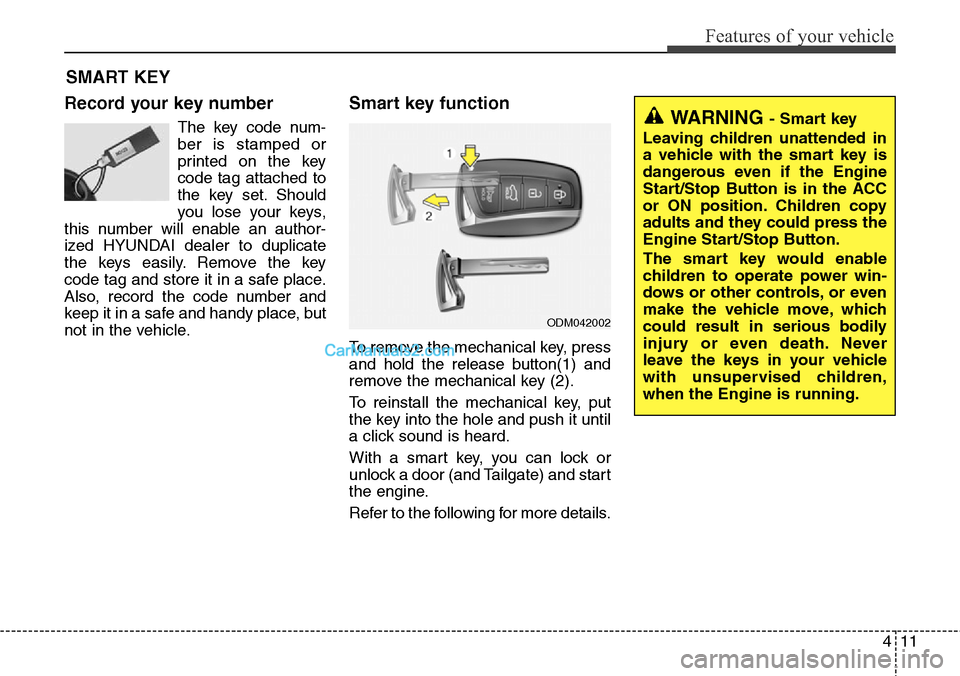
Smart key function
To remove the mechanical key, press
and hold the release button(1) and
remove the mechanical key (2).
To reinstall the mechanical key, put
the key into the hole and push it until
a click sound is heard.
With a smart key, you can lock or
unlock a door (and Tailgate) and start
the engine.
Refer to the following for more details.
SMART KEY
ODM042002
WARNING - Smart key
Leaving children unattended in
a vehicle with the smart key is
dangerous even if the Engine
Start/Stop Button is in the ACC
or ON position. Children copy
adults and they could press the
Engine Start/Stop Button.
The smart key would enable
children to operate power win-
dows or other controls, or even
make the vehicle move, which
could result in serious bodily
injury or even death. Never
leave the keys in your vehicle
with unsupervised children,
when the Engine is running.