door lock Hyundai Santa Fe Sport 2015 Owner's Manual
[x] Cancel search | Manufacturer: HYUNDAI, Model Year: 2015, Model line: Santa Fe Sport, Model: Hyundai Santa Fe Sport 2015Pages: 785, PDF Size: 13.38 MB
Page 15 of 785
Your vehicle at a glance
2 2
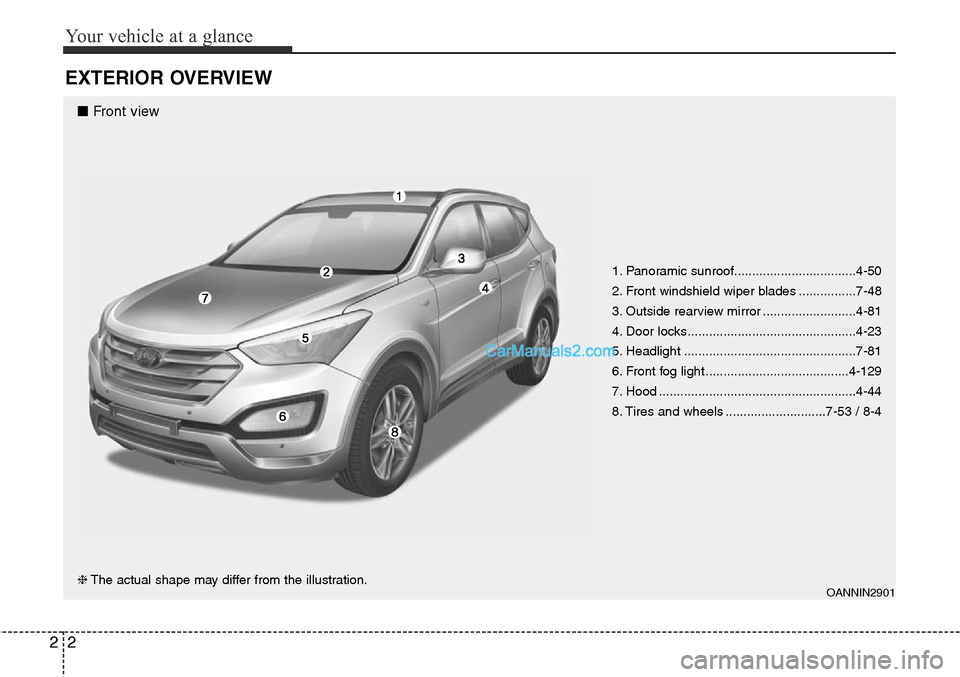
EXTERIOR OVERVIEW
1. Panoramic sunroof..................................4-50
2. Front windshield wiper blades ................7-48
3. Outside rearview mirror ..........................4-81
4. Door locks...............................................4-23
5. Headlight ................................................7-81
6. Front fog light ........................................4-129
7. Hood .......................................................4-44
8. Tires and wheels ............................7-53 / 8-4
OANNIN2901❈The actual shape may differ from the illustration.
■ Front view
Page 17 of 785
Your vehicle at a glance
4 2
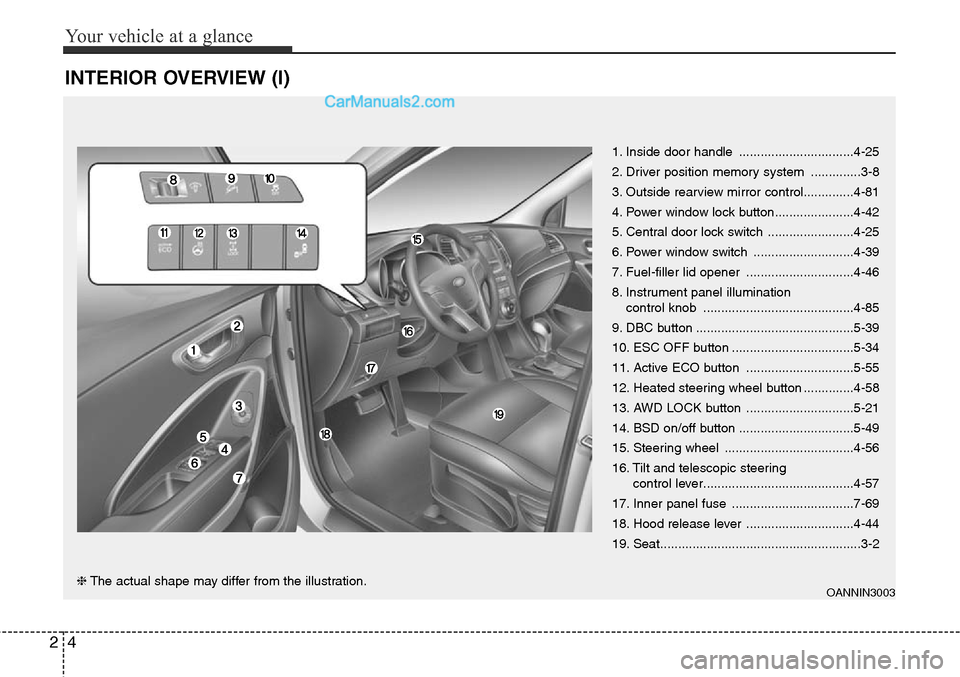
INTERIOR OVERVIEW (I)
1. Inside door handle ................................4-25
2. Driver position memory system ..............3-8
3. Outside rearview mirror control..............4-81
4. Power window lock button......................4-42
5. Central door lock switch ........................4-25
6. Power window switch ............................4-39
7. Fuel-filler lid opener ..............................4-46
8. Instrument panel illumination
control knob ..........................................4-85
9. DBC button ............................................5-39
10. ESC OFF button ..................................5-34
11. Active ECO button ..............................5-55
12. Heated steering wheel button ..............4-58
13. AWD LOCK button ..............................5-21
14. BSD on/off button ................................5-49
15. Steering wheel ....................................4-56
16. Tilt and telescopic steering
control lever..........................................4-57
17. Inner panel fuse ..................................7-69
18. Hood release lever ..............................4-44
19. Seat........................................................3-2
OANNIN3003❈The actual shape may differ from the illustration.
Page 47 of 785
Safety features of your vehicle
26 3
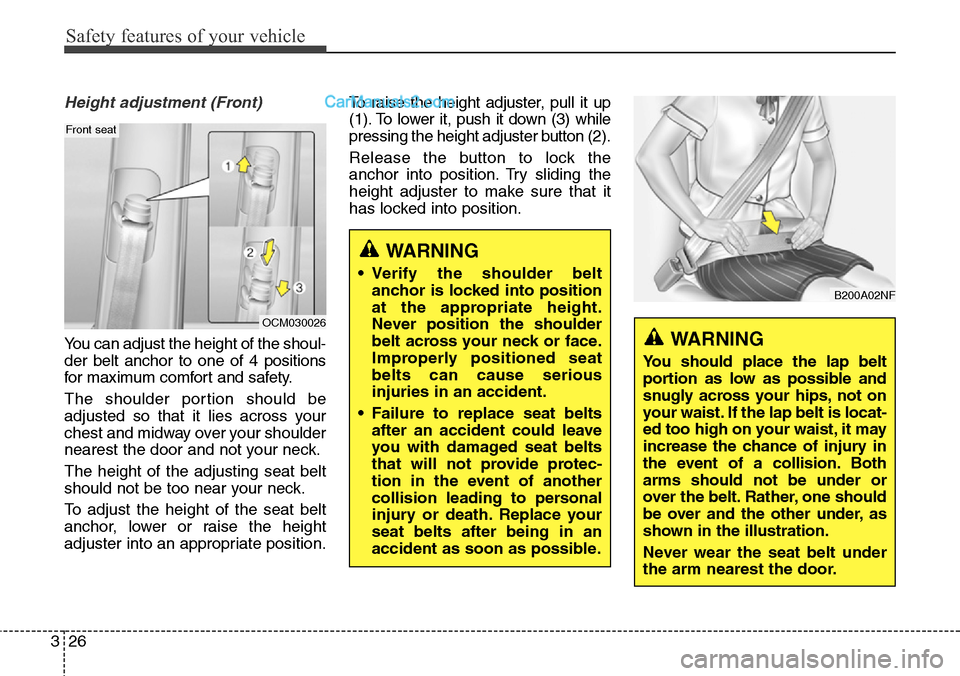
Height adjustment (Front)
You can adjust the height of the shoul-
der belt anchor to one of 4 positions
for maximum comfort and safety.
The shoulder portion should be
adjusted so that it lies across your
chest and midway over your shoulder
nearest the door and not your neck.
The height of the adjusting seat belt
should not be too near your neck.
To adjust the height of the seat belt
anchor, lower or raise the height
adjuster into an appropriate position.To raise the height adjuster, pull it up
(1). To lower it, push it down (3) while
pressing the height adjuster button (2).
Release the button to lock the
anchor into position. Try sliding the
height adjuster to make sure that it
has locked into position.
WARNING
• Verify the shoulder belt
anchor is locked into position
at the appropriate height.
Never position the shoulder
belt across your neck or face.
Improperly positioned seat
belts can cause serious
injuries in an accident.
• Failure to replace seat belts
after an accident could leave
you with damaged seat belts
that will not provide protec-
tion in the event of another
collision leading to personal
injury or death. Replace your
seat belts after being in an
accident as soon as possible.
OCM030026
Front seat
B200A02NF
WARNING
You should place the lap belt
portion as low as possible and
snugly across your hips, not on
your waist. If the lap belt is locat-
ed too high on your waist, it may
increase the chance of injury in
the event of a collision. Both
arms should not be under or
over the belt. Rather, one should
be over and the other under, as
shown in the illustration.
Never wear the seat belt under
the arm nearest the door.
Page 85 of 785
Safety features of your vehicle
64 3
They are designed to help protect
occupants in certain side impacts
and to help prevent them from eject-
ing out of the vehicle as a result of a
rollover, especially when the seat-
belts are also in use.
• The curtain air bags are designed
to deploy during certain side
impact collisions, depending on the
crash severity, angle, speed and
point of impact.
However, when side deployment
threshold is satisfied at frontim-
pact, curtain air bags may deploy.
• The curtain air bags do not only
deploy on the side of the impact
but also on the opposite side.
• Also, the curtain air bags on both
sides of the vehicle will deploy in
certain rollover situations.
• The curtain air bags are not
designed to deploy in all side
impact or rollover situations.(Continued)
• Do not allow the passengers
to lean their heads or bodies
onto doors, put their arms on
the doors, stretch their arms
out of the window, or place
objects between the doors
and passengers when they are
seated on seats equipped with
side and/or curtain air bags.
• Never try to open or repair any
components of the side cur-
tain air bag system. This
should only be done by an
authorized HYUNDAI dealer.
Failure to follow the above
instructions can result in injury
or death to the vehicle occu-
pants in an accident.WARNING
• In order for side and curtain
air bags to provide the best
protection, front seat occu-
pants and outboard rear occu-
pants should sit in an upright
position with the seat belts
properly fastened.
Importantly, children should
sit in a proper child restraint
system in the rear seat.
• When children are seated in
the rear outboard seats, they
must be seated in the proper
child restraint system. Make
sure to put the child restraint
system as far away from the
door side as possible, and
secure the child restraint sys-
tem in a locked position.
(Continued)
Page 94 of 785
Features of your vehicle
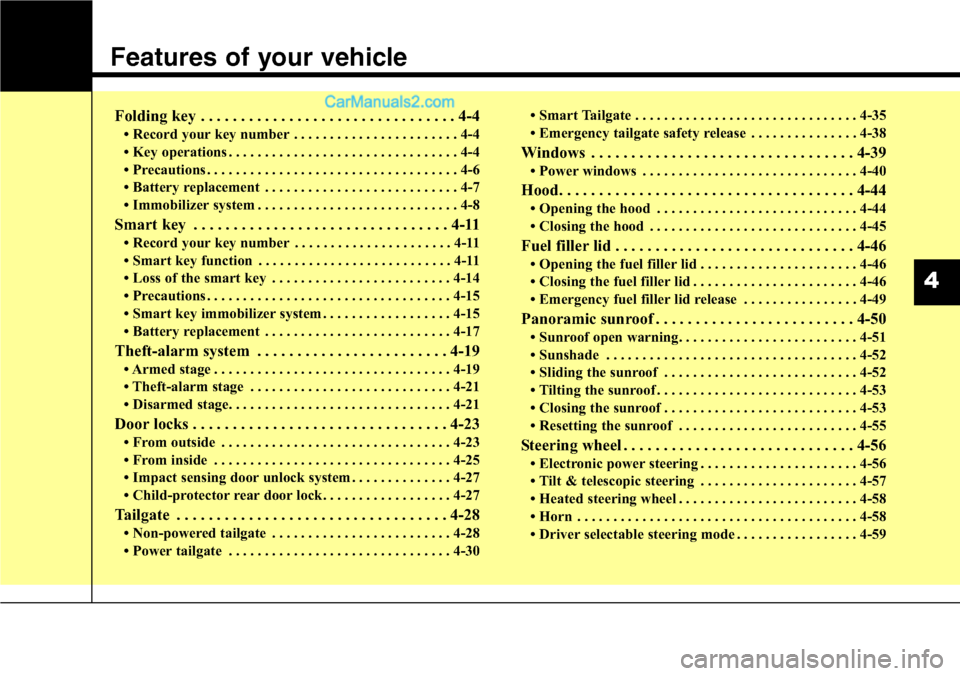
Folding key . . . . . . . . . . . . . . . . . . . . . . . . . . . . . . . . 4-4
• Record your key number . . . . . . . . . . . . . . . . . . . . . . . 4-4
• Key operations . . . . . . . . . . . . . . . . . . . . . . . . . . . . . . . . 4-4
• Precautions . . . . . . . . . . . . . . . . . . . . . . . . . . . . . . . . . . . 4-6
• Battery replacement . . . . . . . . . . . . . . . . . . . . . . . . . . . 4-7
• Immobilizer system . . . . . . . . . . . . . . . . . . . . . . . . . . . . 4-8
Smart key . . . . . . . . . . . . . . . . . . . . . . . . . . . . . . . . 4-11
• Record your key number . . . . . . . . . . . . . . . . . . . . . . 4-11
• Smart key function . . . . . . . . . . . . . . . . . . . . . . . . . . . 4-11
• Loss of the smart key . . . . . . . . . . . . . . . . . . . . . . . . . 4-14
• Precautions . . . . . . . . . . . . . . . . . . . . . . . . . . . . . . . . . . 4-15
• Smart key immobilizer system . . . . . . . . . . . . . . . . . . 4-15
• Battery replacement . . . . . . . . . . . . . . . . . . . . . . . . . . 4-17
Theft-alarm system . . . . . . . . . . . . . . . . . . . . . . . . 4-19
• Armed stage . . . . . . . . . . . . . . . . . . . . . . . . . . . . . . . . . 4-19
• Theft-alarm stage . . . . . . . . . . . . . . . . . . . . . . . . . . . . 4-21
• Disarmed stage. . . . . . . . . . . . . . . . . . . . . . . . . . . . . . . 4-21
Door locks . . . . . . . . . . . . . . . . . . . . . . . . . . . . . . . . 4-23
• From outside . . . . . . . . . . . . . . . . . . . . . . . . . . . . . . . . 4-23
• From inside . . . . . . . . . . . . . . . . . . . . . . . . . . . . . . . . . 4-25
• Impact sensing door unlock system . . . . . . . . . . . . . . 4-27
• Child-protector rear door lock. . . . . . . . . . . . . . . . . . 4-27
Tailgate . . . . . . . . . . . . . . . . . . . . . . . . . . . . . . . . . . 4-28
• Non-powered tailgate . . . . . . . . . . . . . . . . . . . . . . . . . 4-28
• Power tailgate . . . . . . . . . . . . . . . . . . . . . . . . . . . . . . . 4-30• Smart Tailgate . . . . . . . . . . . . . . . . . . . . . . . . . . . . . . . 4-35
• Emergency tailgate safety release . . . . . . . . . . . . . . . 4-38
Windows . . . . . . . . . . . . . . . . . . . . . . . . . . . . . . . . . 4-39
• Power windows . . . . . . . . . . . . . . . . . . . . . . . . . . . . . . 4-40
Hood. . . . . . . . . . . . . . . . . . . . . . . . . . . . . . . . . . . . . 4-44
• Opening the hood . . . . . . . . . . . . . . . . . . . . . . . . . . . . 4-44
• Closing the hood . . . . . . . . . . . . . . . . . . . . . . . . . . . . . 4-45
Fuel filler lid . . . . . . . . . . . . . . . . . . . . . . . . . . . . . . 4-46
• Opening the fuel filler lid . . . . . . . . . . . . . . . . . . . . . . 4-46
• Closing the fuel filler lid . . . . . . . . . . . . . . . . . . . . . . . 4-46
• Emergency fuel filler lid release . . . . . . . . . . . . . . . . 4-49
Panoramic sunroof . . . . . . . . . . . . . . . . . . . . . . . . . 4-50
• Sunroof open warning. . . . . . . . . . . . . . . . . . . . . . . . . 4-51
• Sunshade . . . . . . . . . . . . . . . . . . . . . . . . . . . . . . . . . . . 4-52
• Sliding the sunroof . . . . . . . . . . . . . . . . . . . . . . . . . . . 4-52
• Tilting the sunroof . . . . . . . . . . . . . . . . . . . . . . . . . . . . 4-53
• Closing the sunroof . . . . . . . . . . . . . . . . . . . . . . . . . . . 4-53
• Resetting the sunroof . . . . . . . . . . . . . . . . . . . . . . . . . 4-55
Steering wheel . . . . . . . . . . . . . . . . . . . . . . . . . . . . . 4-56
• Electronic power steering . . . . . . . . . . . . . . . . . . . . . . 4-56
• Tilt & telescopic steering . . . . . . . . . . . . . . . . . . . . . . 4-57
• Heated steering wheel . . . . . . . . . . . . . . . . . . . . . . . . . 4-58
• Horn . . . . . . . . . . . . . . . . . . . . . . . . . . . . . . . . . . . . . . . 4-58
• Driver selectable steering mode . . . . . . . . . . . . . . . . . 4-59
4
Page 97 of 785
Features of your vehicle
4 4
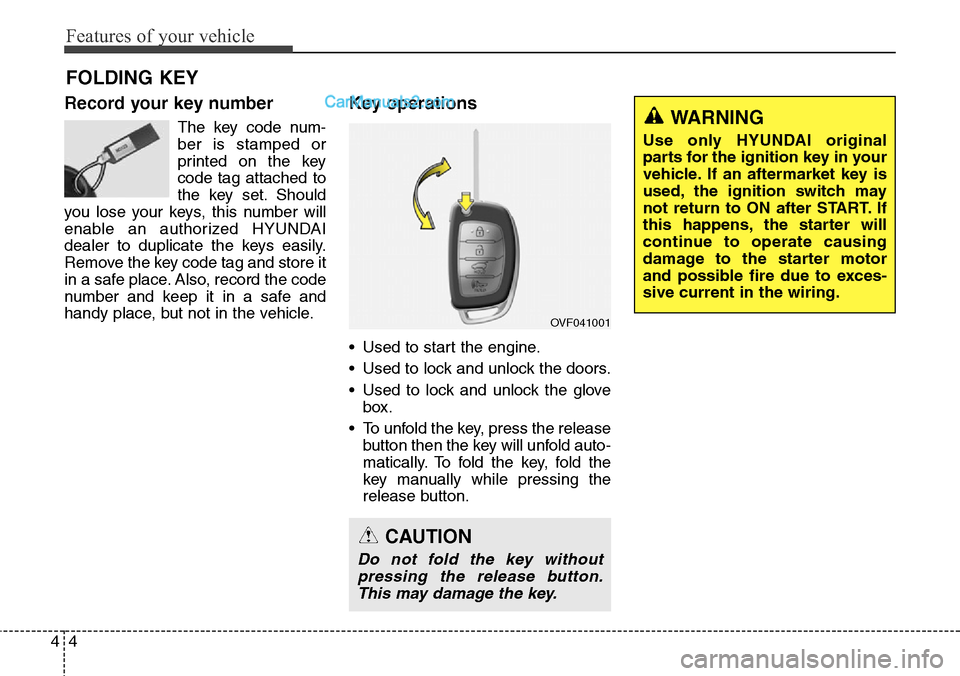
Record your key number
The key code num-
ber is stamped or
printed on the key
code tag attached to
the key set. Should
you lose your keys, this number will
enable an authorized HYUNDAI
dealer to duplicate the keys easily.
Remove the key code tag and store it
in a safe place. Also, record the code
number and keep it in a safe and
handy place, but not in the vehicle.
Key operations
• Used to start the engine.
• Used to lock and unlock the doors.
• Used to lock and unlock the glove
box.
• To unfold the key, press the release
button then the key will unfold auto-
matically. To fold the key, fold the
key manually while pressing the
release button.
FOLDING KEY
OVF041001
CAUTION
Do not fold the key without
pressing the release button.
This may damage the key.
WARNING
Use only HYUNDAI original
parts for the ignition key in your
vehicle. If an aftermarket key is
used, the ignition switch may
not return to ON after START. If
this happens, the starter will
continue to operate causing
damage to the starter motor
and possible fire due to exces-
sive current in the wiring.
Page 98 of 785
45
Features of your vehicle
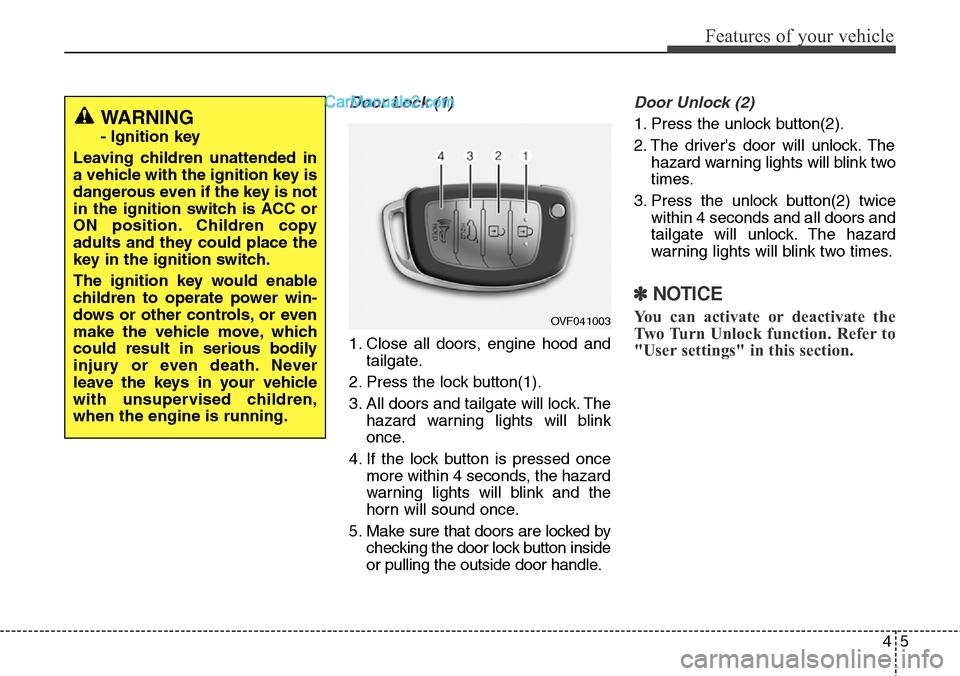
Door Lock (1)
1. Close all doors, engine hood and
tailgate.
2. Press the lock button(1).
3. All doors and tailgate will lock. The
hazard warning lights will blink
once.
4. If the lock button is pressed once
more within 4 seconds, the hazard
warning lights will blink and the
horn will sound once.
5. Make sure that doors are locked by
checking the door lock button inside
or pulling the outside door handle.
Door Unlock (2)
1. Press the unlock button(2).
2. The driver's door will unlock. The
hazard warning lights will blink two
times.
3. Press the unlock button(2) twice
within 4 seconds and all doors and
tailgate will unlock. The hazard
warning lights will blink two times.
✽NOTICE
You can activate or deactivate the
Two Turn Unlock function. Refer to
"User settings" in this section.
WARNING
- Ignition key
Leaving children unattended in
a vehicle with the ignition key is
dangerous even if the key is not
in the ignition switch is ACC or
ON position. Children copy
adults and they could place the
key in the ignition switch.
The ignition key would enable
children to operate power win-
dows or other controls, or even
make the vehicle move, which
could result in serious bodily
injury or even death. Never
leave the keys in your vehicle
with unsupervised children,
when the engine is running.
OVF041003
Page 99 of 785
Features of your vehicle
6 4
Tailgate unlock (3)
The tailgate is unlocked if the button
is pressed for more than 1 second.
Also, once the tailgate is opened and
then closed, the tailgate will be
locked automatically.
Panic (4)
The horn sounds and hazard warn-
ing lights flash for about 30 seconds
if this button is pressed for more than
1.5 seconds. To stop the horn and
lights, press any button except the
trunk button on the transmitter.
Transmitter precautions
✽NOTICE
The transmitter will not work if any
of following occur:
• The ignition key is in the ignition
switch.
• You exceed the operating distance
limit (about 30 m [90 feet]).
• The battery in the transmitter is
weak.
• Other vehicles or objects may be
blocking the signal.
• The weather is extremely cold.
• The transmitter is close to a radio
transmitter such as a radio substa-
tion or an airport which can inter-
fere with normal operation of the
transmitter.
When the transmitter does not work
correctly, open and close the door
with the ignition key. If you have a
problem with the transmitter, contact
an authorized HYUNDAI dealer.
(Continued)(Continued)
• If the transmitter is in close prox-
imity to your mobile phone, the
signal could be blocked by your
mobile phones normal operational
signals. This is especially impor-
tant when the phone is active such
as making and receiving calls, text
messaging, and/or sending/receiv-
ing emails. Avoid placing the
transmitter and your mobile
phone in the same pants or jacket
pocket and always try to maintain
an adequate distance between the
two devices.
CAUTION
Keep the transmither away from
water or any liquid and fire.
If the inside of the smart key
gets damp (due to drinks or
moisture), or is heated, internal
circuit may malfunction, exclud-
ing the car from the warranty.
Page 104 of 785
411
Features of your vehicle
Record your key number
The key code num-
ber is stamped or
printed on the key
code tag attached to
the key set. Should
you lose your keys,
this number will enable an author-
ized HYUNDAI dealer to duplicate
the keys easily. Remove the key
code tag and store it in a safe place.
Also, record the code number and
keep it in a safe and handy place, but
not in the vehicle.
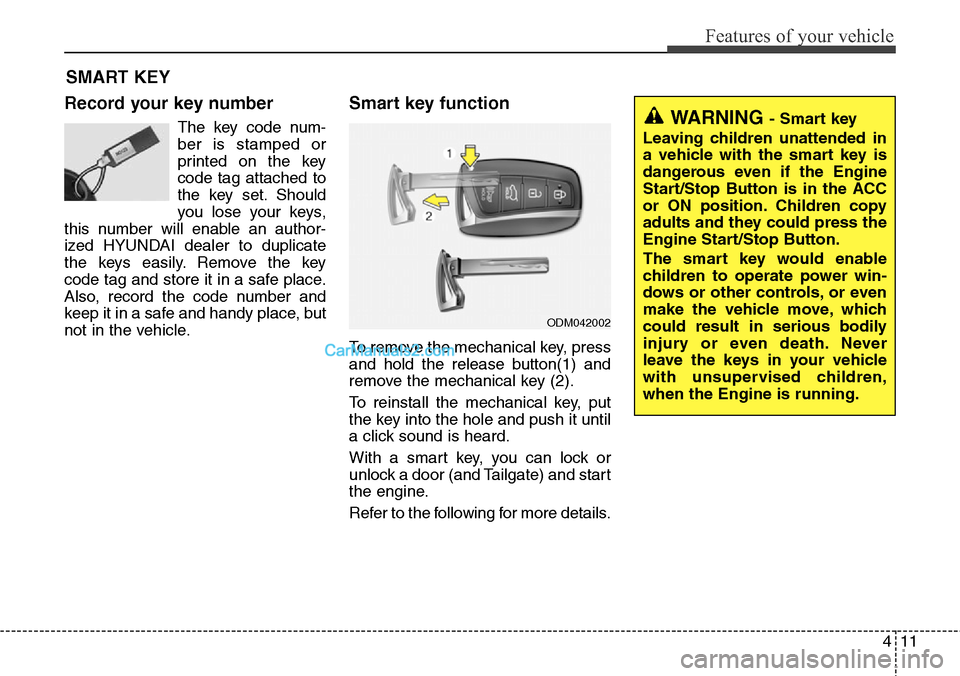
Smart key function
To remove the mechanical key, press
and hold the release button(1) and
remove the mechanical key (2).
To reinstall the mechanical key, put
the key into the hole and push it until
a click sound is heard.
With a smart key, you can lock or
unlock a door (and Tailgate) and start
the engine.
Refer to the following for more details.
SMART KEY
ODM042002
WARNING - Smart key
Leaving children unattended in
a vehicle with the smart key is
dangerous even if the Engine
Start/Stop Button is in the ACC
or ON position. Children copy
adults and they could press the
Engine Start/Stop Button.
The smart key would enable
children to operate power win-
dows or other controls, or even
make the vehicle move, which
could result in serious bodily
injury or even death. Never
leave the keys in your vehicle
with unsupervised children,
when the Engine is running.
Page 105 of 785
Features of your vehicle
12 4
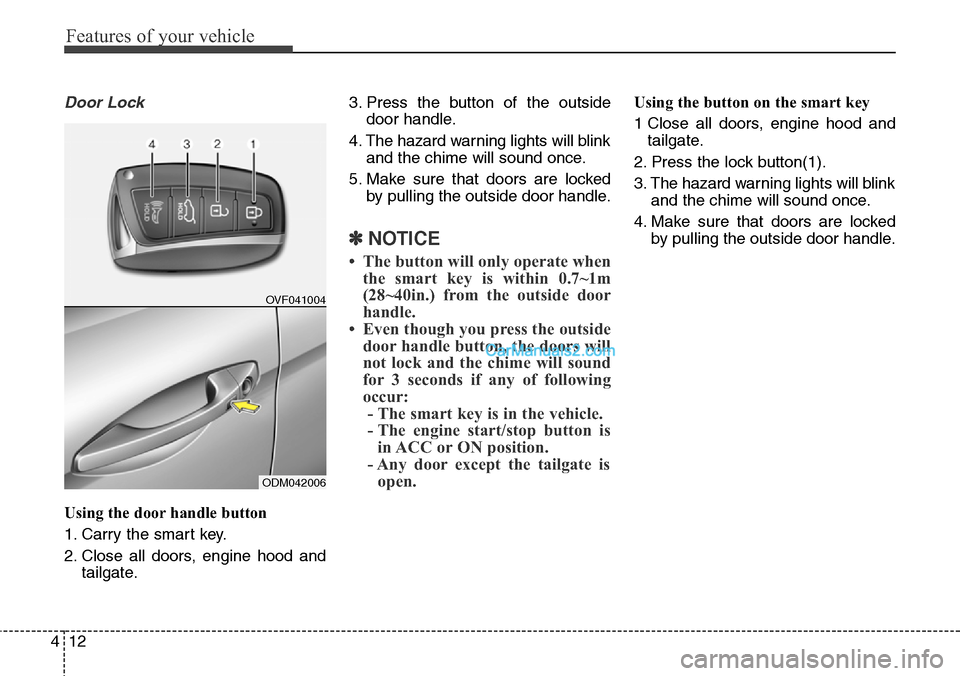
Door Lock
Using the door handle button
1. Carry the smart key.
2. Close all doors, engine hood and
tailgate.3. Press the button of the outside
door handle.
4. The hazard warning lights will blink
and the chime will sound once.
5. Make sure that doors are locked
by pulling the outside door handle.
✽NOTICE
• The button will only operate when
the smart key is within 0.7~1m
(28~40in.) from the outside door
handle.
• Even though you press the outside
door handle button, the doors will
not lock and the chime will sound
for 3 seconds if any of following
occur:
- The smart key is in the vehicle.
- The engine start/stop button is
in ACC or ON position.
- Any door except the tailgate is
open.
Using the button on the smart key
1 Close all doors, engine hood and
tailgate.
2. Press the lock button(1).
3. The hazard warning lights will blink
and the chime will sound once.
4. Make sure that doors are locked
by pulling the outside door handle.
ODM042006OVF041004