set Hyundai Santa Fe Sport 2015 Owner's Manual
[x] Cancel search | Manufacturer: HYUNDAI, Model Year: 2015, Model line: Santa Fe Sport, Model: Hyundai Santa Fe Sport 2015Pages: 785, PDF Size: 13.38 MB
Page 25 of 785
Safety features of your vehicle
4 3
WARNING - Rear
seatbacks
• The rear seatback must be
securely latched. If not, pas-
sengers and objects could be
thrown forward resulting in
serious injury or death in the
event of a sudden stop or col-
lision.
• No passenger should ride in
the cargo area or sit or lie on
folded seatbacks while the
vehicle is moving. All passen-
gers must be properly seated
in seats and restrained prop-
erly while riding.
• When resetting the seatback
to the upright position, make
sure it is securely latched by
pushing it forward and rear-
wards.
• To avoid the possibility of
burns, do not remove the car-
pet in the cargo area. Emission
control devices beneath this
floor generate high tempera-
tures.
(Continued)(Continued)
• Luggage and other cargo
should be laid flat in the cargo
area or on the folded rear
seatback. If objects are large,
heavy, or must be piled, they
must be secured. Under no
circumstances should cargo
be piled higher than the seat-
backs. Failure to follow these
warnings could result in seri-
ous injury or death in the
event of a sudden stop, colli-
sion or rollover.
WARNING
After adjusting the seat, always
check that it is securely locked
into place by attempting to
move the seat forward or
reverse without using the lock
release lever. Sudden or unex-
pected movement of the dri-
ver's seat could cause you to
lose control of the vehicle
resulting in an accident.
WARNING
• Do not adjust the seat while
wearing seat belts. Moving the
seat cushion forward may
cause strong pressure on the
abdomen.
• Use extreme caution so that
hands or other objects are not
caught in the seat mechanisms
while the seat is moving.
• Do not place a cigarette
lighter on the floor or seat.
When you operate the seat,
gas may exit out of the lighter
and cause a fire.
• Use extreme caution when
picking small objects trapped
under the seats or between
the seat and the center con-
sole. Your hands might be cut
or injured by the sharp edges
of the seats mechanism.
Page 29 of 785
Safety features of your vehicle
8 3
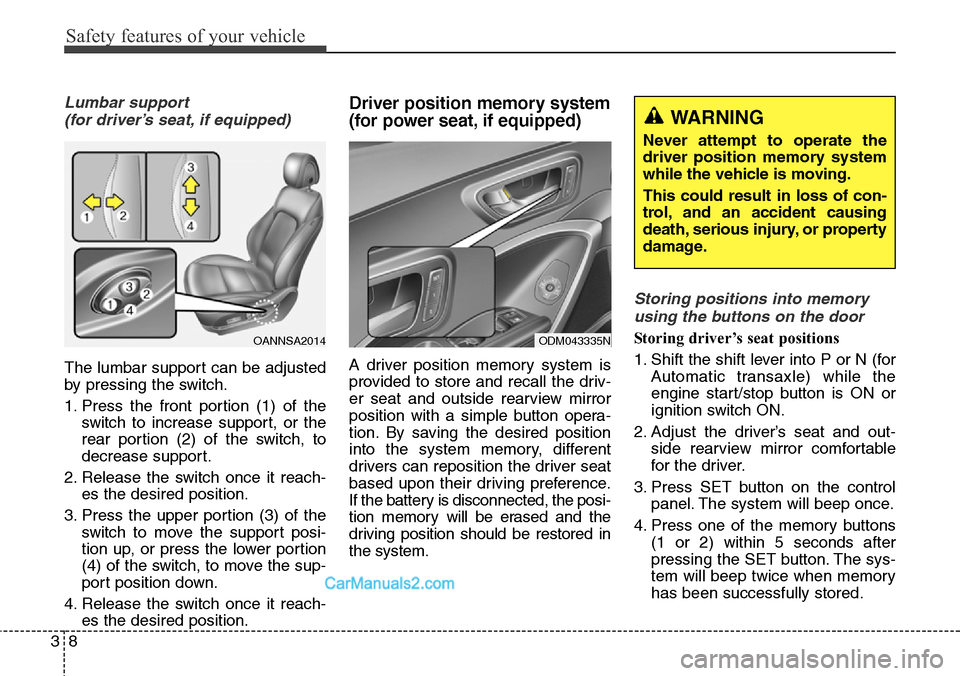
Lumbar support
(for driver’s seat, if equipped)
The lumbar support can be adjusted
by pressing the switch.
1. Press the front portion (1) of the
switch to increase support, or the
rear portion (2) of the switch, to
decrease support.
2. Release the switch once it reach-
es the desired position.
3. Press the upper portion (3) of the
switch to move the support posi-
tion up, or press the lower portion
(4) of the switch, to move the sup-
port position down.
4. Release the switch once it reach-
es the desired position.
Driver position memory system
(for power seat, if equipped)
A driver position memory system is
provided to store and recall the driv-
er seat and outside rearview mirror
position with a simple button opera-
tion. By saving the desired position
into the system memory, different
drivers can reposition the driver seat
based upon their driving preference.
If the battery is disconnected, the posi-
tion memory will be erased and the
driving position should be restored in
the system.
Storing positions into memory
using the buttons on the door
Storing driver’s seat positions
1. Shift the shift lever into P or N (for
Automatic transaxle) while the
engine start/stop button is ON or
ignition switch ON.
2. Adjust the driver’s seat and out-
side rearview mirror comfortable
for the driver.
3. Press SET button on the control
panel. The system will beep once.
4. Press one of the memory buttons
(1 or 2) within 5 seconds after
pressing the SET button. The sys-
tem will beep twice when memory
has been successfully stored.OANNSA2014ODM043335N
WARNING
Never attempt to operate the
driver position memory system
while the vehicle is moving.
This could result in loss of con-
trol, and an accident causing
death, serious injury, or property
damage.
Page 30 of 785
39
Safety features of your vehicle
Recalling positions from memory
1. Shift the shift lever into P or N (for
Automatic transaxle) while the
engine start/stop button is ON or
ignition switch ON.
2. To recall the position in the memo-
ry, press the desired memory but-
ton (1 or 2). The system will beep
once, then the driver’s seat will
automatically adjust to the stored
position.
Adjusting the control switch for the
driver’s seat while the system is
recalling the stored position will
cause the movement to stop and
move in the direction that the control
switch is moved.Easy access function
(if equipped)
The system will move the driver's
seat automatically as follows:
• Without smart key system
- It will move the driver’s seat rear-
ward when the ignition key is
removed and front driver’s door is
opened.
- It will move the driver’s seat for-
ward when the ignition key is
inserted.
• With smart key system
- It will move the driver’s seat rear-
ward when the engine start/stop
button is changed to the OFF
position and front driver’s door is
opened.
- It will move the driver’s seat for-
ward when the engine start/stop
button is changed to the ACC or
START position.
You can activate or deactivate this
feature. Refer to "User settings" in
section 4.
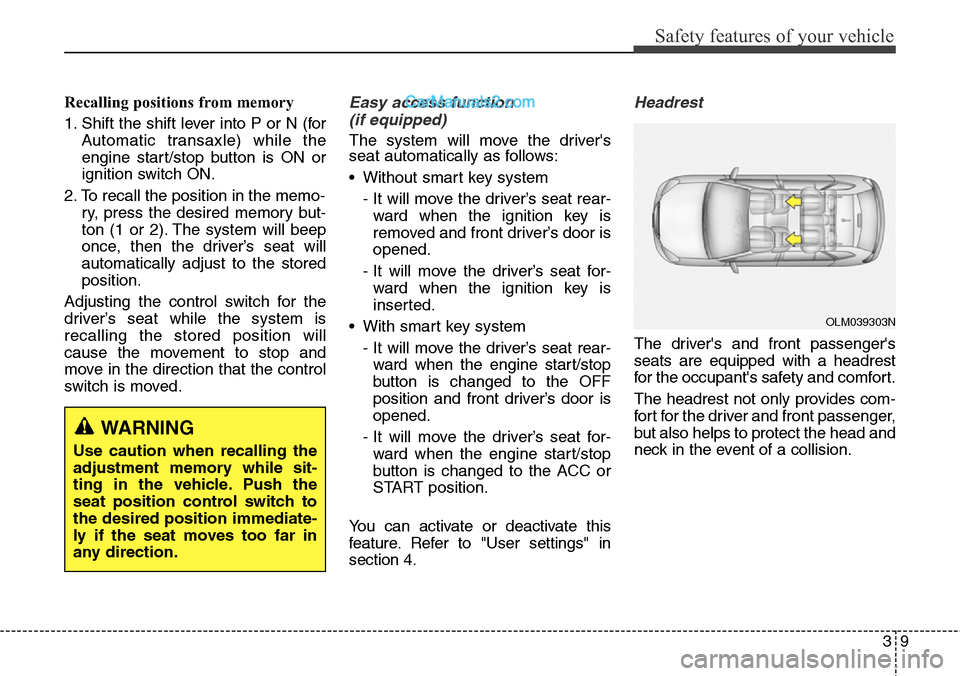
Headrest
The driver's and front passenger's
seats are equipped with a headrest
for the occupant's safety and comfort.
The headrest not only provides com-
fort for the driver and front passenger,
but also helps to protect the head and
neck in the event of a collision.
WARNING
Use caution when recalling the
adjustment memory while sit-
ting in the vehicle. Push the
seat position control switch to
the desired position immediate-
ly if the seat moves too far in
any direction.
OLM039303N
Page 33 of 785
Safety features of your vehicle
12 3
With the ignition switch in the ON
position, push either of the switches
to warm the driver's seat or the front
passenger's seat.
During mild weather or under condi-
tions where the operation of the seat
warmer is not needed, keep the
switches in the OFF position.
• Each time you push the button, the
temperature setting of the seat is
changed as follows :
• The seat warmer defaults to the
OFF position whenever the ignition
switch is turned on.
• With the seat warmer switch in the
ON position, the heating system in
the seat turns off or on automati-
cally depending on the seat tem-
perature.
OFF→HIGH( )→MIDDLE( )→LOW( )
→
WARNING - Seat warmer
burns
Never allow passengers who
may not be able to take care of
themselves to be exposed to
the risk of seat warmer burns.
These include:
1. Infants, children, elderly or
disabled persons, or hospital
outpatients
2. Persons with sensitive skin
or those that burn easily
3. Fatigued individuals
4. Intoxicated individuals
5. Individuals taking medication
that can cause drowsiness or
sleepiness (sleeping pills,
cold tablets, etc.)CAUTION
• When cleaning the seats, do
not use an organic solvent
such as thinner, benzene,
alcohol and gasoline. Doing
so may damage the surface of
the heater or seats.
• To prevent overheating the
seat warmer, do not place any-
thing on the seats that insu-
lates against heat, such as
blankets, cushions or seat
covers while the seat warmer
is in operation.
• Do not place heavy or sharp
objects on seats equipped
with seat warmers. Damage to
the seat warming components
could occur.
Page 38 of 785
317
Safety features of your vehicle
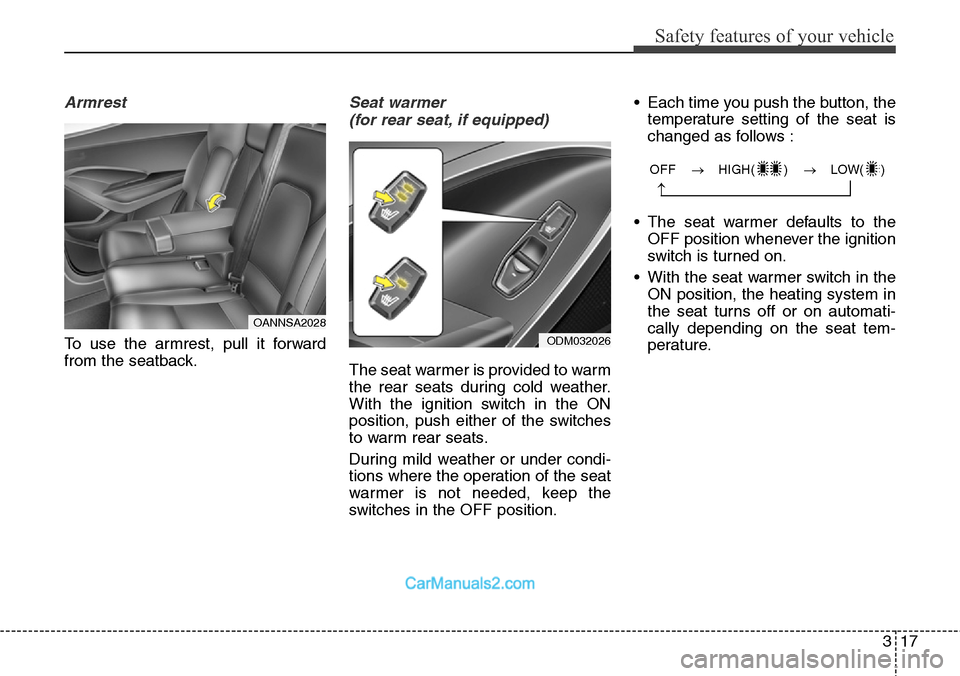
OFF → HIGH( ) → LOW( )
→
Armrest
To use the armrest, pull it forward
from the seatback.
Seat warmer
(for rear seat, if equipped)
The seat warmer is provided to warm
the rear seats during cold weather.
With the ignition switch in the ON
position, push either of the switches
to warm rear seats.
During mild weather or under condi-
tions where the operation of the seat
warmer is not needed, keep the
switches in the OFF position.• Each time you push the button, the
temperature setting of the seat is
changed as follows :
• The seat warmer defaults to the
OFF position whenever the ignition
switch is turned on.
• With the seat warmer switch in the
ON position, the heating system in
the seat turns off or on automati-
cally depending on the seat tem-
perature.
OANNSA2028
ODM032026
Page 40 of 785
319
Safety features of your vehicle
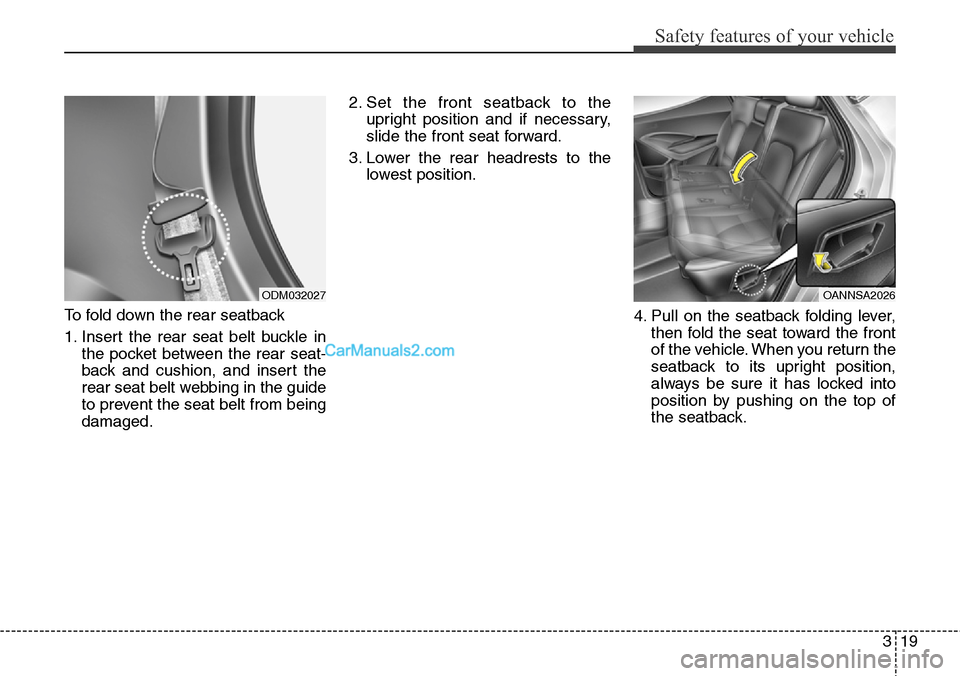
To fold down the rear seatback
1. Insert the rear seat belt buckle in
the pocket between the rear seat-
back and cushion, and insert the
rear seat belt webbing in the guide
to prevent the seat belt from being
damaged.2. Set the front seatback to the
upright position and if necessary,
slide the front seat forward.
3. Lower the rear headrests to the
lowest position.
4. Pull on the seatback folding lever,
then fold the seat toward the front
of the vehicle. When you return the
seatback to its upright position,
always be sure it has locked into
position by pushing on the top of
the seatback.
ODM032027OANNSA2026
Page 61 of 785
Safety features of your vehicle
40 3
When the seat belt is allowed to
retract to its fully stowed position,
the retractor will automatically
switch from the “Automatic lock-
ing” mode to the emergency lock
mode for normal adult usage.
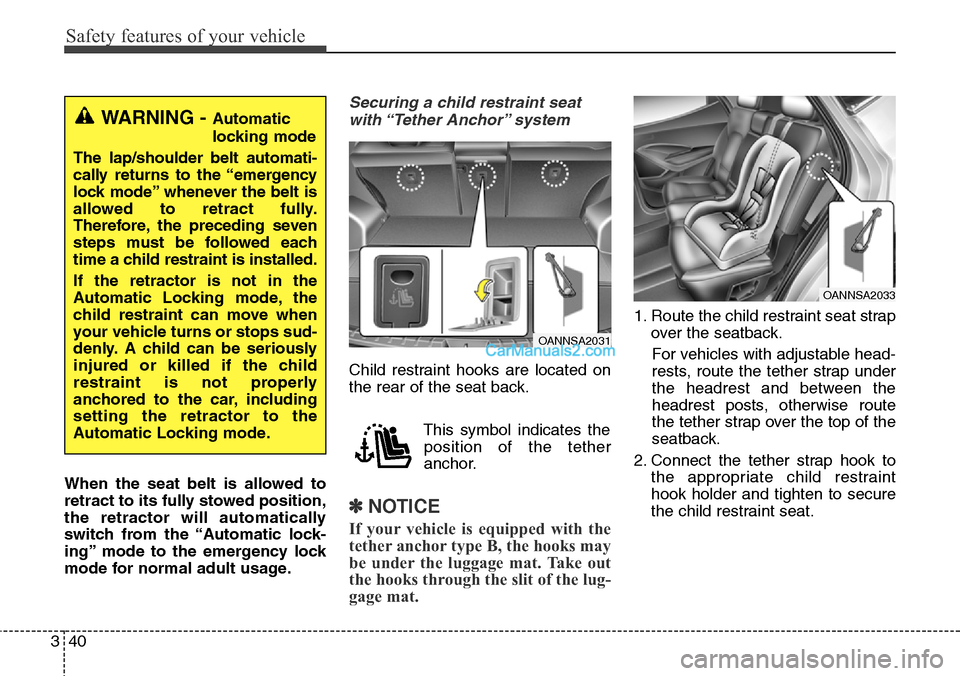
Securing a child restraint seat
with “Tether Anchor” system
Child restraint hooks are located on
the rear of the seat back.
This symbol indicates the
position of the tether
anchor.
✽NOTICE
If your vehicle is equipped with the
tether anchor type B, the hooks may
be under the luggage mat. Take out
the hooks through the slit of the lug-
gage mat.
1. Route the child restraint seat strap
over the seatback.
For vehicles with adjustable head-
rests, route the tether strap under
the headrest and between the
headrest posts, otherwise route
the tether strap over the top of the
seatback.
2. Connect the tether strap hook to
the appropriate child restraint
hook holder and tighten to secure
the child restraint seat.
WARNING - Automatic
locking mode
The lap/shoulder belt automati-
cally returns to the “emergency
lock mode” whenever the belt is
allowed to retract fully.
Therefore, the preceding seven
steps must be followed each
time a child restraint is installed.
If the retractor is not in the
Automatic Locking mode, the
child restraint can move when
your vehicle turns or stops sud-
denly. A child can be seriously
injured or killed if the child
restraint is not properly
anchored to the car, including
setting the retractor to the
Automatic Locking mode.
OANNSA2031
OANNSA2033
Page 94 of 785
Features of your vehicle
Folding key . . . . . . . . . . . . . . . . . . . . . . . . . . . . . . . . 4-4
• Record your key number . . . . . . . . . . . . . . . . . . . . . . . 4-4
• Key operations . . . . . . . . . . . . . . . . . . . . . . . . . . . . . . . . 4-4
• Precautions . . . . . . . . . . . . . . . . . . . . . . . . . . . . . . . . . . . 4-6
• Battery replacement . . . . . . . . . . . . . . . . . . . . . . . . . . . 4-7
• Immobilizer system . . . . . . . . . . . . . . . . . . . . . . . . . . . . 4-8
Smart key . . . . . . . . . . . . . . . . . . . . . . . . . . . . . . . . 4-11
• Record your key number . . . . . . . . . . . . . . . . . . . . . . 4-11
• Smart key function . . . . . . . . . . . . . . . . . . . . . . . . . . . 4-11
• Loss of the smart key . . . . . . . . . . . . . . . . . . . . . . . . . 4-14
• Precautions . . . . . . . . . . . . . . . . . . . . . . . . . . . . . . . . . . 4-15
• Smart key immobilizer system . . . . . . . . . . . . . . . . . . 4-15
• Battery replacement . . . . . . . . . . . . . . . . . . . . . . . . . . 4-17
Theft-alarm system . . . . . . . . . . . . . . . . . . . . . . . . 4-19
• Armed stage . . . . . . . . . . . . . . . . . . . . . . . . . . . . . . . . . 4-19
• Theft-alarm stage . . . . . . . . . . . . . . . . . . . . . . . . . . . . 4-21
• Disarmed stage. . . . . . . . . . . . . . . . . . . . . . . . . . . . . . . 4-21
Door locks . . . . . . . . . . . . . . . . . . . . . . . . . . . . . . . . 4-23
• From outside . . . . . . . . . . . . . . . . . . . . . . . . . . . . . . . . 4-23
• From inside . . . . . . . . . . . . . . . . . . . . . . . . . . . . . . . . . 4-25
• Impact sensing door unlock system . . . . . . . . . . . . . . 4-27
• Child-protector rear door lock. . . . . . . . . . . . . . . . . . 4-27
Tailgate . . . . . . . . . . . . . . . . . . . . . . . . . . . . . . . . . . 4-28
• Non-powered tailgate . . . . . . . . . . . . . . . . . . . . . . . . . 4-28
• Power tailgate . . . . . . . . . . . . . . . . . . . . . . . . . . . . . . . 4-30• Smart Tailgate . . . . . . . . . . . . . . . . . . . . . . . . . . . . . . . 4-35
• Emergency tailgate safety release . . . . . . . . . . . . . . . 4-38
Windows . . . . . . . . . . . . . . . . . . . . . . . . . . . . . . . . . 4-39
• Power windows . . . . . . . . . . . . . . . . . . . . . . . . . . . . . . 4-40
Hood. . . . . . . . . . . . . . . . . . . . . . . . . . . . . . . . . . . . . 4-44
• Opening the hood . . . . . . . . . . . . . . . . . . . . . . . . . . . . 4-44
• Closing the hood . . . . . . . . . . . . . . . . . . . . . . . . . . . . . 4-45
Fuel filler lid . . . . . . . . . . . . . . . . . . . . . . . . . . . . . . 4-46
• Opening the fuel filler lid . . . . . . . . . . . . . . . . . . . . . . 4-46
• Closing the fuel filler lid . . . . . . . . . . . . . . . . . . . . . . . 4-46
• Emergency fuel filler lid release . . . . . . . . . . . . . . . . 4-49
Panoramic sunroof . . . . . . . . . . . . . . . . . . . . . . . . . 4-50
• Sunroof open warning. . . . . . . . . . . . . . . . . . . . . . . . . 4-51
• Sunshade . . . . . . . . . . . . . . . . . . . . . . . . . . . . . . . . . . . 4-52
• Sliding the sunroof . . . . . . . . . . . . . . . . . . . . . . . . . . . 4-52
• Tilting the sunroof . . . . . . . . . . . . . . . . . . . . . . . . . . . . 4-53
• Closing the sunroof . . . . . . . . . . . . . . . . . . . . . . . . . . . 4-53
• Resetting the sunroof . . . . . . . . . . . . . . . . . . . . . . . . . 4-55
Steering wheel . . . . . . . . . . . . . . . . . . . . . . . . . . . . . 4-56
• Electronic power steering . . . . . . . . . . . . . . . . . . . . . . 4-56
• Tilt & telescopic steering . . . . . . . . . . . . . . . . . . . . . . 4-57
• Heated steering wheel . . . . . . . . . . . . . . . . . . . . . . . . . 4-58
• Horn . . . . . . . . . . . . . . . . . . . . . . . . . . . . . . . . . . . . . . . 4-58
• Driver selectable steering mode . . . . . . . . . . . . . . . . . 4-59
4
Page 95 of 785
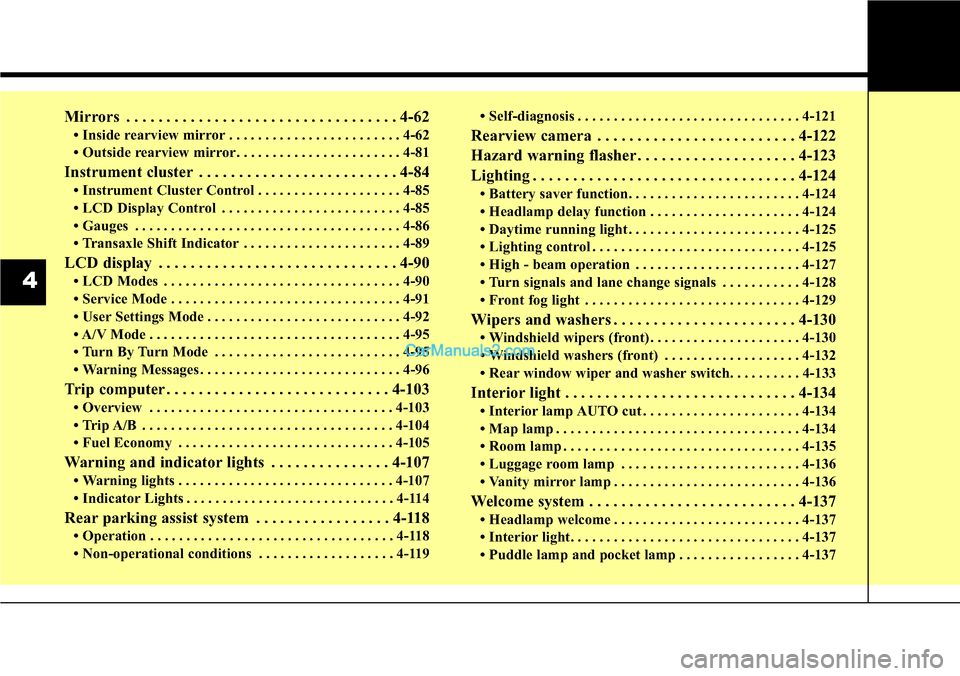
Mirrors . . . . . . . . . . . . . . . . . . . . . . . . . . . . . . . . . . 4-62
• Inside rearview mirror . . . . . . . . . . . . . . . . . . . . . . . . 4-62
• Outside rearview mirror. . . . . . . . . . . . . . . . . . . . . . . 4-81
Instrument cluster . . . . . . . . . . . . . . . . . . . . . . . . . 4-84
• Instrument Cluster Control . . . . . . . . . . . . . . . . . . . . 4-85
• LCD Display Control . . . . . . . . . . . . . . . . . . . . . . . . . 4-85
• Gauges . . . . . . . . . . . . . . . . . . . . . . . . . . . . . . . . . . . . . 4-86
• Transaxle Shift Indicator . . . . . . . . . . . . . . . . . . . . . . 4-89
LCD display . . . . . . . . . . . . . . . . . . . . . . . . . . . . . . 4-90
• LCD Modes . . . . . . . . . . . . . . . . . . . . . . . . . . . . . . . . . 4-90
• Service Mode . . . . . . . . . . . . . . . . . . . . . . . . . . . . . . . . 4-91
• User Settings Mode . . . . . . . . . . . . . . . . . . . . . . . . . . . 4-92
• A/V Mode . . . . . . . . . . . . . . . . . . . . . . . . . . . . . . . . . . . 4-95
• Turn By Turn Mode . . . . . . . . . . . . . . . . . . . . . . . . . . 4-95
• Warning Messages . . . . . . . . . . . . . . . . . . . . . . . . . . . . 4-96
Trip computer . . . . . . . . . . . . . . . . . . . . . . . . . . . . 4-103
• Overview . . . . . . . . . . . . . . . . . . . . . . . . . . . . . . . . . . 4-103
• Trip A/B . . . . . . . . . . . . . . . . . . . . . . . . . . . . . . . . . . . 4-104
• Fuel Economy . . . . . . . . . . . . . . . . . . . . . . . . . . . . . . 4-105
Warning and indicator lights . . . . . . . . . . . . . . . 4-107
• Warning lights . . . . . . . . . . . . . . . . . . . . . . . . . . . . . . 4-107
• Indicator Lights . . . . . . . . . . . . . . . . . . . . . . . . . . . . . 4-114
Rear parking assist system . . . . . . . . . . . . . . . . . 4-118
• Operation . . . . . . . . . . . . . . . . . . . . . . . . . . . . . . . . . . 4-118
• Non-operational conditions . . . . . . . . . . . . . . . . . . . 4-119• Self-diagnosis . . . . . . . . . . . . . . . . . . . . . . . . . . . . . . . 4-121
Rearview camera . . . . . . . . . . . . . . . . . . . . . . . . . 4-122
Hazard warning flasher . . . . . . . . . . . . . . . . . . . . 4-123
Lighting . . . . . . . . . . . . . . . . . . . . . . . . . . . . . . . . . 4-124
• Battery saver function. . . . . . . . . . . . . . . . . . . . . . . . 4-124
• Headlamp delay function . . . . . . . . . . . . . . . . . . . . . 4-124
• Daytime running light . . . . . . . . . . . . . . . . . . . . . . . . 4-125
• Lighting control . . . . . . . . . . . . . . . . . . . . . . . . . . . . . 4-125
• High - beam operation . . . . . . . . . . . . . . . . . . . . . . . 4-127
• Turn signals and lane change signals . . . . . . . . . . . 4-128
• Front fog light . . . . . . . . . . . . . . . . . . . . . . . . . . . . . . 4-129
Wipers and washers . . . . . . . . . . . . . . . . . . . . . . . 4-130
• Windshield wipers (front) . . . . . . . . . . . . . . . . . . . . . 4-130
• Windshield washers (front) . . . . . . . . . . . . . . . . . . . 4-132
• Rear window wiper and washer switch. . . . . . . . . . 4-133
Interior light . . . . . . . . . . . . . . . . . . . . . . . . . . . . . 4-134
• Interior lamp AUTO cut . . . . . . . . . . . . . . . . . . . . . . 4-134
• Map lamp . . . . . . . . . . . . . . . . . . . . . . . . . . . . . . . . . . 4-134
• Room lamp . . . . . . . . . . . . . . . . . . . . . . . . . . . . . . . . . 4-135
• Luggage room lamp . . . . . . . . . . . . . . . . . . . . . . . . . 4-136
• Vanity mirror lamp . . . . . . . . . . . . . . . . . . . . . . . . . . 4-136
Welcome system . . . . . . . . . . . . . . . . . . . . . . . . . . 4-137
• Headlamp welcome . . . . . . . . . . . . . . . . . . . . . . . . . . 4-137
• Interior light. . . . . . . . . . . . . . . . . . . . . . . . . . . . . . . . 4-137
• Puddle lamp and pocket lamp . . . . . . . . . . . . . . . . . 4-137
4
Page 97 of 785
Features of your vehicle
4 4
Record your key number
The key code num-
ber is stamped or
printed on the key
code tag attached to
the key set. Should
you lose your keys, this number will
enable an authorized HYUNDAI
dealer to duplicate the keys easily.
Remove the key code tag and store it
in a safe place. Also, record the code
number and keep it in a safe and
handy place, but not in the vehicle.
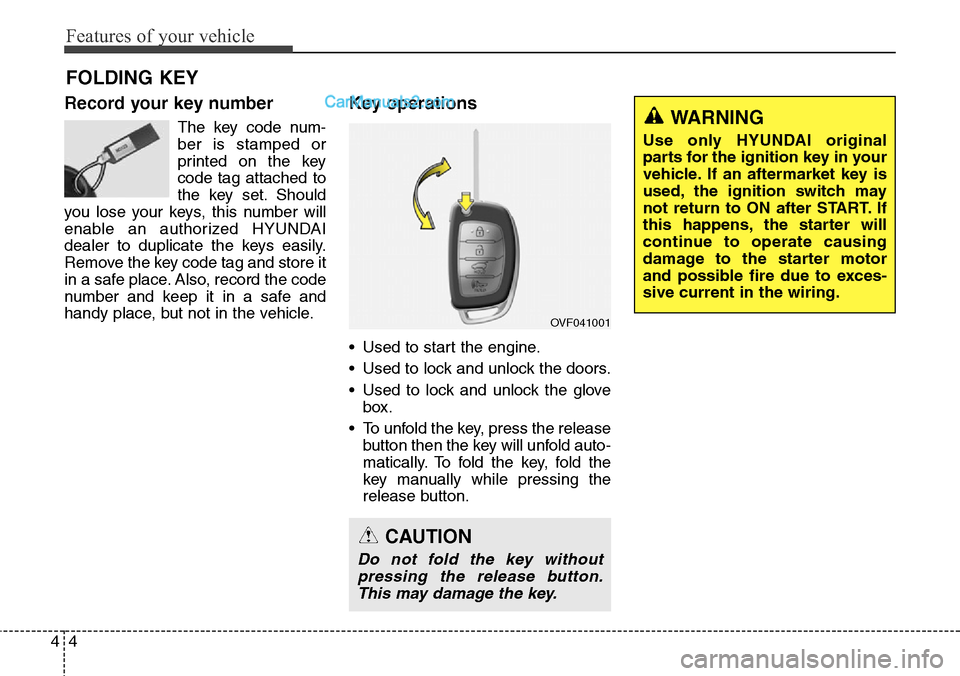
Key operations
• Used to start the engine.
• Used to lock and unlock the doors.
• Used to lock and unlock the glove
box.
• To unfold the key, press the release
button then the key will unfold auto-
matically. To fold the key, fold the
key manually while pressing the
release button.
FOLDING KEY
OVF041001
CAUTION
Do not fold the key without
pressing the release button.
This may damage the key.
WARNING
Use only HYUNDAI original
parts for the ignition key in your
vehicle. If an aftermarket key is
used, the ignition switch may
not return to ON after START. If
this happens, the starter will
continue to operate causing
damage to the starter motor
and possible fire due to exces-
sive current in the wiring.