P off Hyundai Santa Fe Sport 2017 Owner's Manual
[x] Cancel search | Manufacturer: HYUNDAI, Model Year: 2017, Model line: Santa Fe Sport, Model: Hyundai Santa Fe Sport 2017Pages: 614, PDF Size: 18.99 MB
Page 9 of 614

Introduction
21
We want to help you get the greatest
possible driving experience from your
vehicle. Your Owner’s Manual can
assist you in many ways. We strongly
recommend that you read the entire
manual. In order to minimize the
chance of death or injury, you must
read the WARNING and CAUTION
sections in the manual. Illustrations
complement the text in this manual to
best explain how to use your vehicle.
By reading your manual, you will
learn about features, important safety
information, and driving tips under
various road conditions. The general
layout of the manual is provided in
the Table of Contents. A good place
to start is the index; it has an alpha-
betical listing of all information in your
manual. Sections: This manual has
eight sections plus an index. Each
section begins with a brief list of con-
tents so you can tell at a glance if that
section has the information you want.
You will find various WARNINGS,
CAUTIONS, and NOTICES in this
manual. These WARNINGS were pre-
pared to enhance your personal safe-
ty. You should carefully read and follow
ALL procedures and recommenda-
tions provided in these WARNINGS,
CAUTIONS and NOTICES.Symbols used in this manual
Warnings, Cautions and Notices
✽ ✽NOTICE
A NOTICE indicates interesting or
helpful information is being provided.
Safety symbol in illustrations
The symbol means to "Avoid"
or "Do not do something". Your new vehicle is designed to obtain
maximum performance with UNLEAD-
ED FUEL, as well as minimize exhaust
emissions and spark plug fouling.
Your new vehicle is designed to use
only unleaded fuel having a pump
octane number ((R+M)/2) of 87
(Research Octane Number 91) or
higher. (Do not use methanol blended
fuels.)
Never add any fuel system cleaning
agents to the fuel tank other than what
has been specified. (Consult an
authorized HYUNDAI dealer for
details.)
HOW TO USE THIS MANUAL
WARNING
A WARNING indicates that a
condition may result in harm,
serious bodily injury or death if
the warning is ignored.
CAUTION
A CAUTION indicates that a con-
dition may result in damage toyour vehicle if the caution isignored.
FUEL REQUIREMENTS
WARNING - Refueling
• Do not "top off" after the noz- zle automatically shuts off
when refueling. Attempts to
force more fuel into the tank
can cause fuel overflow onto
you and the ground causing a
risk of fire.
Always check that the fuel cap is installed securely to pre-
vent fuel spillage in the event
of an accident.
Page 18 of 614
Your vehicle at a glance
42
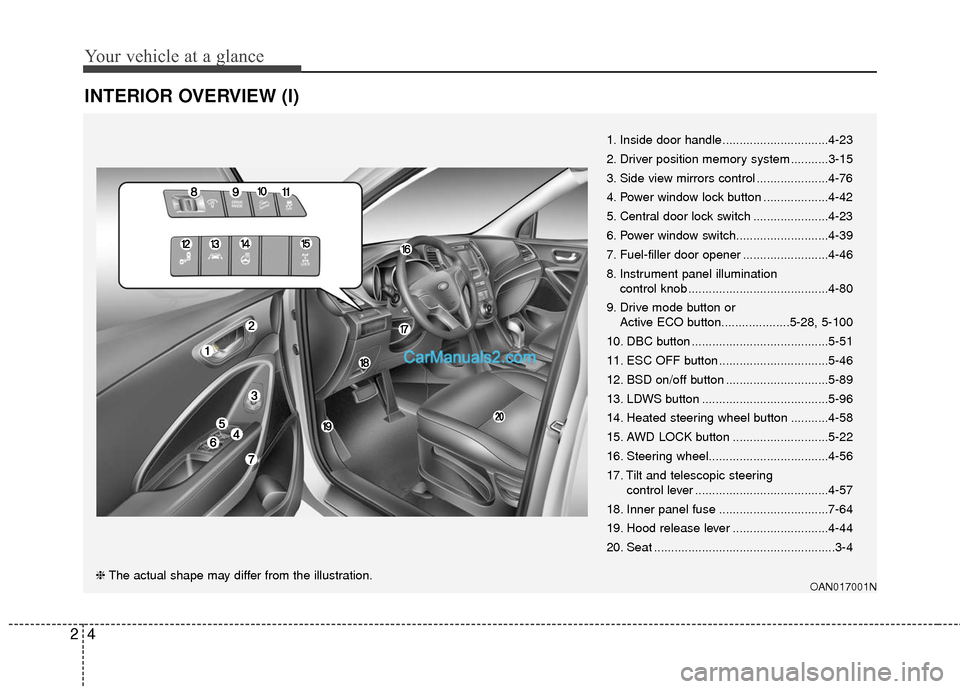
INTERIOR OVERVIEW (I)
1. Inside door handle...............................4-23
2. Driver position memory system ...........3-15
3. Side view mirrors control .....................4-76
4. Power window lock button ...................4-42
5. Central door lock switch ......................4-23
6. Power window switch...........................4-39
7. Fuel-filler door opener .........................4-46
8. Instrument panel illumination control knob .........................................4-80
9. Drive mode button or Active ECO button....................5-28, 5-100
10. DBC button ........................................5-51
11. ESC OFF button ................................5-46
12. BSD on/off button ..............................5-89
13. LDWS button .....................................5-96
14. Heated steering wheel button ...........4-58
15. AWD LOCK button ............................5-22
16. Steering wheel...................................4-56
17. Tilt and telescopic steering control lever .......................................4-57
18. Inner panel fuse ................................7-64
19. Hood release lever ............................4-44
20. Seat .....................................................3-4
OAN017001N❈ The actual shape may differ from the illustration.
Page 19 of 614

25
Your vehicle at a glance
INTERIOR OVERVIEW (II)
OAN017002N❈The actual shape may differ from the illustration. 1. Power outlet.......................................4-173
2. Aux, USB and iPod
®..........................4-176
3. Transaxle shift lever .............................5-14
4. Seat warmer or Air ventilation seat button ..............3-12, 3-13
5. Parking assist system button.............4-120
6. Multi-view camera system
on/off button ......................................4-125
7. Cup holder .........................................4-172
8. AUTO HOLD button.............................5-40
9. EPB switch ..........................................5-34
■ Type A
■Type B
Page 24 of 614
Safety features of your vehicle
23
You will find many safety precautions
and recommendations throughout
this section, and throughout this
manual. The safety precautions in
this section are among the most
important.
Always Wear Your Seat Belt
A seat belt is your best protection in
all types of accidents. Air bags are
designed to supplement seat belts,
not replace them. So even though
your vehicle is equipped with air
bags, ALWAYS make sure you and
your passengers wear your seat
belts, and wear them properly.
Restrain All Children
All children under age 13 should ride
in your vehicle properly restrained in
a rear seat, not the front seat. Infants
and small children should be
restrained in an appropriate child
restraint. Larger children should use
a booster seat with the lap/shoulder
belt until they can use the seat belt
properly without a booster seat.
Air Bag Hazards
While air bags can save lives, they
can also cause serious or fatal
injuries to occupants who sit too
close to them, or who are not prop-
erly restrained. Infants, young chil-
dren, and shorter adults are at the
greatest risk of being injured by an
inflating air bag. Follow all instruc-
tions and warnings in this manual.
Driver Distraction
Driver distraction presents a serious
and potentially deadly danger, espe-
cially for inexperienced drivers.
Safety should be the first concern
when behind the wheel and drivers
need to be aware of the wide array of
potential distractions, such as
drowsiness, reaching for objects,
eating, personal grooming, other
passengers, and using cellular
phones.
Drivers can become distracted when
they take their eyes and attention off
the road or their hands off the wheel
to focus on activities other than driv-
ing. To reduce your risk of distraction
or getting into an accident:
IMPORTANT SAFETY PRECAUTIONS
Page 30 of 614
Safety features of your vehicle
83
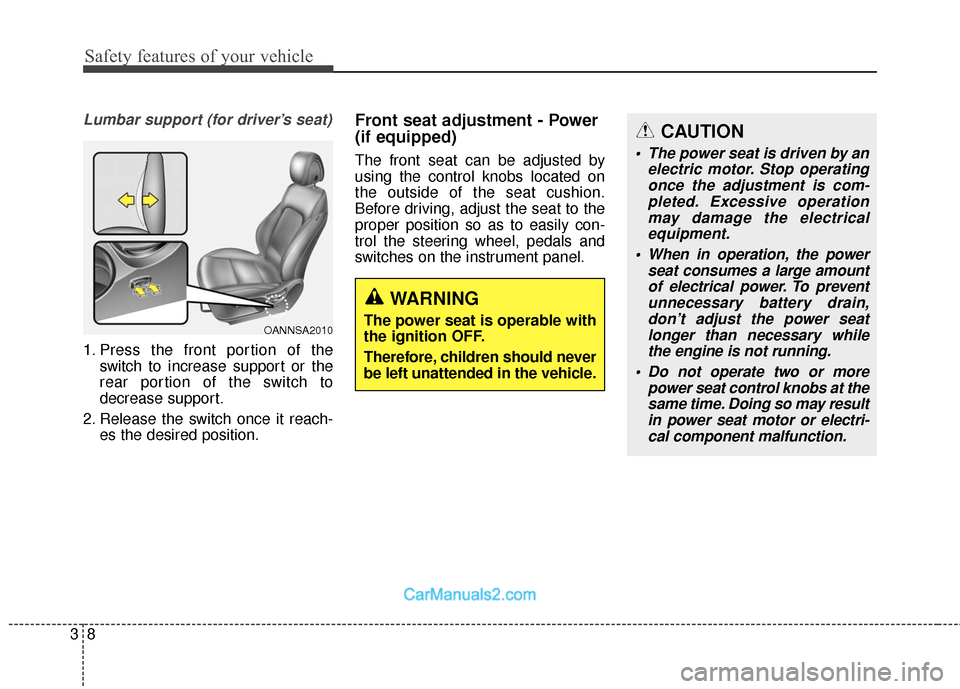
Lumbar support (for driver’s seat)
1. Press the front portion of theswitch to increase support or the
rear portion of the switch to
decrease support.
2. Release the switch once it reach- es the desired position.
Front seat adjustment - Power
(if equipped)
The front seat can be adjusted by
using the control knobs located on
the outside of the seat cushion.
Before driving, adjust the seat to the
proper position so as to easily con-
trol the steering wheel, pedals and
switches on the instrument panel.
OANNSA2010
WARNING
The power seat is operable with
the ignition OFF.
Therefore, children should never
be left unattended in the vehicle.
CAUTION
The power seat is driven by anelectric motor. Stop operatingonce the adjustment is com-pleted. Excessive operationmay damage the electricalequipment.
When in operation, the power seat consumes a large amountof electrical power. To preventunnecessary battery drain,don’t adjust the power seatlonger than necessary whilethe engine is not running.
Do not operate two or more power seat control knobs at thesame time. Doing so may resultin power seat motor or electri-cal component malfunction.
Page 34 of 614
Safety features of your vehicle
12
3
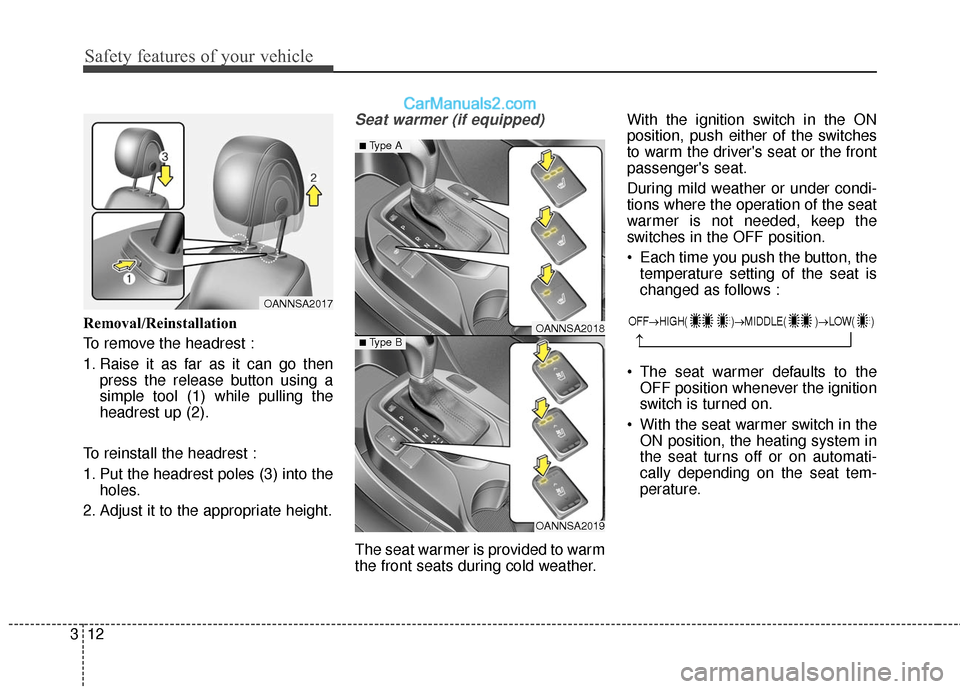
Removal/Reinstallation
To remove the headrest :
1. Raise it as far as it can go then
press the release button using a
simple tool (1) while pulling the
headrest up (2).
To reinstall the headrest :
1. Put the headrest poles (3) into the holes.
2. Adjust it to the appropriate height.
Seat warmer (if equipped)
The seat warmer is provided to warm
the front seats during cold weather. With the ignition switch in the ON
position, push either of the switches
to warm the driver's seat or the front
passenger's seat.
During mild weather or under condi-
tions where the operation of the seat
warmer is not needed, keep the
switches in the OFF position.
Each time you push the button, the
temperature setting of the seat is
changed as follows :
The seat warmer defaults to the OFF position whenever the ignition
switch is turned on.
With the seat warmer switch in the ON position, the heating system in
the seat turns off or on automati-
cally depending on the seat tem-
perature.
OANNSA2017
OANNSA2018
OANNSA2019
■Type A
■ Type B
OFF→ HIGH( )→ MIDDLE( )→LOW( )
→
Page 35 of 614

313
Safety features of your vehicle
Air ventilation seat (if equipped)
The Air ventilation seat is provided to
cool the front seats during hot weath-
er by blowing air through small vent
holes on the surface of the seats.
While the engine is running, press
the cooling portion (blue color) of the
switch to cool the driver's seat or the
front passenger's seat.
When the operation of the seat cool-
er is not needed, keep the switches
in the OFF position.
OANNSA2020
WARNING
The seat warmers can cause a
SERIOUS BURN, even at low
temperatures and especially if
used for long periods of time.
Passengers must be able to feel
if the seat is becoming too
warm so they can turn it off, if
needed.
People who cannot detect tem-
perature change or pain to the
skin should use extreme cau-
tion, especially the following
types of passengers:
Infants, children, elderly ordisabled persons, or hospital
outpatients.
People with sensitive skin or who burn easily.
Fatigued individuals.
Intoxicated individuals.
People taking medication that can cause drowsiness or
sleepiness.
WARNING
NEVER place anything on the
seat that insulates against heat
when the seat warmer is in
operation, such as a blanket or
seat cushion. This may cause
the seat warmer to overheat,
causing a burn or damage to
the seat.
CAUTION
To prevent damage to the seatwarmers and seats:
Never use a solvent such as paint thinner, benzene, alco-hol or gasoline to clean theseats.
Do not place heavy or sharp objects on seats equippedwith seat warmers.
Do not change the seat cover. It may damage the seatwarmer.
Page 36 of 614

Safety features of your vehicle
14
3
airflow will change as follows:
the OFF position whenever the igni-
tion switch is turned on.Seatback pocket (if equipped)
OFF→ HIGH( )→ MIDDLE( )→LOW( )
→
OCM030052
WARNING - Seatback
pockets
Do not put heavy or sharp
objects in the seatback pocket.
An occupant could contact such
objects in a crash. Heavy objects
in the front passenger seatback
could also interfere with the
occupant sensing system.
CAUTION
To prevent damage to the air ventilation seat:
Use the air ventilation seat ONLY when the climate con-trol system is on. Using theair ventilation seat for pro-longed periods of time withthe climate control system offcould cause the air ventilationseat to malfunction.
(Continued)
(Continued) Never use a solvent such as paint thinner, benzene, alco-hol or gasoline to clean theseats.
Avoid spilling liquids on the surface of the front seats andseatbacks; this may cause theair vent holes to becomeblocked and not work proper-ly.
Do not place materials such as plastic bags or newspapersunder the seats. They mayblock the air intake causingthe air vents to not work prop-erly.
Do not change the seat cov- ers. It may damage the air ven-tilation seat.
If the air vents do not operate, restart the vehicle. If there isno change, we recommendthat you have your vehicleinspected by an authorizedHYUNDAI dealer.
Page 38 of 614
Safety features of your vehicle
16
3
Storing positions into memory
using the buttons on the door
Storing driver’s seat positions
1. Shift the shift lever into P while the engine start/stop button is ON or
ignition switch ON.
2. Adjust the driver’s seat and side view mirror to a position that is
comfortable for the driver.
3. Press SET button on the control panel. The system will beep once.
4. Press one of the memory buttons (1 or 2) within 5 seconds after
pressing the SET button. The sys-
tem will beep twice when memory
has been successfully stored.
Recalling positions from memory
The position in memory will be
recalled when:
1. The shift lever is in P with one of the condition below:
- The ignition switch in the ON position or engine running.
- The ignition switch in the LOCK/OFF or ACC position
while the driver's door is opened.
2. Press the desired memory button (1 or 2). The system will beep
once, then the driver's seat will
automatically adjust to the stored
position.
Adjusting the control switch for the
driver’s seat while the system is
recalling the stored position will
cause the movement to stop and
move in the direction that the control
switch is moved.WARNING
Use caution when recalling the
adjustment memory while sit-
ting in the vehicle. Push the
seat position control switch to
the desired position immediate-
ly if the seat moves too far in
any direction.
Page 39 of 614
317
Safety features of your vehicle
Easy access function (if equipped)
The system will move the driver's
seat automatically as follows:
Without smart key system
- It will move the driver’s seat rear-ward when the ignition key is
removed.
- It will move the driver’s seat for- ward when the ignition key is
inserted.
With smart key system - It will move the driver’s seat rear-ward when the engine start/stop
button is changed to the OFF
position.
- It will move the driver’s seat for- ward when the engine start/stop
button is changed to the ACC or
START position.
You can activate or deactivate this
feature. Refer to "User settings" in
section 4.
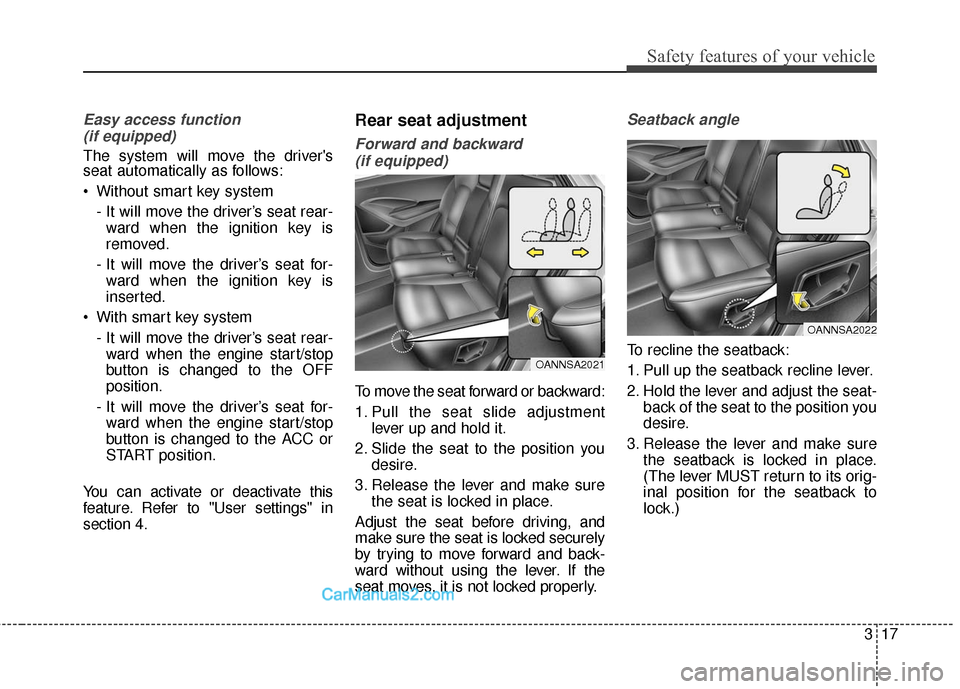
Rear seat adjustment
Forward and backward (if equipped)
To move the seat forward or backward:
1. Pull the seat slide adjustment lever up and hold it.
2. Slide the seat to the position you desire.
3. Release the lever and make sure the seat is locked in place.
Adjust the seat before driving, and
make sure the seat is locked securely
by trying to move forward and back-
ward without using the lever. If the
seat moves, it is not locked properly.
Seatback angle
To recline the seatback:
1. Pull up the seatback recline lever.
2. Hold the lever and adjust the seat- back of the seat to the position you
desire.
3. Release the lever and make sure the seatback is locked in place.
(The lever MUST return to its orig-
inal position for the seatback to
lock.)OANNSA2021
OANNSA2022