display Hyundai Santa Fe Sport 2017 Owner's Manual
[x] Cancel search | Manufacturer: HYUNDAI, Model Year: 2017, Model line: Santa Fe Sport, Model: Hyundai Santa Fe Sport 2017Pages: 614, PDF Size: 18.99 MB
Page 20 of 614
Your vehicle at a glance
62
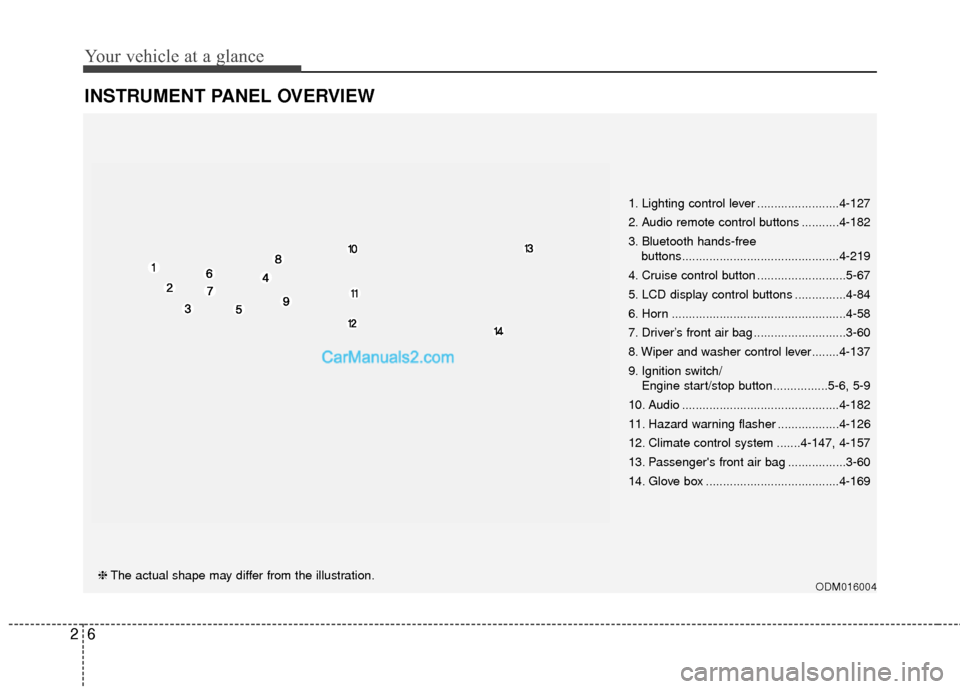
INSTRUMENT PANEL OVERVIEW
ODM016004❈The actual shape may differ from the illustration. 1. Lighting control lever ........................4-127
2. Audio remote control buttons ...........4-182
3. Bluetooth hands-free
buttons..............................................4-219
4. Cruise control button ..........................5-67
5. LCD display control buttons ...............4-84
6. Horn ...................................................4-58
7. Driver’s front air bag ...........................3-60
8. Wiper and washer control lever........4-137
9. Ignition switch/ Engine start/stop button ................5-6, 5-9
10. Audio ..............................................4-182
11. Hazard warning flasher ..................4-126
12. Climate control system .......4-147, 4-157
13. Passenger's front air bag .................3-60
14. Glove box .......................................4-169
Page 99 of 614
Mirrors . . . . . . . . . . . . . . . . . . . . . . . . . . . . . . . . . . 4-60\
. . . . . . . . . . . . . . . . . . . . . . . . 4-60
. . . . . . . . . . . . . . . . . . . . . . . . . . . . 4-76
Instrument cluster . . . . . . . . . . . . . . . . . . . . . . . . . 4-79
. . . . . . . . . . . . . . . . . . . . 4-80
. . . . . . . . . . . . . . . . . . . . . . . . . . . . . . . . . . . . \
. 4-80
. . . . . . . . . . . . . . . . . . . . . . 4-83
LCD display . . . . . . . . . . . . . . . . . . . . . . . . . . . . . . 4-84
. . . . . . . . . . . . . . . . . . . . . . . . . 4-84
. . . . . . . . . . . . . . . . . . . . . . . . . . . . . . . . . 4-84
. . . . . . . . . . . . . . . . . . . . . . . . . 4-85
. . . . . . . . . . . . . . . . . . . . . . . . . . . . 4-85
. . . . . . . . . . . . . . . . . . . . . . . . . . . . . . . . . . . 4-\
86
. . . . . . . . . . . . . . . . . . . . . . . . . . . . . . . . 4-86
. . . . . . . . . . . . . . . . . . . . . . . . . . . 4-87
. . . . . . . . . . . . . . . . . . . . . . . . . . . . 4-93
Trip computer . . . . . . . . . . . . . . . . . . . . . . . . . . . . 4-102
. . . . . . . . . . . . . . . . . . . . . . . . . . . . . . 4-103
. . . . . . . . . . . . . . . . . . . . . . . . . . . . . . . . . . . 4-\
104
. . . . . . . . . . . . . . . . . . . . . . . . . 4-105
Warning and indicator lights . . . . . . . . . . . . . . . 4-107
. . . . . . . . . . . . . . . . . . . . . . . . . . . . . . 4-107
. . . . . . . . . . . . . . . . . . . . . . . . . . . . . 4-115
Drive assist system . . . . . . . . . . . . . . . . . . . . . . . . 4-120
. . . . . . . . . . . . . . . . . . . . 4-120
. . . . . . . . . . . . . . . . . . . . . . . . . . . 4-124
. . . . . . . . . . . . . . . . . . . 4-125
Hazard warning flasher . . . . . . . . . . . . . . . . . . . . 4-126
Lighting . . . . . . . . . . . . . . . . . . . . . . . . . . . . . . . . . 4-127
. . . . . . . . . . . . . . . . . . . . . . . . . . . . . 4-127
. . . . . . . . . . . . . . . . . . . . . . . . . . . . . 4-128
. . . . . . . . . . . . . . . . . . . . . . . . . . . 4-133
. . . . . . . . 4-136
Wipers and washers . . . . . . . . . . . . . . . . . . . . . . . 4-137
. . . . . . . . . . . . . . . . . . . . . . . . . . . 4-137
. . . . . . . . . 4-140
Interior light . . . . . . . . . . . . . . . . . . . . . . . . . . . . . 4-141
. . . . . . . . . . . . . . . . . . . 4-141
. . . . . . . . . . . . . . . . . . . . . . . . . . . . . . . . . . 4-14\
1
. . . . . . . . . . . . . . . . . . . . . . . . . . . . . . . . . 4-142
. . . . . . . . . . . . . . . . . . . . . . . . . 4-143
. . . . . . . . . . . . . . . . . . . . . . . . . . 4-143
4
Page 132 of 614
435
Features of your vehicle
1. Setting
To activate the Smart Liftgate (Smart
Tailgate), go to User Settings Mode
and select Smart Liftgate (Smart
Tailgate) on the LCD display.
❈For more details, refer to "LCD dis-
play" in this chapter.
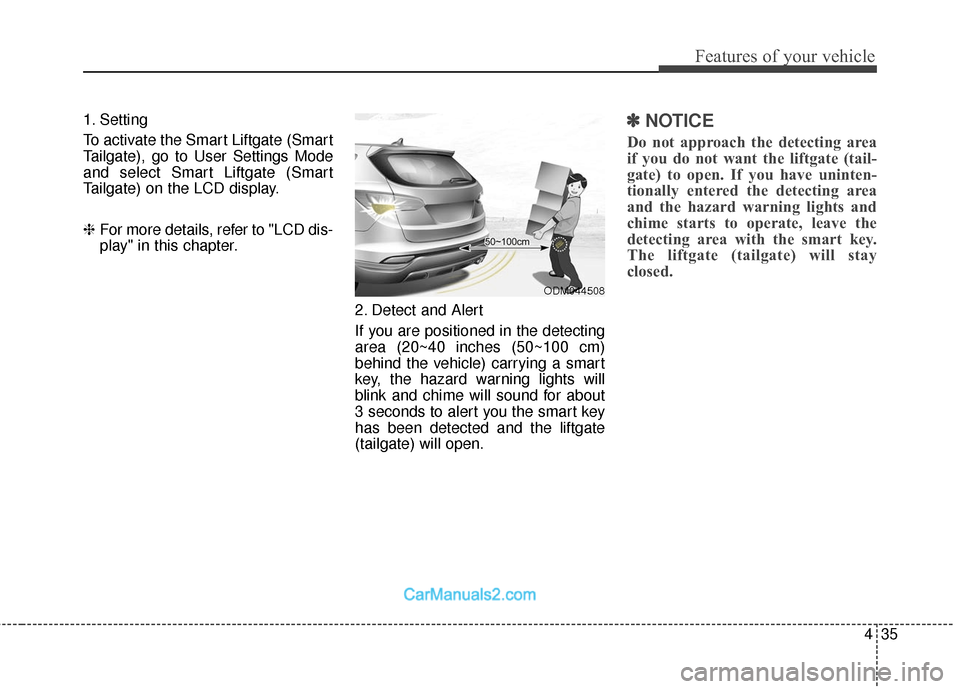
2. Detect and Alert
If you are positioned in the detecting
area (20~40 inches (50~100 cm)
behind the vehicle) carrying a smart
key, the hazard warning lights will
blink and chime will sound for about
3 seconds to alert you the smart key
has been detected and the liftgate
(tailgate) will open.✽ ✽NOTICE
Do not approach the detecting area
if you do not want the liftgate (tail-
gate) to open. If you have uninten-
tionally entered the detecting area
and the hazard warning lights and
chime starts to operate, leave the
detecting area with the smart key.
The liftgate (tailgate) will stay
closed.
ODM044508
Page 148 of 614
451
Features of your vehicle
Sunroof open warning
(if equipped)
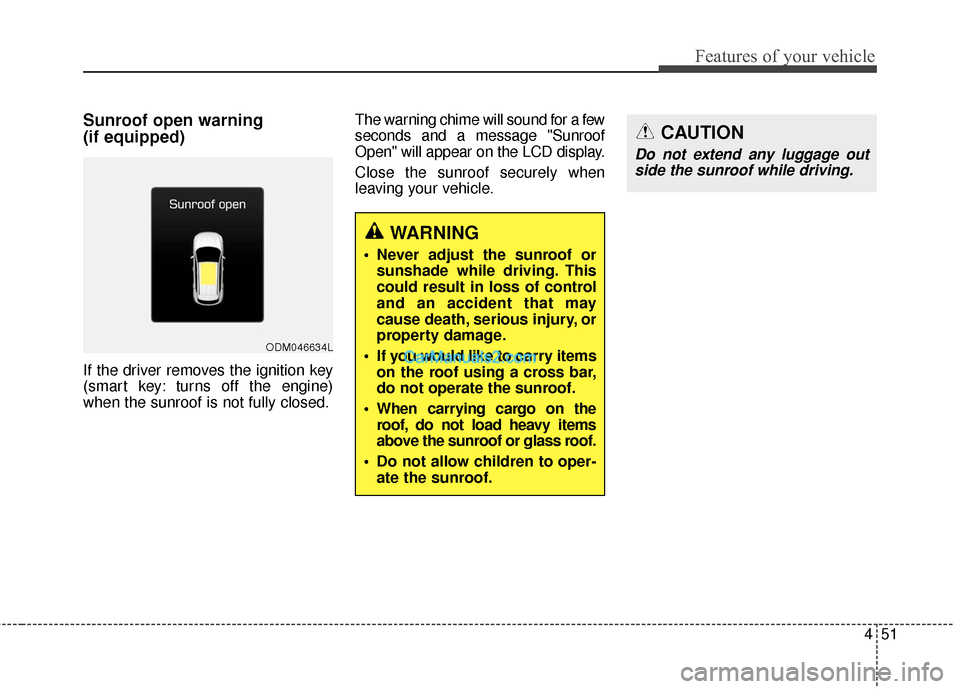
If the driver removes the ignition key
(smart key: turns off the engine)
when the sunroof is not fully closed.The warning chime will sound for a few
seconds and a message "Sunroof
Open" will appear on the LCD display.
Close the sunroof securely when
leaving your vehicle.
ODM046634L
WARNING
Never adjust the sunroof or
sunshade while driving. This
could result in loss of control
and an accident that may
cause death, serious injury, or
property damage.
If you would like to carry items on the roof using a cross bar,
do not operate the sunroof.
When carrying cargo on the roof, do not load heavy items
above the sunroof or glass roof.
Do not allow children to oper- ate the sunroof.
CAUTION
Do not extend any luggage outside the sunroof while driving.
Page 155 of 614
Features of your vehicle
58
4
Heated steering wheel
(if equipped)
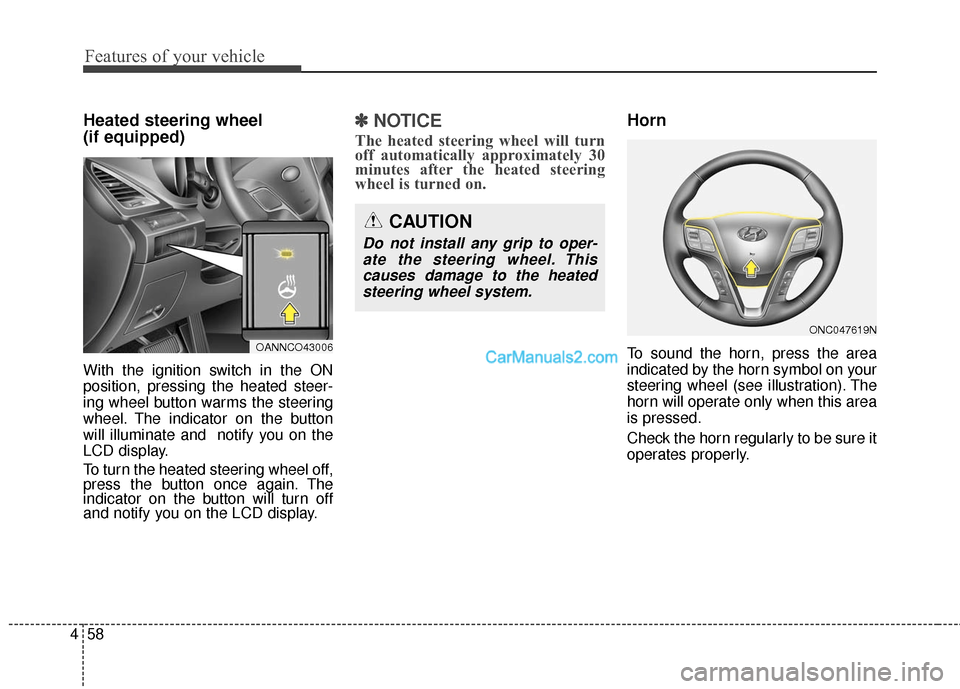
With the ignition switch in the ON
position, pressing the heated steer-
ing wheel button warms the steering
wheel. The indicator on the button
will illuminate and notify you on the
LCD display.
To turn the heated steering wheel off,
press the button once again. The
indicator on the button will turn off
and notify you on the LCD display.
✽ ✽
NOTICE
The heated steering wheel will turn
off automatically approximately 30
minutes after the heated steering
wheel is turned on.
Horn
To sound the horn, press the area
indicated by the horn symbol on your
steering wheel (see illustration). The
horn will operate only when this area
is pressed.
Check the horn regularly to be sure it
operates properly.
CAUTION
Do not install any grip to oper-
ate the steering wheel. Thiscauses damage to the heatedsteering wheel system.
OANNCO43006
ONC047619N
Page 158 of 614
461
Features of your vehicle
Electric chromic mirror (ECM)with compass and HomeLink®
system (if equipped)
Your vehicle may be equipped with a
Gentex Automatic-Dimming Mirror
with a Z-Nav™ Electronic Compass
Display and an Integrated HomeLink
®
Wireless Control System.
During nighttime driving, this feature
will automatically detect and reduce
rearview mirror glare while the com-
pass indicates the direction the vehi-
cle is pointed. The HomeLink
®
Universal Transceiver allows you to
activate your garage door(s), electric
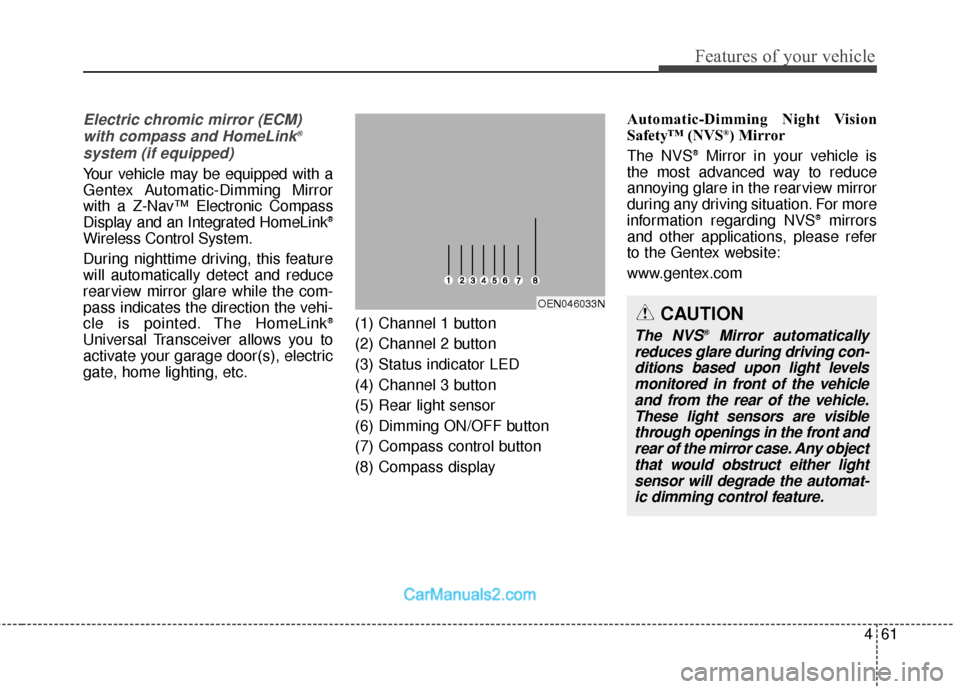
gate, home lighting, etc. (1) Channel 1 button
(2) Channel 2 button
(3) Status indicator LED
(4) Channel 3 button
(5) Rear light sensor
(6) Dimming ON/OFF button
(7) Compass control button
(8) Compass display Automatic-Dimming Night Vision
Safety™ (NVS
®) Mirror
The NVS®Mirror in your vehicle is
the most advanced way to reduce
annoying glare in the rearview mirror
during any driving situation. For more
information regarding NVS
®mirrors
and other applications, please refer
to the Gentex website:
www.gentex.com
OEN046033NCAUTION
The NVS®Mirror automatically
reduces glare during driving con- ditions based upon light levelsmonitored in front of the vehicleand from the rear of the vehicle.These light sensors are visiblethrough openings in the front andrear of the mirror case. Any objectthat would obstruct either lightsensor will degrade the automat-ic dimming control feature.
Page 159 of 614
Features of your vehicle
62
4
Automatic-dimming function
Your mirror will automatically dim
upon detecting glare from the vehi-
cles traveling behind you. The auto-
dimming function can be controlled
by pushing the ON/OFF Button:
1. Pressing the button turns the auto-
dimming function OFF which is
indicated by the green Status
Indicator LED turning off.
2. Pressing the button again turns the auto-dimming function ON
which is indicated by the green
Status Indicator LED turning on.
✽ ✽NOTICE
The mirror defaults to the ON posi-
tion each time the vehicle is started.
Z-Nav™ Compass Display
The NVS™ Mirror in your vehicle is
also equipped with a Z-Nav™
Compass that shows the vehicle
Compass heading in the Display
Window using the 8 basic cardinal
headings (N, NE, E, SE, etc.). Compass function
The Compass can be turned ON and
OFF and will remember the last state
when the ignition is cycled. To turn
the display feature ON/OFF:
1. Press and release the button to
turn the display feature OFF.
2. Press and release the button again to turn the display back ON.
Additional options can be set with
press and hold sequences of the
button and are detailed below.
There is a difference between mag-
netic north and true north. The com-
pass in the mirror can compensate
for this difference when it knows the
Magnetic Zone in which it is operat-
ing. This is set either by the dealer or
by the user. The operating Zone
Numbers for North America are
shown in the figure on the following
section.
Page 160 of 614
463
Features of your vehicle
To adjust the Zone setting:
1. Determine the desired ZoneNumber based upon your current
location on the Zone Map.
2. Press and hold the button for more than 3 but less than 6 sec-
onds, the current Zone Number
will appear on the display.
3. Pressing and holding the button again will cause the numbers to
increment (Note: they will repeat
…13, 14, 15, 1, 2, …). Releasing
the button when the desired Zone
Number appears on the display
will set the new Zone.
4. Within about 5 seconds the com- pass will start displaying a com-
pass heading again.
There are some conditions that can
cause changes to the vehicle mag-
nets, such as installing a ski rack or
a CB antenna. Body repair work on
the vehicle can also cause changes
to the vehicle's magnetic field. In
these situations, the compass will
need to be re-calibrated to quickly
correct for these changes. To re-cali-
brate the compass:
B520C05NF
Page 161 of 614
Features of your vehicle
64
4
1. Press and hold the button for
more than 6 seconds. When the
compass memory is cleared a "C"
will appear in the display.
2. To calibrate the compass, drive the vehicle in 2 complete circles at
less than 5 mph (8 km/h).
Integrated HomeLink
®Wireless Control
System
The HomeLink
®Wireless Control
System provides a convenient way to
replace up to three hand-held radio-
frequency (RF) transmitters with a
single built-in device. This innovative
feature will learn the radio frequency
codes of most current transmitters to
operate devices such as gate opera-
tors, garage door openers, entry
door locks, security systems, even
home lighting. Both standard and
rolling code-equipped transmitters
can be programmed by following the
outlined procedures. Additional
HomeLink
®information can be found
at: www.homelink.com or by calling
1-800-355-3515. Retain the original transmitter of the
RF device you are programming for
use in other vehicles as well as for
future HomeLink
®programming. It is
also suggested that upon the sale of
the vehicle, the programmed
HomeLink
®buttons be erased for
security purposes.
CAUTION
Before programming HomeLink®
to a garage door opener or gate operator, make sure that peopleand objects are out of the way ofthe device to prevent potentialharm or damage. Do not useHomeLink
®with any garage door
opener that lacks the safety stop and reverse features required byU.S. federal safety standards(this includes any garage dooropener model manufacturedbefore April 1, 1982). A garagedoor that cannot detect an object- signaling the door to stop andreverse - does not meet currentU.S. federal safety standards.Using a garage door opener with-out these features increases therisk of serious injury or death.
Page 165 of 614
Features of your vehicle
68
4
This device complies with Part 15
of the FCC Rules.
Operation is subject to the following
two conditions:
1. This device may not cause harm-
ful interference, and
2. This device must accept any inter- ference received, including inter-
ference that may cause undesired
operation.
NVS
®is a registered trademark and
Z-Nav™ is a trademark of the Gentex
Corporation, Zeeland, Michigan.
HomeLink
®is a registered trademark
owned by Johnson Controls,
Incorporated, Milwaukee, Wisconsin.
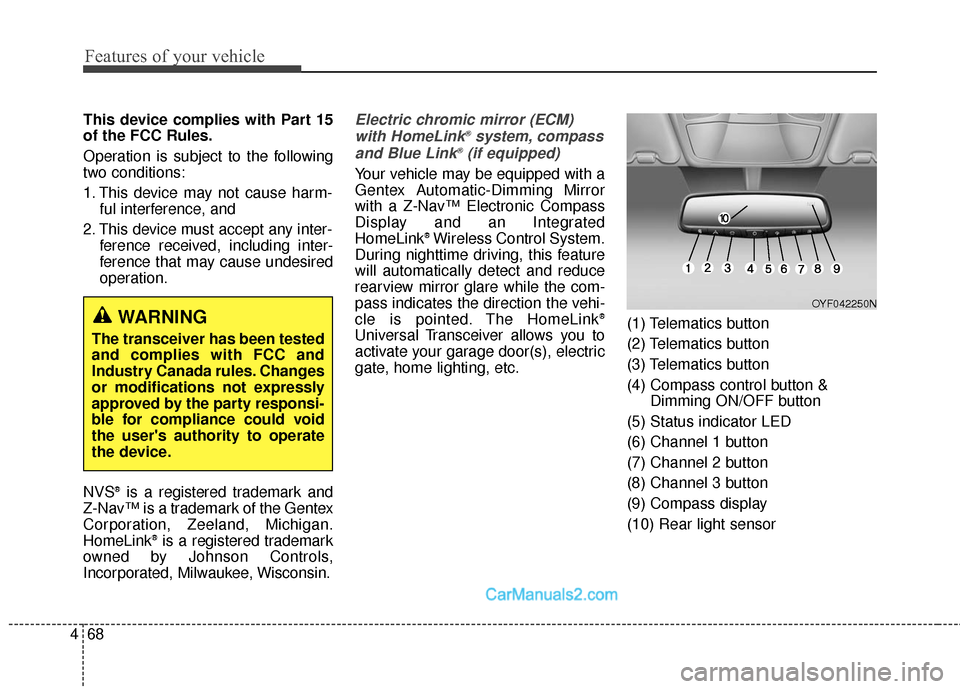
Electric chromic mirror (ECM)
with HomeLink®system, compass
and Blue Link®(if equipped)
Your vehicle may be equipped with a
Gentex Automatic-Dimming Mirror
with a Z-Nav™ Electronic Compass
Display and an Integrated
HomeLink
®Wireless Control System.
During nighttime driving, this feature
will automatically detect and reduce
rearview mirror glare while the com-
pass indicates the direction the vehi-
cle is pointed. The HomeLink
®
Universal Transceiver allows you to
activate your garage door(s), electric
gate, home lighting, etc. (1) Telematics button
(2) Telematics button
(3) Telematics button
(4) Compass control button &
Dimming ON/OFF button
(5) Status indicator LED
(6) Channel 1 button
(7) Channel 2 button
(8) Channel 3 button
(9) Compass display
(10) Rear light sensor
WARNING
The transceiver has been tested
and complies with FCC and
Industry Canada rules. Changes
or modifications not expressly
approved by the party responsi-
ble for compliance could void
the user's authority to operate
the device.
OYF042250N