height Hyundai Santa Fe Sport 2017 Owner's Manual
[x] Cancel search | Manufacturer: HYUNDAI, Model Year: 2017, Model line: Santa Fe Sport, Model: Hyundai Santa Fe Sport 2017Pages: 614, PDF Size: 18.99 MB
Page 26 of 614
Safety features of your vehicle
43
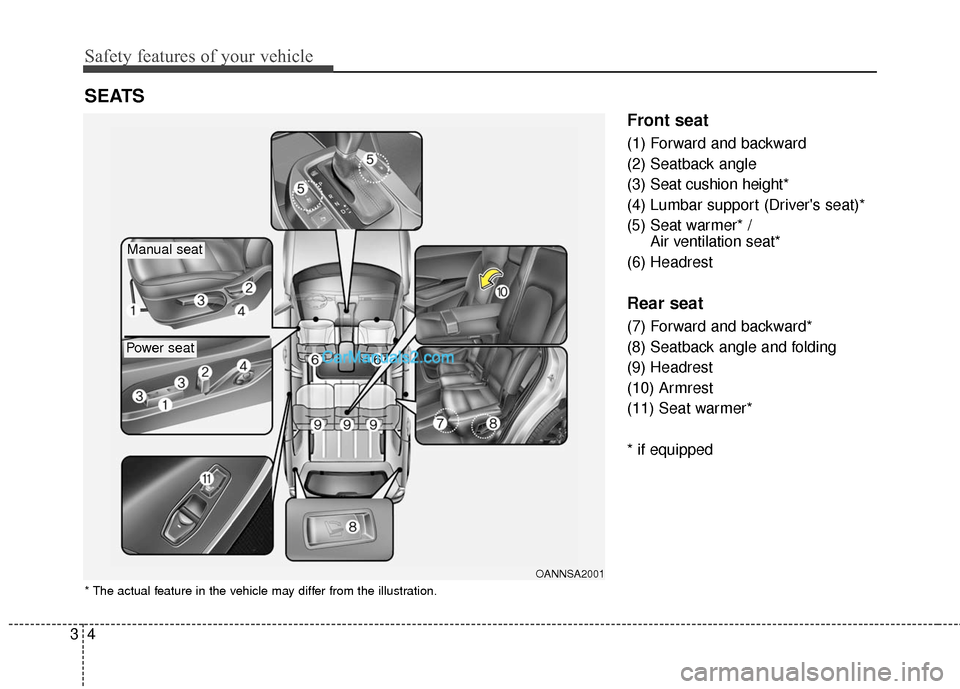
Front seat
(1) Forward and backward
(2) Seatback angle
(3) Seat cushion height*
(4) Lumbar support (Driver's seat)*
(5) Seat warmer* / Air ventilation seat*
(6) Headrest
Rear seat
(7) Forward and backward*
(8) Seatback angle and folding
(9) Headrest
(10) Armrest
(11) Seat warmer*
* if equipped
SEATS
OANNSA2001
* The actual feature in the vehicle may differ from the illustration.
Manual seat
Power seat
Page 29 of 614
37
Safety features of your vehicle
Front seat adjustment - Manual
(if equipped)
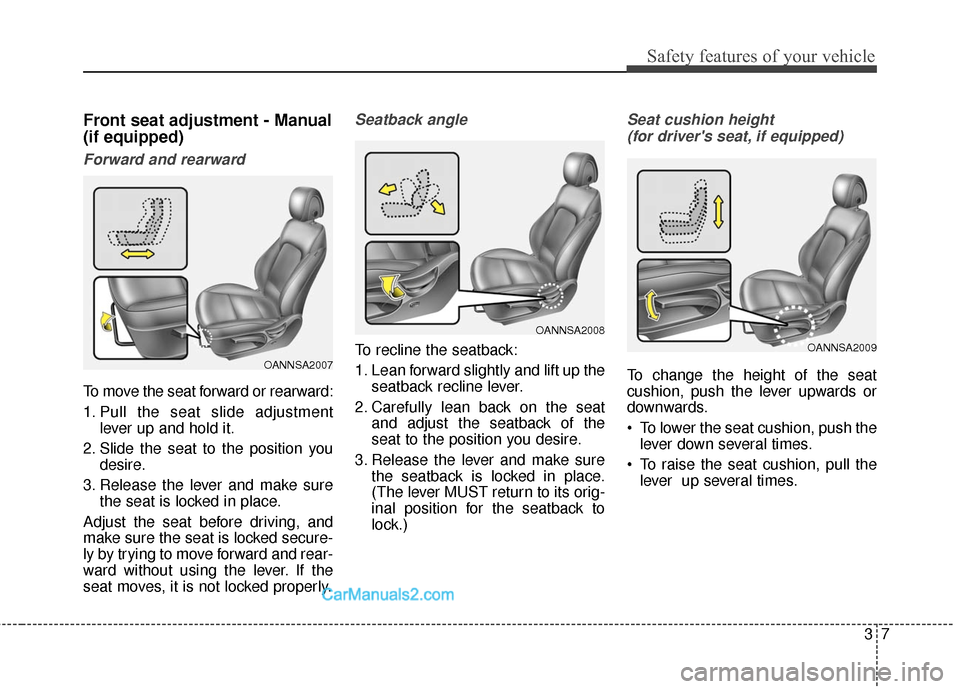
Forward and rearward
To move the seat forward or rearward:
1. Pull the seat slide adjustmentlever up and hold it.
2. Slide the seat to the position you desire.
3. Release the lever and make sure the seat is locked in place.
Adjust the seat before driving, and
make sure the seat is locked secure-
ly by trying to move forward and rear-
ward without using the lever. If the
seat moves, it is not locked properly.
Seatback angle
To recline the seatback:
1. Lean forward slightly and lift up the seatback recline lever.
2. Carefully lean back on the seat and adjust the seatback of the
seat to the position you desire.
3. Release the lever and make sure the seatback is locked in place.
(The lever MUST return to its orig-
inal position for the seatback to
lock.)
Seat cushion height
(for driver's seat, if equipped)
To change the height of the seat
cushion, push the lever upwards or
downwards.
To lower the seat cushion, push the lever down several times.
To raise the seat cushion, pull the lever up several times.OANNSA2007
OANNSA2008
OANNSA2009
Page 31 of 614
39
Safety features of your vehicle
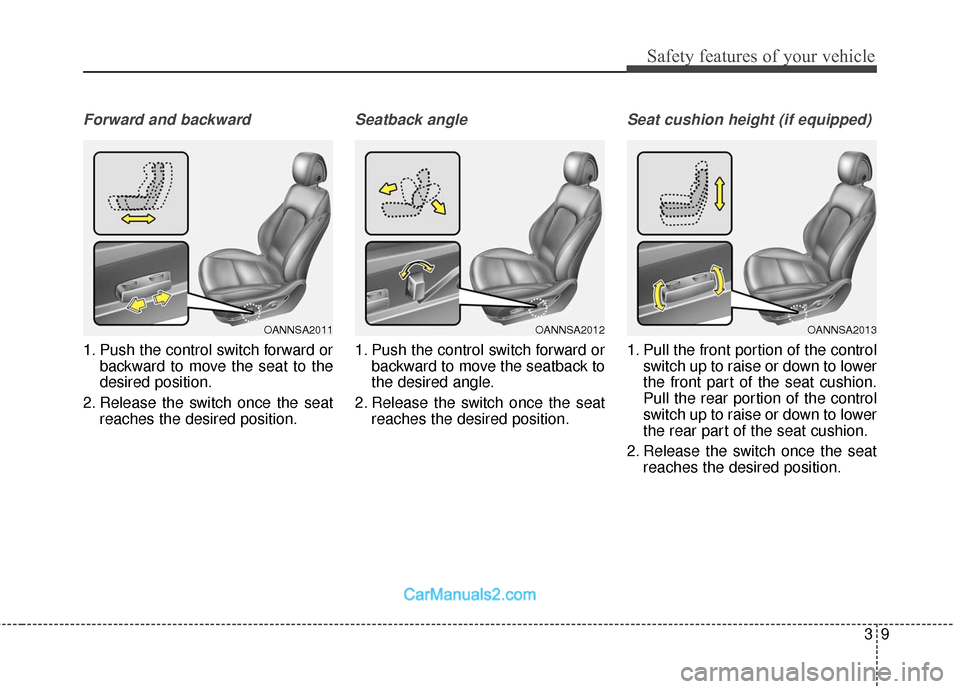
Forward and backward
1. Push the control switch forward orbackward to move the seat to the
desired position.
2. Release the switch once the seat reaches the desired position.
Seatback angle
1. Push the control switch forward orbackward to move the seatback to
the desired angle.
2. Release the switch once the seat reaches the desired position.
Seat cushion height (if equipped)
1. Pull the front portion of the controlswitch up to raise or down to lower
the front part of the seat cushion.
Pull the rear portion of the control
switch up to raise or down to lower
the rear part of the seat cushion.
2. Release the switch once the seat reaches the desired position.
OANNSA2013OANNSA2011OANNSA2012
Page 32 of 614
Safety features of your vehicle
10
3
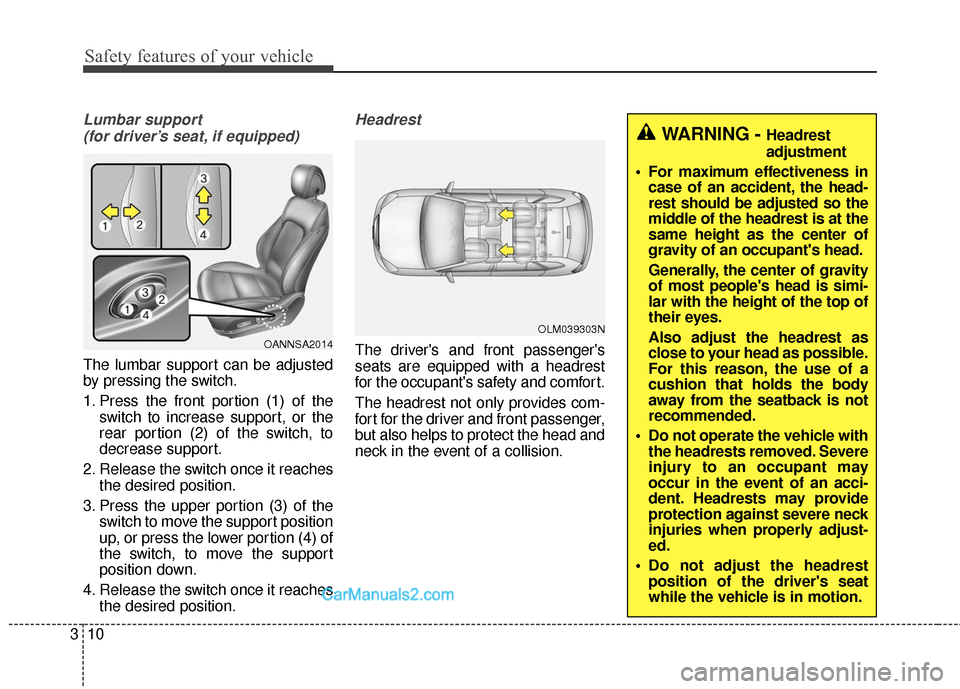
Lumbar support
(for driver’s seat, if equipped)
The lumbar support can be adjusted
by pressing the switch.
1. Press the front portion (1) of the switch to increase support, or the
rear portion (2) of the switch, to
decrease support.
2. Release the switch once it reaches the desired position.
3. Press the upper portion (3) of the switch to move the support position
up, or press the lower portion (4) of
the switch, to move the support
position down.
4. Release the switch once it reaches the desired position.
Headrest
The driver's and front passenger's
seats are equipped with a headrest
for the occupant's safety and comfort.
The headrest not only provides com-
fort for the driver and front passenger,
but also helps to protect the head and
neck in the event of a collision.OANNSA2014OLM039303N
WARNING - Headrest
adjustment
For maximum effectiveness in case of an accident, the head-
rest should be adjusted so the
middle of the headrest is at the
same height as the center of
gravity of an occupant's head.
Generally, the center of gravity
of most people's head is simi-
lar with the height of the top of
their eyes.
Also adjust the headrest as
close to your head as possible.
For this reason, the use of a
cushion that holds the body
away from the seatback is not
recommended.
Do not operate the vehicle with the headrests removed. Severe
injury to an occupant may
occur in the event of an acci-
dent. Headrests may provide
protection against severe neck
injuries when properly adjust-
ed.
Do not adjust the headrest position of the driver's seat
while the vehicle is in motion.
Page 33 of 614
311
Safety features of your vehicle
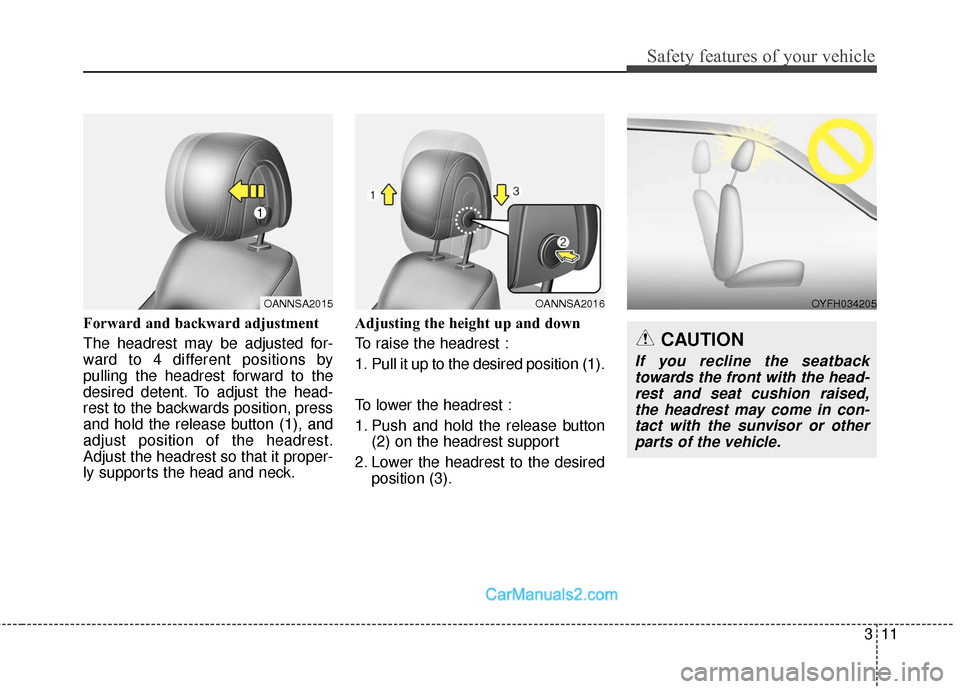
Forward and backward adjustment
The headrest may be adjusted for-
ward to 4 different positions by
pulling the headrest forward to the
desired detent. To adjust the head-
rest to the backwards position, press
and hold the release button (1), and
adjust position of the headrest.
Adjust the headrest so that it proper-
ly supports the head and neck.Adjusting the height up and down
To raise the headrest :
1. Pull it up to the desired position (1).
To lower the headrest :
1. Push and hold the release button
(2) on the headrest support
2. Lower the headrest to the desired position (3).
OANNSA2015OANNSA2016OYFH034205
CAUTION
If you recline the seatbacktowards the front with the head-rest and seat cushion raised,the headrest may come in con-tact with the sunvisor or otherparts of the vehicle.
Page 34 of 614
Safety features of your vehicle
12
3
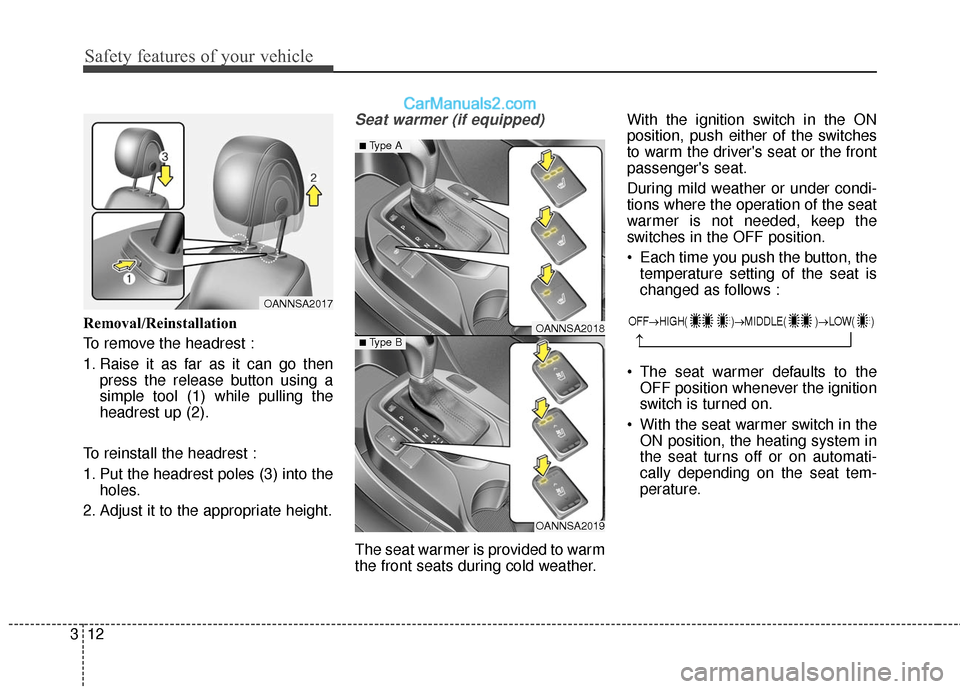
Removal/Reinstallation
To remove the headrest :
1. Raise it as far as it can go then
press the release button using a
simple tool (1) while pulling the
headrest up (2).
To reinstall the headrest :
1. Put the headrest poles (3) into the holes.
2. Adjust it to the appropriate height.
Seat warmer (if equipped)
The seat warmer is provided to warm
the front seats during cold weather. With the ignition switch in the ON
position, push either of the switches
to warm the driver's seat or the front
passenger's seat.
During mild weather or under condi-
tions where the operation of the seat
warmer is not needed, keep the
switches in the OFF position.
Each time you push the button, the
temperature setting of the seat is
changed as follows :
The seat warmer defaults to the OFF position whenever the ignition
switch is turned on.
With the seat warmer switch in the ON position, the heating system in
the seat turns off or on automati-
cally depending on the seat tem-
perature.
OANNSA2017
OANNSA2018
OANNSA2019
■Type A
■ Type B
OFF→ HIGH( )→ MIDDLE( )→LOW( )
→
Page 40 of 614
Safety features of your vehicle
18
3
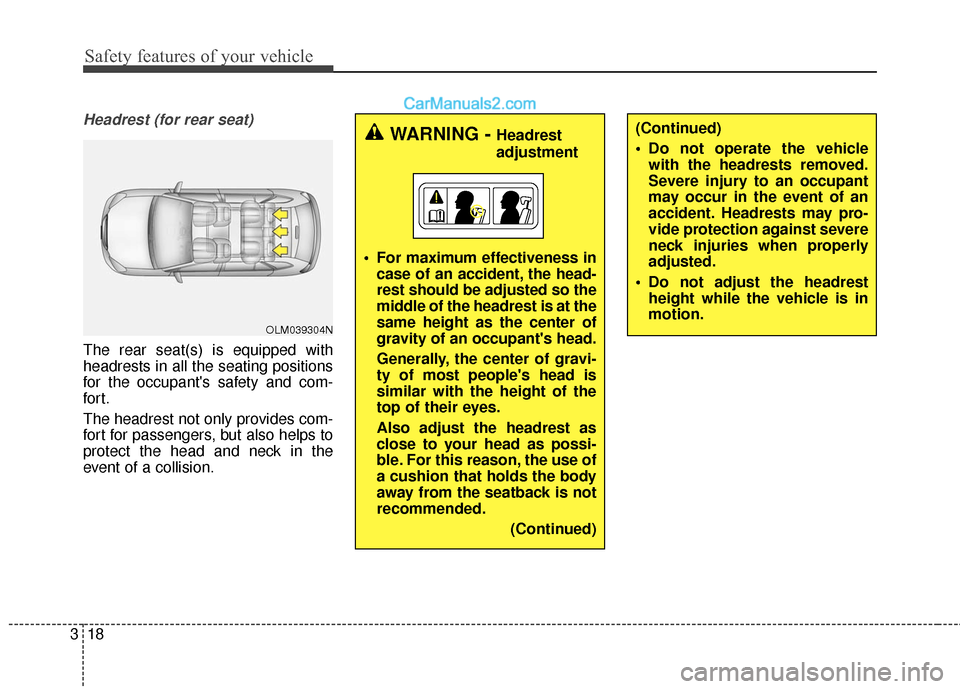
Headrest (for rear seat)
The rear seat(s) is equipped with
headrests in all the seating positions
for the occupant's safety and com-
for t.
The headrest not only provides com-
fort for passengers, but also helps to
protect the head and neck in the
event of a collision.
WARNING - Headrest
adjustment
For maximum effectiveness in case of an accident, the head-
rest should be adjusted so the
middle of the headrest is at the
same height as the center of
gravity of an occupant's head.
Generally, the center of gravi-
ty of most people's head is
similar with the height of the
top of their eyes.
Also adjust the headrest as
close to your head as possi-
ble. For this reason, the use of
a cushion that holds the body
away from the seatback is not
recommended.
(Continued)(Continued)
Do not operate the vehiclewith the headrests removed.
Severe injury to an occupant
may occur in the event of an
accident. Headrests may pro-
vide protection against severe
neck injuries when properly
adjusted.
Do not adjust the headrest height while the vehicle is in
motion.
OLM039304N
Page 41 of 614
319
Safety features of your vehicle
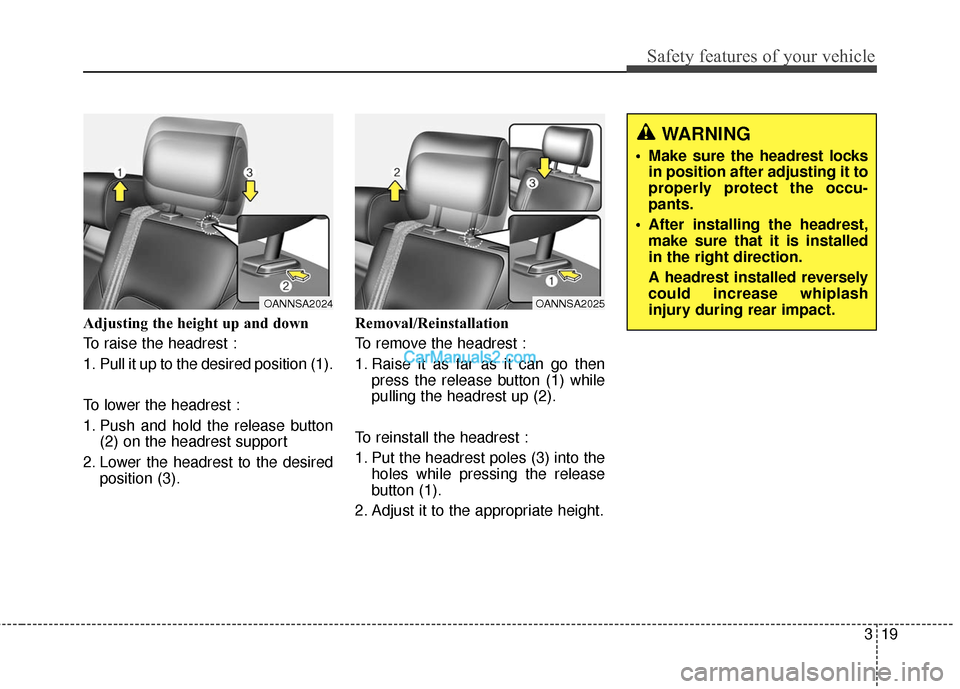
Adjusting the height up and down
To raise the headrest :
1. Pull it up to the desired position (1).
To lower the headrest :
1. Push and hold the release button(2) on the headrest support
2. Lower the headrest to the desired position (3). Removal/Reinstallation
To remove the headrest :
1. Raise it as far as it can go then
press the release button (1) while
pulling the headrest up (2).
To reinstall the headrest :
1. Put the headrest poles (3) into the holes while pressing the release
button (1).
2. Adjust it to the appropriate height.
OANNSA2025
WARNING
Make sure the headrest locks in position after adjusting it to
properly protect the occu-
pants.
After installing the headrest, make sure that it is installed
in the right direction.
A headrest installed reversely
could increase whiplash
injury during rear impact.
OANNSA2024
Page 51 of 614
329
Safety features of your vehicle
Height adjustment (Front)
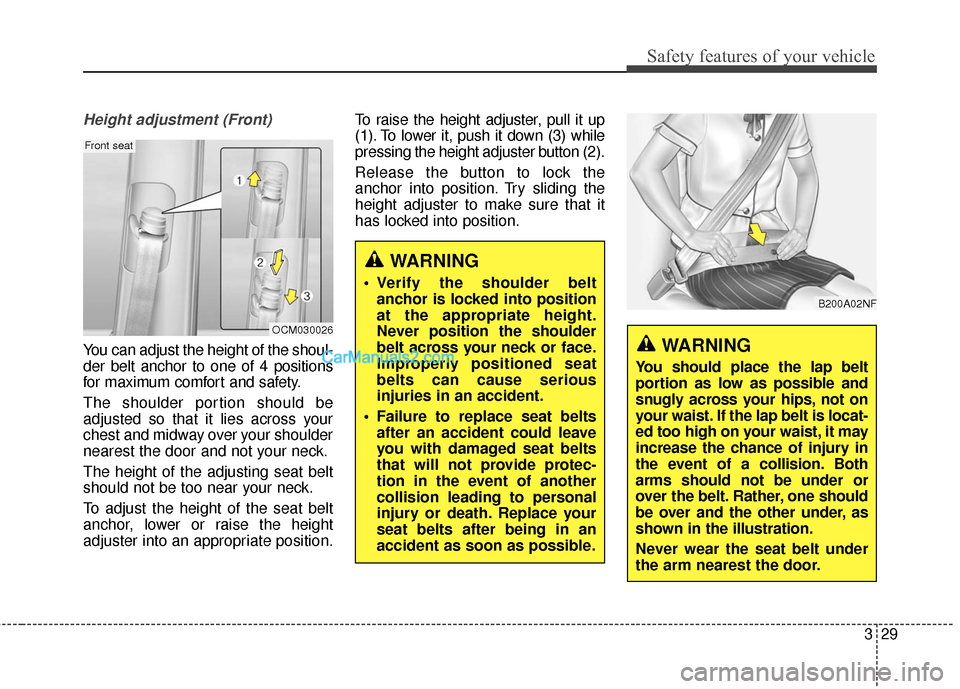
You can adjust the height of the shoul-
der belt anchor to one of 4 positions
for maximum comfort and safety.
The shoulder portion should be
adjusted so that it lies across your
chest and midway over your shoulder
nearest the door and not your neck.
The height of the adjusting seat belt
should not be too near your neck.
To adjust the height of the seat belt
anchor, lower or raise the height
adjuster into an appropriate position.To raise the height adjuster, pull it up
(1). To lower it, push it down (3) while
pressing the height adjuster button (2).
Release the button to lock the
anchor into position. Try sliding the
height adjuster to make sure that it
has locked into position.
WARNING
Verify the shoulder belt
anchor is locked into position
at the appropriate height.
Never position the shoulder
belt across your neck or face.
Improperly positioned seat
belts can cause serious
injuries in an accident.
Failure to replace seat belts after an accident could leave
you with damaged seat belts
that will not provide protec-
tion in the event of another
collision leading to personal
injury or death. Replace your
seat belts after being in an
accident as soon as possible.
OCM030026
Front seat
B200A02NF
WARNING
You should place the lap belt
portion as low as possible and
snugly across your hips, not on
your waist. If the lap belt is locat-
ed too high on your waist, it may
increase the chance of injury in
the event of a collision. Both
arms should not be under or
over the belt. Rather, one should
be over and the other under, as
shown in the illustration.
Never wear the seat belt under
the arm nearest the door.
Page 56 of 614
Safety features of your vehicle
34
3
Seat belt precautionsInfant or small child
All 50 states have child restraint laws.
You should be aware of the specific
requirements in your state. Child
and/or infant seats must be properly
placed and installed in the rear seat.
For more information about the use of
these restraints, refer to “Child
restraint system” in this section.(Continued)
Improper handling of the pre-
tensioner seat belt assem-
blies, and failure to heed the
warnings not to strike, modify,
inspect, replace, service or
repair the pre-tensioner seat
belt assemblies may lead to
improper operation or inad-
vertent activation and serious
injury.
Always wear the seat belts when driving or riding in a
motor vehicle.
If the vehicle or pre-tensioner seat belt must be discarded,
contact an authorized
HYUNDAI dealer.
WARNING
All occupants of the vehicle
must wear their seat belts at all
times. Seat belts and child
restraints reduce the risk of
serious or fatal injuries for all
occupants in the event of a col-
lision or sudden stop. Without a
seat belt, occupants could be
shifted too close to a deploying
air bag, strike the interior struc-
ture or be thrown from the vehi-
cle. Properly worn seat belts
greatly reduce these hazards.
Even with advanced air bags,
unbelted occupants can be
severely injured by a deploying
air bag.
Always follow the precautions
about seat belts, air bags and
occupant seating contained in
this manual.
WARNING
Every person in your vehicle
needs to be properly restrained
at all times, including infants
and children. Never hold a child
in your arms or lap when riding
in a vehicle. The violent forces
created during a crash will tear
the child from your arms and
throw the child against the inte-
rior. Always use a child restraint
appropriate for your child's
height and weight.