oil dipstick Hyundai Sonata
[x] Cancel search | Manufacturer: HYUNDAI, Model Year: , Model line: , Model:Pages: 286, PDF Size: 9.58 MB
Page 213 of 286
5
VEHICLE MAINTENANCE REQUIREMENTS8
F070G02A-AATo Brake FluidCheck brake fluid level in the brake fluid
reservoir. The level should be between
"MIN" and "MAX" marks on the side of the
reservoir. Use only hydraulic brake fluid
conforming to DOT 3 or DOT 4.F070F01A-AATo Brake Hoses and LinesVisually check for proper installation,
chafing, cracks, deterioration and any
leakage. Replace any deteriorated or
damaged parts immediately.
F070E06A-AATo Automatic Transaxle FluidThe fluid level should be in the “HOT”
range of the dipstick, after the engine and
transaxle are at normal operating
temperature. Check the automatic
transaxle fluid level with the engine running
and the transaxle in neutral, with the
parking brake properly applied. Use
HYUNDAI GENUINE ATF SP III, DIAMOND
ATF SP III, SK ATF SP III or other brands
meeting the SP III specification approved
by Hyundai Motor Co. when adding or
changing fluid. Using the wrong ATF may
result in damage to the ATM.
F070H01A-AATo Rear Brake Drums and Linings/
Parking BrakeCheck the rear brake drums and linings for
scoring, burning, leaking fluid, broken parts,
and excessive wear. Inspect the parking
brake system including the parking brake
lever and cables. For detailed service
procedures, refer to the Shop Manual.
F070C01A-AATo CoolantThe coolant should be changed at the
intervals specified in the maintenance
schedule.
F060J01A-AATo Spark PlugsMake sure to install new spark plugs of the
correct heat range.F060H01A-AATo Air Cleaner FilterA Genuine Hyundai air cleaner filter is
recommended when the filter is replaced.F060G01A-AATo Vapor Hose and Fuel Filler CapThe vapor hose and fuel filler cap should
be inspected at those intervals specified in
the maintenance schedule. Make sure that
a new vapor hose or fuel filler cap is correctly
replaced.
F070D01A-AATo Manual Transaxle OilInspect the manual transaxle oil according
to the maintenance schedule.NOTE:If the oil level is low, check for possible
leaks before adding oil. Do not overfill.
F060N02E-AATo Valve ClearanceInspect excessive valve noise and/or
engine vibration and adjust if necessary. A
qualified technician should perform the
operation.
Page 217 of 286
6
DO-IT-YOURSELF MAINTENANCE
2
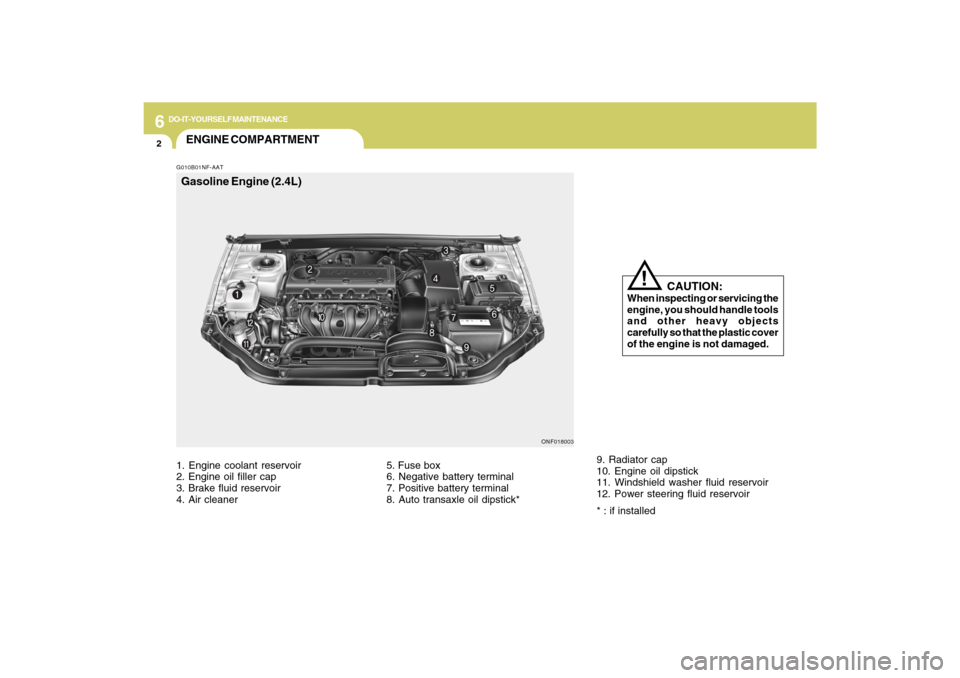
G010B01NF-AATENGINE COMPARTMENT
ONF018003
CAUTION:
When inspecting or servicing the
engine, you should handle tools
and other heavy objects
carefully so that the plastic cover
of the engine is not damaged.
!
1. Engine coolant reservoir
2. Engine oil filler cap
3. Brake fluid reservoir
4. Air cleaner5. Fuse box
6. Negative battery terminal
7. Positive battery terminal
8. Auto transaxle oil dipstick*9. Radiator cap
10. Engine oil dipstick
11. Windshield washer fluid reservoir
12. Power steering fluid reservoir
* : if installedGasoline Engine (2.4L)
Page 218 of 286
6
DO-IT-YOURSELF MAINTENANCE
3
8G010A01NF
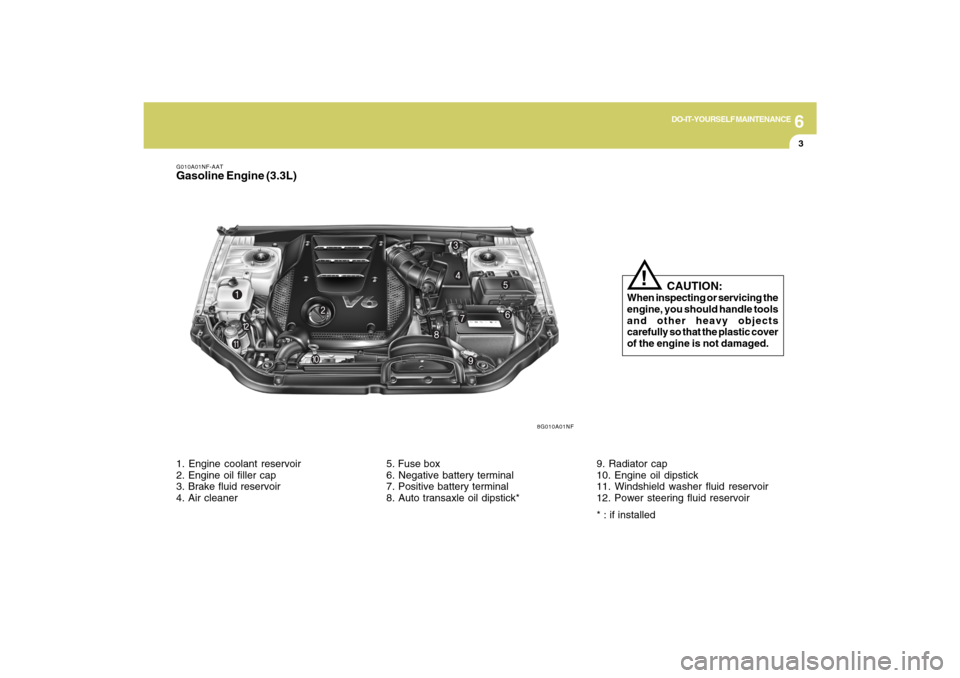
G010A01NF-AATGasoline Engine (3.3L)
CAUTION:
When inspecting or servicing the
engine, you should handle tools
and other heavy objects
carefully so that the plastic cover
of the engine is not damaged.
!
1. Engine coolant reservoir
2. Engine oil filler cap
3. Brake fluid reservoir
4. Air cleaner5. Fuse box
6. Negative battery terminal
7. Positive battery terminal
8. Auto transaxle oil dipstick*9. Radiator cap
10. Engine oil dipstick
11. Windshield washer fluid reservoir
12. Power steering fluid reservoir
* : if installed
Page 220 of 286
6
DO-IT-YOURSELF MAINTENANCE
5
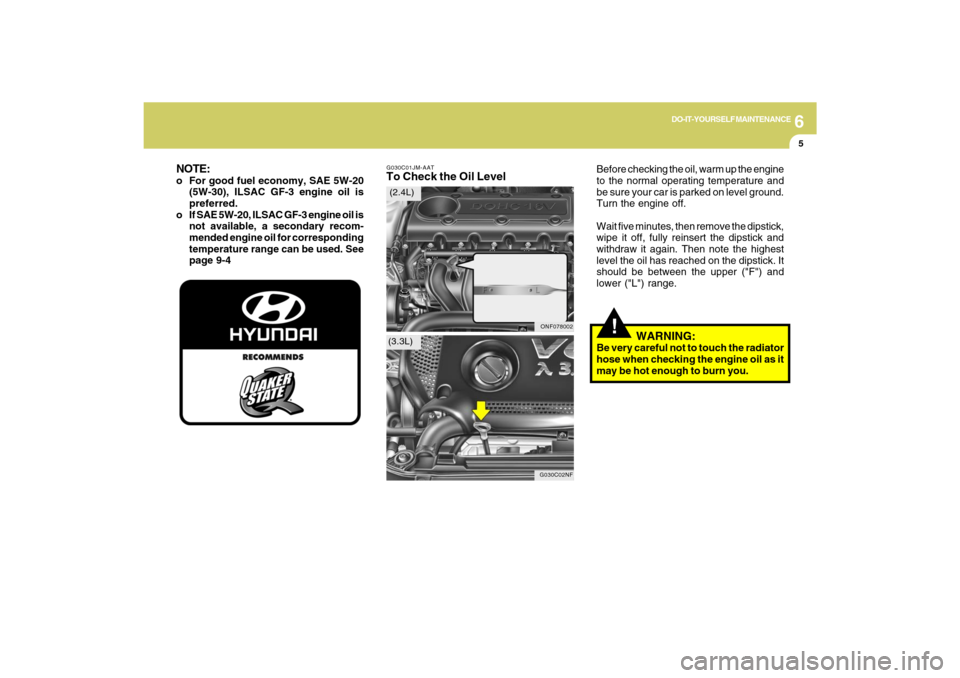
G030C01JM-AATTo Check the Oil Level
Before checking the oil, warm up the engine
to the normal operating temperature and
be sure your car is parked on level ground.
Turn the engine off.
Wait five minutes, then remove the dipstick,
wipe it off, fully reinsert the dipstick and
withdraw it again. Then note the highest
level the oil has reached on the dipstick. It
should be between the upper ("F") and
lower ("L") range.
!
WARNING:
Be very careful not to touch the radiator
hose when checking the engine oil as it
may be hot enough to burn you.
ONF078002
G030C02NF
(2.4L)
(3.3L)
NOTE:o For good fuel economy, SAE 5W-20
(5W-30), ILSAC GF-3 engine oil is
preferred.
o If SAE 5W-20, ILSAC GF-3 engine oil is
not available, a secondary recom-
mended engine oil for corresponding
temperature range can be used. See
page 9-4
Page 221 of 286
6
DO-IT-YOURSELF MAINTENANCE
6
!!
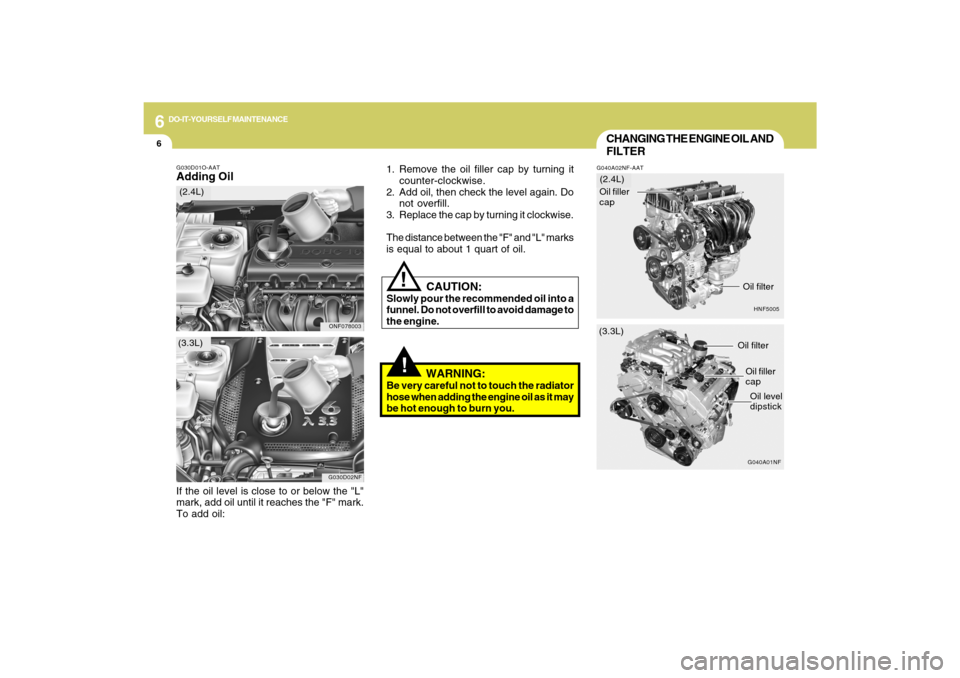
G030D01O-AATAdding Oil
1. Remove the oil filler cap by turning it
counter-clockwise.
2. Add oil, then check the level again. Do
not overfill.
3. Replace the cap by turning it clockwise.
The distance between the "F" and "L" marks
is equal to about 1 quart of oil.
CAUTION:
Slowly pour the recommended oil into a
funnel. Do not overfill to avoid damage to
the engine.
WARNING:
Be very careful not to touch the radiator
hose when adding the engine oil as it may
be hot enough to burn you.
If the oil level is close to or below the "L"
mark, add oil until it reaches the "F" mark.
To add oil:
ONF078003
G030D02NF
(3.3L)(2.4L)
CHANGING THE ENGINE OIL AND
FILTERG040A02NF-AAT
HNF5005(3.3L)(2.4L)
G040A01NFOil filter
Oil filler
cap
Oil level
dipstick Oil filler
cap
Oil filter
Page 223 of 286
6
DO-IT-YOURSELF MAINTENANCE
8
CHECKING AND CHANGING THE
ENGINE COOLANT!
G050A01A-AAT
WARNING:
Do not remove the radiator cap when the
engine is hot. When the engine is hot, the
engine coolant is under pressure and
may erupt through the opening if the cap
is removed. You could be seriously
burned if you do not observe this
precaution. Do not remove the radiator
cap until the radiator is cool to the touch.
!
5. Remove the oil filter by turning it counter-
clockwise with a oil filter wrench of the
proper size. A certain amount of oil will
come out when you remove the filter. So be
sure to have your drain pan in place
underneath it.
6. Install a new oil filter in accordance with the
instructions on the carton or on the filter
itself. Do not over-tighten.
Tightening torque:
8.7 ~ 11.6 lb.ft (1.2 ~ 1.6 kgf.m)
Be sure that the mounting surface on the
engine is clean and that the old gasket is
removed completely. Lubricate the new
gasket on the filter with clean engine oil
before installation.
7. Remove the engine oil level dipstick.
8. Refill the crankcase with the recommended
engine oil. Refer to the specification in
chapter 9 for engine oil capacity.
CAUTION:
Slowly pour the recommended oil into a
funnel. Do not overfill to avoid damage to
the engine.
NOTE:Always dispose of used engine oil in an
environmentally acceptable manner. It
is suggested that it be placed in a sealed
container and taken to a service station
for reclamation. Do not pour the oil on the
ground or put it into the household trash.
PROPOSITION 65 WARNING:
This product contains a chemical known
to the State of California to cause cancer.
Used engine oil may cause irritation or
cancer of the skin if left in contact with
the skin for prolonged periods of time.
Used engine oil contains chemicals that
have caused cancer in laboratory
animals. Always protect your skin by
washing your hands thoroughly with
soap and warm water as soon as possible
after handling used oil.
!
9. Start the engine and check to be sure no
oil is leaking from the drain plug or oil
filter.
10. Shut off the engine and recheck the oil
level.