child lock Hyundai Sonata
[x] Cancel search | Manufacturer: HYUNDAI, Model Year: , Model line: , Model:Pages: 340, PDF Size: 18.45 MB
Page 33 of 340
Safety features of your vehicle
24
3
(Continued)
Never leave children unattended
in a vehicle – not even for a short
time. The car can heat up very
quickly, resulting in serious
injuries to children inside. Even
very young children may inadver-
tently cause the vehicle to move,entangle themselves in the win-
dows, or lock themselves or oth-
ers inside the vehicle.
Never allow two children, or any two persons, to use the sameseat belt.
Children often squirm and repo- sition themselves improperly.
Never let a child ride with theshoulder belt under their arm or
behind their back. Always prop-
erly position and secure childrenin rear seat.
Never allow a child to stand-up or kneel on the seat or floorboard of
a moving vehicle. During a colli-
sion or a sudden stop, the child
can be violently thrown against
the vehicles interior, resulting in
serious injury.
(Continued)(Continued)
Never use an infant carrier or achild safety seat that "hooks"
over a seatback, it may not pro-vide adequate security in an acci-dent.
Under all circumstances the attaching bolt must be engagedat least 5 full threads in the
anchorage. If you are in doubt
with any aspect of this installa-tion please contact an authorised
HYUNDAI dealer.
Seat belts can become very hot, especially when the car is parked
in direct sunlight. Always check
seat belt buckles before fasten-
ing them over a child.
Always store or secure a child seat, even when it is not in use.
During a collision or a sudden
stop, the child seat could be
thrown inside the vehicle.WARNING
To reduce the chance or serious or fatal injuries:
Children of all ages are safer when restrained in the rear seat.
A child riding in the front passen-
ger seat can be forcefully struck
by an inflating air bag resulting inserious or fatal injuries.
Always follow the instructions for installation and use of the child
restraint manufacturer.
Always make sure the child seat is secured properly in the car and
your child is securely restrained
in the child seat.
Never hold a child in your arms or lap when riding in a vehicle. The
violent forces created during a
crash will tear the child from your
arms and throw the child against
the car’s interior.
Never put a seat belt over your- self and a child. During a crash,the belt could press deep into the
child causing serious internalinjuries.
(Continued)
Page 35 of 340
Safety features of your vehicle
26
3
C030102AUN-EA
Installing a child restraint system by
lap/shoulder belt
To install a child restraint system on the
outboard or centre rear seats, do the fol-
lowing:
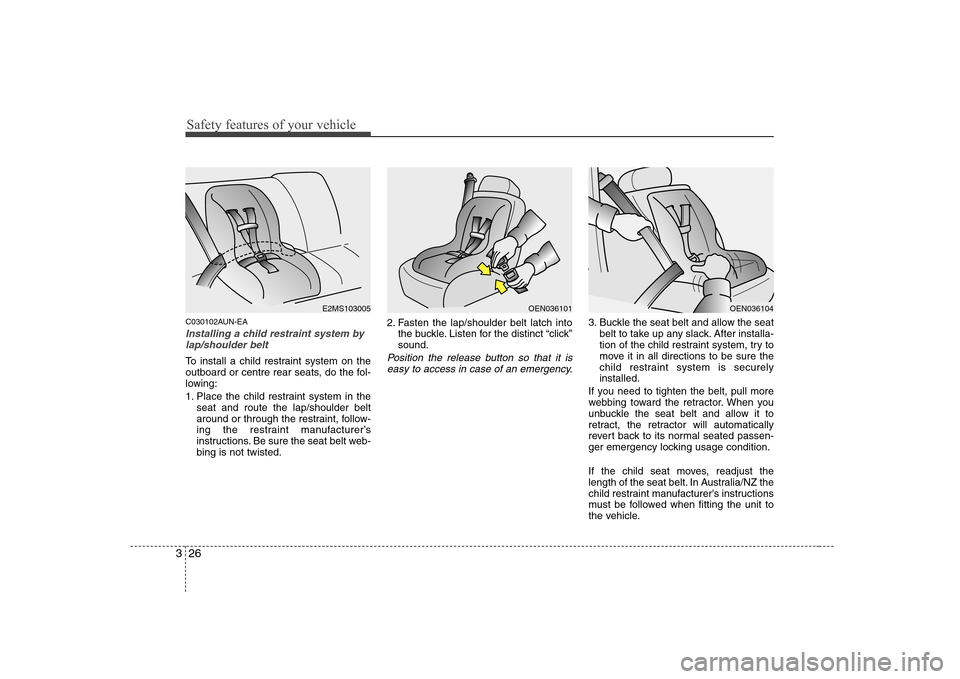
1. Place the child restraint system in the seat and route the lap/shoulder belt
around or through the restraint, follow-
ing the restraint manufacturer’s
instructions. Be sure the seat belt web-bing is not twisted. 2. Fasten the lap/shoulder belt latch into
the buckle. Listen for the distinct “click”sound.Position the release button so that it is
easy to access in case of an emergency.
3. Buckle the seat belt and allow the seat belt to take up any slack. After installa-
tion of the child restraint system, try to
move it in all directions to be sure the
child restraint system is securelyinstalled.
If you need to tighten the belt, pull more
webbing toward the retractor. When you
unbuckle the seat belt and allow it to
retract, the retractor will automatically
revert back to its normal seated passen-
ger emergency locking usage condition.
If the child seat moves, readjust the
length of the seat belt. In Australia/NZ the
child restraint manufacturer's instructions
must be followed when fitting the unit to
the vehicle.
E2MS103005OEN036104OEN036101
Page 47 of 340
Safety features of your vehicle
38
3
(Continued)
Where sun blinds are fitted to the
rear doors, these must not
obstruct or impair the airbag in
any way.
Do not install any accessories or children’s toys in the Curtain
Airbag deployment zones, as this
may impair the operation of the
system or throw parts of them
into the vehicle cabin causing
injury to occupants if the system
is deployed.
To maintain the integrity of the Curtain Airbag system, any work,
removal or installation of the
airbag and associated compo-
nents (such as roof lining and
side trims) should always be per-
formed by a qualified vehicle
repairer.WARNING
In order for side and curtain air bags to provide its best protec-
tion, both front seat occupants
and both outboard rear occu-pants should sit in an upright
position with the seat belts prop-
erly fastened. Importantly, chil-
dren should sit in a proper childrestraint system in the rear seat.
When children are seated in the rear outboard seats, they must be
seated in the proper child
restraint system. Make sure to
put the child restraint system as
far away from the door side as
possible, and secure the child
restraint system in a locked posi-tion.
(Continued)(Continued)
Do not allow the passengers tolean their heads or bodies onto
doors, put their arms on the
doors, stretch their arms out of
the window, or place objects
between the doors and passen-
gers when they are seated onseats equipped with side and/or
curtain air bags.
Never try to open or repair any components of the side curtain
air bag system. This should only
be done by an authorised
HYUNDAI dealer.
Failure to follow the above men-tioned instructions can result in
injury or death to the vehicle occu-pants in an accident.
Page 55 of 340
Safety features of your vehicle
46
3
C041000AUN
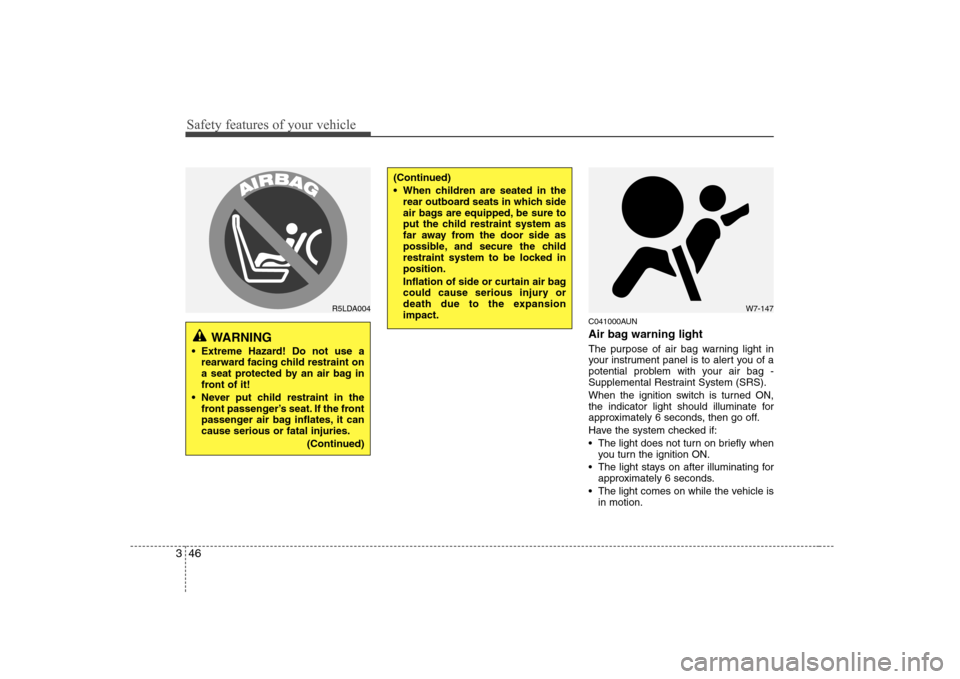
Air bag warning light
The purpose of air bag warning light in
your instrument panel is to alert you of a
potential problem with your air bag -
Supplemental Restraint System (SRS).
When the ignition switch is turned ON,
the indicator light should illuminate for
approximately 6 seconds, then go off.
Have the system checked if:
The light does not turn on briefly when
you turn the ignition ON.
The light stays on after illuminating for approximately 6 seconds.
The light comes on while the vehicle is in motion.
WARNING
Extreme Hazard! Do not use a rearward facing child restraint on
a seat protected by an air bag in
front of it!
Never put child restraint in the front passenger’s seat. If the front
passenger air bag inflates, it cancause serious or fatal injuries.
(Continued)
(Continued)
When children are seated in therear outboard seats in which side
air bags are equipped, be sure to
put the child restraint system as
far away from the door side as
possible, and secure the child
restraint system to be locked inposition.
Inflation of side or curtain air bag
could cause serious injury or
death due to the expansionimpact.
W7-147R5LDA004
Page 60 of 340
Features of your vehicle
2
4
D010100AFD-EA
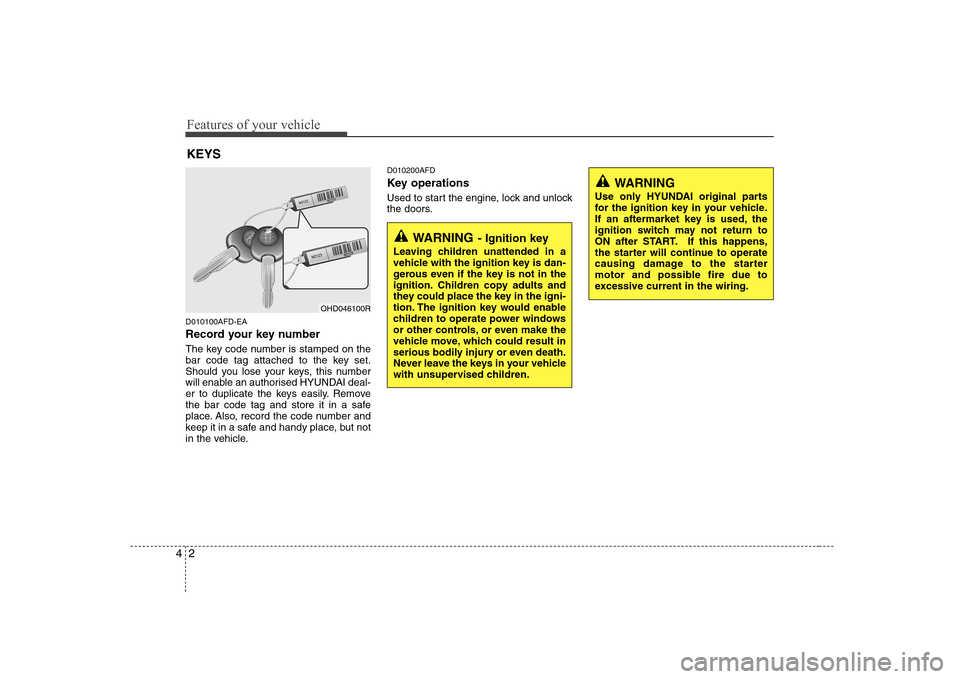
Record your key number
The key code number is stamped on the
bar code tag attached to the key set.
Should you lose your keys, this number
will enable an authorised HYUNDAI deal-
er to duplicate the keys easily. Remove
the bar code tag and store it in a safe
place. Also, record the code number and
keep it in a safe and handy place, but not
in the vehicle. D010200AFD
Key operations
Used to start the engine, lock and unlock
the doors.
KEYS
WARNING
- Ignition key
Leaving children unattended in a
vehicle with the ignition key is dan-
gerous even if the key is not in the
ignition. Children copy adults and
they could place the key in the igni-
tion. The ignition key would enable
children to operate power windows
or other controls, or even make the
vehicle move, which could result in
serious bodily injury or even death.
Never leave the keys in your vehicle
with unsupervised children.
OHD046100R
WARNING
Use only HYUNDAI original parts
for the ignition key in your vehicle.
If an aftermarket key is used, the
ignition switch may not return to
ON after START. If this happens,
the starter will continue to operate
causing damage to the starter
motor and possible fire due to
excessive current in the wiring.
Page 68 of 340
Features of your vehicle
10
4
When pushing down on the front por-
tion (1) of the switch, all vehicle doors
will lock.
When pushing down on the rear por- tion (2) of the switch, all vehicle doors
will unlock.
However, if the key is in the ignition switch and any front door is open, the
doors will not lock when the front por-
tion of central door lock switch ispressed. D050600ANF
Deadlocks
Deadlocks prevent opening of a door
from either inside or outside the vehicle
once the deadlocks have been activated
providing an additional measure of vehi-
cle security.
To lock the vehicle using the deadlock
function, the doors must be locked using
the key or the Remote Keyless Entry
transmitter. To unlock the vehicle, the key
or the transmitter must again be used.
To lock a vehicle without using the dead-
lock function, the doors should be locked
by depressing the central door lock
switch and closing the doors.
WARNING
- Unlocked
vehicles
Leaving your vehicle unlocked can
invite theft or possible harm to you
or others from someone hiding in
your vehicle while you are gone.
Always remove the ignition key,
engage the parking brake, close all
windows and lock all doors when
leaving your vehicle unattended.
WARNING - Unattended
children
An enclosed vehicle can become
extremely hot, causing death or
severe injury to unattended chil-dren or animals who cannot escape
the vehicle. Furthermore, children
might operate features of the vehi-
cle that could injure them, or they
could encounter other harm, possi-
bly from someone gaining entry to
the vehicle. Never leave children or
animals unattended in your vehicle.WARNING - Doors
The doors should always be fully closed and locked while the vehi-
cle is in motion to prevent acci-
dental opening of the door.
Locked doors will also discour-
age potential intruders when the
vehicle stops or slows.
Be careful when opening doors and watch for vehicles, motorcy-
cles, bicycles or pedestrians
approaching the vehicle in the
path of the door. Opening a door
when something is approaching
can cause damage or injury.
WARNING
Occupants must not be allowed to
remain in the vehicle when the
deadlocking system is activated
since it will not be possible for
them, or persons outside the vehi-
cle, to open the doors and leave the
vehicle in case of an emergency.
Page 71 of 340
413
Features of your vehicle
B540B04Y-DAT
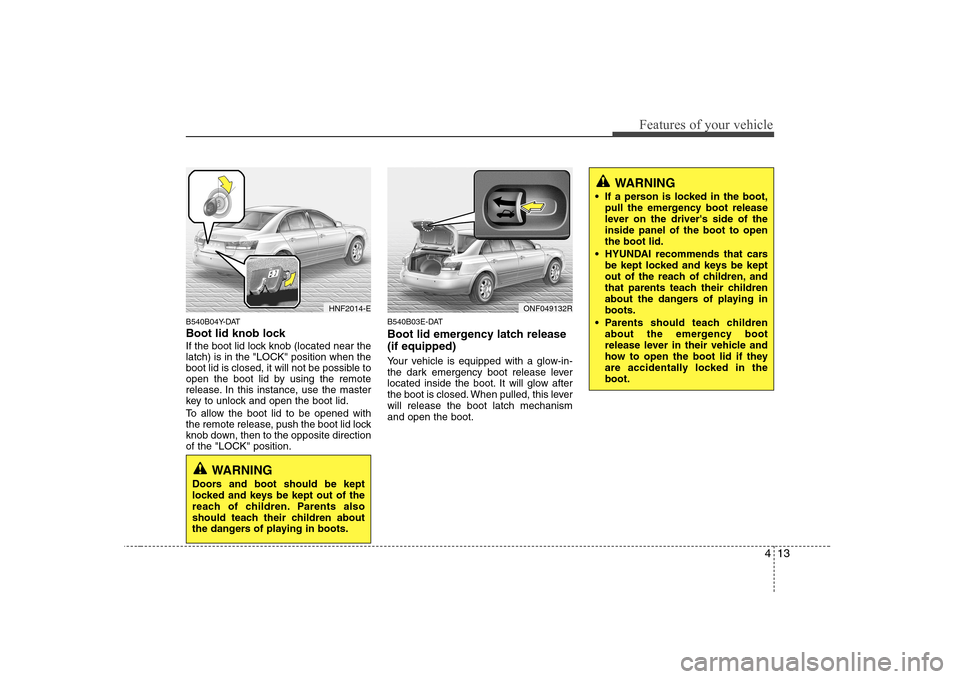
Boot lid knob lock
If the boot lid lock knob (located near the latch) is in the "LOCK" position when the
boot lid is closed, it will not be possible to
open the boot lid by using the remote
release. In this instance, use the master
key to unlock and open the boot lid.
To allow the boot lid to be opened with
the remote release, push the boot lid lock
knob down, then to the opposite directionof the "LOCK" position.B540B03E-DAT
Boot lid emergency latch release (if equipped)
Your vehicle is equipped with a glow-in-
the dark emergency boot release lever
located inside the boot. It will glow after
the boot is closed. When pulled, this leverwill release the boot latch mechanismand open the boot.
WARNING
Doors and boot should be kept
locked and keys be kept out of the
reach of children. Parents also
should teach their children about
the dangers of playing in boots.
WARNING
If a person is locked in the boot, pull the emergency boot release
lever on the driver's side of theinside panel of the boot to openthe boot lid.
HYUNDAI recommends that cars be kept locked and keys be kept
out of the reach of children, and
that parents teach their children
about the dangers of playing inboots.
Parents should teach children about the emergency boot
release lever in their vehicle and
how to open the boot lid if they
are accidentally locked in theboot.
HNF2014-EONF049132R
Page 75 of 340
417
Features of your vehicle
CAUTION
To prevent possible damage tothe power window system, do notopen or close two windows ormore at the same time. This will
also ensure the longevity of thefuse.
Never try to operate the main switch on the driver's door andthe individual door window
switch in opposing directions at the same time. If this is done, thewindow will stop and cannot be
opened or closed.WARNING - Windows
NEVER leave the ignition key in the vehicle.
NEVER leave any child unattend- ed in the vehicle. Even very
young children may inadvertently
cause the vehicle to move, entan-
gle themselves in the windows,or otherwise injure themselves or
others.
Always double check to make sure all arms, hands, head and
other obstructions are safely out
of the way before closing a win-
dow.
Do not allow children to play with the power windows. Keep the dri-
ver’s door power window lock
switch in the LOCK position
(depressed). Serious injury can
result from unintentional window
operation by the child.
Do not extend face or arms out- side through the window openingwhile driving.
Page 158 of 340
Features of your vehicle
100
4
In case USB is connected to the multiple
terminal inside the console on the left
hand side of the driver’s seat. When USB
is connected, the ‘USB’ icon will be dis-
played on the top right corner of the dis-
play screen.
1.AUX Selection Button
If USB is not connected, it switches to the USB mode from the Radio and CD mode
to play the song files stored in the USB.
If AUX is not connected, it is invalid key.
2. Track Moving Button
Press the [SEEK ] button for less
than 0.8 second to play from the
beginning of the song currently played.
Press the button for less than 0.8 sec- ond and press it again within 1 second
to move and play the previous track.
Press the button for 0.8 second or
longer to play the song in reverse
direction in fast speed.
Press the [SEEK ] button but ton for
less than 0.8 second to move to the
next track. Press the button for 0.8 sec-
ond or longer to play the song in for-
ward direction in fast speed. 3. INFO Button
Displays the information of the file cur-
rently played in the order of FILE NAME➟
TITLE ➟ARTIST ➟ALBUM ➟FOLDER ➟
TOTAL FILE ➟normal display ➟FILE
NAME ➟… (Displays no information if
the file has no song information.)
4. Folder moving Button
Moves [FLDR ] button child folder of
the current folder and displays the first
song in the folder. Press TUNE/ENTER
button to move to the folder displayed.
It will play the first song in the folder.
Moves [FLDR ] button parent folder and displays the first song in the folder.
Press TUNE/ENTER button to move to
the folder displayed. It will play the first
song in the folder.
5. TUNE/ENTER Button
Turn this button clockwise to display the
songs next to the currently played song.
Turn the button counterclockwise to dis-
play the songs before the currently
played song.
Press the button to skip to and play the selected song. Pressing this button changes the BASS,
MIDDLE, TREBLE, FADER and BAL-
ANCE TUNE mode.
The mode selected is shown on the dis-
play.
After selecting each mode, rotate the
Audio control knob clockwise or counter-
clockwise.
To increase the BASS, rotate the knob
clockwise, while to decrease the BASS,
rotate the knob counterclockwise.
To increase the MIDDLE, rotate the knob
clockwise, while to decrease the MID-
DLE, rotate the knob counterclockwise.
Control
To increase the TREBLE, rotate the knob
clockwise, while to decrease the TRE-
BLE, rotate the knob counterclockwise.
Page 172 of 340
Features of your vehicle
114
4
In case USB is connected to the multiple
terminal inside the console on the left
hand side of the driver’s seat. When USB
is connected, the ‘USB’ icon will be dis-
played on the top right corner of the dis-
play screen.
1.AUX Selection Button Once the USB is connected, the audio
unit switches to USB mode to play song
files stored in the USB. If AUX jack is not
connected, the AUX selection button will
not operate.
2. Track Moving Button
Press the [SEEK ] button for less
than 0.8 second to play from the begin-
ning of the song currently played.
Press the button for less than 0.8 sec- ond and press it again within 1 second
to move and play the previous track.
Press the button for 0.8 second or
longer to play the song in reverse
direction in fast speed.
Press the [SEEK ] button but ton for
less than 0.8 second to move to the
next track. Press the button for 0.8 sec-
ond or longer to play the song in for-
ward direction in fast speed. 3. INFO Button
Displays the information of the file cur-
rently played in the order of FILE NAME➟
TITLE ➟ARTIST ➟ALBUM ➟FOLDER ➟
TOTAL FILE ➟normal display ➟FILE
NAME ➟… (Displays no information if
the file has no song information.)
4. Folder moving Button
Moves [FLDR ] button child folder of
the current folder and displays the first
song in the folder. Press TUNE/ENTER
button to move to the folder displayed.
It will play the first song in the folder.
Moves [FLDR ] button parent folder and displays the first song in the folder.
Press TUNE/ENTER button to move to
the folder displayed. It will play the first
song in the folder.
5. TUNE/ENTER Button
Turn this button clockwise to display the
songs next to the currently played song.
Turn the button counterclockwise to dis-
play the songs before the currently
played song.
Press the button to skip and play the selected song. Pressing this button changes the BASS,
MIDDLE, TREBLE, FADER and BAL-
ANCE TUNE mode.
The mode selected is shown on the dis-
play.
After selecting each mode, rotate the
Audio control knob clockwise or counter-
clockwise.
To increase the BASS, rotate the knob
clockwise, while to decrease the BASS,
rotate the knob counterclockwise.
To increase the MIDDLE, rotate the knob
clockwise, while to decrease the MID-
DLE, rotate the knob counterclockwise.
Control
To increase the TREBLE, rotate the knob
clockwise, while to decrease the TRE-
BLE, rotate the knob counterclockwise.